Glock Parts Diagram: Understanding the Anatomy of Your Glock Pistol
Are you a Glock enthusiast looking to deepen your knowledge about this iconic firearm? Whether you’re a proud owner or simply curious about how a Glock pistol functions, understanding its parts and their roles is crucial. In this comprehensive guide, we will delve into the Glock parts diagram, exploring the various components that make up this reliable and popular firearm. So, grab your Glock and let’s embark on a journey of discovery!
Table of Contents
- Table of Contents
- 1. Introduction: Unveiling the Glock Phenomenon
- 2. The Anatomy of a Glock Pistol
- 3. Understanding Glock Parts Terminology
- 4. Glock Parts Diagram: Exploring the Components
- 5. Assembling and Disassembling Your Glock
- 6. Common Upgrades and Accessories
- 7. Glock Parts Diagram Resources and References
- 8. Conclusion
- Frequently Asked Questions (FAQs)
Table of Contents
1. Introduction: Unveiling the Glock Phenomenon
A Brief History of Glock Pistols
Before diving into the intricacies of the Glock parts diagram, let’s take a moment to appreciate the history behind these remarkable firearms. Glock pistols were introduced in the early 1980s by Austrian engineer Gaston Glock. Their innovative design, reliability, and use of polymer materials quickly revolutionized the handgun industry. Today, Glock pistols are trusted by law enforcement agencies, military personnel, and countless civilians around the world.
Why Glock is Popular Among Shooters
What sets Glock apart from its competitors? The answer lies in its simplicity, durability, and reliability. Glock pistols feature a striker-fired mechanism, eliminating the need for an external hammer and reducing the chances of snagging. Additionally, their high-capacity magazines, consistent trigger pull, and ease of maintenance make them popular choices among shooters of all levels.
2. The Anatomy of a Glock Pistol
To fully comprehend the Glock parts diagram, let’s familiarize ourselves with the fundamental components that come together to form a Glock pistol.
Frame: The Foundation of the Glock
The frame serves as the foundation of the Glock and houses critical components such as the trigger mechanism, magazine well, and grip. Made from a durable polymer material, Glock frames offer lightweight yet robust construction, contributing to the pistol’s overall reliability.
Slide: The Moving Powerhouse
The slide is an essential part of the Glock, responsible for multiple functions. It houses the firing pin assembly, extractor, and ejection port. When fired, the slide reciprocates, extracting and ejecting spent casings while cocking the firing pin for the next shot.
Barrel: Where the Magic Happens
The barrel is where the bullet travels through, guided by the rifling, which imparts spin for stability. Glock barrels are renowned for their polygonal rifling, which enhances accuracy and facilitates easier cleaning.
Recoil Spring Assembly: Managing Recoil
The recoil spring assembly consists of a guide rod and a recoil spring. Its primary role is to absorb and manage the recoil generated when a round is fired, allowing for quick and controlled follow-up shots.
Trigger: The Gateway to Firing
The trigger is arguably one of the most critical components of any firearm. Glock triggers are known for their consistent and relatively light pull, contributing to the pistol’s accuracy and ease of use.
Sights: Aiming for Accuracy
Glock pistols come equipped with standard sights, typically consisting of a front sight post and a rear sight notch. These sights allow for quick target acquisition and precise aiming.
Magazine: Feeding the Beast
The magazine is responsible for holding and feeding ammunition into the Glock. Available in various capacities, Glock magazines are renowned for their reliability and ease of use.
3. Understanding Glock Parts Terminology
Before diving into the specific Glock parts diagram, it’s essential to understand some commonly used terminology.
Upper Receiver Group
The upper receiver group refers to the collection of components located above the frame. This includes the slide, barrel, recoil spring assembly, and sights.
Lower Receiver Group
The lower receiver group encompasses the components housed within the frame, such as the trigger mechanism, magazine well, and grip.
Small Parts and Components
Within the upper and lower receiver groups, you will find various small parts and components that contribute to the overall functionality of the Glock pistol.
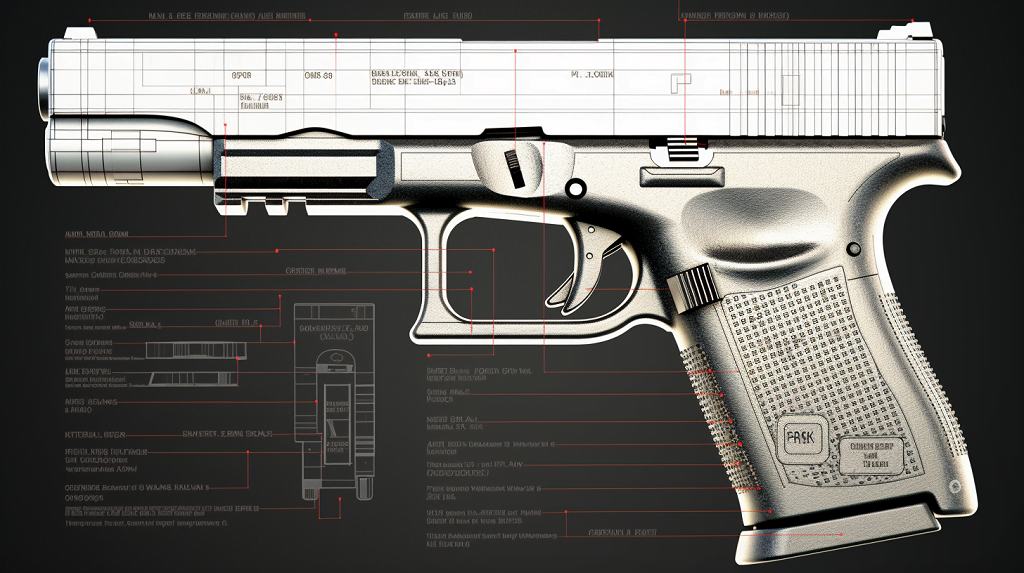
4. Glock Parts Diagram: Exploring the Components
Now, let’s explore the Glock parts diagram for specific models, including the Glock 19, Glock 17, Glock 43, and Glock lower parts.
Glock 19 Parts Diagram
The Glock 19 is one of the most popular models, revered for its versatility and compact size. Refer to the following diagram to visualize the individual components of the Glock 19:
Glock 17 Parts Diagram
The Glock 17 is Glock’s flagship model, renowned for its full-size frame and magazine capacity. Here’s a detailed diagram showcasing the components of the Glock 17:
Glock 43 Parts Diagram
The Glock 43 is a single-stack, subcompact pistol designed for concealed carry. Below is a comprehensive diagram highlighting the Glock 43 parts:
Glock Lower Parts Diagram
Understanding the lower parts of a Glock is essential for those interested in customization and upgrades. Here’s a detailed diagram of the lower parts:
5. Assembling and Disassembling Your Glock
To maintain and customize your Glock, it’s crucial to understand how to assemble and disassemble the firearm. Let’s explore the basic field stripping process, detailed disassembly, and reassembly steps.
Field Stripping: Basic Disassembly
Field stripping refers to the process of partially disassembling the Glock for cleaning and routine maintenance. By following a few simple steps, you can quickly field strip your Glock pistol.
Detailed Disassembly: Going Beyond the Basics
For those interested in a more thorough cleaning or customization, detailed disassembly allows you to delve deeper into the various Glock parts. However, it’s crucial to exercise caution and follow reliable instructions to ensure a safe disassembly process.
Reassembly: Putting it All Back Together
After cleaning or modifying your Glock, it’s time to put the components back together. Reassembly requires attention to detail and proper alignment to ensure the firearm functions correctly.
6. Common Upgrades and Accessories
Glock owners often seek aftermarket upgrades and accessories to enhance their shooting experience. Here are some popular options worth considering:
Extended Magazine Releases
Extended magazine releases allow for easier and quicker magazine changes, particularly useful for competitive shooters or those with smaller hands.
Aftermarket Slides
Aftermarket slides offer customization options such as enhanced serrations, optics-ready cuts, and improved aesthetics. They allow Glock owners to personalize their pistols to suit their preferences.
Upgraded Triggers
Upgrading the trigger can enhance the shooting experience by reducing trigger pull weight, improving reset, or providing a crisper break.
Custom Grips
Custom grips provide a comfortable and ergonomic grip, offering improved control and recoil management.
7. Glock Parts Diagram Resources and References
To further expand your knowledge of Glock parts and explore additional resources, consider the following references:
Glock Manuals and Official Documentation
Glock provides detailed manuals and documentation for their pistols, offering comprehensive information on parts, assembly, and maintenance. These resources can be found on the official Glock website or through authorized distributors.
Online Glock Communities and Forums
Engaging with online Glock communities and forums allows you to connect with fellow Glock enthusiasts, share experiences, and learn from their expertise. These communities are excellent sources of information and can help answer specific questions you may have.
8. Conclusion
Congratulations! You’ve now become acquainted with the Glock parts diagram, exploring the various components that make up your Glock pistol. Understanding the anatomy and functionality of your firearm not only enhances your shooting experience but also empowers you to maintain, customize, and optimize your Glock according to your preferences. Remember to prioritize safety and always consult reliable sources when performing any modifications or maintenance on your firearm.
Frequently Asked Questions (FAQs)
Q1: Where can I find a detailed Glock parts diagram for my specific model?
A1: Glock parts diagrams can be found in official Glock manuals, online firearm forums, or through reputable gunsmithing resources. Additionally, several online retailers specializing in Glock parts may offer detailed diagrams on their websites.
Q2: Are Glock parts interchangeable between different models?
A2: While some parts may be compatible between Glock models, it’s crucial to verify compatibility before making any modifications. Not all parts are interchangeable, especially when it comes to frame sizes and calibers.
Q3: Can I upgrade my Glock’s trigger without compromising its reliability?
A3: Yes, it’s possible to upgrade your Glock’s trigger while maintaining its reliability. However, it’s important to choose reputable brands and follow proper installation procedures to ensure safe and reliable operation.
Q4: How often should I clean and maintain my Glock pistol?
A4: Regular cleaning and maintenance are essential to keep your Glock in optimal condition. It is recommended to clean your Glock after every shooting session and perform routine maintenance at least every 500-1,000 rounds or as specified by Glock’s official guidelines.
Q5: Are there any restrictions on modifying Glock pistols?
A5: Modification restrictions vary depending on local laws and regulations. Before making any modifications to your Glock, it is crucial to familiarize yourself with applicable laws in your jurisdiction and ensure compliance to avoid legal issues.
Remember, understanding the Glock parts diagram empowers you as a Glock owner, allowing you to appreciate the intricacies of this remarkable firearm and make informed decisions about maintenance and customization. Happy shooting!