Crossbow vs Compound Bow: Which One Should You Choose?

Choose a compound bow if you want a more traditional vertical-bow archery experience, more active drawing skill, and a lighter setup for walking or tree-stand hunting. Choose a crossbow if you need a held-at-full-draw design, easier aiming once cocked, or a legal/physical accommodation where crossbows are allowed. Neither is automatically better; the better choice depends on rules, skill, strength, hunting style, and safety discipline.

This comparison is a practical guide, not legal advice. Crossbow seasons, equipment rules, minimum ages, disability permits, broadhead rules, and public-land regulations vary by state and property, so always check current official hunting rules before buying or hunting.

Table of Contents

Quick Comparison

FactorCrossbowCompound bow
Best forHeld-at-full-draw aiming, physical accommodation, some hunting setups where legalTraditional vertical-bow archery, active shooting form, lighter carry
DrawingCocked before aiming; requires safe cocking/decocking processDrawn by the archer before each shot
Carry feelBulkier and front-heavyUsually lighter and easier to carry
Learning curveEasier to aim once cocked, but safety procedure is strictMore form practice required
Legal caveatRules vary strongly by state/season/propertyAlso regulated, but often treated as standard archery equipment
MaintenanceString/cables, limbs, rail, trigger, scope, bolts, cocking systemString/cables, cams, rest, sight, release, arrows, tuning

What A Crossbow Does Better

A crossbow stores energy after it is cocked, so the shooter can aim without holding draw weight the same way a vertical bow shooter does. That can make it easier for some hunters to settle into the shot, especially from a blind or stable rest.

Held-at-full-draw aiming

The biggest crossbow advantage is that it stays cocked until fired or safely decocked. That helps hunters who struggle to hold a compound bow at full draw while waiting for a clear shot angle.

Blind and rest-friendly setup

A crossbow often works well from a ground blind, shooting rail, tripod, or other stable position. It can feel more familiar to people who are used to firearm-style aiming, though crossbows still require archery-specific safety and range judgment.

Physical accommodation

Some hunters choose crossbows because of age, shoulder strength, injury, or disability. Whether a crossbow is allowed during a given season or under a permit depends on current local rules, so verify before assuming it is legal for your hunt.

What A Compound Bow Does Better

A compound bow is a vertical bow that uses cams or pulleys to reduce holding weight at full draw. It is still more physically active than a crossbow, but that is exactly what many archers enjoy.

Traditional archery skill

Compound bows reward consistent stance, anchor, grip, release, follow-through, and tuning. If you want the skill-building side of archery, the compound bow is usually more satisfying.

Lighter carry and faster handling

Most compound bows are easier to carry through brush, up a tree stand, or across public land than a crossbow. They also avoid some of the front-heavy feel that many crossbows have.

Better fit for archery-first hunters

If you enjoy practicing, tuning, and improving as an archer, a compound bow gives you more room to grow. It also connects naturally to target archery, 3D archery, and bowhunting practice.

Which Is Better For Hunting?

For hunting, the better choice is the one that is legal, ethical, accurate in your hands, and matched to the distance and shot angles you can handle. A crossbow can be easier to aim once cocked, but it is bulkier and has strict cocking/decocking safety requirements. A compound bow is lighter and more archery-centered, but it demands more practice and draw-strength management.

The Archery Trade Association is a useful industry reference point for archery equipment context, but hunting rules themselves should come from current state wildlife-agency sources.

Safety And Legal Checks

  • Check whether crossbows are legal for your season, age group, permit type, and property.
  • Confirm minimum draw weight, bolt/arrow, broadhead, and equipment requirements.
  • Use the correct bolt or arrow for your exact setup.
  • Practice at realistic hunting distances before the season.
  • Never dry fire a crossbow or compound bow.
  • Use safe cocking and decocking methods for crossbows.
  • Use a haul line and fall protection when hunting from an elevated stand.
  • Keep fingers and thumbs out of the crossbow string path.

Use-Case Guide

For beginners

A crossbow can feel easier at first because aiming after cocking is simpler. A compound bow builds more archery skill and may be the better choice if the beginner wants to learn archery as a sport, not only hunting.

For tree stands and blinds

Crossbows can work well from blinds and stable rests. Compound bows are easier to carry and maneuver but require drawing at the right moment without being seen. In a tree stand, both require fall protection and careful equipment handling.

For target practice

A compound bow is usually the better long-term skill-building tool for target and 3D archery. A crossbow is better if your goal is crossbow-specific hunting preparation and equipment familiarity.

Frequently Asked Questions

Is a crossbow more powerful than a compound bow?

Not always in a simple way. Crossbows and compound bows use different draw systems, projectile weights, speeds, and energy profiles. Compare complete setups and legal requirements rather than assuming one category is always more powerful.

Is a crossbow easier to shoot?

A crossbow is often easier to aim after it is cocked, but safe cocking, decocking, bolt choice, trigger discipline, and string-path safety still matter. Easier aiming does not remove the need for practice.

Is a compound bow better for archery practice?

Usually, yes. A compound bow develops more of the vertical-bow skill set: stance, anchor, grip, release, follow-through, and tuning. It is better if you want archery as a long-term sport.

Are crossbows legal during archery season?

It depends on the state, season, age, permit type, and property rules. Check current official wildlife-agency regulations before hunting with a crossbow.

Final Recommendation

Choose a compound bow if you want lighter carry, more active archery skill, and a traditional bowhunting path. Choose a crossbow if you need held-at-full-draw aiming, a blind/rest-friendly setup, or an accommodation that is legal where you hunt. The right answer is the one you can use safely, legally, accurately, and ethically.

What To Check Before Choosing a Firearm for Hunting

Before choosing a firearm for hunting, check the animal you plan to hunt, legal equipment rules, cartridge suitability, firearm fit, recoil tolerance, safe handling, sighting system, carry weight, and your real practice time. The best hunting firearm is not the biggest or most expensive one; it is the one you can use safely, legally, accurately, and ethically.

This guide is a pre-purchase checklist, not a product recommendation or legal guide. Hunting rules vary by state, season, property, species, and weapon type, so verify current official regulations before buying or hunting.

Table of Contents

Quick Checklist

CheckWhat to confirmWhy it matters
Legal rulesSpecies, season, caliber/gauge, magazine, ammunition, and property rulesA legal setup in one place may not be legal somewhere else
Game sizeFirearm and cartridge/gauge match the animal and expected distanceSupports ethical shot placement and performance
FitLength of pull, stock shape, eye alignment, and controls feel manageablePoor fit makes safe, accurate shooting harder
RecoilYou can practice without flinching or avoiding range timeAccuracy matters more than raw power
Optics/sightsSighting system matches terrain and distanceDifferent hunts need different sight pictures
Carry weightYou can carry the firearm safely for the full huntHeavy gear changes real field performance
TrainingYou have time and access to practice before huntingConfidence should come from verified practice, not assumptions

Start With Legal Hunting Rules

Do not choose a firearm before checking the rules for your actual hunt. State wildlife agencies may regulate firearm type, caliber, gauge, cartridge, magazine capacity, ammunition type, hunting method, season dates, public-land rules, and special zones.

Rules also change. A setup that worked for one hunter last season may not be correct for your state, species, or property. Treat legal verification as the first checklist item, not the last.

Match The Firearm To The Game

The firearm, cartridge or gauge, and ammunition should match the animal, distance, and shot angles you can handle. Small-game hunting, deer hunting, turkey hunting, hog hunting, and predator hunting can require different setups.

Avoid choosing based on power alone. Too little performance can be unethical, but too much recoil can reduce accuracy and practice time. Ethical hunting depends on knowing your limit and staying inside it.

Check Fit, Controls, And Handling

A hunting firearm should fit your body and field position. Check length of pull, cheek weld, eye alignment, safety location, bolt or action access, trigger reach, and how naturally the firearm points from standing, sitting, kneeling, or supported positions.

Fit matters for safety too. If you struggle to reach the safety, manage the action, or keep the muzzle controlled, the firearm is not a good match yet.

Think About Recoil Before Power

The firearm you shoot accurately is usually better than the one that looks impressive on paper but makes you flinch. Recoil, stock fit, firearm weight, shooting position, and practice volume all affect real accuracy.

If a firearm is uncomfortable at the range, you may not practice enough to use it responsibly in the field. Choose a setup you can verify with realistic practice.

Sight System And Distance

Open sights, red dots, low-power scopes, and higher-magnification scopes all have different strengths. Thick woods, short-range drives, open fields, and mountain hunts do not ask for the same sighting system.

Whatever you choose, sight it in properly and confirm point of impact with the ammunition you will actually hunt with. Do not assume a new optic or new ammunition is ready without range verification.

Safety And Storage Checks

Firearm choice is tied to safe ownership. The NSSF rules for firearm safety are a useful baseline before handling any firearm, and Project ChildSafe’s safety habit guidance reinforces safe behavior and secure storage thinking.

  • Keep the muzzle pointed in a safe direction.
  • Keep your finger off the trigger until ready to shoot.
  • Know your target and what is beyond it.
  • Use the correct ammunition for the firearm.
  • Store firearms so unauthorized people cannot access them.
  • Use a case, sling, lock, or safe storage method that fits your situation and local rules.

Practice Before Hunting

Practice from realistic field positions, not only from a perfect bench. Confirm the firearm from supported positions, sitting or kneeling when appropriate, and the distance ranges you expect in the field. Practice should also include safe loading, unloading, carrying, and using the safety under calm range conditions.

If you cannot place shots consistently at a certain distance, that distance is outside your hunting limit for now. Shortening the shot is better than stretching skill you have not verified.

Frequently Asked Questions

What is the most important thing to check before choosing a hunting firearm?

Start with current legal rules for your species, season, and location. After that, check firearm fit, recoil, cartridge or gauge suitability, safe handling, and your ability to practice enough before hunting.

Should beginners choose the most powerful firearm they can handle?

No. Beginners should choose a legal, ethical setup they can shoot accurately and practice with consistently. Too much recoil can create flinching and reduce real-world accuracy.

Does firearm fit really matter for hunting?

Yes. Fit affects sight alignment, recoil control, comfort, safety manipulation, and confidence from field positions. A poorly fitting firearm can make a good cartridge harder to use well.

Can one firearm work for every hunt?

Usually no. Some firearms are versatile, but species, local rules, terrain, distance, and ammunition requirements vary. A single setup may cover several hunts, but it will not be ideal for everything.

Final Recommendation

Before choosing a hunting firearm, confirm the rules, match the setup to the animal and distance, choose a firearm that fits, keep recoil manageable, verify sights and ammunition at the range, and plan safe storage. The right firearm is the one you can use safely, legally, accurately, and responsibly on the hunt you actually plan to take.

How To Remove Rust From a Gun Safely

Rust on a firearm should be handled slowly and safely. Before any cleaning, unload the firearm, remove ammunition from the work area, follow the manual, and inspect the rust level. Light surface rust may be manageable with proper gun oil and gentle cleaning, but deep pitting, bore rust, or rust around critical parts should be checked by a qualified gunsmith.

This guide is a conservative maintenance checklist, not a shortcut for damaged firearms. Start with the NSSF firearm safety rules, work in a ventilated area, and avoid harsh chemicals or abrasive methods unless the firearm maker specifically recommends them.

Table of Contents
  1. Quick Rust Removal Checklist
  2. Safety Before Cleaning
  3. Inspect the Rust Level
  4. Light Surface Rust
  5. When To Stop and Use a Gunsmith
  6. How To Prevent Rust
  7. Common Mistakes
  8. Related Guides
  9. FAQ
  10. Final Recommendation

Quick Rust Removal Checklist

StepWhat to doWhy it matters
Unload firstRemove magazine, open action, check chamber, and remove ammunition from the roomMaintenance starts with safe handling.
Identify rust levelSeparate light surface rust from pitting, bore rust, or damaged partsDifferent rust levels need different decisions.
Use proper productsUse firearm-safe oil, cloth, nylon brush, or approved toolsHarsh abrasives can damage finish and metal.
Work gentlyUse light pressure and check progress oftenRemoving finish can make future rust worse.
Avoid risky chemicalsDo not mix chemicals or use unknown household acids/cleanersChemical damage can be permanent or unsafe.
Stop for deep rustUse a gunsmith for pitting, bore obstruction, action rust, or structural concernsSome rust is a safety issue, not a cleaning task.
Prevent recurrenceDry, lightly oil, inspect, and store correctlyPrevention is easier than repair.

Safety Before Cleaning

Point the firearm in a safe direction, remove the magazine, open the action, and visually and physically confirm the chamber is clear. Move all ammunition away from the cleaning area. If you are not comfortable disassembling the firearm according to the manual, stop and get help from a qualified person.

Use gloves and ventilation when working with oils, solvents, or rust-removal products. The OSHA chemical hazards resource is a useful reminder that cleaning chemicals should be treated with care, labels, and ventilation.

Inspect the Rust Level

Light surface rust often appears as a thin orange or brown film on exterior metal. Deeper rust may show pitting, rough texture, flaking finish, bore damage, or rust around screws, action parts, sights, or the muzzle. Deep rust is not just cosmetic.

Check the bore only after the firearm is confirmed unloaded and safe to inspect. If the bore looks obstructed, heavily rusted, bulged, or damaged, do not fire the gun. Have it inspected by a gunsmith.

How To Handle Light Surface Rust

For light surface rust, apply a small amount of firearm-safe oil to a soft cloth and let it sit briefly. Wipe gently and check the surface often. A nylon brush can help in textured areas, but avoid aggressive scraping. The goal is to remove rust without cutting through the finish.

After the rust is removed, wipe away excess oil and apply a light protective film. Too much oil can collect dust or migrate into areas where it does not belong. Follow the firearm manual for lubrication points.

When To Stop and Use a Gunsmith

Stop and use a gunsmith if rust is deep, pitted, inside the bore, around the chamber, on locking surfaces, near the action, or on parts that affect safe operation. Also stop if a screw strips, a part will not move normally, or you are unsure whether the firearm is safe to fire.

Cosmetic rust and safety-critical rust are different problems. A firearm can look mostly fine and still need professional inspection if rust affects the bore, chamber, action, or structural surfaces.

How To Prevent Rust

Rust prevention starts with moisture control. Dry the firearm after rain, sweat, snow, or humid storage. Wipe metal surfaces with a light protective oil, inspect periodically, and store firearms in a stable, secure location. Avoid foam cases or damp bags for long-term storage.

Secure storage also matters. Project ChildSafe is a useful resource for responsible storage habits, especially when maintenance and storage routines overlap at home.

Common Rust-Removal Mistakes

  • Cleaning before confirming the firearm is unloaded.
  • Using harsh abrasives that remove finish and expose more metal.
  • Mixing chemicals or using household cleaners not intended for firearms.
  • Ignoring rust in the bore, chamber, or action.
  • Storing a firearm in a damp case after cleaning.

FAQ

Can light rust be removed from a gun at home?

Light surface rust may be manageable at home with firearm-safe oil, a soft cloth, and gentle pressure. Deep rust, bore rust, or rust near operating parts should be inspected by a gunsmith.

Should I use abrasive tools on gun rust?

Avoid aggressive abrasives unless the firearm maker or a qualified gunsmith recommends a specific method. Removing finish can expose more metal and make future rust worse.

Is rust inside a barrel dangerous?

It can be. Rust inside the bore or chamber may affect safety and accuracy. If the bore looks pitted, obstructed, or heavily rusted, do not fire the firearm until it is inspected.

How can I prevent gun rust after cleaning?

Dry the firearm, apply a light protective oil where appropriate, avoid damp storage, and inspect regularly. Moisture control is the best rust prevention habit.

Final Recommendation

Treat rust removal as firearm maintenance, not a cosmetic shortcut. Handle the firearm safely, use gentle firearm-safe products, stop when rust looks deep or structural, and prevent future rust with dry storage and regular inspection.

The 10 Best Elk Hunting Pack in 2025

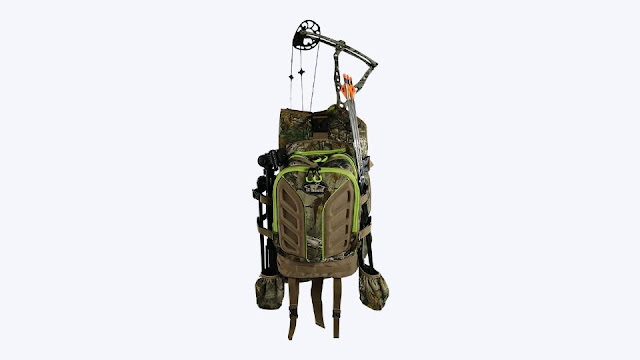
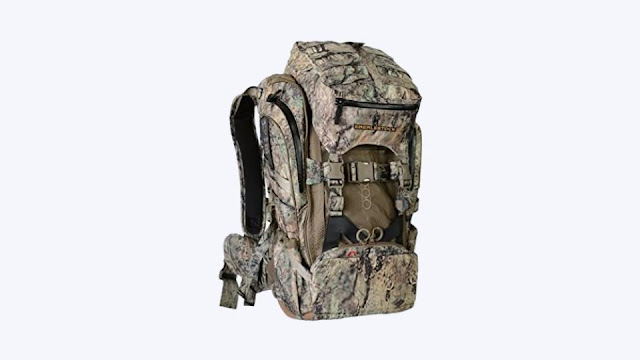
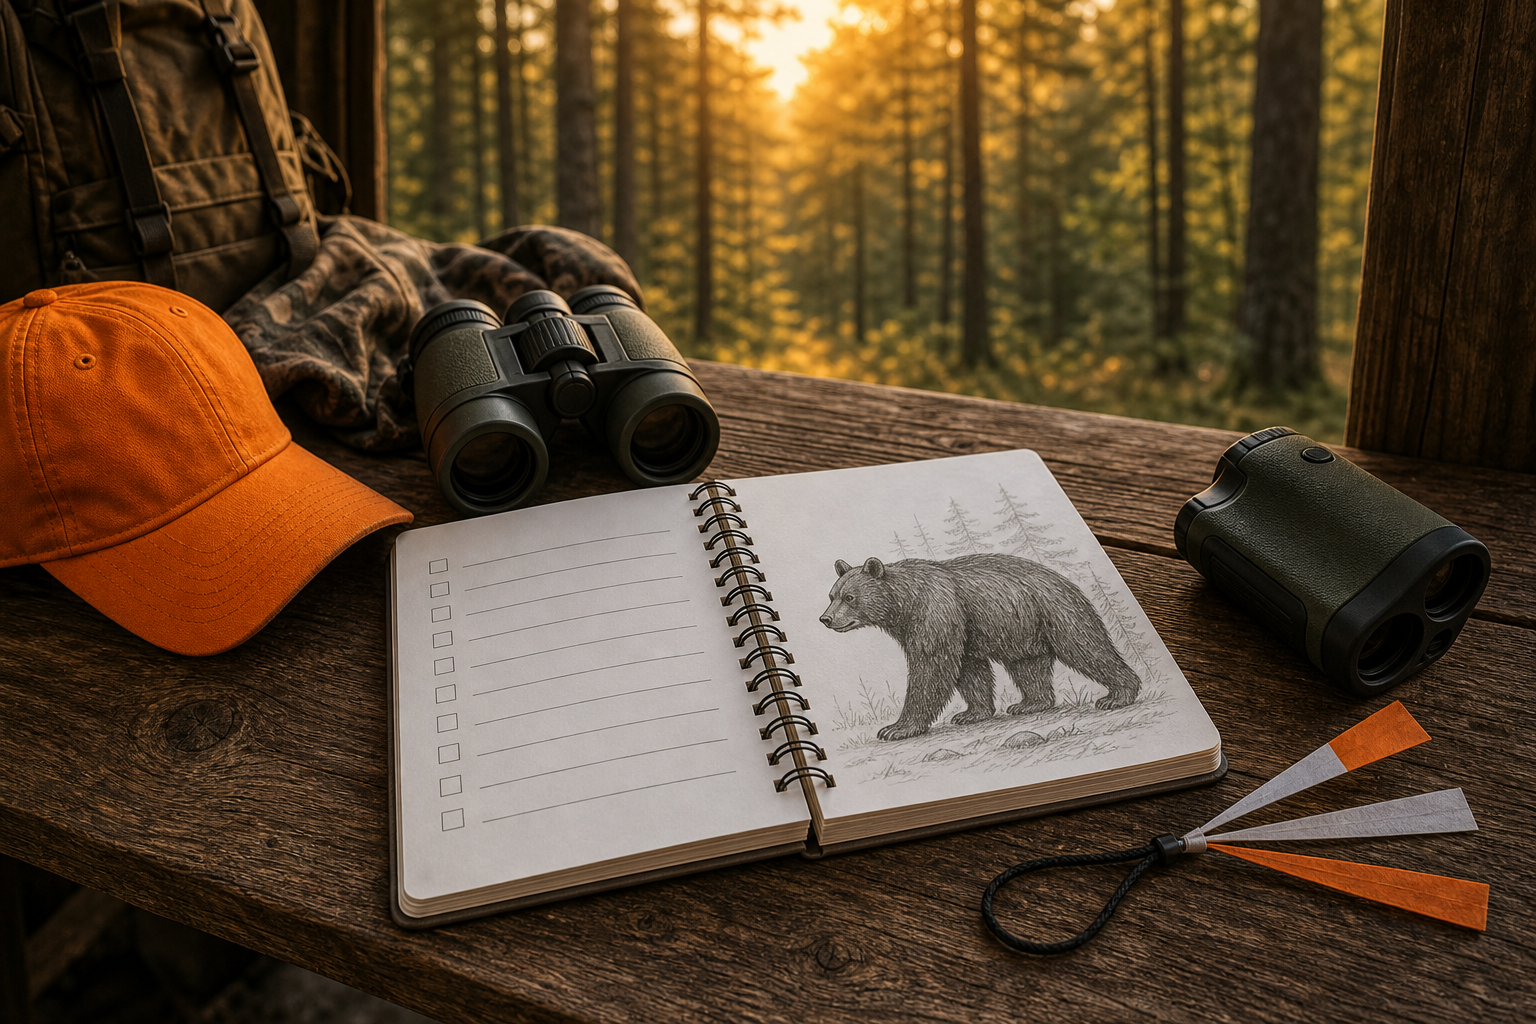
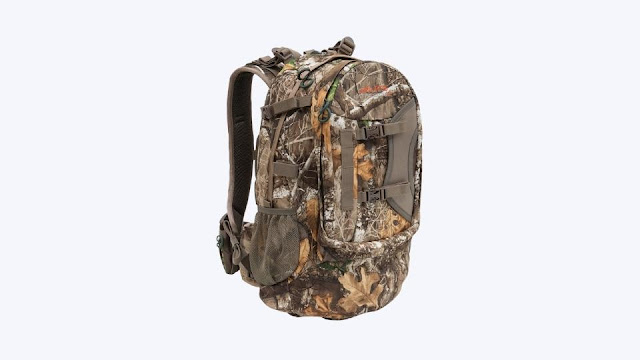
When an elk hunter sets out to hunt, he must take a gun, equipment, food, and several necessary devices. To carry all these items, he will need a spacious hunting backpack. Besides, an elk hunting pack is the only way to protect hunting gears from cold and moisture and free your hands as much as possible.

Furthermore, for an experienced elk hunter, equipment is of great importance. Thus, a hunting backpack for elk hunt needs to be waterproof, breathable, very durable (you will be in very adverse conditions) and above all, be silent.

While these qualities are met, you may have found the perfect backpack. Usually, a best elk hunting pack perfectly copes with these roles, the volume of which depends on the ambitious plans of its owner.

Review of the Best Elk Hunting Pack

If you take hunting seriously, you should invest in a backpack that is more durable and functional than regular hunting backpacks. We bring you some of the top elk hunting packs on the market. Each elk hunting day pack has a unique set of features and qualities, and you can select the one that best meets your requirements.

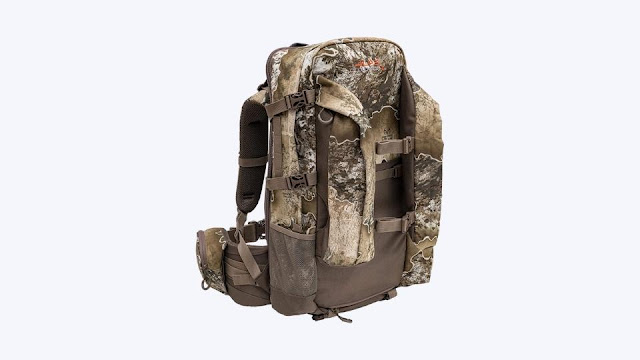
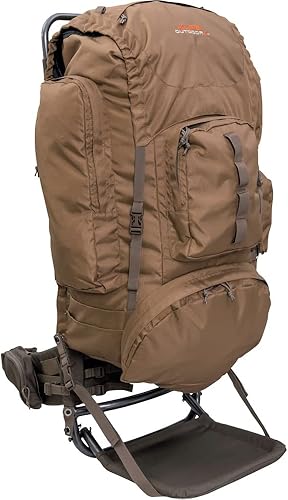
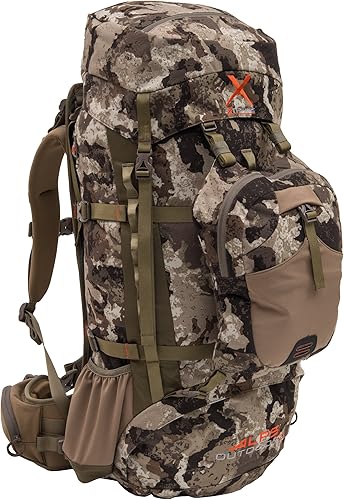
1. ALPS OutdoorZ Traverse EPS

The Traverse EPS is large enough to fit the gear needed for a stand or backcountry hunt. Besides 3300 cubic inches of storage, these packs have an expandable storage area as well.

When you unzip the pack and expand that section, you’ll find an additional 1200 cubic inches of storage, bringing the total to 4500 cubic inches.

Moreover, this hunting pack for elk is ideal for situations where you need to carry more than one bulky item. It is excellent for storing more significant things like tripods, camera arms, and bulky clothing.

Also, the Traverse EPS includes a weapon-carrying system that uses the two front wing pockets and a drop-down weapon pocket to carry your bow or rifle. Again, there’s a padded budget spotting scope pocket that fits most spotting scopes, keeps your optics from getting damaged, and lets you quickly access your tripods.

However, the pack’s “H” frame provides comfort and support. The waist belt with a PE outer layer and multiple layers of foam makes the pack comfortable to carry even when it’s loaded up.

Besides, its EPS section is located close to your body, which allows you to carry heavier items closer to your torso. Thus, you can transport your harvest out of the backcountry with the EPS section after a successful hunt. Again, it is ventilated to keep your harvest cool while you’re transporting it.

Overall, it’s a Well-balanced Elk Hunting Pack. The key to its comfortably carrying weight is its robust frame and rock-solid, adjustable suspension system. The Traverse’s suspension is highly adjustable, making it simple to find the ideal fit.

[su_row][su_column size=”1/2″]

Pros

[su_list icon=”icon: plus” icon_color=”#45BF55 “]

  • 3300 cubic inches of storage
  • Additional 1200 cubic inches of storage
  • Robust frame and firm adjustable suspension
  • Ideal for carrying more than one bulky item
  • Let’s you quickly access your tripods

[/su_list]

[/su_column] [su_column size=”1/2″]

Cons

[su_list icon=”icon: minus” icon_color=”#e24941″]

  • It is a bit loud while wearing

[/su_list][/su_column] [/su_row]

[su_button url=”https://www.amazon.com/dp/B00E3Q7Y1A?tag=shootinggea0f-20&linkCode=osi&th=1&psc=1″ target=”blank” style=”default” background=”#0091cd” size=”8″ center=”yes” radius=”10″ icon=”icon: hand-o-right” rel=”nofollow”]Check Latest Price on Amazon.com![/su_button]

[su_spacer size=”40″]

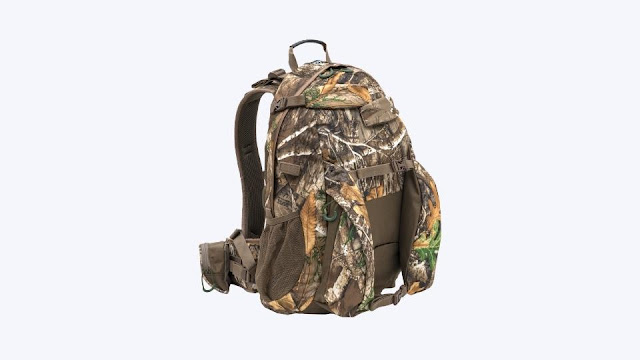
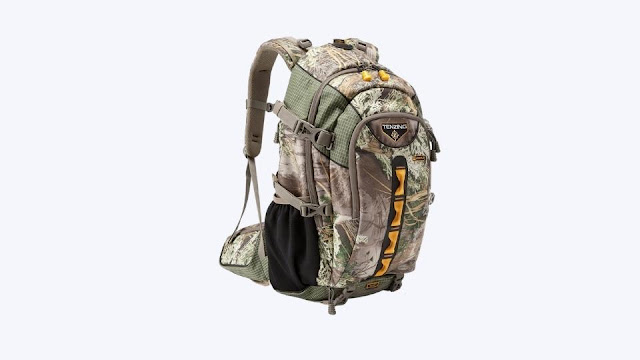
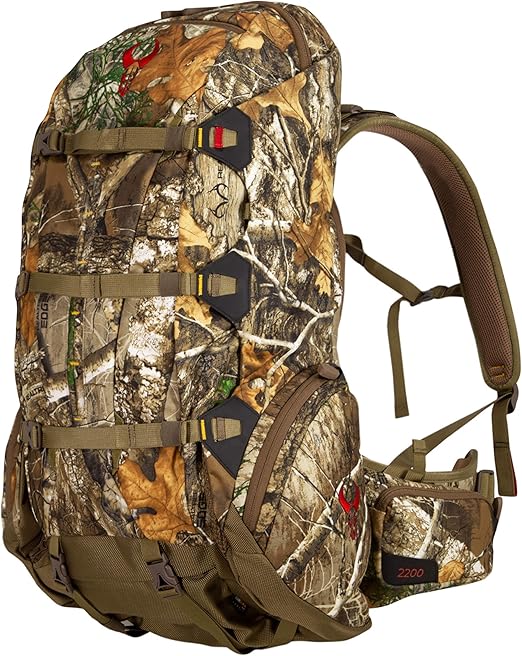
2. Badlands 2200 Camouflage Hunting Backpack

Badlands 2200 Camouflage Backpack is one of the best elk hunting packs available in the market. It comes with a specially designed suspension system that can mold itself to the shape of your body.

You can easily adjust the length of your waist belt by simply pulling the ends inwards instead of outwards, which enables you to cinch your belt and make carrying your gear easier yet.

Moreover, this hunting pack features proprietary magnesium alloy, which is more robust and lighter than T6 aluminum. Again its KXO-50 fabric is an improvement over KXO-32 FABRIC and has all of its benefits. This fabric is super tough, quiet, and utterly resistant to water.

Although KXO-50 fabric is lighter than KXO-32 fabric, its C6 Durable Water Repellent (DWR) treatment prevents moisture from penetrating fabrics. Its water beads and rolls off, keeping your gear dry for longer.

Also, you can attach your rifle or bow on the back of your backpack with a unique rifle or bow boot and with straps.  Furthermore, you can also easily connect your bino case directly to your pack harness through the Bino Connect System to carry your binoculars safely and hands-free.

Again, this pack is compatible with Badlands’ 2L hydration reservoir and includes a hip belt pistol holster and a built-in meat shelf.

Overall, this hunting pack for elk features a carefully crafted and neutral color Camo that adapts to hunting surroundings and lighting conditions. Usually, this Elk Hunting Pack is no longer reliant on the light to remain hidden as well.

[su_row][su_column size=”1/2″]

Pros

[su_list icon=”icon: plus” icon_color=”#45BF55 “]

  • Super tough KXO-50 fabric
  • Quiet and extreme water resistance
  • Lighting conditions adaptable Camo
  • Features 2L hydration reservoir
  • Equipped with unique rifle boot and straps

[/su_list]

[/su_column] [su_column size=”1/2″]

Cons

[su_list icon=”icon: minus” icon_color=”#e24941″]

  • Its size doesn’t fit all

[/su_list][/su_column] [/su_row]

[su_button url=”https://www.amazon.com/dp/B07WSDJVTN?tag=shootinggea0f-20&linkCode=osi&th=1&psc=1″ target=”blank” style=”default” background=”#0091cd” size=”8″ center=”yes” radius=”10″ icon=”icon: hand-o-right” rel=”nofollow”]Check Latest Price on Amazon.com![/su_button]

[su_spacer size=”40″]

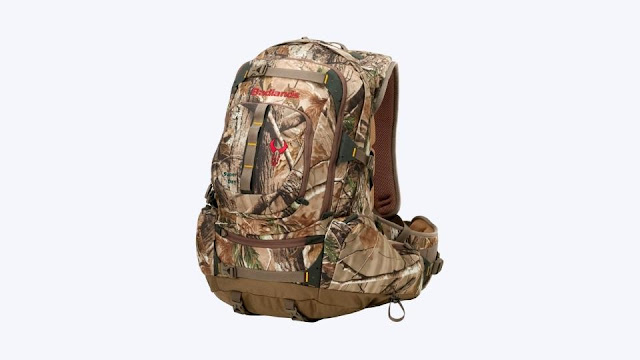
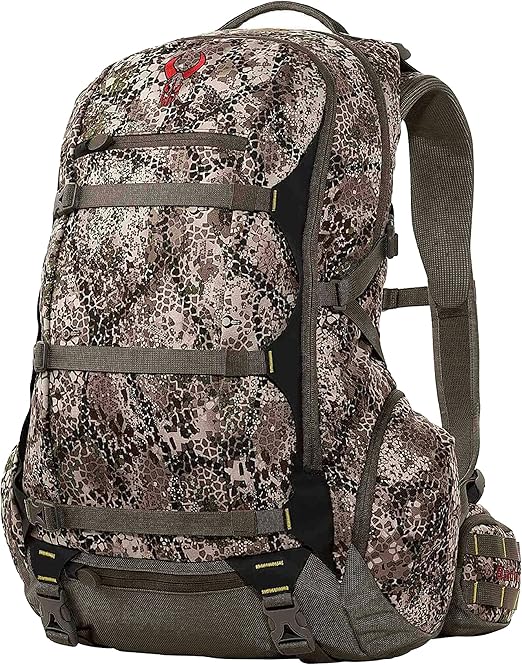
3. Badlands Superday Hunting Daypack

Among the best elk hunting pack, the Superday hunting pack comes first. More hunters carry it than any other hunting pack in the world. Also, it is capable of carrying weight in the same way that a frame pack for elk hunting does.

Furthermore, with its belts’ reverse tightening feature, you can pull the belt’s ends inward rather than outward, giving you the flexibility necessary to adjust your belt comfortably. Its waist belt hugs your hips and evenly distributes weight across your hip contours.

Its comfortable memory foam back suspension and advanced ventilation keep hunters cool at all times. Besides, in the long run, the strap will conform to your body as it improves.

Moreover, by using KXO-50 fabric, the Hunting Pack features all of the advantages of KXO-32 fabric. KXO-50 is amazingly light, completely waterproof, and super durable. Its Durable Water Repellent (DWR) finish repels moisture to protect your things inside.

Generally, its color palette is neutral that adapts lighting conditions and hunting surroundings. Besides, hunters can now conveniently carry their rifles or bows via the Badlands’ integrated Rifle/Bow boot and batwing straps on the back of this pack. Yet, it also has a holster for a hip-belt pistol.

However, the Superday elk hunting day pack is the ultimate backpack offering a list of features that make the hunter’s life easier. It is formed to carry all of your gear.

This pack has organized pockets, hip belt pouches, and straps. Besides, this Badlands backpack is also compatible with a 2L water reservoir and Bino Connect System that attaches your binoculars to this pack.

[su_row][su_column size=”1/2″]

Pros

[su_list icon=”icon: plus” icon_color=”#45BF55 “]

  • Compatible with the 2L water reservoir
  • Compatible with Bino Connect System
  • Features holster for a hip-belt pistol
  • Durable Water Repellent (DWR) finish
  • Comfortable memory foam back suspension

[/su_list]

[/su_column] [su_column size=”1/2″]

Cons

[su_list icon=”icon: minus” icon_color=”#e24941″]

  • It has no frame yet

[/su_list][/su_column] [/su_row]

[su_button url=”https://www.amazon.com/dp/B07VN488VS?tag=shootinggea0f-20&linkCode=osi&th=1&psc=1″ target=”blank” style=”default” background=”#0091cd” size=”8″ center=”yes” radius=”10″ icon=”icon: hand-o-right” rel=”nofollow”]Check Latest Price on Amazon.com![/su_button]

[su_spacer size=”40″]

4. Badlands Diablo Dos Hunting Backpack

Diablo Dos is an all-time best elk hunting pack due to its hyper vent suspension and seamless shoulder straps. This tension-loaded suspension and non-chafing straps enable this pack to get vented at every part where it contracts with people’s bodies.

Thus, this adjustable back eliminates the temperature to ensure comfort for all the time beings. Besides, it delivers the highest strength to weight ratio than other hunting packs available in the market.

Moreover, along with 7-pockets, this hunting pack comes with a dimension of 24 inches x 15 IN x 11 inch and its main pocket measures only 1,700 CI. In addition, its total volume and weight are respectively 2,100 CI and 4 OZ.

Again, this elk hunting backpack also features a built-in Rifle/Bow Boot with a batwing sleeve to hold your rifle or bow safely. Furthermore, this Diablo Dos pack is made of KXO-32 fabric, which is incredibly lightweight, quiet, and rugged.

Again, this fabric also keeps your gears dry from the inside through its C6 DWR (Durable Water Repellent) treatment. It includes easily accessible hip-belt pouches and compression straps at the rear.

Likewise, its shoulder straps also have firm padding to add comfort on long flights. Yet, this pack is also compatible with a 3L hydration reservoir. However, its Mud neutral tone can easily blend with most terrain and pair well with any camouflage pattern.

[su_row][su_column size=”1/2″]

Pros

[su_list icon=”icon: plus” icon_color=”#45BF55 “]

  • Comfortable and adjustable back
  • C6 DWR (Durable Water Repellent) finishing
  • KXO-32 fabric construction
  • Built-in Rifle/Bow Boot
  • Total of 2,100 CI volume

[/su_list]

[/su_column] [su_column size=”1/2″]

Cons

[su_list icon=”icon: minus” icon_color=”#e24941″]

  • It doesn’t include any battery yet

[/su_list][/su_column] [/su_row]

[su_button url=”https://www.amazon.com/dp/B07C48MZN3?tag=shootinggea0f-20&linkCode=osi&th=1&psc=1″ target=”blank” style=”default” background=”#0091cd” size=”8″ center=”yes” radius=”10″ icon=”icon: hand-o-right” rel=”nofollow”]Check Latest Price on Amazon.com![/su_button]

[su_spacer size=”40″]

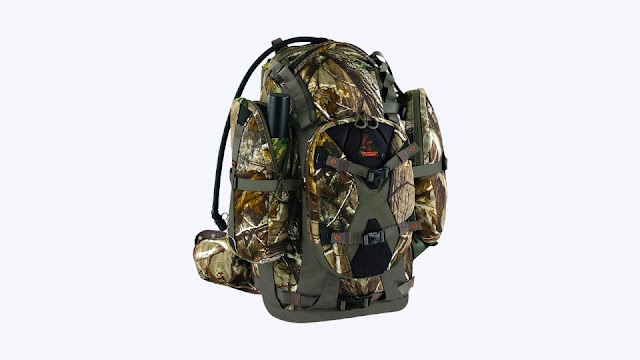
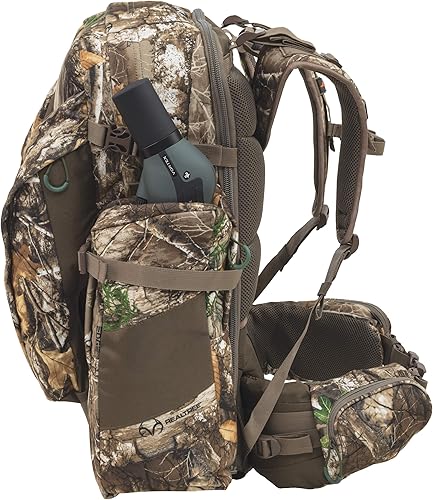
5. ALPS OutdoorZ Unisex-Adult Briar

This unisex hunting pack from ALPS Outdoor Z is designed by a team of dedicated and professional hunters. With a 5250 in³ of space in the main compartment, this Commander Pack has 2-accessory hinged pockets, an exterior front pocket, lashing loops, and a spin-drift collar top for storing your gears.

Besides, it has a side pocket measuring 16 “x 6″ x 2.5” to keep your spotting scopes for shooting, safe during long-distance hunting. In addition, it also has a Drop-Down Rifle Holder that makes it easy to carry a long gun without interfering with walking.

Moreover, this Ripstop nylon fabric Elk Hunting Pack includes an internal horizontal divider, lower door access, H2O pocket/port, and webbing loops. However, this 2 lbs. 3 oz doesn’t come with Commander Freighter Frame. It would help if you bought the frame separately.

[su_row][su_column size=”1/2″]

Pros

[su_list icon=”icon: plus” icon_color=”#45BF55 “]

  • It has a Drop-Down Rifle Holder
  • Ripstop nylon fabric construction
  • 2-accessory hinged pockets
  • 5250 in³ main compartment
  • Dedicated side pocket for spotting scopes

[/su_list]

[/su_column] [su_column size=”1/2″]

Cons

[su_list icon=”icon: minus” icon_color=”#e24941″]

  • It doesn’t have Commander Freighter Frame

[/su_list][/su_column] [/su_row]

[su_button url=”https://www.amazon.com/dp/B07RS4X1MG?tag=shootinggea0f-20&linkCode=osi&th=1&psc=1″ target=”blank” style=”default” background=”#0091cd” size=”8″ center=”yes” radius=”10″ icon=”icon: hand-o-right” rel=”nofollow”]Check Latest Price on Amazon.com![/su_button]

[su_spacer size=”40″]

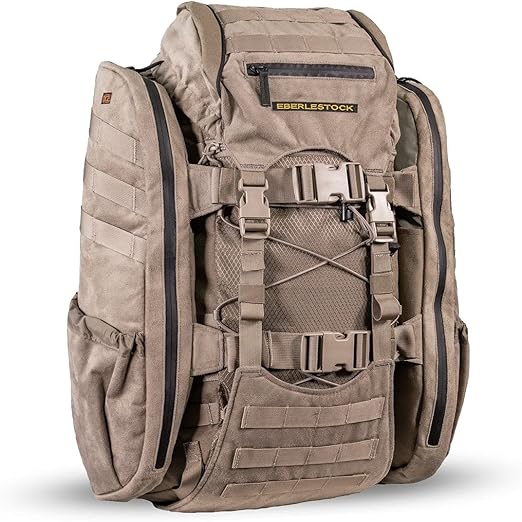
6. Eberlestock X2 Pack

The X2 is a rugged pack that comes with all the large pack features, like too large compression straps, 2-separate compartments for hydration, easily reachable convenient pockets for spotting scopes and tripods, and an Intex frame of tubular aluminum.

Furthermore, when it comes to features, this pack is a big punch. This Dry Earth Microsuede-colored hunting pack features padlock webbing tie-points at the vital position that attaches accessories and lashes gears.

Again, its too-large compression straps are capable of lashing and securing a heavy load. Also, it allows A1SS or A2SS Side Scabbards for carrying handguns or long-range hunting rifles.

Afterward, there are pockets for spotting scopes and tripods, which are conveniently located within easy reach. Most importantly, it has a slim and more relaxed shooter harness for carrying heavier loads during shooting.

Again, you can use its Ample FlexChassis as a seat or stand to mount loads attached to the pack. However, another notable feature is its ARCG ButtBucket compatibility, which allows ARCG ButtBucket to fit on this pack perfectly.

This feature makes this pack ideal for carrying a beginner’s compound bow. Again, like most hunting packs, this Microsuede pack also comes with water-resistant capability.

[su_row][su_column size=”1/2″]

Pros

[su_list icon=”icon: plus” icon_color=”#45BF55 “]

  • Dry Earth Microsuede-colored hunting pack
  • Water-resistant capability
  • It features a shooter harness
  • Compatible with A1SS or A2SS Side Scabbards
  • Too-large compression straps

[/su_list]

[/su_column] [su_column size=”1/2″]

Cons

[su_list icon=”icon: minus” icon_color=”#e24941″]

  • Lack of smaller exterior pockets

[/su_list][/su_column] [/su_row]

[su_button url=”https://www.amazon.com/dp/B013V0O3V2?tag=shootinggea0f-20&linkCode=osi&th=1&psc=1″ target=”blank” style=”default” background=”#0091cd” size=”8″ center=”yes” radius=”10″ icon=”icon: hand-o-right” rel=”nofollow”]Check Latest Price on Amazon.com![/su_button]

[su_spacer size=”40″]

7. ALPS OutdoorZ Dark Timber Hunting Day Pack

The Dark Timber is a quality choice for adventures that require comfort and durability. It includes a waist belt and shoulder straps that let you distribute the weight evenly over your body.

With 3-dedicated pockets to keep your gear organized, as well as water bottle pockets on each side, it has plenty of room to bring everything you need on your trip.

The Elk Hunting Pack is hydration-compatible, meaning you can pack in the water bladder of your choice. Other than the central compartment, there is also a lower pocket for extra storage. Again, it also has lashing straps to secure additional gear.

Moreover, this 100% Polyester-made Mossy Oak Country day pack for elk hunting has a capacity of 37L/2,285 in³, and its weight measures only 2 lbs. It has an adjustable sternum strap that enables you to secure and adjust the backpack to your body.

Furthermore, the pack is both padded and adjustable through a waist belt and shoulder straps. Its side compression straps help bring the pack’s weight closer to your body, making heavy loads easy and more comfortable to carry.

[su_row][su_column size=”1/2″]

Pros

[su_list icon=”icon: plus” icon_color=”#45BF55 “]

  • It comes with a capacity of 37L/2,285 in³
  • Weight measures only 2 lbs
  • Adjustable sternum strap
  • Hydration pockets on both sides
  • 3-dedicated pockets for storage

[/su_list]

[/su_column] [su_column size=”1/2″]

Cons

[su_list icon=”icon: minus” icon_color=”#e24941″]

  • Stitching seems weak in quality

[/su_list][/su_column] [/su_row]

[su_button url=”https://www.amazon.com/dp/B017LGZJ6K?tag=shootinggea0f-20&linkCode=osi&th=1&psc=1″ target=”blank” style=”default” background=”#0091cd” size=”8″ center=”yes” radius=”10″ icon=”icon: hand-o-right” rel=”nofollow”]Check Latest Price on Amazon.com![/su_button]

[su_spacer size=”40″]

8. ALPS OutdoorZ Extreme Commander X + Pack

This commander backpack comes with unbeatable strength, weighing only 9 pounds and 3 ounces. Its nylon ballistic and robin nylon fabrics ensure the maximum strength of this pack. You can attach the pack bag to the frame through compression straps or zippers to carry more gear.

Besides, it has a removable fanny pack for carrying extra accessories. Also, its waist belt has pockets and extra straps and clips that allow you to carry essential items comfortably and securely.

Moreover, this hunting backpack for elk hunt comes with a capacity of 4000 in³. It features a spindrift collar and, dedicated fleece-lined spotting scope pocket to provide easy access to your scope. Again, its internal divider also helps hunters to store their gears in an organized way.

However, like other hunting packs on our list, this pack also features a drop-down pocket to securely hold a rifle/bow. Besides, it is also equipped with a rain cover and H2O pocket/port.

[su_row][su_column size=”1/2″]

Pros

[su_list icon=”icon: plus” icon_color=”#45BF55 “]

  • It has a capacity of 4000 in³
  • It has a removable fanny pack
  • Equipped with rain cover, and H2O pocket/port
  • Extra straps and clips to carry essential items
  • Nylon ballistic and robin nylon fabrics construction

[/su_list]

[/su_column] [su_column size=”1/2″]

Cons

[su_list icon=”icon: minus” icon_color=”#e24941″]

  • A bit of noisy

[/su_list][/su_column] [/su_row]

[su_button url=”https://www.amazon.com/dp/B07BWN3JV6?tag=shootinggea0f-20&linkCode=osi&th=1&psc=1″ target=”blank” style=”default” background=”#0091cd” size=”8″ center=”yes” radius=”10″ icon=”icon: hand-o-right” rel=”nofollow”]Check Latest Price on Amazon.com![/su_button]

[su_spacer size=”40″]

9. Eberlestock Little Brother Pack

This Little Brother pack is designed to complement the J51 Warhammer pack. It was created for Skycrane II (SCII) system users. With A4SS Tactical Weapon Carrier, you can turn this pack’s functionality like G3M Phantom.

Again, the G1 has an expansion tunnel through which you can insert side scabbards (sold separately). Moreover, the pack has two loading options: top-loading and full-front panel. And, its webbing allows both interior and exterior access.

It’s MOLLE/PALS webbing makes efficient use of both interior and exterior space. Also, this hunting pack contains 2-hydration sleeves that fit WXP3L 3-liter bladders and a compartment for military radios of the PRC-117 class.

Again, it includes a harness. Therefore, HBSS is possible to add to this pack if you prefer a more supportive hip belt. Moreover, it has two systems to add frame structure.

The Endo pack frame slides into the pack’s central load bay, adding structure vertically and laterally while improving comfort and lowering noise. Besides, the Endo has no impact on the pack’s ability to tunnel with a scabbard.

Again, if you don’t want to carry a scabbard, you can fit a Gossamer frame inside the scabbard tunnel when the zipper remains closed.

However, you can also turn G1 into a compact Elk Hunting Pack through its structured frame otherwise. The approximate volume of this pack is 1800 cubic inches.

[su_row][su_column size=”1/2″]

Pros

[su_list icon=”icon: plus” icon_color=”#45BF55 “]

  • The pack has two loading options
  • Its volume measures 1800 cubic inches
  • Features a rack for military radio
  • Equipped with 2-hydration sleeves
  • It has an expansion tunnel for side scabbards

[/su_list]

[/su_column] [su_column size=”1/2″]

Cons

[su_list icon=”icon: minus” icon_color=”#e24941″]

  • It is not too big

[/su_list][/su_column] [/su_row]

[su_button url=”https://www.amazon.com/dp/B005TAH2QQ?tag=shootinggea0f-20&linkCode=osi&th=1&psc=1″ target=”blank” style=”default” background=”#0091cd” size=”8″ center=”yes” radius=”10″ icon=”icon: hand-o-right” rel=”nofollow”]Check Latest Price on Amazon.com![/su_button]

[su_spacer size=”40″]

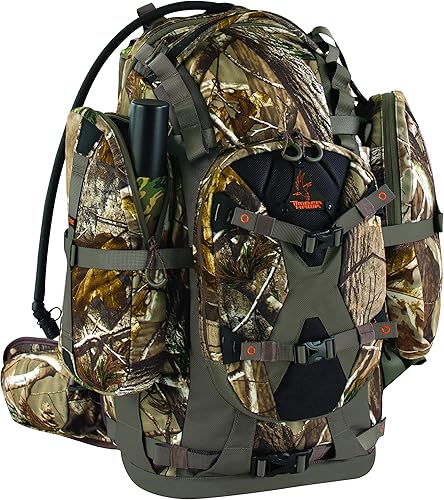
10. Timber Hawk Killshot Backpack, 56.2-Liter Storage

Timber Hawk is a company founded in 2005 by Mike O’Reilly and Paul Thomas, committed to making the field more fulfilling. The Timber Hawk Killshot backpack is a perfect fit for day hunts and multi-day wilderness excursions, featuring spacious and comfortable compartments with multiple storage options.

The backpack’s main compartment is large enough to carry multiple days’ worth of gear and meat, while still allowing for quiet movement in the forest. Made of polyester brushed tricot with a PVC backing, the quiet-cloth backpack includes a 2-liter hydration bladder with an insulated hose and can transport a bow or rifle in different ways.

With a pull-out rain cover, raptor compression straps, right and left hip belt accessory pockets, and dual shoulder strap pockets, it offers a range of convenient features. The backpack also features a padded front organizer and external lashing points at the bottom and top, an internal spotting scope sleeve, and a Hawk-Eye binocular strap system.

The Timber Hawk Killshot backpack is equipped with a removable shoulder strap pouch with magnetic closure and a drop-down scabbard to securely carry hunting gear and a rifle. The accessory pockets are fleece-lined, twill-lined, and quiet, ensuring that hunting gear remains protected.

The backpack measures 12.5 x 22 x 12 inches (WxHxD) and weighs 7.6 pounds, making it easy to carry on hunts. It also comes with a lifetime warranty against any manufacturer defects in materials and quality. Overall, the Timber Hawk Killshot backpack is an excellent choice for hunters who require durability, comfort, and convenience on their hunting trips.

[su_row][su_column size=”1/2″]

Pros

[su_list icon=”icon: plus” icon_color=”#45BF55 “]

  • 2-liter hydration bladder
  • Dual shoulder strap pockets
  • A pull-out rain cover (orange blaze)
  • Drop-down scabbard for a hunting rifle
  • External lashing points at the bottom and top

[/su_list]

[/su_column] [su_column size=”1/2″]

Cons

[su_list icon=”icon: minus” icon_color=”#e24941″]

  • A bit heavy, even empty

[/su_list][/su_column] [/su_row]

[su_button url=”https://www.amazon.com/dp/B016OZHT5I?tag=shootinggea0f-20&linkCode=osi&th=1&psc=1″ target=”blank” style=”default” background=”#0091cd” size=”8″ center=”yes” radius=”10″ icon=”icon: hand-o-right” rel=”nofollow”]Check Latest Price on Amazon.com![/su_button]

[su_spacer size=”40″]

Things to Consider Before Buying an Elk Hunting Pack

For a hunting backpack that is reliable and useful on the hunt, it is necessary to check it for compliance with all the criteria when purchasing.

Beginners rely on the advice of seasoned hunters who know from their own experience what kind of equipment is required. Both of them pay attention to the following parameters:

Weight Capacity

The ratio of weight and volume is selected for specific tasks (for how many days it is planned to go hunting for the game, what is required to take with you, in addition to the standard set of things and items). Of the backpacks of the same volume, a smaller one is chosen in weight, but not at the expense of strength.

Comfort

An ergonomic backpack will allow you to get the convenience of adjusting belts, waistbands, and other structural elements. It also allows you to fix the equipment on the body. Even in soft backpacks, the back seal and support rollers guarantee more comfortable wearing.

Material

It would be best if you chose a backpack which is made of durable and waterproof fabric. Securely fastened belts, comfortable elastic locks, zippers, buttons, carabiners – you must check all parts.

Noise

The bag’s materials should be Noiselessness. An empty pack should be shaken freely, held over the surface with a palm, a fingernail to hear how much it “makes noise.”

Functionality

Based on the goals, decide how much and how many internal, external pockets are needed. It is also worth paying attention to the presence of ties, slings for external fastening of the tent, other items, the number of internal sections, additional functions (chair).

Frame

If in a backpack that does not keep its shape, the center of gravity is constantly shifting, the hunter has to spend energy on maintaining balance, which is exhausting in long journeys.

Ease of Use

If an empty backpack holds its shape without load when fully loaded, it will not tilt to one side; it will not swell. It is important for ease of use, as you do not have to make additional efforts to keep the equipment in the desired position.

Frequently asked questions

What should I look for in an elk hunting pack?
Answer: When looking for an elk hunting pack, you should consider the capacity, durability, comfort, weight, and organizational features.

What is the best size for an elk hunting pack?
Answer: The best size for an elk hunting pack depends on your personal needs, but a capacity of 4,000-5,000 cubic inches is usually sufficient.

Can I use a regular backpack for elk hunting?
Answer:
While it is possible to use a regular backpack for elk hunting, it is not recommended. Hunting packs are designed with features specific to hunting, such as rifle and bow carrying capabilities.

What is a good weight for an elk hunting pack?
Answer:
A good weight for an elk hunting pack is around 5-7 pounds. However, lighter packs may not have the durability and organizational features needed for a successful hunt.

Do I need a hydration system in my elk hunting pack?
Answer:
A hydration system is highly recommended for elk hunting, as it allows for easy access to water while on the move.

Should I choose a framed or frameless elk hunting pack?
Answer:
A framed elk hunting pack offers more support and weight distribution, but may be heavier. A frameless pack is lighter but may not be as comfortable for longer hunts.

What material should my elk hunting pack be made of?
Answer:
Look for elk hunting packs made of durable, water-resistant materials such as nylon or polyester.

Can I use an elk hunting pack for other activities?
Answer:
Yes, an elk hunting pack can be used for other outdoor activities such as hiking, camping, and backpacking.

Final Verdict

Hunting skills are independent of equipment, but good hunting gear will make it much easier to enjoy the sport. If you are one of those who are new to elk hunting or just starting, you should buy an entry-level hunting backpack.

Buying an entry-level backpack won’t hurt your chances of getting a kill. But if you’re an expert or want to be a good hunter, it’s still essential to have the right hunting gear. Whenever you get experienced at hunting, you must upgrade your backpack to a more advanced model.

Spotting Scopes vs Binoculars: Which Optic Should You Use?

Choose binoculars when you need fast, handheld scanning and a wider view. Choose a spotting scope when you need more magnification for distant targets, birds, wildlife, or terrain and you are willing to use a tripod. Most hunters, birders, and range users eventually understand the split this way: binoculars find things faster; spotting scopes inspect distant detail better.

This comparison explains the practical difference between spotting scopes and binoculars without turning the page into a product roundup. If you are shopping later, use this guide to decide which optic type fits the job before comparing brands, prices, or models.

Table of Contents

Quick Comparison

FactorBinocularsSpotting scope
Best roleFast scanning, walking, glassing, general observationDetailed viewing at longer distance
Typical handlingHandheldTripod or steady support
Field of viewUsually wider and easier to scanUsually narrower, especially at higher magnification
MagnificationModerate and easier to stabilize by handHigher magnification for detail work
PortabilityEasier to carry all dayBulkier once scope and tripod are included
Best for beginnersUsually the first optic to buyBetter as a second optic when distance detail matters

What Binoculars Do Better

Binoculars use two optical tubes so both eyes can view at once. In the field, that makes them comfortable for scanning, tracking movement, and checking a wide area without setting up a tripod.

Faster scanning

Binoculars are usually the better tool when you are searching for movement, following birds, glassing a hillside, or checking multiple lanes at a range. You can raise them quickly, scan, lower them, and move without rebuilding your setup.

Better portability

A pair of binoculars is usually easier to carry than a spotting scope plus tripod. That matters on long walks, public-land hunts, scouting trips, travel, and casual nature observation.

More forgiving handheld use

Moderate magnification is easier to hold steady. Once magnification gets high, every hand movement is more obvious. This is one reason binoculars are often the first optic for beginners.

What Spotting Scopes Do Better

A spotting scope is built for higher-magnification observation. It is not as fast or as portable as binoculars, but it can show detail that ordinary handheld binoculars may not resolve at distance.

More detail at distance

Use a spotting scope when your main question is not “where is it?” but “what exactly am I looking at?” This can matter for reading target impacts, judging distant wildlife detail, watching birds from a fixed position, or glassing terrain from an overlook.

Tripod-supported viewing

Higher magnification works best when the optic is steady. A tripod turns a spotting scope from a shaky high-power tube into a useful observation tool. The tradeoff is that tripod setup adds weight, bulk, and time.

Better for fixed observation

If you are staying in one spot and need to study a distant subject, the spotting scope has the advantage. If you are moving constantly or scanning close-to-medium range, binoculars are usually easier.

Which Should You Buy First?

Most people should buy binoculars first unless they already know they need high magnification from a fixed position. Binoculars cover more everyday use: scouting, hiking, birdwatching, hunting, travel, and general outdoor viewing.

A spotting scope makes more sense when you already have binoculars and keep running into the same problem: the subject is too far away for the detail you need. At that point, a scope and tripod can be a useful second optic.

Use-Case Guide

For hunting

Binoculars are usually the first hunting optic because they are faster and easier to carry. A spotting scope can be useful for open-country glassing, long-distance observation, or situations where you plan to sit and study terrain for a while.

For birdwatching and wildlife viewing

Binoculars are better for moving subjects and casual birding. A spotting scope is stronger from a fixed location, such as shorebirds, waterfowl, raptors, or distant wildlife where detail matters more than speed.

For shooting range use

At closer ranges, binoculars may be enough for quick target checks. At longer distances, a spotting scope on a stable tripod can make it easier to see impacts without walking downrange. Always follow range commands and never use optics as a substitute for safe range procedure.

Mistakes To Avoid

  • Buying a spotting scope when you really need a lightweight scanning optic.
  • Buying high-magnification binoculars that are too shaky to handhold comfortably.
  • Forgetting that a spotting scope usually needs a tripod to perform well.
  • Comparing only magnification and ignoring field of view, weight, eye relief, and low-light needs.
  • Assuming one optic is always better; the right choice depends on the task.

Frequently Asked Questions

Are spotting scopes better than binoculars?

Spotting scopes are better for detailed long-distance viewing from a steady position. Binoculars are better for handheld scanning, portability, and general outdoor use. Neither is automatically better for every person.

Can binoculars replace a spotting scope?

Binoculars can replace a spotting scope for general scanning and moderate-distance viewing. They usually cannot match a tripod-mounted spotting scope when you need high magnification and fine detail at longer distances.

Do spotting scopes need a tripod?

Most spotting scopes are much more useful on a tripod or stable support. Higher magnification makes hand movement obvious, so support matters more as power increases.

What is better for beginners?

Binoculars are usually better for beginners because they are easier to carry, easier to aim, and more useful across many outdoor activities. A spotting scope is a good second optic when distance detail becomes the limiting factor.

Final Recommendation

If you can only choose one, start with binoculars for general outdoor use. Add a spotting scope when you need a tripod-supported optic for distant detail. The simplest rule is still the best one: binoculars help you find and follow; spotting scopes help you study from farther away.

Best Bow Hunting Backpack in 2025

The best bow hunting backpack is an essential piece of equipment for any bow hunter. While going out for bow hunting, whether your destination is a popular spot or an isolated spot, you can’t afford to leave any gear behind.

Therefore, the bow carrying backpack comes with all the features hunters usually need for their hunting trip. There are many different best bow hunting backpack designs for bow hunters, but not all are compatible with every type of bow. If you’re thinking about getting a suitable pack for bow hunting, keep reading this article.

[su_spacer size=”10″]

Quick Answer – Top 10 Best Bow Hunting Backpack

1. ALPS OutdoorZ Pursuit Pack

2. ALPS OutdoorZ Traverse EPS

3. Eberlestock X2 Pack

4. ALPS OutdoorZ Matrix, Realtree Edge

5. Timber Hawk Killshot Backpack

6. InSights Realtree Xtra Multi Weapon Pack

7. Tenzing 2220 Daypack with Firearm Carry Boot

8. ALPS OutdoorZ Extreme Traverse X

9. Badlands Superday Pack

10. Eberlestock Team Elk Pack

[su_spacer size=”10″]

Review of The Best Bow Hunting Backpack

Thereby, here we have chosen the 10 Best Bow Hunting Backpacks regarding their quality, features, and brands. Now we are going to review them along with their pros and cons. We hope our review will aid you in selecting the best one for your needs.

1. ALPS OutdoorZ Pursuit Pack

ALPS OutdoorZ’s Pursuit backpack is the most comprehensive bow hunting pack available. It includes a front shelf pocket that organizes all of your gears to keep them easily accessible.

A drop-down rifle/bow holder pocket, quiver holders, and a hydration pocket with ports are just a few of the features that have been designed to assist you in preparing for an all-day hike or hunt.

This backpack is fully equipped for your ultimate comfort, with two pockets on the waist belt to hold essential gear for quick access and reinforced webbing on the pack’s sides to accommodate clip-style leather holsters.

It also comes with an orange rain cover to keep your equipment dry during inclement weather conditions. Furthermore, this bow hunting backpack is an exceptional value with the Realtree Edge camo pattern.

It weighs approximately 4 lbs. 1 oz and has a storage capacity of 2700 cubic inches. Overall, this backpack with heavy-duty stitching and high-quality materials and fabrics is one that you can count on.

[su_row][su_column size=”1/2″]

Pros

[su_list icon=”icon: plus” icon_color=”#45BF55 “]

  • Easy-to-access pockets
  • Includes a hydration pouch
  • It comes with a quiver holder
  • Highly versatile and convenient to carry
  • It comes with a rain cover to resist extreme weather

[/su_list]

[/su_column] [su_column size=”1/2″]

Cons

[su_list icon=”icon: minus” icon_color=”#e24941″]

  • It’s tricky to mount a bow on it

[/su_list][/su_column] [/su_row]

[su_button url=”https://www.amazon.com/dp/B004SXC652?tag=shootinggea0f-20&linkCode=osi&th=1&psc=1″ target=”blank” style=”default” background=”#0091cd” size=”8″ center=”yes” radius=”10″ icon=”icon: hand-o-right” rel=”nofollow”]Check Latest Price on Amazon.com![/su_button]

[su_spacer size=”40″]

2. ALPS OutdoorZ Traverse EPS

This Traverse backpack is made for the hunter who knows how to get in and out of the woods. You can carry heavy loads due to its distinctive H-frame design and extension lashing straps.

It has 1200 cubic inches (approximately 30 liters) of expansion space, which can be used to store your weapon, extra clothing, and other mission-related items. You can secure your weapon or other gear with the drop-down pocket and front zippered ‘wing pockets.’

Moreover, it comes with a tripod sleeve holder, a padded spotting scope pocket, and padded shoulder straps. There’s also a waist belt with two easy-access pockets to keep your belongings safe and well-ordered. In addition, its clip-style holster that is compatible with waist belt adds an extra layer of security as well.

Afterward, this real tree camouflaged bow hunting pack has 74 Liters of volume (4,500 Cubic Inches), and it weighs 6 pounds 14 ounces. It also has an H20 pocket/port and a blaze orange rain cover for bad weather situations. Yet, this backpack is ideal for any outdoor adventure.

[su_row][su_column size=”1/2″]

Pros

[su_list icon=”icon: plus” icon_color=”#45BF55 “]

  • 30 liters of expansion space
  • Front zippered ‘wing pockets
  • It comes with an H20 pocket/port
  • Clip-style holster with waist belt
  • Includes Blaze orange rain cover

[/su_list]

[/su_column] [su_column size=”1/2″]

Cons

[su_list icon=”icon: minus” icon_color=”#e24941″]

  • Shoulder straps are not very comfortable

[/su_list][/su_column] [/su_row]

[su_button url=”https://www.amazon.com/dp/B0889R7SKR?tag=shootinggea0f-20&linkCode=osi&th=1&psc=1″ target=”blank” style=”default” background=”#0091cd” size=”8″ center=”yes” radius=”10″ icon=”icon: hand-o-right” rel=”nofollow”]Check Latest Price on Amazon.com![/su_button]

[su_spacer size=”40″]

Read Also: The 10 Best Elk Hunting Pack

3. Eberlestock X2 Pack

This backpack is the best way to hunt with your A1SS or A2SS Side Scabbard. Padlock webbing tie-points are strategically placed for accessory attachment and gear lashing. It also allows you to carry your shotgun or full-scale hunting rifle comfortably over one shoulder while wearing the backpack.

Moreover, the X2 is a backpack with excellent load-hauling capabilities; it’s ideal for traveling into the backcountry to access that prime hunting spot. The Ample FlexChassis lets you flip it forward to use as a seat so you can take a break from carrying the load, and the back features a set of compression straps for lashing on a heavy load.

It has dual hydration compartments so you can keep water on both sides of your body and pockets for spotting scopes for birding and tripods with easy access.

With its durable tubular aluminum Intex frame, padded shoulder straps, plus padded back panel and waistbelt, this is a comfortable backpack regardless of how far you have to go. Overall, the use of waterproof Microsuede material makes this backpack durable and very comfortable to wear.

[su_row][su_column size=”1/2″]

Pros

[su_list icon=”icon: plus” icon_color=”#45BF55 “]

  • Dual hydration compartments
  • Durable tubular aluminum Intex frame
  • Made of waterproof Microsuede material
  • Ample FlexChassis lets you flip it forward
  • Pockets for spotting scopes and tripods

[/su_list]

[/su_column] [su_column size=”1/2″]

Cons

[su_list icon=”icon: minus” icon_color=”#e24941″]

  • The side pouches can cause bladder pain

[/su_list][/su_column] [/su_row]

[su_button url=”https://www.amazon.com/dp/B00D5CSE26?tag=shootinggea0f-20&linkCode=osi&th=1&psc=1″ target=”blank” style=”default” background=”#0091cd” size=”8″ center=”yes” radius=”10″ icon=”icon: hand-o-right” rel=”nofollow”]Check Latest Price on Amazon.com![/su_button]

[su_spacer size=”40″]

4. ALPS OutdoorZ Matrix, Realtree Edge

This ALPS OutdoorZ Matrix Hunting Backpack has been designed to expand your hunting experience. This Matrix bow hunting day pack features a unique, versatile design that lets you carry your weapon of choice, whether a crossbow, beginner’s compound bow, or rifle, comfortably.

Due to the system’s unique design, you can secure your weapon on both sides of the pack. The pack’s top section features two padded straps that begin in the center and wrap around the weapon before fastening on each side.

Additionally, the pack features two front wing pockets that help secure and protect your weapons. If you don’t want to carry your weapons in them, the “Wing Pockets” are great for carrying extra gear or strapping down heavier loads.

Its two extension lashing straps are also capable of carrying heavier loads. Again, the bottom of this pack includes a specialized pocket to hold a drawn bow or rifle securely. Elsewhere its main compartment is an ideal place to store your smaller items.

However, this ALPS OutdoorZ Matrix backpack also comes with a rain cover, which you can use whenever rainfalls. Also, it has a hydration pocket, so you can use it to carry water or other things.

Furthermore, you don’t have to worry about holding on to your gear while you battle the terrain or carry additional gear because this pack will keep everything in place. Overall, if you enjoy hunting, you’ll appreciate how easier it will make your day when this pack is by your side.

[su_row][su_column size=”1/2″]

Pros

[su_list icon=”icon: plus” icon_color=”#45BF55 “]

  • Capable of carrying heavier loads
  • Features two extension lashing straps
  • Versatile design with the unique fastening system
  • It comes with a Blaze orange rain cover
  • Specialized pocket to carry a crossbow, compound bow, or rifle

[/su_list]

[/su_column] [su_column size=”1/2″]

Cons

[su_list icon=”icon: minus” icon_color=”#e24941″]

  • It is not suitable for a week-long hunting

[/su_list][/su_column] [/su_row]

[su_button url=”https://www.amazon.com/dp/B0084Y9N0M?tag=shootinggea0f-20&linkCode=osi&th=1&psc=1″ target=”blank” style=”default” background=”#0091cd” size=”8″ center=”yes” radius=”10″ icon=”icon: hand-o-right” rel=”nofollow”]Check Latest Price on Amazon.com![/su_button]

[su_spacer size=”40″]

Read Also: The 10 Best Bow Release for Hunting

5. Timber Hawk Killshot Backpack

Mike O’Reilly and Paul Thomas founded Timber Hawk Hunting Backpack in 2005. After testing it for years in the Utah mountains, they improved the backpack design with pro staffers and big-game guides input. This Killshot backpack is ideal for day hunts as well as multi-day trips.

It has a large main compartment that can hold several nights’ worth of gear and can also be used to pack out meat. It’s small enough to move around in thick timber without being noticed, but it has enough storage space for clothing, food, and other supplies to last several nights.

Moreover, this quiet-cloth backpack is made of polyester brushed tricot with a PVC backing and includes a rain cover in the orange blaze. It can carry a rifle or bow in various ways and can hold a two-liter hydration bladder.

Furthermore, this pack has compression straps adjusted for lighter loads and hip belt storage pockets for snacks or gear. It also has Silent Stalk quick-ejection clips and lashing points on the bottom and top.

The backpack comes equipped with a drop-down scabbard for safe rifle storage, a binocular strap system, an internal spotting scope sleeve, and dual shoulder strap pockets for GPS phones and radios.

Overall, Timber Hawk’s bow carrying a backpack for hunting is a durable product that comes with a lifetime warranty. For a reasonable price, you can enhance the comfort and convenience of your next hunting experience.

[su_row][su_column size=”1/2″]

Pros

[su_list icon=”icon: plus” icon_color=”#45BF55 “]

  • It weighs only 7.6 pounds
  • 12.5 x 22 x 12 inches dimensions
  • 56.2 liters Storage Capacity
  • Lifetime warranty from the manufacturer
  • Suitable for both day hunts and multi-day tours

[/su_list]

[/su_column] [su_column size=”1/2″]

Cons

[su_list icon=”icon: minus” icon_color=”#e24941″]

  • Bit of heavy due to the solid construction

[/su_list][/su_column] [/su_row]

[su_button url=”https://www.amazon.com/dp/B00P31IJIG?tag=shootinggea0f-20&linkCode=osi&th=1&psc=1″ target=”blank” style=”default” background=”#0091cd” size=”8″ center=”yes” radius=”10″ icon=”icon: hand-o-right” rel=”nofollow”]Check Latest Price on Amazon.com![/su_button]

[su_spacer size=”40″]

6. InSights Realtree Xtra Multi Weapon Pack

InSights is a revolutionary company. In the Insights multi-weapon pack, you will find an innovative and ergonomic design that allows you to store your weapons and accessories safely and functionally. The revolutionary MWP will change the way you think about hunting.

Moreover, the Multi-Weapon Pack is revolutionary new archery and outdoor accessories backpack designed to meet the needs of the modern hunter. With its single weapon compartment and padded shoulder straps, it’s like nothing else on the market.

Overall, this In Sight’s Realtree Xtra Multi Weapon Pack clips your weapon to the back of your vest so you can swing over obstacles, climb trees, and crouch without fear of dropping your weapon.

[su_row][su_column size=”1/2″]

Pros

[su_list icon=”icon: plus” icon_color=”#45BF55 “]

  • Weighs only 4.8 Pounds
  • Enclosure for a patented weapon
  • 28 x 15 x 3.6 inches in dimension
  • Ergonomic and comfortable design
  • Capable of holding and protecting a variety of weapons

[/su_list]

[/su_column] [su_column size=”1/2″]

Cons

[su_list icon=”icon: minus” icon_color=”#e24941″]

  • Little bit squeaky

[/su_list][/su_column] [/su_row]

[su_button url=”https://www.amazon.com/dp/B01JOEB54C?tag=shootinggea0f-20&linkCode=osi&th=1&psc=1″ target=”blank” style=”default” background=”#0091cd” size=”8″ center=”yes” radius=”10″ icon=”icon: hand-o-right” rel=”nofollow”]Check Latest Price on Amazon.com![/su_button]

[su_spacer size=”40″]

7. Tenzing 2220 Daypack with Firearm Carry Boot

When it comes to hunting, the TZ 2220 is a hard-to-beat option for most hunters, especially ones looking for a lightweight pack. With 2,220 cubic inches of space and a weight of 4 pounds, it could be the ideal companion for long hunting trips.

This advanced hunting pack comes fully equipped with eleven specialized compartments that are able to arrange additional accessories. Also, you can customize this advanced weapon pack in many different ways to match your needs.

Along with high-quality Textile and Synthetic construction and plentiful features like- 6 exterior slips, 4- zip, 1- slip, and a Rain Cover, this Realtree Xtra Multi Weapon Pack has everything you need for a successful hike.

[su_row][su_column size=”1/2″]

Pros

[su_list icon=”icon: plus” icon_color=”#45BF55 “]

  • It comes with a rain cover
  • Textile and Synthetic construction
  • 6- exterior slip, 4- zip, 1- slip pouches
  • Features 11-specialized compartments
  • 2,220 cubic inches storage capacity

[/su_list]

[/su_column] [su_column size=”1/2″]

Cons

[su_list icon=”icon: minus” icon_color=”#e24941″]

  • Difficult to place the hydration bladder back after refilling

[/su_list][/su_column] [/su_row]

[su_button url=”https://www.amazon.com/dp/B007TNXY04?tag=shootinggea0f-20&linkCode=osi&th=1&psc=1″ target=”blank” style=”default” background=”#0091cd” size=”8″ center=”yes” radius=”10″ icon=”icon: hand-o-right” rel=”nofollow”]Check Latest Price on Amazon.com![/su_button]

[su_spacer size=”40″]

8. ALPS OutdoorZ Extreme Traverse X

The TraverseX is your trusted hunting pack for everyday use, but when you head out on an adventure, it can hold everything from your rifle to your rifle scope, and it’s even big enough to haul in the meat of whatever game you’re hunting.

This multipurpose backpack has capabilities for mountain weather and western-style hunting. Its wing pockets can be used as storage for scope and as a means to haul out meat. It also includes a tripod holder and shooting stick.

Additionally, the stowable meat shelf is another hidden component of the ALPS OutdoorZ Extreme Traverse X backpack. It transforms and allows the pack to live up to its reputation by carrying additional weight securely and comfortably.

Again, the Lycra shoulder straps and padded waist belt, as well as load lifters and anti-sway straps, make this pack ideal for overnight backpacking trips into the backcountry.

However, it uses 1680D nylon ballistic fabric, which is used throughout the pack for more durability and strength. The backpack weighs 6 pounds 2 ounces and has enough space (48L/2, 900 in³) for your rifle, bow, or handgun. Also, it has Hypalon to reinforce stress points, dual aluminum stays, a 2-liter H2O pocket/port, and a rain cover.

[su_row][su_column size=”1/2″]

Pros

[su_list icon=”icon: plus” icon_color=”#45BF55 “]

  • Features Lycra shoulder straps
  • Includes 2-liter H2O pocket/port
  • 48L/2, 900 in³ storage capacity
  • Suitable for western-style hunting
  • 1680D nylon ballistic construction

[/su_list]

[/su_column] [su_column size=”1/2″]

Cons

[su_list icon=”icon: minus” icon_color=”#e24941″]

  • Bit of heavy

[/su_list][/su_column] [/su_row]

[su_button url=”https://www.amazon.com/dp/B011YC24PQ?tag=shootinggea0f-20&linkCode=osi&th=1&psc=1″ target=”blank” style=”default” background=”#0091cd” size=”8″ center=”yes” radius=”10″ icon=”icon: hand-o-right” rel=”nofollow”]Check Latest Price on Amazon.com![/su_button]

[su_spacer size=”40″]

9. Badlands Superday Pack

It is the most popular Badlands daypack. It comfortably carries everything you need for an epic day in the woods, including bows, rifles, emergency gear, and more.

Moreover, this backpack is highly durable and quiet because it’s made of KXO 32 camo fabric. It has a molded foam suspension system, making it a daypack and fitting exceptionally well when carrying a rifle.

It is a pack with two pistol-holding straps on the sides. Also, it has 3-storage compartments and seven pockets, which make it ideal for people who carry almost everything they own with them.

However, if you face something wrong with it, Badlands, the company that makes this backpack, will fix everything wrong with it for free. Heck, they’ll replace it if they can’t fix it.

[su_row][su_column size=”1/2″]

Pros

[su_list icon=”icon: plus” icon_color=”#45BF55 “]

  • KXO 32 camo fabric construction
  • Extraordinarily durable design
  • Features two pistol-holding straps
  • Features molded foam suspension system
  • Equipped with 3-compartments and 7-pockets

[/su_list]

[/su_column] [su_column size=”1/2″]

Cons

[su_list icon=”icon: minus” icon_color=”#e24941″]

  • It doesn’t feature any handle on the top

[/su_list][/su_column] [/su_row]

[su_button url=”https://www.amazon.com/dp/B001O00W4O?tag=shootinggea0f-20&linkCode=osi&th=1&psc=1″ target=”blank” style=”default” background=”#0091cd” size=”8″ center=”yes” radius=”10″ icon=”icon: hand-o-right” rel=”nofollow”]Check Latest Price on Amazon.com![/su_button]

[su_spacer size=”40″]

10. Eberlestock Team Elk Pack

The Eberlestock Team Elk Backpack is a top-quality bow hunting backpack designed for the Rocky Mountain Elk Foundation’s (RMEF) team members and hunters worldwide.

The Team Elk pack includes grapple-compression straps, built-in bow carrier, Intex tubular aluminum frame, waistbelt rangefinder pockets, and a fold-away rifle scabbard, along with other best-in-class features.

Moreover, this 50 liters team Elk Pack is an excellent size for shorter hunting trips and can also be used as a day pack. This Team Elk pack has an ergonomic body-following design that conforms to your body’s shape, ensuring stability. Even the best bow hunting pack won’t help you if it doesn’t fit you.

Furthermore, this M5 is a combination of comfort, durability, and accessibility. It has been designed specifically for hunting and hauling big game. It can be accessed from two points to quickly retrieve your gear, especially useful when you haul heavy loads.

With both top and front-loading access, you can grab your equipment at any time. Again, this Team Elk backpack has hydration pockets and dual full-depth spotting scope on either side of the pack.

[su_row][su_column size=”1/2″]

Pros

[su_list icon=”icon: plus” icon_color=”#45BF55 “]

  • 2-optimal access points
  • 3,100 cubic inches storage room
  • Features dual full-depth spotting scope
  • Bottom-shelf design that contours your body
  • Lightweight, comfortable and tough construction

[/su_list]

[/su_column] [su_column size=”1/2″]

Cons

[su_list icon=”icon: minus” icon_color=”#e24941″]

  • Heavy-weight

[/su_list][/su_column] [/su_row]

[su_button url=”https://www.amazon.com/dp/B006WDH3DG?tag=shootinggea0f-20&linkCode=osi&th=1&psc=1″ target=”blank” style=”default” background=”#0091cd” size=”8″ center=”yes” radius=”10″ icon=”icon: hand-o-right” rel=”nofollow”]Check Latest Price on Amazon.com![/su_button]

[su_spacer size=”40″]

Best Bow Hunting Backpack Buying Guide

Generally, best bow hunting backpacks are built with thick woven nylon fabrics, durable padded shoulder straps, dual side-loading cargo pockets that hold bows safely.

They also feature a unique front shelf pocket that holds maps and keeps your gear at your fingertips without having to stop to dig through your pack.

However, as bow hunting backpacks are available in various brands, quality, design, color, and features, it becomes difficult to understand which one will best fit my hunting needs.

So, in this section, we will break down all the essential features and factors necessary to determine the right hunting pack for you.

Bow Attachment

If you’re considering hunting with a bow, make sure you get a backpack with a bow attachment. It’s the first thing you should look for when shopping for backpacks.

There is usually one in a bow hunting backpack. Although whether a hunter needs a bow attachment or not depends on how they plan to use their backpack.

It’s convenient for you because you may need free hands from time to time, and finding a safe place to store your bow can be difficult.

Hydration Bladder

Dehydration can lead to severe health issues. That’s why the hydration bladder is one of the essential features to look for in a backpack designed for use during bow hunting.

When looking for the best bow hunting backpack, always check to see if it has a place for a water reservoir. Or, at least, there should be enough room to store one that you will purchase separately.

Depending on the season and how many hours you will be in the woods, it is better to determine how much water you will carry along with you.

Storage

Hunters, who prefer to be well-prepared, need a backpack that will carry all their items without issue. Therefore, the capacity of your bow hunting bag is essential.

Usually, a bow backpack’s storage capacity varies based on one’s habits and lifestyle. On the go, not everyone requires a lot of storage space.

Choose the suitable storage space for you, and have fun on your hunting trip. However, if you go hunting for a long time, your backpack should be big enough to hold everything you need.

Weight

The weight of your backpack is crucial because it will transfer the weight to your body. It means that for longer trips, you should have a light hunting backpack.

Also, if you prefer to hunt light, you should note the weight capacity of the bow backpack. You may want to check out the available choices and choose one that’s best for your needs.

Comfort

Although you may feel that comfort isn’t that important, it is something that you should not compromise. It is crucial to ensure that your bow hunting backpack provides padding for your back and fits closely to your body.

Therefore, most bow hunting day packs also come with waist, chest, and shoulder straps. On the contrary, if you wear a heavy pack and do not have ample padding, you’ll end up with a sore back and spend the day feeling uncomfortable and distracted.

Durability

The quality of the materials and craftsmanship will determine how well a backpack holds up over time. Quality backpacks are designed to be both durable and easy to use.

So, when choosing a backpack, look for a strong one that will last over the years.

Usually, bow hunters look for a backpack with solid zippers, wide straps, heavy-duty fabric, double stitching at the seams, large clips, and most importantly, one that won’t tear or break.

Frequently asked questions

Q: What should I look for in a bow hunting backpack?
A: Look for features like durability, storage capacity, comfort, adjustability, and weather resistance.

Q: What is the ideal size for a bow hunting backpack?
A: The ideal size depends on your needs and preferences, but most backpacks range between 20 and 40 liters in capacity.

Q: Are backpacks with hydration systems better for bow hunting?
A: Yes, backpacks with hydration systems are ideal for bow hunting because they allow you to stay hydrated without having to carry a separate water bottle.

Q: How much weight can a bow hunting backpack carry?
A: Most bow hunting backpacks can carry up to 50 pounds of weight, but it’s best to check the manufacturer’s specifications to be sure.

Q: Can I use a regular backpack for bow hunting?
A: You can use a regular backpack for bow hunting, but it may not have the specialized features that a bow hunting backpack offers, such as bow and arrow pockets or a meat hauler.

Q: Do I need a camouflage backpack for bow hunting?
A: A camouflage backpack can help you blend in with your surroundings and remain undetected by prey, but it’s not a necessity. A neutral-colored backpack can also work well.

Q: Can I use a bow hunting backpack for other outdoor activities?
A: Yes, a bow hunting backpack can be used for other outdoor activities like hiking, camping, or fishing.

Q: How do I clean my bow hunting backpack?
A: You can clean your bow hunting backpack with a mild detergent, warm water, and a soft brush. Avoid using harsh chemicals or a washing machine.

Final Verdict

Usually, a high-quality bow-carrying backpack makes hunting significantly easier and more successful. And so, here we have reviewed the ten Best Bow Hunting Backpacks of our choice.

Here we have included major buying factors in this article as well. We hope investing in any of our recommended bow hunting packs will help you be better prepared for your next trip and even help you get more hunts!

How To Install a Rifle Scope: Safe Mounting Checklist

Installing a rifle scope is mostly about alignment, fit, and verification. The short version: use the right base and rings, keep the rifle unloaded, level the scope, set eye relief, tighten screws evenly to the manufacturer’s torque specs, then confirm zero at the range before hunting or relying on the setup.

This guide is written as a practical checklist, not a substitute for your firearm manual, optic manual, or a qualified gunsmith. If a mount does not fit cleanly, screws feel wrong, or the rifle has heavy recoil, get the setup checked before firing.

Table of Contents
  1. Quick Scope Install Checklist
  2. Before You Start
  3. Choose the Right Mounts
  4. Set Eye Relief
  5. Level the Rifle and Scope
  6. Tighten and Check
  7. Boresight and Zero
  8. Common Mistakes
  9. FAQ
  10. Final Recommendation

Quick Scope Install Checklist

StepWhat to confirmWhy it matters
Unload and clearMagazine out, chamber clear, muzzle pointed in a safe directionEvery setup job starts with firearm safety.
Match base and ringsCorrect action, rail style, tube diameter, ring height, and recoil ratingWrong parts cause poor fit, scope movement, or damage.
Dry-fit firstBase, rings, optic, bolt clearance, and objective clearanceCatches fit issues before thread locker or final torque.
Set eye reliefFull sight picture from your real shooting positionReduces scope bite risk and makes the rifle easier to mount.
Level reticleRifle level and reticle vertical/horizontalA canted reticle can cause misses, especially at distance.
Torque screwsUse the optic or mount manufacturer’s inch-pound specsOver-tightening and under-tightening both create problems.
BoresightInitial alignment before live fireSaves ammunition and gets shots on paper faster.
Live zeroConfirm zero with the ammunition you will useThe rifle is not ready until it is verified at the range.

Before You Start

Start by making the firearm safe. Remove the magazine, open the action, confirm the chamber is empty, and keep the muzzle pointed in a safe direction. The NSSF firearm safety rules are a good baseline for handling habits during any setup or maintenance task.

Gather the manuals for your firearm, scope, base, and rings. You need exact fit and torque information. Generic torque numbers found online can be wrong for your hardware, especially with lightweight rings, aluminum parts, or optics with thin tubes.

Choose the Right Base and Rings

The base must match the rifle action, and the rings must match both the base style and the scope tube diameter. Common tube diameters include 1 inch, 30 mm, and 34 mm, but you should verify your specific scope. Ring height should give the objective bell enough clearance while keeping the scope low enough for a natural cheek weld.

Do not force parts together. If screws bind, a rail rocks, or the rings leave uneven marks, stop and diagnose the fit. For hard-recoiling rifles, confirm that the mount is rated for that recoil level and that any recoil lug or crossbolt seats correctly.

Set Eye Relief From a Real Shooting Position

Eye relief is the distance between your eye and the ocular lens where you see a full, clear image. Set it while holding the rifle the way you actually shoot: shoulder position, cheek weld, clothing thickness, and shooting stance all matter.

Move the scope forward and backward in the rings until the sight picture is full without stretching your neck. Leave enough clearance to reduce the chance of the scope contacting your eyebrow under recoil. This matters most on lightweight rifles, steep-angle shots, and heavier cartridges.

Level the Rifle and Scope

Leveling keeps the reticle aligned with the rifle. Use a stable rest, a small level, or a scope leveling kit. The goal is not just making the scope look straight; it is making the reticle track vertically when you dial elevation or hold for distance.

Take your time here. Many poor scope installs come from rushing the reticle alignment, then compensating later with awkward holds. If your rifle has a canted rail or unusual stock geometry, visual alignment can be misleading, so use a repeatable leveling method.

Tighten Screws Evenly and Check the Fit

Tighten ring screws in small, even steps so the gap stays balanced on both sides. Use an inch-pound torque driver and follow the mount or scope manufacturer’s spec. Over-tightening can crush or mark a scope tube; under-tightening can let the scope shift under recoil.

After tightening, check that the magnification ring turns freely, the bolt cycles without contacting the scope, the safety works, and the objective bell does not touch the barrel or rail. If you use thread locker, use only the type recommended by the mount manufacturer and keep it away from the optic body.

Boresight and Zero at the Range

Boresighting is only a starting point. It helps you get on paper, but it does not replace live-fire zeroing. Once you reach the range, confirm zero with the ammunition you plan to use. Different loads can shift point of impact, even from the same rifle.

For ammunition and pressure terminology, SAAMI is a useful industry reference. For safe range habits and responsible firearm handling, Project ChildSafe is also worth keeping in your resource list.

Common Rifle Scope Installation Mistakes

  • Using rings that are too high or too low for the rifle and objective bell.
  • Forgetting to set eye relief from a real shooting position.
  • Cranking screws by feel instead of using an inch-pound torque driver.
  • Leveling the scope by appearance only.
  • Skipping live-fire zero confirmation.
  • Assuming one ammunition load will hit the same point as another.

FAQ

Can I install a rifle scope without a gunsmith?

Many shooters can install a scope with the right tools, manuals, and patience. Use a qualified gunsmith if parts do not fit cleanly, you lack torque specs, the rifle has heavy recoil, or you are not confident about safe firearm handling.

Do I need a torque driver for scope rings?

Yes, a torque driver is strongly recommended. Scope rings and bases often use inch-pound specs, and guessing can either loosen the mount or damage the optic.

Should the scope be mounted as low as possible?

Usually the scope should be low enough for a natural cheek weld, but it still needs clearance for the objective bell, bolt handle, caps, and barrel. The lowest possible ring is not always the right ring.

Is boresighting the same as zeroing?

No. Boresighting is a rough alignment step. Zeroing requires live fire at the range with the ammunition you plan to use.

Final Recommendation

A good scope install should feel boring: safe firearm handling, correct parts, careful eye relief, level reticle, proper torque, and verified zero. Do those steps patiently and the rifle will be easier to shoot well. Rush them, and even an expensive scope can perform like a poor setup.

Where to Shoot a Bear With a Bow

If you are wondering where to shoot a bear with a bow, the safest ethical answer is: wait for a calm broadside or slightly quartering-away bear, stay inside your proven bow range, and aim only when the path is clear and you are confident in the shot. If the angle, distance, light, brush, or the bear’s behavior is wrong, pass the shot.

Bear bowhunting is not a place for rushed guesses. A bear’s heavy hair, rounded body, and different posture can make the aiming point harder to read than on a deer. This guide focuses on shot selection, when to wait, and when to walk away so the decision is ethical, legal, and realistic.

Table of Contents

Quick Answer

For most bowhunters, the best bear shot is a broadside or slightly quartering-away shot at a calm animal. The aiming point should be selected from the bear’s body position, not from hair outline alone. Keep the shot inside the range you can repeat accurately under hunting pressure, and avoid any angle that forces the arrow through heavy shoulder structure, brush, or too much body before reaching the vital area.

That does not mean every broadside bear is automatically a shot opportunity. Wind, legal rules, distance, light, recovery access, and the bear’s behavior all matter. State wildlife agencies may also have season, bait, tagging, sex, cub, and recovery rules, so check your current state bear regulations before hunting. Florida’s official bear hunting information is one example of why state-specific rules matter.

Before You Think About Aiming

The first decision is not where to hold the pin. It is whether you should take the shot at all. A responsible bowhunter should already know the legal season, have a sharp broadhead that matches the bow setup, understand the recovery plan, and know the maximum distance they can shoot cleanly without stretching.

Use a rangefinder before the bear steps into the opening if possible. Pick clear landmarks, know your shooting lanes, and decide your pass-shot limits before adrenaline shows up. If you are hunting from a stand, account for the downward angle and practice from that type of position before the season. If you cannot explain your plan calmly before drawing, wait.

Why Bears Are Different From Deer

Bears can look bigger and lower than they really are because of hair, fat, and a rounded body shape. The leg position can also be harder to read, especially on a dark bear in shade. That is why experienced hunters often warn new bear hunters not to aim by the outline of the hair. Study the body angle, shoulder line, and leg position instead.

There is also a bigger judgment issue: bear behavior and identification matter. Do not take a shot if you are unsure whether cubs are nearby, if the bear is alert and about to move, or if the situation feels rushed. Resources like Bear Smart’s bear education material are useful background because ethical hunting starts with understanding the animal, not just the equipment.

Best Bowhunting Shot Angles

The right shot angle is the one that gives your arrow a clean path and gives you a realistic recovery. The best options are usually simple, patient shots. Complicated angles are where wounded animals, lost recovery trails, and unsafe follow-up decisions happen.

Broadside

A broadside bear is usually the clearest bow shot because the body angle is easiest to read. Wait until the near-side front leg is not blocking the path. Pick a clean lane, settle the pin, and avoid drifting too far forward into heavy shoulder structure or too low into hair and body outline.

The key is patience. If the bear is walking, turning, or stretching, let it settle. A calm standing bear gives you time to confirm the angle and distance. If the bear never gives you that calm position, passing is the right decision.

Slightly Quartering Away

A slight quartering-away shot can be ethical when the angle is mild and the arrow path is clear. Think about where the arrow needs to travel through the body, not just where it touches the near side. If the angle becomes steep, or the shot would need to drive through too much body before reaching the vital area, do not force it.

This is where many hunters make mistakes by treating every quartering-away animal the same. Slight is different from hard quartering. When the angle is hard, wait for a turn or pass the shot completely.

Elevated Stand Angles

From a treestand, the contact point and exit path matter more than the pin picture alone. A steep downward shot can make the arrow path narrower and less forgiving. Practice from elevated positions, use a rangefinder with angle awareness if you trust it, and avoid steep shots that look tempting but reduce recovery confidence.

Bowhunter education resources often stress patience, controlled shot execution, and understanding your limits. If you need a refresher on bowhunting fundamentals, start with a reputable hunter-education source such as Bowhunter Ed, then apply your own state’s current rules.

Shots to Pass

A strong bear hunter knows which shots not to take. Passing is not failure; it is part of ethical hunting. The shots below are the ones most likely to create poor penetration, unclear recovery, or unsafe follow-up.

Frontal Shots

Do not take frontal bow shots on a bear. The target window is small, the structure is heavy, and the margin for error is too narrow. Wait for the bear to turn broadside or quarter slightly away.

Hard Quartering-To

A hard quartering-to bear usually protects the clean path you need. Even if the range is close, this is a shot to pass. Let the animal move, or let the opportunity go.

Running or Alert

Never rush a shot at a running, nervous, or alert bear. The animal can move during your shot sequence, and a small aiming error becomes a major recovery problem. Draw only when the situation is calm enough to finish the shot cleanly.

Brush, Obstructed, or Too Far

Do not shoot through brush, branches, grass, or uncertain cover. Do not stretch the range because the bear is impressive or because the hunt has been slow. Your field range is not your best range on a perfect practice day; it is the distance you can repeat when your heart rate is high.

Bear Bowhunting Shot Checklist

Before drawing, run through a short checklist. Is the bear legal? Is the distance known? Is the bear calm? Is the angle broadside or slightly quartering away? Is the shooting lane clear? Is your recovery plan realistic? If one answer is no, wait.

  • Legal: Season, tag, area, bait rules, and bear identification are confirmed.
  • Distance: The bear is inside your proven bow range, not just your hopeful range.
  • Angle: Broadside or slight quartering-away only.
  • Lane: No brush, limbs, grass, or other animals in the path.
  • Behavior: The bear is calm enough that you can finish the shot cleanly.
  • Recovery: You have light, help, permissions, and a plan for follow-up.

After the Shot and Recovery

After the shot, watch and listen carefully. Mark the spot where the bear stood and the last place you saw it. Do not climb down or start moving immediately unless your state rules, safety, or specific situation require it. If you are unsure about the hit, slow down and get help instead of pushing too fast.

Recovery rules and best practices vary by state, property, terrain, weather, and available tracking help. Plan this before the hunt. Know who you can call, what lights or marking tape you carry, and what your local regulations allow. A good recovery plan is part of ethical shot selection, not an afterthought.

Common Mistakes

The most common mistake is rushing because the bear finally appeared. Another is aiming from the hair outline instead of reading the body. A third is using deer habits without adjusting for bear shape, hair, and behavior. Good bear bowhunting is slower than that. You wait, verify, breathe, and only shoot when the answer is clear.

Another mistake is letting gear confidence replace judgment. Sharp broadheads, a tuned bow, and solid arrows matter, but they do not make a bad angle ethical. Equipment supports the decision; it does not rescue the wrong one.

FAQ

What is the best shot angle for a bear with a bow?

A calm broadside bear is usually the clearest bow shot. A slight quartering-away angle can also work when the arrow path is clean and the angle is not steep.

Should you shoot a bear facing you?

No. A frontal bow shot on a bear has too little margin for error. Wait for the bear to turn or pass the shot.

How far should you shoot a bear with a bow?

Stay inside the distance you can repeat accurately under field pressure. That number is different for each hunter, and it should be based on honest practice, not hope.

Is bear shot placement the same as deer shot placement?

No. Bear hair, body shape, posture, and shoulder structure can make the aiming picture different. Do not aim from the hair outline alone.

What should you do if the shot does not feel right?

Do not shoot. Passing a questionable shot is the ethical choice, especially with a powerful animal and a difficult recovery situation.

Final Recommendation

The best place to shoot a bear with a bow is not a single magic dot. It is the right shot opportunity: legal bear, calm behavior, known distance, broadside or slight quartering-away angle, clear lane, and a recovery plan. If those pieces are not present, pass the shot and wait for a better one.

That mindset protects the animal, the hunter, and the quality of the hunt. A bear you pass today is better than a bear you cannot recover tomorrow.

The 10 Best Scope Mounts for Accurate Shooting & Hunting in 2025

The Best Scope Mounts: For a perfect shot, you need three things, a rifle, good ammo, and a well-made scope, right? But like most others, you also forget one crucial thing!

Yes, I am talking about the scope mount that holds the rifle to the scope. For an accurate shot, it is vital to have a perfect connection between rifle and scope; hence, a scope mount is essential.

In this article, we will present some best scope mounts in front of you with proper pros and cons. After reading the entire article, you will be able to grab an excellent scope mount, I promise!

Reviews of The Best Scope Mount

Many beginners struggle to find the right scope mounts. Often they purchase a useless product, therefore, experience horror in a shooting.

I thought; why not make it a bit easier for you to acquire the best product according to your need. I’ve got a little experience in this filed, and I also analyze the market and examine many products.

Finally, I found the following ten most efficient in terms of performance, built quality, and price. Allow me to share the reviews of the best scope mounts so that you can purchase the right one within a short period.

Top 10 Best Scope Mounts

1. Nikon P-Series Riflescope Picatinny Mount

The Nikon P-Series Riflescope is our first attraction today. Though we didn’t maintain any particular order, still, if something is on top of the list, it must be unique.

The Nikon P-Series Riflescope is made of top quality materials; therefore, it is durable and able to serve many years. The mount is suitable for any 1-inch scope tube.

The Nikon P-Series Riflescope is compatible to any flattop Picatinny rail system. You will also get mounting versatility with a reversible two-piece ring set. You can set properly for eye relief and also forward positioning with ease.

It provides the versatility of two ring scope sets through its rigid broad base. The scope mount is durable yet lightweight and constructed in the USA. Overall, it is excellent for the price.

[su_row][su_column size=”1/2″]

Pros

[su_list icon=”icon: plus” icon_color=”#45BF55 “]

  • Lightweight
  • Solid construction with top quality materials
  • Allows proper height, Eye Relief, and Forward Position
  • Made In USA
  • Offers extreme mounting flexibility

[/su_list] [/su_column] [su_column size=”1/2″]

Cons

[su_list icon=”icon: minus” icon_color=”#e24941″]

  • The built quality is not that good as it should be

[/su_list][/su_column] [/su_row]

[su_button url=”https://www.amazon.com/dp/B00B5F02ZW?tag=shootinggea0f-20&linkCode=ogi&th=1&psc=1″ target=”blank” style=”default” background=”#0091cd” size=”8″ center=”yes” radius=”10″ icon=”icon: hand-o-right” rel=”nofollow”]Check Latest Price on Amazon.com![/su_button]

[su_spacer size=”40″]

2. Vortex Optics Sports Cantilever Mounts

The Vortex Optics Sports Cantilever Mounts are widely popular for many reasons, and high-quality construction is the major one. The product is made of top quality aluminum materials with excellent craftsmanship.

Therefore, the product will last several years without any problem. It will not break after a while, like most of the cheap products. Besides, versatility is the most common problem that many people face with their scope mount.

Well,  if you’ve installed the Vortex Optics Sport Mounts, then you will not face such issues yet.  You can choose between 2-inch and 3-inch offset for mounting position.

The Vortex Optics Sports Cantilever Mount will give you better eye relief, and you can place your head on the right place of the rifle.

As a result, you will never experience any discomfort. The mount is not the lightest, but the weight is standard. Overall, it is the right product in this price range.

[su_row][su_column size=”1/2″]

Pros

[su_list icon=”icon: plus” icon_color=”#45BF55 “]

  • Strong construction with Aluminum materials
  • Ensures excellent eye relief
  • Versatile
  • Standard weight
  • Two options included for offset positions

[/su_list] [/su_column] [su_column size=”1/2″]

Cons

[su_list icon=”icon: minus” icon_color=”#e24941″]

  • A bit larger than other models

[/su_list][/su_column] [/su_row]

[su_button url=”https://www.amazon.com/dp/B009N24RN2?tag=shootinggea0f-20&linkCode=ogi&th=1&psc=1″ target=”blank” style=”default” background=”#0091cd” size=”8″ center=”yes” radius=”10″ icon=”icon: hand-o-right” rel=”nofollow”]Check Latest Price on Amazon.com![/su_button]

[su_spacer size=”40″]

3. Burris 410344 PEPR 1-Inch Mount

The Burris 410344 PEPR 1-Inch Mount is the third entry on our list. Burris is one of the biggest names who earned tremendous respect all over the globe due to its quality products.

The built quality is fantastic with top quality materials. It is designed to last and serve you for many years. By using two quick detach levers, these rings attach to standard Universal rail or Picatinny on AR.

Six hex bolts place the scope on each ring. You can separate and reattach the mount without losing zero because of the excellent design and built quality. You will get the field of view and an ideal eye relief too.

If you don’t want any hassle, the Burris 410344 PEPR 1-Inch Mount is a great option. The quick detach also helps to get the most out of the top rail.  To sight in different rifles, you can alternatively use the scope mount. The price is also meager for such quality.

[su_row][su_column size=”1/2″]

Pros

[su_list icon=”icon: plus” icon_color=”#45BF55 “]

  • Strong construction
  • Includes optional Picatinny Rail on top
  • One-piece design
  • Long-lasting and easy to use
  • No need to lap the rings
  • Quick detach system included

[/su_list] [/su_column] [su_column size=”1/2″]

Cons

[su_list icon=”icon: minus” icon_color=”#e24941″]

  • A bit heavy

[/su_list][/su_column] [/su_row]

[su_button url=”https://www.amazon.com/dp/B004P81FMU?tag=shootinggea0f-20&linkCode=ogi&th=1&psc=1″ target=”blank” style=”default” background=”#0091cd” size=”8″ center=”yes” radius=”10″ icon=”icon: hand-o-right” rel=”nofollow”]Check Latest Price on Amazon.com![/su_button]

[su_spacer size=”40″]

4. Burris PEPR QD Scope Mount

Burris, as I mentioned, is one of the trusted names in this field with their top quality products. They always want to satisfy their consumer with quality.

This Burris PEPR QD Scope Mount is an example of their class. The AR PEPR mount is one of the latest and advanced rifles cantilever mounts of this time.

For QD capability, the ring features two locking throw levers. The mount is available in  30mm,  34mm, and 1-inch, configurations. You can choose any one as per your needs.

The mounting system is perfect for Burris optics and many other optics in the market. The lightweight mount has two Picatinny rails sections on the top of each ring. So attaching and reattaching is simple and faster with the mount.

You can also get two inches of forwarding scope position with the scope mount. The item is affordable and best in many ways.

[su_row][su_column size=”1/2″]

Pros

[su_list icon=”icon: plus” icon_color=”#45BF55 “]

  • Ideal for hunters, competitive shooters, and duty officers
  • Offers 2-inches of forwarding scope positioning
  • Has smooth and Picatinny ring tops
  • Offers optimum eye relief

[/su_list] [/su_column] [su_column size=”1/2″]

Cons

[su_list icon=”icon: minus” icon_color=”#e24941″]

  • The locking mechanism is not reliable
  • A bit pricy

[/su_list][/su_column] [/su_row]

[su_button url=”https://www.amazon.com/dp/B004P81FMU?tag=shootinggea0f-20&linkCode=ogi&th=1&psc=1″ target=”blank” style=”default” background=”#0091cd” size=”8″ center=”yes” radius=”10″ icon=”icon: hand-o-right” rel=”nofollow”]Check Latest Price on Amazon.com![/su_button]

[su_spacer size=”40″]

5. American Defense AD-RECON STD Riflescope Optic Mount

Are you in search of a user-friendly mount so that you can operate with ease?

Well, the American Defense is the perfect choice for you then. Adjusting the mount is super simple and requires zero effort. With a flat blade screwdriver or your finger, you can adjust the mount. Even no tools are required for adjustment.

You will also get a unique auto-lock system that locks the rear or to the front with a lever.  The mount is made in the USA and meets all the USA standard. The manufacturer also used top quality materials. Thus, it is long-lasting.

The cantilever is designed to provide excellent eye relief and throw the scope out front. You will not lose your zero, not anymore. Its returns to zero after prolonged or removal use. The price is also affordable.

[su_row][su_column size=”1/2″]

Pros

[su_list icon=”icon: plus” icon_color=”#45BF55 “]

  • User-friendly tension adjust system
  • Automatically returns to zero
  • Good quality machining
  • Locks uptight
  • Adjustment is smooth without any tool
  • Securely attaches to the rail

[/su_list] [/su_column] [su_column size=”1/2″]

Cons

[su_list icon=”icon: minus” icon_color=”#e24941″]

  • You might have to keep tightening the screws every time you use it

[/su_list][/su_column] [/su_row]

[su_button url=”https://www.amazon.com/dp/B002E6USZK?tag=shootinggea0f-20&linkCode=osi&th=1&psc=1″ target=”blank” style=”default” background=”#0091cd” size=”8″ center=”yes” radius=”10″ icon=”icon: hand-o-right” rel=”nofollow”]Check Latest Price on Amazon.com![/su_button]

[su_spacer size=”40″]

6. CCOP USA 30mm Cantilever Scope Mounts

Are you looking for the most reliable option? Indeed, the CCOP USA 30mm Cantilever Scope Mount is the one you are looking for.

With 6061 aircraft-grade aluminum construction and durable matte black anodized finish, the CCOP Scope Mount will last more than you’ve ever expected.

The CCOP Scope Mount is a high profile model that offers excellent eye relief. It works with the 1913 Picatinny mounting system.

The mount scope returns to zero automatically and also holds zero. The Scope Mount Fits In any 30mm Optics. Overall, the product is fantastic in every possible way.

I am sure you will love to have it on your hand. The price is affordable too. Give it a try before the stock expires.

[su_row][su_column size=”1/2″]

Pros

[su_list icon=”icon: plus” icon_color=”#45BF55 “]

  • High profile
  • Fits all 30mm optics
  • Durable and long-lasting with 6061 aircraft-grade aluminum construction
  • Durable matte black anodized finish
  • Secure zero hold

[/su_list] [/su_column] [su_column size=”1/2″]

Cons

[su_list icon=”icon: minus” icon_color=”#e24941″]

  • Rough and heavy

[/su_list][/su_column] [/su_row]

[su_button url=”https://www.amazon.com/dp/B00DP26OUK?tag=shootinggea0f-20&linkCode=osi&th=1&psc=1″ target=”blank” style=”default” background=”#0091cd” size=”8″ center=”yes” radius=”10″ icon=”icon: hand-o-right” rel=”nofollow”]Check Latest Price on Amazon.com![/su_button]

[su_spacer size=”40″]

7. Larue Tactical QD Cantilever Scope Mount LT104

The Laure Tactical QD Cantilever Scope Mount-LT104 is another robust mounting system for heavy recoil rifles. The Scope mount features an excellent backbone that offers split vertical ring a solid grip to prevent any movement.

For this, the mount is widely popular among the professional shooters. Those mount rings are precision-machined from a sturdy aluminum-anodized body. So, the mount is durable and able to tolerate the toughest situation. You can abuse it for a lifetime.

The unique design provides a robust platform for continuous shooting by reducing lapping time. You can maintain zero without any problem, and thanks to locking LaRue speed levers for that.

The Scope Mount is highly adjustable and keeps you safe from all the additional hassles. The price is acceptable too.

You will also get some other gifts with the mount like set up instructions, spare mounting screws,  and QD adjustment wrench.

[su_row][su_column size=”1/2″]

Pros

[su_list icon=”icon: plus” icon_color=”#45BF55 “]

  • Offers a stable platform for riflescope
  • Adjust and detach from the rail
  • Holds zero after removing and reinstalling
  • Solid construction with top quality material
  • Easy to install

[/su_list] [/su_column] [su_column size=”1/2″]

Cons

[su_list icon=”icon: minus” icon_color=”#e24941″]

  • Special tools needed to adjust the mounting tension

[/su_list][/su_column] [/su_row]

[su_button url=”https://www.amazon.com/dp/B00Z7G9QJS?tag=shootinggea0f-20&linkCode=osi&th=1&psc=1″ target=”blank” style=”default” background=”#0091cd” size=”8″ center=”yes” radius=”10″ icon=”icon: hand-o-right” rel=”nofollow”]Check Latest Price on Amazon.com![/su_button]

[su_spacer size=”40″]

8. Flat Top Offset One Piece QD Scope Mount

The Flat Top Offset One Piece QD Scope Mount by Hammers is another excellent product for the present time based on construction, performance, and price.

Many professional shooters all over the globe are using this product right now, and they are highly satisfied.

The built quality of the scope mount is fantastic with aircraft-grade aluminum alloy material. The item is heavy and robust. Without any doubt, it will last and serve you many years.

The Flat Top Offset One Piece QD Scope Mount fits onto flattop Picatinny rail and works with both 30mm and 1-inch main tube rifle scopes. You can adjust the scope without any problem, and it can be installed within a few seconds.

[su_row][su_column size=”1/2″]

Pros

[su_list icon=”icon: plus” icon_color=”#45BF55 “]

  • Install in seconds with finger adjustable quick-release cam locks
  • Offset design
  • Offers better eye relief position
  • Works perfectly with both 30mm and 1inch main tube rifle scopes
  • Made from aircraft-grade aluminum alloy
  • Fits onto flattop Picatinny rail

[/su_list] [/su_column] [su_column size=”1/2″]

Cons

[su_list icon=”icon: minus” icon_color=”#e24941″]

  • Way to heavy

[/su_list][/su_column] [/su_row]

[su_button url=”https://www.amazon.com/dp/B006MYCIOE?tag=shootinggea0f-20&linkCode=osi&th=1&psc=1″ target=”blank” style=”default” background=”#0091cd” size=”8″ center=”yes” radius=”10″ icon=”icon: hand-o-right” rel=”nofollow”]Check Latest Price on Amazon.com![/su_button]

[su_spacer size=”40″]

9. Warne Scope Mounts XSKEL30TW

The Warne Scope Mounts is an excellent option for the price. All the Warne Scope Mounts are amazing in terms of price, strength, and performance.

This one is no exception. It is also machine precision from sintered steel. The product is made by using the highest quality materials with great care in the USA.

Durability will never be a problem. The Warne Scope Mount is made of top quality aluminum materials. It is durable but lightweight. You can use it without any problem.

There are 8 Torx style fasteners included with steel threaded inserts to prevent stripping. You will also get excellent eye relief and head positioning while using the scope mount.

The price is affordable, so as all the other features. It should not be missed from your hand. Hurry up. The stock is limited.

[su_row][su_column size=”1/2″]

Pros

[su_list icon=”icon: plus” icon_color=”#45BF55 “]

  • Strong construction with aluminum materials
  • Lightweight
  • Prevent stripping with 8 Torx
  • Offers excellent Eye Relief

[/su_list] [/su_column] [su_column size=”1/2″]

Cons

[su_list icon=”icon: minus” icon_color=”#e24941″]

  • A little pricey for the quality

[/su_list][/su_column] [/su_row]

[su_button url=”https://www.amazon.com/dp/B001BR4TJY?tag=shootinggea0f-20&linkCode=osi&th=1&psc=1″ target=”blank” style=”default” background=”#0091cd” size=”8″ center=”yes” radius=”10″ icon=”icon: hand-o-right” rel=”nofollow”]Check Latest Price on Amazon.com![/su_button]

[su_spacer size=”40″]

10. Leapers Accushot 1-Pc Mount

The Leapers Accushot 1-Pc Mount is the last entry in our list of best scope mounts article.

It is a single medium profile ring that fits in 3/8 dovetail 100mm base length four hex screws/ring secure the scope.

The first tape located inside the ring will keep your scope tight in the right place without excessive clamp pressure.

The built quality of the product is good with premium quality materials. The price of the product is also affordable.

Overall, the scope mount is excellent in every aspect. Hurry up; it is a highly popular product. The stock might end up soon. Don’t miss it!

[su_row][su_column size=”1/2″]

Pros

[su_list icon=”icon: plus” icon_color=”#45BF55 “]

  • Solid construction
  • Easy to use
  • Holds zero
  • Medium profile

[/su_list] [/su_column] [su_column size=”1/2″]

Cons

[su_list icon=”icon: minus” icon_color=”#e24941″]

  • Less durable compared to other products in the list

[/su_list][/su_column] [/su_row]

[su_button url=”https://www.amazon.com/dp/B001BR4TJY?tag=shootinggea0f-20&linkCode=osi&th=1&psc=1″ target=”blank” style=”default” background=”#0091cd” size=”8″ center=”yes” radius=”10″ icon=”icon: hand-o-right” rel=”nofollow”]Check Latest Price on Amazon.com![/su_button]

[su_spacer size=”40″]

Frequently asked questions

What is the purpose of a scope mount?
A: The purpose of a scope mount is to keep the scope in place and maintain its accuracy while shooting.

How to choose the right scope mount for my rifle?
A: To choose the right scope mount for your rifle, you need to consider the type of rifle, the type of scope, and the size of the scope. You can also consult a professional gunsmith for advice.

What are the types of scope mounts?
A: The types of scope mounts include Weaver, Picatinny, Dovetail, and Quick Detach (QD).

What is the difference between Weaver and Picatinny scope mounts?
A: Weaver scope mounts have a smaller rail than Picatinny scope mounts. Picatinny scope mounts have a standard size rail with evenly spaced slots.

What is the advantage of using a QD scope mount?
A: QD scope mounts allow the shooter to quickly remove and attach the scope without losing zero.

Can I use the same scope mount for different rifles?
A: It depends on the type of scope mount and the type of rifle. Some scope mounts are designed to fit multiple rifles, while others are specific to a certain type of rifle.

How do I install a scope mount on my rifle?
A: You need to follow the instructions provided with the scope mount and use the appropriate tools to install it correctly.

What is the best material for scope mounts?
A: The best material for scope mounts is aircraft-grade aluminum, as it is lightweight and durable.

Do I need to regularly maintain my scope mount?
A: Yes, you need to regularly clean and inspect your scope mount to ensure it remains secure and maintains its accuracy.

Final Words

You can see the quality of each of the products mentioned above is outstanding. All of them are made of top quality materials and an excellent performer. You can pick any one of them without any problem.

However, before shopping for the best scope mounts, you need to consider the following factors seriously. Otherwise, you won’t be able to grab the best one.

Pick the right size according to your needs. Too small scope mount dent and crush on the other hand too large ring fails to hold the scope in the right place. So, it is necessary to pick the correct size.

The second thing you need to consider is the height. For a smaller diameter object lens, a low profile scope ring is fair enough, and for a substantial 50mm objective lens scope, a high profile mount is needed. Decide between two-piece set and single-piece set. Two-piece versions offer flexibility while one-piece versions provide durability.

After considering all the factors, you can purchase the best scope mount without any problem. I hope you enjoyed our article. I tried to provide all the necessary information. If you still need to know something, please comment below and keep visiting our web blogs. I will see you soon with many more.

Read Next – Best Rifle Scope Under 500

How to Train a Hunting Dog: Beginner Field Guide

To train a hunting dog, build obedience first, then add field skills in small steps: recall, heel, sit or whoa, place, steadiness, retrieving, scent work, and calm exposure to hunting environments. A good hunting dog is not created by pressure alone; it is built through clear commands, consistency, safety, and trust.

This guide is for beginners who want a practical training roadmap. It does not replace a professional trainer, veterinarian, or experienced gun-dog mentor, especially if the dog shows fear, aggression, injury, or stress around field work.

Table of Contents
  1. Quick Answer
  2. Start With Foundation Obedience
  3. Match Training to the Dog’s Purpose
  4. Core Hunting Dog Field Skills
  5. Training Checklist
  6. Common Training Mistakes
  7. Simple Training Timeline
  8. Frequently Asked Questions
  9. Final Recommendation

Quick Answer

The best way to train a hunting dog is to teach reliable obedience first, then introduce hunting tasks one layer at a time. Start with recall, leash manners, steadiness, and calm handling. After that, add retrieving, scent work, water or cover exposure, and field drills that match the type of hunting the dog will actually do.

Start With Foundation Obedience

A hunting dog that cannot listen at home will not become reliable in a noisy field. Foundation work should include name recognition, recall, sit, stay, heel, place, crate comfort, and calm handling. Keep sessions short and end before the dog becomes frustrated.

Positive reinforcement is useful because it teaches the dog what behavior earns reward. Humane World has a helpful overview of positive reinforcement training. Hunting dogs still need boundaries, but fair training starts with clarity, timing, and consistency.

Recall Is Non-Negotiable

Recall should be practiced in low-distraction places before moving to fields, woods, water, or birds. Use a long line or check cord until the dog is reliable. Do not gamble with an off-leash dog around roads, livestock, other hunters, or unsafe terrain.

Match Training to the Dog’s Purpose

Not every hunting dog is trained for the same job. Retrievers, pointers, flushers, hounds, and versatile breeds use different instincts. A duck retriever needs steadiness and water work. A pointing dog needs bird contact and steadiness. A tracking dog needs nose work and patience.

Groups such as the North American Versatile Hunting Dog Association are useful for understanding versatile hunting-dog testing and training culture. Use breed purpose as a guide, but train the individual dog in front of you.

A good hunting dog plan starts with obedience, safety, field exposure, and gradual skill building.

Core Hunting Dog Field Skills

Steadiness

Steadiness means the dog can wait instead of breaking early. It protects the dog, prevents ruined hunts, and helps the handler stay in control. Practice steadiness with low excitement before adding bumpers, birds, water, or gunfire.

Retrieving

Retrieving starts with short, fun sessions. Teach the dog to go out, pick up, return directly, and deliver calmly. Avoid turning every session into a marathon; quality repetitions matter more than exhausting the dog.

Scent Work

Introduce scent work gradually with simple trails, bird wings where legal and appropriate, or controlled training setups. Let the dog learn how scent moves with wind and cover instead of rushing into advanced drills too soon.

Field Exposure

Field exposure should feel like education, not chaos. Walk the dog through light cover, short grass, different footing, shallow water edges, and quiet training areas before expecting polished work in a real hunt. Let the dog learn new surfaces, smells, and sounds in manageable pieces.

Keep early field sessions simple. A few calm retrieves, a short scent trail, or a clean recall from cover is better than a long session that ends with confusion. When the dog succeeds, stop and build from that success next time.

Gunfire and Field Noise

Do not surprise a young or unprepared dog with loud gunfire. Noise exposure should be slow, positive, and paired with confidence-building work. If a dog shows fear, stop and get help from an experienced trainer.

Training Checklist

  • Short daily obedience sessions.
  • Reliable recall on a long line before off-leash work.
  • Calm leash and crate habits.
  • Gradual exposure to fields, water, cover, decoys, and other dogs.
  • Simple retrieving or scent drills matched to the dog’s job.
  • Slow, careful noise conditioning.
  • Rest days, hydration, paw checks, and injury monitoring.

Common Training Mistakes

  • Skipping obedience and rushing straight to birds or bumpers.
  • Training too long after the dog loses focus.
  • Using harsh pressure when the dog does not understand the task.
  • Introducing gunfire too quickly.
  • Expecting one dog to excel at every hunting style.
  • Ignoring fitness, heat, cold, paw injuries, and hydration.

Simple Training Timeline

A young dog should begin with socialization, confidence, handling, and short obedience. As the dog matures, add longer recalls, steadiness, retrieving, scent games, and controlled field exposure. Advanced work should come only after the foundation is reliable.

Do not compare your dog to a finished field-trial dog or a polished guide dog. The right pace is the one where your dog stays confident, healthy, and clear about what you are asking.

The Handler Matters Too

Many hunting dog problems begin with unclear handling. Use the same command words, reward timing, hand signals, and release cues every time. If one family member allows jumping, another corrects it, and a third repeats commands five times, the dog learns noise instead of rules.

Train yourself to be calm and predictable. A dog working around birds, water, other dogs, or field noise will make mistakes. Correct the setup first, simplify the drill, and help the dog understand the job before adding more pressure.

Frequently Asked Questions

When should hunting dog training start?

Basic manners and confidence-building can start early, but advanced field work should wait until the dog is physically and mentally ready. Keep puppy sessions short and positive.

Can any dog become a hunting dog?

Any dog can learn obedience and field manners, but breed traits and individual temperament matter. Some dogs are naturally better suited to retrieving, pointing, flushing, tracking, or scent work.

How long should training sessions be?

Short sessions are usually better than long ones. Stop while the dog is still engaged, and repeat consistently instead of trying to fix everything in one day.

Should I use an e-collar?

An e-collar should never be used to teach a command the dog does not understand. If you use one, learn from a qualified trainer and treat it as a communication tool, not a shortcut or punishment device.

Final Recommendation

The best hunting dog training plan is patient, fair, and specific. Build obedience first, match drills to the dog’s hunting role, introduce field pressure gradually, and protect the dog’s confidence and health. A steady, safe, responsive dog is more valuable than a rushed dog with unfinished basics.

Exit mobile version