10 Must-Have Archery Accessories for Hunters

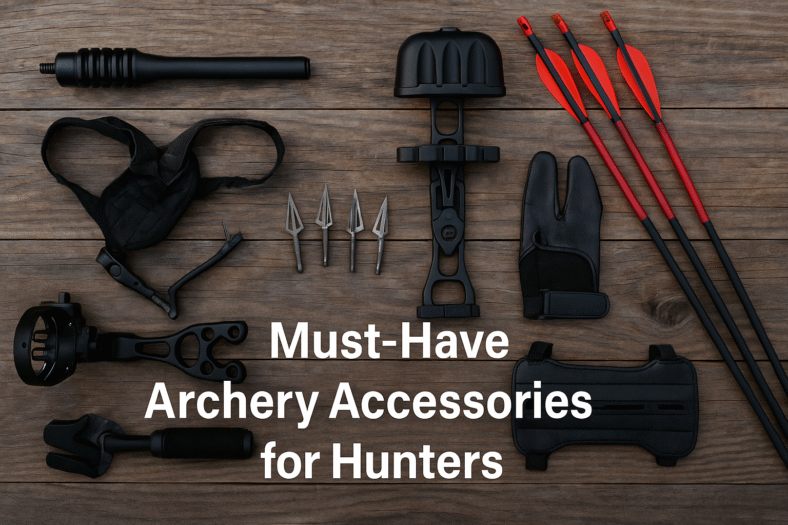
The most useful archery accessories for hunters are the items that help you shoot safely, keep arrows organized, protect broadheads, and solve small field problems before they become hunt-ending problems. You do not need every gadget in a catalog. You need a compact kit that supports your bow setup, your arrows, your local rules, and the way you actually hunt.

This checklist is written for bowhunters who want practical, field-ready accessories rather than hype. Start with safety and bow compatibility first, then add comfort and convenience items only when they earn space in your pack.

Table of contents

Quick Answer

A strong bowhunting accessory kit usually includes a quiver, rangefinder, release aid or finger tab, broadhead wrench, arrow puller, bow sling, small repair kit, arm guard, bow hanger or hook, and a compact field checklist. If you shoot traditional gear, swap the release aid for the tab or glove that matches your setup. If you hunt from a stand, prioritize safe storage, quiet handling, and a way to keep broadheads protected.

The best accessory is the one you have practiced with before the season opens. New gear should be tested at the range, from hunting positions, and with the exact arrows or broadheads you plan to carry.

10 Archery Accessories Worth Carrying

1. Quiet Quiver

A quiver keeps arrows protected, organized, and easy to reach. For hunting, the main priorities are secure arrow retention, broadhead coverage, quiet attachment, and a fit that does not change how the bow balances too much. Some hunters prefer a bow-mounted quiver for mobility, while stand hunters may remove the quiver once settled.

Check that the hood fully covers sharp broadheads and that arrows do not rattle while walking. A quiver that is loud, loose, or awkward will bother you more in the field than it did in the store.

2. Rangefinder

A rangefinder helps remove guessing from distance judgment. Bowhunting has less margin for range error than many rifle setups, so knowing the distance to lanes, trees, and likely shot windows can make your practice more honest. Range common landmarks before animals arrive, not while you are rushing.

For more detail on distance tools, see our guide to choosing a hunting rangefinder.

3. Release Aid, Finger Tab, Or Shooting Glove

Compound bowhunters commonly use a release aid. Traditional archers may use a finger tab or glove. The goal is consistency: the same anchor, the same trigger or finger pressure, and the same follow-through every time. Do not switch release style right before a hunt unless you have rebuilt your practice around it.

Carry a backup release if your hunt depends on one. A lost or broken release can end a hunt quickly if you have not practiced an alternative.

4. Broadhead Wrench

A broadhead wrench helps install or remove broadheads without putting fingers near sharp blades. It is a small item, but it supports one of the most important safety habits in bowhunting: handling broadheads with respect. Keep it in the same pocket as your spare blades or broadhead case so it is easy to find.

If you are comparing head styles, our types of arrowheads guide explains the basic differences without treating one design as perfect for every hunter.

5. Arrow Puller

An arrow puller saves your hands during practice and helps remove arrows more cleanly from dense targets. It is especially useful when you are shooting high-volume sessions or practicing with small-diameter shafts. Better practice habits lead to better field confidence, and this is one accessory that makes practice less frustrating.

6. Bow Sling

A bow sling helps secure the bow while walking, climbing, glassing, or using both hands for another task. Wrist slings can also help some shooters keep a relaxed bow hand during the shot. Pick the style based on how you hunt: a simple wrist sling for shooting form, or a shoulder/back sling for moving through terrain.

7. Small Bow Repair Kit

A compact repair kit can include Allen keys that match your bow, serving thread, wax, spare nocks, spare D-loop material if appropriate, and a small microfiber cloth. Keep it realistic. The field kit is for minor fixes and inspection, not for major tuning or unsafe repairs.

If a limb, cam, string, cable, or riser looks damaged, stop shooting and have the bow inspected by a qualified shop. Do not try to force a hunt with questionable equipment.

8. Arm Guard

An arm guard protects clothing and skin from string contact. It is useful for new archers, bulky cold-weather sleeves, and traditional setups where string path can be less forgiving. It also keeps sleeve fabric from interfering with the shot.

9. Bow Hanger Or Hook

A bow hanger or hook keeps the bow accessible in a stand or blind without laying it on the ground. The right setup should hold the bow securely, quietly, and within comfortable reach. Practice moving from rest to ready without scraping, clanking, or making a rushed movement.

10. Compact Field Checklist

A checklist is not exciting, but it prevents forgotten essentials. Use it before leaving home and again before walking in. Include license, tag, release or tab, rangefinder, arrows, broadhead wrench, light, knife, first-aid basics, water, and weather-specific clothing.

For a broader pack system, compare this list with our day hunting packing checklist.

How To Choose Archery Accessories

Choose accessories around your bow type, arrow setup, hunting method, and practice routine. A compound bowhunter in a tree stand may need different gear than a traditional archer still-hunting public land. The accessory should solve a real problem: safety, consistency, organization, quiet movement, or field readiness.

  • Compatibility: Make sure the accessory fits your bow, arrows, broadheads, and hunting style.
  • Noise: Test for rattles and contact points before the hunt.
  • Weight: Avoid adding items you will not use.
  • Practice value: Prioritize gear that helps you train more consistently.
  • Safety: Protect broadheads, keep arrows controlled, and avoid risky field repairs.

A Simple Bowhunting Packing System

Separate accessories into three groups: on-bow, on-body, and in-pack. On-bow items include the quiver, sight, rest, stabilizer, and sling if used. On-body items include release, rangefinder, tag, knife, and safety gear. In-pack items include repair kit, water, first-aid basics, spare layers, and the checklist.

This system makes it easier to find weak points. If a must-have item lives loose in a pocket, give it a dedicated pouch. If your pack is heavy with items you never touch, remove them before the next practice hike.

Safety And Legal Notes

Follow your state hunting regulations for legal equipment, season dates, tagging, blaze orange or pink rules where required, and broadhead requirements. Rules vary by location and can change. Bowhunter education resources such as Bowhunter Ed are useful for reviewing safety basics, responsible shot selection, and field conduct.

The Archery Trade Association is also a helpful industry resource for archery participation, safety culture, and equipment education. Use those broader resources alongside your bow manual and your local wildlife agency’s current regulations.

FAQ

What archery accessories should a beginner hunter buy first?

Start with a safe quiver, release aid or tab/glove, arm guard if needed, rangefinder, broadhead wrench, and a small repair kit. Add comfort items later after you know what your actual hunting setup needs.

Do bowhunters really need a rangefinder?

A rangefinder is not always legally required, but it is very useful because small distance errors matter in archery. If you carry one, practice ranging landmarks before an animal arrives.

Should I carry a backup release?

Compound bowhunters should strongly consider a backup release, especially on travel hunts. Make sure the backup is adjusted and practiced with before the season.

Can too many accessories hurt bowhunting performance?

Yes. Extra weight, noise, and complexity can hurt more than they help. Keep accessories that improve safety, consistency, organization, or readiness, and remove items you never use.

Final Takeaway

The best archery accessories for hunters are practical, quiet, safe, and practiced with before the hunt. Build your kit around a secure quiver, reliable distance checking, consistent release method, broadhead safety, basic repair capability, and a simple checklist. That gives you a cleaner setup and fewer surprises in the field.

Best Shotgun Chokes for Goose and Duck Hunting

Waterfowl hunting is addictive – when flock after flock of geese and ducks swing down into the spread and you feel feathers raining through the barrel, you can’t help but smile. Those euphoric moments don’t come by accident; they are built on countless hours scouting, tuning decoys, perfecting calling and making sure that your shotgun delivers dense, even patterns. Shotgun barrels come from the factory with various degrees of constriction, but what turns a good gun into a great waterfowling tool is the choke.

A choke is a taper at the muzzle end of a shotgun barrel designed to control the spread of the shot column. Without a choke, pellets spread rapidly and can be ineffective beyond twenty yards. With a properly chosen choke, your shot stays together longer, creating dense patterns that retain the energy needed to penetrate the thick down and feathers of geese and ducks.

The right choke depends on the species you are hunting, the distance at which birds will be taken, the type of shotshells you use and your personal shooting style. This guide explains how chokes work, what factors influence your choice and which constrictions and aftermarket tubes are the best for goose and duck hunting.

Chokes work by restricting the diameter of the bore near the muzzle. As the shot column exits the constricted section, pellets are squeezed together and leave the barrel in a tighter group. Different choke designations correspond to specific reductions in bore diameter and produce predictable patterns at standardized distances. While there are minor variations between manufacturers, the common chokes for waterfowl are:

  • Cylinder (no constriction) – The internal diameter is the same as the barrel. Patterns are open and ideal for extremely close shots and buckshot.
  • Improved Cylinder – Constriction of about 0.010 inches. An improved cylinder places roughly 55 percent of pellets in a 30-inch circle at 40 yards. It is ideal for decoying ducks and geese at 20–35 yards because it spreads shot evenly without shredding birds.
  • Modified – Constriction of about 0.020 inches. A modified choke yields around 60 percent of pellets in a 30-inch circle at 40 yards, making it a favourite general-purpose waterfowling choke. Modified works well for mixed flocks and pass-shooting within 40 yards.
  • Improved Modified and Full – Constrictions of 0.025 inches and 0.035 inches respectively. A full choke produces a dense 80–85 percent pattern at 40 yards. These chokes are best for long-range pass-shooting or large geese over 45 yards but can be too tight at closer ranges.
  • Extra‑Full and Turkey – Constrictions of 0.040 inches or more. They deliver extremely tight patterns for turkey hunting but risk blowing patterns with steel shot and can damage barrels with large pellets.

Chokes are available as smooth, ported or extended tubes. Ported chokes have slots to vent gases in hopes of reducing recoil and muzzle rise. However, field testing shows that ported tubes do not noticeably reduce recoil, pattern worse and quickly accumulate fouling. Smooth extended tubes tend to pattern consistently and are easier to clean, making them the more practical choice for waterfowl.

Species and size of the target – Mallards and teal are smaller, while Canada geese and snow geese require more penetration. It takes about 90 steel pellets inside a 30-inch circle to cleanly kill large ducks. Bigger birds like geese require even higher pellet counts or denser shot such as bismuth or tungsten.

Distance and decoy placement – Birds over decoys are usually shot at 20–35 yards, making improved cylinder or light modified chokes ideal. Pass-shooting birds crossing at 40–50 yards benefits from modified or improved modified chokes. Over-choking for close birds can tear them to pieces, as noted by hunters who accidentally used long-range chokes on teal.

Pellet material and shot size – Steel is less dense than lead or bismuth; it loses energy faster, so patterns open up quickly. To maintain lethality with steel, waterfowl hunters use larger shot sizes and heavier charges. Bismuth and tungsten retain energy better and allow the use of tighter chokes without pellet deformation.

Your shotgun and ammunition – Every barrel, choke and load combination produces unique patterns. Bore diameter variation means that one factory tube may pattern poorly while an aftermarket tube excels. Patterning your shotgun is essential.

Your shooting ability – Inexperienced hunters benefit from forgiving, slightly open patterns because they still hit vital areas if the bird is not centered. Advanced hunters may opt for tighter chokes to maximize pellet counts on long-range birds.Factors that influence the best choke choice

Patterning your shotgun – why it matters

Patterning a shotgun means testing how your gun, choke and ammunition combination throw their pellets at a realistic hunting distance. The classic method involves standing 35–40 yards from a large sheet of paper and firing the load you plan to use during the season. After the shot, draw a 30‑inch circle around the densest part of the pattern. Count the pellet holes within the circle to see how much of the payload stayed in the effective zone. Repeat with several shots to eliminate flyers and count the average pellet strikes.

A well‑balanced pattern at the intended distance should be dense enough to put multiple pellets into a goose or duck’s vitals but open enough to offer margin for error on crossing birds. Full chokes typically put 80–85 percent of pellets inside a 30‑inch circle at 40 yards, while modified chokes average around 60 percent and an improved‑cylinder throws about 55 percent. When shooting decoying birds over water at 20–30 yards, a modified or improved‑cylinder pattern is often more forgiving than a super‑tight full choke.

Counting pellets also shows whether your load has the payload to cleanly kill birds. Outdoor testers note that a steel load needs roughly 90 pellets in a 30‑inch circle at your chosen range to reliably put several hits into a large duck. Larger birds like Canada geese may require even denser patterns or larger shot sizes. If the pattern is too thin with your chosen load, try a different shot size or material, such as bismuth or tungsten, which have higher density and carry energy better.

Don’t stop at one load. Pattern at least two different brands and shot sizes because each gun and choke combination behaves differently. Also note that wind, temperature and choke cleanliness all influence patterns. Shoot on a calm day, clean your choke tube after a few rounds and aim at the same point each time to get consistent results.

Aftermarket vs factory chokes – do premium tubes matter?

Factory choke tubes that come with your shotgun are designed to provide safe, generic performance across a wide range of loads. They do a decent job, but tolerances can vary from one barrel to the next. A tube marked “modified” might throw a surprisingly tight pattern from one gun and a loose pattern from another because of slight differences in bore diameter.

Aftermarket tubes are machined to precise dimensions and often have extended bodies and internal geometry designed to coax a more even, denser pattern. Many feature knurled ends for easy installation and removal. Hunters who test several brands often find that a quality aftermarket tube will tighten up loose factory patterns or smooth out hot cores. Don’t assume that you need the tightest constriction available; choose a tube that patterns evenly with your preferred load at the ranges you hunt.

Porting – holes drilled in the tube just ahead of the muzzle – is marketed as a way to reduce recoil and muzzle jump. Independent tests show that any recoil reduction is minimal and the gases vented through the ports can disrupt shot strings. Some shooters report that ported tubes produce uneven patterns and quickly become fouled with plastic wad residue. A smooth, non‑ported tube is generally easier to clean and patterns just as well or better.

Examples of proven aftermarket options include the Muller Decoy choke, which keeps about eighty‑five percent of its pellets in the kill zone at 30 yards with steel or bismuth ammunition; the Carlson’s Cremator series, an affordable line that produces roughly seventy percent patterns at 30 and 50 yards; and the Patternmaster Code Black tube, which delivers some of the tightest waterfowl patterns on the market and excels at longer ranges. The Code Black is so tight that inexperienced hunters may struggle to make clean hits at close distances, so reserve it for pass‑shooting geese or long‑range decoy spreads. Always match the choke to your load; trying to force large steel pellets through an ultra‑tight tube can blow patterns or even bulge a thin‑walled barrel.

Best chokes for duck hunting

Ducks over decoys are usually shot at moderate ranges, so a forgiving constriction is desirable. An improved‑cylinder choke reduces the bore by about one hundredth of an inch and delivers roughly fifty‑five percent of the payload inside a 30‑inch circle at 40 yards. That modest restriction produces open, uniform patterns that allow a slight margin of error on fast teal and wigeon without tearing the breast meat of closer mallards. The improved‑cylinder is also approved for use with all steel, bismuth and tungsten loads.

Hunters who want a bit more reach can step up to a light modified or modified choke. A light modified splits the difference between improved‑cylinder and modified and is effective from the decoys out to about 40‑45 yards. Field testers report that a light modified tube like the Rob Roberts T2 puts pellets into teal at 12 yards without shredding them but still drops birds cleanly at 40 yards. A standard modified will tighten patterns further and is ideal for large ducks or mixed duck‑goose spreads where shots might extend past the decoy line.

Avoid extremely tight long‑range chokes for close‑in ducks. Full and extra‑full constrictions concentrate most of the pellets into a very small core; when the bird is only 20 yards away the pattern may be smaller than the bird, resulting in torn meat and destroyed wings. Worse, an over‑choked barrel can blow the pattern apart when shooting larger steel pellets or high‑velocity loads.

As mentioned above, the Muller Decoy choke is a top performer for mallards and puddle ducks, throwing an 85 percent pattern at 30 yards with common steel or bismuth ammunition. It provides a balance of pattern density and forgiveness that many waterfowlers enjoy. Carlson’s Cremator mid‑range tubes offer similar performance at a lower price point and work well for both small ponds and bigger open water. Whichever choke you choose, pair it with a No. 2 or No. 3 steel load and verify that you have at least 90 pellet impacts inside your circle at your expected range. If not, try a different brand, a different shot size or a denser material like bismuth.

Best chokes for goose hunting

Canada and snow geese are larger and tougher than puddle ducks. They have thick down, big bones and longer wingspans, which means pellets must retain enough energy to penetrate vital organs. For birds over decoys at 20‑35 yards, an improved‑cylinder or light modified choke paired with BB or No.¡2 steel works well and provides a forgiving pattern for flock shooting. As the season progresses and shots get longer, many hunters move up to a modified choke to keep the pattern dense enough out to 40 yards.

Just as with ducks, over‑choking geese can be counterproductive. Pass‑shooting geese at extreme range is tempting, but a pattern that is too tight may blow apart or leave too few hits if the bird is even slightly off centre. A light modified or modified tube will usually deliver plenty of pellets to the head and neck without shredding birds at the edge of the decoy spread. Remember that geese are often moving when you pull the trigger, so a slightly open pattern gives you some buffer for lead errors.

Hunters who target specklebellies or giant Canadas at longer ranges often turn to specialized aftermarket tubes. The Patternmaster Code Black Goose and similar extended tubes are designed to grab the wad and shorten the shot string, placing an elongated swarm of pellets on the bird at 40‑45 yards. Jebs High Voltage chokes and Mojo Fatal Shot tubes also pattern very evenly with large steel or bismuth pellets. These extended chokes can push patterns farther downrange, but they still need to be matched with the right load and carefully patterned. Heavy‑density shot materials like bismuth, tungsten or Hevi‑X retain more energy and allow you to use slightly more open constrictions without sacrificing penetration.

When in doubt, start with the choke that came with your gun and a mid‑sized steel load, then experiment. Most hunters will never need a super‑tight goose choke. A well‑placed modified or light modified shot with quality ammunition will consistently bring down honkers within 40 yards while leaving plenty of edible meat.

Choosing the right loads and shot materials

Pellet material has a profound impact on lethality because the density of the metal determines how far a pellet penetrates. Steel is the most common material for modern waterfowl loads because it is non‑toxic and affordable, but it is about 35 percent less dense than lead and sheds velocity quickly. To maintain lethality with steel, waterfowl hunters use larger shot sizes and heavier payloads. Bismuth is about 86 percent as dense as lead and patterns similarly; it is soft enough to use in older shotguns and retains energy better than steel, allowing you to drop down a shot size. Tungsten‑based composites are heavier than lead and deliver tremendous energy; a tungsten alloy pellet retains energy farther downrange and penetrates through feathers and bone with authority. The trade‑off is cost, as tungsten loads are significantly more expensive.

Selecting the right shot size is equally important. For decoying ducks, a No. 2 or No. 3 steel pellet strikes a good balance between pellet count and energy. Smaller teal or wood ducks can be cleanly taken with No. 4 steel or No. 5 bismuth. Geese demand larger pellets to carry energy through thick plumage; most hunters choose BB, BBB or even T shot in steel and size 1 or 2 in bismuth. As shot size increases, pellet count decreases, so patterning becomes even more critical to ensure you still have enough pellet strikes on target.

Velocity and payload also influence patterns. High‑velocity loads generate more recoil and can sometimes spread patterns faster, while slower loads may produce denser cores. A 3 inch shell stuffed with 1 1/4 ounces of steel No. 2 shot might throw a beautiful pattern through your modified tube, while a 1 oz load at 1,600 fps might blow the pattern open. Test both heavy and light loads to see which your gun and choke prefer. Some hunters find that a lower‑recoil 1 oz bismuth load patterns better than a magnum 1 oz steel load and still delivers enough energy for puddle ducks.

Finally, consider your personal tolerance for recoil and the ethics of long‑range shooting. Bigger pellets and heavier charges kick more and may slow your follow‑up shot. Denser materials like bismuth and tungsten cost more per round, but they allow you to use a more open choke and take ethical shots without pounding your shoulder. Choose a load that you can afford to practice with and that patterns well through your chosen tube at your hunting distance.

Field tips for consistent kills

Patterning is only part of the equation – you also have to put the pellets where they belong. Spend time at the range mounting your shotgun, swinging through on crossing targets and practicing follow‑through so you don’t stop the gun as you pull the trigger. Many sporting clays courses offer teal and overhead shots that mimic waterfowl; these are excellent for learning how much lead to give a bird at 25, 35 and 45 yards.

Estimate range accurately in the field. Place a decoy or mark at 30 yards when you set your spread; if birds flare outside that marker, hold fire. Some hunters pace off the distance from the blind to the farthest decoy so they know their maximum range. Shooting birds beyond the effective range of your choke and load often results in cripples that escape or require long, difficult retrieves.

Shot placement matters more than pattern diameter. Waterfowl are best killed by breaking the neck or spine or hitting the head. Swing slightly ahead of the bird, keep the gun moving and squeeze the trigger as the muzzle passes the beak. For crossing shots, maintain a smooth follow‑through; for incoming or overhead birds, place the bead just below the head so that the pattern climbs into the neck. Resist the temptation to “poke” at the bird, which stops the swing and causes you to shoot behind.

Finally, hunt ethically and within your abilities. Use decoys, calls and concealment to bring birds into your effective range rather than sky‑busting at specks on the horizon. Practice calling and decoy placement so you can finish birds over the spread. You will enjoy more clean kills, fewer cripples and a better hunting experience when you let the birds work, pattern your gear and shoot only when everything comes together.

Conclusion

After digesting all the information above, the key takeaway is that there is no single “magic” choke that The improved cylinder overview linked here—will get you on the right track. However, patterning your shotgun with the loads you plan to use remains essential because every gun and shell combination is unique. For larger geese or longer shots, you might consider extended aftermarket tubes.

Models like the Patternmaster Code Black Goose, Jebs High Voltage and Mojo Fatal Shot were designed for dense patterns at 40–50 yards and beyond. But even with these specialized chokes, resist the urge to over constrict. Excessively tight tubes paired with large shot can blow patterns, increase recoil and damage barrels. Patterning proves whether a long‑range tube really improves your setup or not. Ultimately, selecting the best choke for goose and duck hunting comes down to matching constriction with your typical shooting distance, the size of the birds and your chosen ammunition.

Testing improved cylinder and light modified tubes with different steel, bismuth or tungsten loads will reveal the combination that delivers even, lethal patterns on paper. Once you have that baseline, practice estimating ranges in the field, swing smoothly through targets and let birds work into your effective zone. An ethical, patient approach grounded in patterning and practice will result in more clean kills and a more rewarding season.

A good starting point for most waterfowlers is an improved cylinder or light modified tube; these constrictions throw dense yet forgiving patterns that will cleanly take mallards and teal over decoys at 20–35 yards. A stock or aftermarket improved cylinder tube that reduces the bore by about 0.010 inches and patterns roughly 55 percent of pellets in a 30‑inch circle—as explained in this detailed guide on improved cylinder chokes—works very well.

For additional perspective on why light modified tubes are such versatile performers for ducks and geese, read this Field & Stream discussion. It reiterates that these mid-range chokes keep patterns forgiving at close range yet lethal out to 40–45 yards — perfect for mixed flocks over decoys.

Duck Hunting Gear Checklist: Must-Have Items for Every Season


A complete duck hunting gear checklist starts with safety and legal compliance, then covers waders and layered clothing for cold and wet conditions, the right shotgun loaded with non-toxic shot, decoys and calls, a blind or concealment, and the small items that make a long sit bearable. The single most important rule is that waterfowl hunting requires federally approved non-toxic shot and a current federal duck stamp, so confirm both before you load a shell. Use the list below to pack by category, then adjust for the season and the water you hunt.

Table of contents

Before any gear talk, settle the safety and legal items, because waterfowl hunting is regulated at both the federal and state level and takes place in cold, wet, often dark conditions. Get these right and the rest of the list is just comfort and efficiency.

  • Valid state hunting license and any required state waterfowl or migratory bird permit.
  • A current federal duck stamp, required for hunters 16 and older, available through the U.S. Fish and Wildlife Service migratory bird program.
  • Harvest Information Program (HIP) registration where your state requires it.
  • Eye and ear protection appropriate for shooting.
  • A U.S. Coast Guard approved personal flotation device for every person when hunting from or near a boat.
  • A charged phone in a waterproof case, plus a whistle and a small first aid kit.
  • A plan left with someone on shore: where you are hunting and when you expect to return.

Bag limits, legal shooting hours, season dates, and species restrictions change every year and vary by flyway and state. Confirm the current federal framework and your state regulations before each season, and treat this article as general guidance, not legal advice. The four standard rules of firearm safety from the National Shooting Sports Foundation apply fully in a blind, where crowded seating and excitement can lead to unsafe muzzle direction.

Shotgun and non-toxic shot

Waterfowl hunting requires federally approved non-toxic shot, so lead shot is not legal for ducks and geese anywhere in the United States. Match your shotgun, choke, and load to the birds and the range you expect.

The shotgun and choke

Most duck hunters use a 12 gauge for its load options, though 20 gauge works well for close decoy work. A pump or semi-automatic action handles the dirt, mud, and water of a marsh better than many other designs. Carry a couple of choke tubes so you can open up for close decoying birds or tighten for pass shooting. Keep the action clean and lightly lubricated, and protect it from grit between hunts.

Choosing non-toxic shot

Steel is the most common and affordable non-toxic option, and other approved materials such as bismuth and tungsten alloys are also legal. Because steel is lighter than lead, many hunters step up one or two shot sizes compared with old lead recommendations. Confirm the current list of approved non-toxic shot types and any local restrictions with the U.S. Fish and Wildlife Service and your state agency, since the approved list and field rules are set by regulation.

Clothing and cold-water safety

Dress in layers for cold, wet conditions and treat cold water as a genuine hazard, not a discomfort. Hypothermia and cold-water immersion are the real dangers of late-season waterfowling.

  • Insulated, properly fitted chest waders with a belt cinched at the waist to limit water entry if you fall.
  • A moisture-wicking base layer, an insulating mid layer, and a waterproof, windproof outer layer in a marsh or camo pattern.
  • Warm, waterproof gloves plus a spare dry pair, and a warm hat.
  • Hand and toe warmers for late-season sits.
  • A change of dry clothes left in the vehicle.

A safety note on waders: if you go into deep water, waders can fill and make swimming difficult, which is one reason a wading belt and a flotation device matter so much. Know the depth and bottom of the water you wade, move slowly, and use a wading staff in unfamiliar marsh or current.

Boat and blind safety

If you hunt from a boat, treat boating safety as seriously as firearm safety, because cold-water boating accidents are a leading cause of waterfowl hunting fatalities. Most incidents involve overloading, standing to shoot, or not wearing a flotation device.

  • Wear a Coast Guard approved life jacket while underway, and ideally while hunting in deep or cold water.
  • Do not overload the boat with hunters, dogs, decoys, and gear; respect the rated capacity.
  • Keep weight low and distributed, and never stand to shoot from a small boat.
  • Unload and case firearms while running the boat, and load only after you are set in position.
  • Carry a bailing device, a paddle, navigation lights for low-light runs, and a means to signal for help.

For a fixed or layout blind, make sure everyone knows their assigned shooting zone before birds arrive. Clear, pre-agreed zones keep muzzles pointed safely and prevent the swing-through-the-line problem that causes blind accidents.

Decoys, calls, and concealment

Decoys, calls, and good concealment are what bring birds into range, and they scale with the water and the hunt. Start simple and add as you learn the spot.

Decoys

A workable spread can be a dozen mallard decoys for small water, scaling up for big open water or late-season pressured birds. Carry extra decoy line and weights, a decoy bag, and consider a jerk cord or motion decoy where legal in your state. Match species and confidence decoys to the birds you expect.

Calls and concealment

A basic mallard call and, where appropriate, a whistle for teal or pintail will cover most situations; learn a few clean sounds rather than many sloppy ones. For concealment, carry blind material, natural vegetation that matches the area, a face mask or paint, and gloves so bare skin does not flare birds. A layout blind or a brushed-in boat blind extends where you can hunt.

Dog and retrieve basics

If you hunt with a retrieving dog, pack for the dog’s safety and recovery just as you do for yourself, and have a backup plan for retrieving birds without a dog. A good dog recovers downed birds, including cripples that would otherwise be lost.

  • A neoprene vest for the dog in cold water, which adds warmth and buoyancy.
  • Fresh water and a bowl for the dog, plus high-energy food for long days.
  • A dog stand or platform to keep the dog out of cold water between retrieves.
  • A basic canine first aid kit and knowledge of the nearest vet.
  • A way to recover birds without a dog: a long-handled net, a retrieving dummy on a line, or wadeable access, so cripples are not lost.

Recovering every downed bird is part of ethical hunting. Mark falls carefully, follow up on cripples promptly, and do not take low-percentage shots that lead to lost birds.

Seasonal adjustments

The core checklist stays the same all season, but early-season and late-season hunts call for different emphasis. Adjust clothing, decoy strategy, and water access to the conditions.

Early season

Early-season hunts can be warm and buggy. Favor lighter, breathable layers and uninsulated or lightweight waders, add insect protection, and plan for shade and hydration. Birds are often less pressured, so smaller spreads and simpler calling can work.

Late season

Late-season hunts bring cold, ice, and higher cold-water risk. Switch to insulated waders and heavier layers, carry hand and toe warmers, and add ice-fishing-style tools to open or maintain holes where legal. Pressured birds may demand larger or more realistic spreads and lighter calling. Cold-water safety becomes the top priority.

Frequently asked questions

What do I legally need to hunt ducks?

You generally need a state hunting license, a current federal duck stamp if you are 16 or older, HIP registration where required, and you must use approved non-toxic shot. Confirm the exact requirements and season dates with the U.S. Fish and Wildlife Service and your state wildlife agency each year.

Why can’t I use lead shot for ducks?

Federal regulations require non-toxic shot for waterfowl because spent lead pellets can poison birds and wildlife. Steel, bismuth, and approved tungsten alloys are legal alternatives. Check the current approved list with the U.S. Fish and Wildlife Service.

What is the most important safety item for duck hunting?

For boat and deep-water hunts, a Coast Guard approved life jacket is the most important item, because cold-water immersion is a leading cause of waterfowl hunting deaths. A wading belt on your waders is a close second.

How many duck decoys do I need?

It depends on the water. A dozen can be plenty on small ponds or timber, while big open water or pressured late-season birds may call for larger spreads. Start small, watch how birds respond, and adjust.

Final takeaway

Pack the legal and safety items first: license, duck stamp, non-toxic shot, eye and ear protection, and a life jacket for any boat hunt. Build out from there with waders and layers, a reliable shotgun and chokes, a sensible decoy spread, concealment, and dog or retrieve gear, then fine-tune by season. Confirm current season dates, bag limits, and shot rules with the U.S. Fish and Wildlife Service and your state agency before each hunt, and let safety, legal compliance, and clean recovery guide every trip.

Public Land Deer Hunting Guide: Scouting, Access, Pressure, and Safety

Public land deer hunting can be one of the most rewarding ways to hunt because access is open, the ground is shared, and success depends on preparation more than permission. It can also be frustrating if you treat public land like private land. The best public-land hunters scout more, walk farther when needed, study pressure, follow regulations closely, and keep backup plans ready.

The short version: find legal hunting land, confirm the rules for that exact property, scout deer sign and hunter access points, choose stand locations based on wind and pressure, and hunt with a safety-first plan. Public land is not about secret tricks. It is about doing the basics carefully in places where other hunters may be doing the obvious things.

Table of contents

Quick Answer

To hunt public-land deer well, start by confirming that the property is open to deer hunting during your season. Then identify access points, parking areas, terrain funnels, bedding cover, food sources, water, and escape routes. Scout more than one area so you are not locked into one spot when wind, pressure, or other hunters change the plan.

A good public-land setup usually balances deer movement with low human pressure. The easiest trail from the parking lot is rarely the best spot. Look for overlooked pockets, hard-to-reach edges, thick cover near food, terrain breaks, creek crossings, saddles, benches, and downwind access routes that let you enter without alerting deer.

What Public Land Means

Public land includes property owned or managed by federal, state, county, or local agencies. Some land is open to hunting with a normal state license. Other land may require a special permit, lottery draw, refuge-specific rules, check-in process, weapon restriction, or seasonal closure. Never assume that one public property has the same rules as another.

Common Public-Land Types

Hunters may encounter national forests, Bureau of Land Management land, wildlife management areas, state forests, state game lands, waterfowl production areas, national wildlife refuges, and county or municipal properties. The Bureau of Land Management hunting page and U.S. Forest Service hunting guidance are useful starting points for understanding federal-land access, but your state wildlife agency rules still control seasons, tags, and legal methods.

Why Public Land Hunts Differ

Public land adds one variable private-land hunters may not face as often: other people. Deer react to pressure from parking areas, trails, roads, food plots, popular ridges, and obvious stand trees. That does not mean you must always hike miles. Sometimes the best spot is an overlooked corner close to access that most hunters walk past. The key is to understand how people move and how deer avoid them.

Rules, Access, and Permits

Before scouting, verify the rules for the exact property. Check the state hunting regulation booklet, agency map, property signboard, and any special area page. Pay attention to open dates, weapon restrictions, blaze-orange rules, antler rules, check-in requirements, baiting rules, stand placement rules, camping restrictions, motorized access, and whether the property allows Sunday hunting if that matters in your state.

Confirm Boundaries

Public-land boundaries can be confusing, especially near private parcels, timber leases, utility corridors, and water access. Use official maps whenever possible, and cross-check with current property signs. Mapping apps are helpful, but they should not replace agency rules or posted boundaries. If a boundary is unclear, treat it conservatively until you can verify it.

Have Backup Properties

Public areas can fill quickly on opening weekend, during the rut, or after a fresh cold front. Build a list of backup locations before the season. A simple three-level plan works well: primary property, nearby backup property, and small overlooked property for crowded days. For broader trip planning, see our guide to hunting trip planning for beginners.

Digital Scouting

Digital scouting helps you eliminate poor spots before spending time in the woods. Start with access points, parking lots, roads, trails, creeks, ridges, field edges, recent timber cuts, bedding cover, and terrain funnels. Mark several potential stand locations, then study wind direction and entry routes before visiting.

Look for Terrain That Guides Movement

Deer often use terrain that offers security and efficient travel. Saddles, benches, creek crossings, inside corners, ridge points, drainage heads, and narrow strips of cover can all concentrate movement. On flat public land, focus more on vegetation edges, bedding cover, food transitions, water, and subtle elevation changes.

Map Hunter Pressure Too

Mark likely human routes just like you mark deer routes. Parking lots, easy trails, obvious field corners, old logging roads, and scenic overlooks can all collect pressure. Deer may shift to thicker cover, steeper terrain, or odd travel routes after pressure increases. This is where public-land scouting becomes a businesslike process: predict where people go, then predict how deer adjust.

Boots-On-Ground Scouting

Digital maps are only the first pass. Walk the property when legal and appropriate, ideally outside peak hunting hours or during the off-season. Confirm whether the promising map spot actually has deer sign, safe shooting lanes, legal access, and a realistic route in and out.

Scout Entry and Exit Routes

A stand location is only useful if you can reach it without ruining it. Look for quiet entry routes that use terrain, wind, water, or cover to hide your approach. A great-looking spot that requires walking through bedding cover every morning may educate deer before you ever climb into position.

Keep Notes

Track what you see: rubs, scrapes, trails, beds, droppings, tracks, acorns, browse, food sources, water, hunter sign, and wind behavior. Photos and short notes can save time later. If you keep a hunting journal, record the date, weather, wind, pressure, and deer movement so patterns become easier to see over multiple trips.

Deer Sign to Prioritize

Not all deer sign deserves the same attention. A huge rub beside a popular trail may be less useful than a faint trail between bedding cover and a secluded food source. Focus on sign that matches current season, fresh use, and huntable wind.

Fresh Tracks and Trails

Fresh tracks in mud, snow, or soft soil can tell you recent travel direction and size range. Trails are useful when they connect bedding, food, water, or terrain features. On pressured land, the best trail may be less obvious and closer to thick cover than the wide trail everyone notices.

Rubs, Scrapes, Food, and Bedding

Rubs and scrapes can help during pre-rut and rut, but they should be read with context. Food and bedding often matter more across the full season. Acorns, crop edges, browse, clear-cuts, and late-season food sources can shift deer movement quickly. During the rut, combine sign with terrain and doe movement; our article on hunting the rut covers that seasonal shift in more detail.

How to Hunt Around Pressure

Public-land pressure is not always bad. Other hunters can push deer into secure cover, secondary trails, and overlooked pockets. The mistake is pretending pressure does not exist. Pay attention to where trucks park, where boot tracks go, where stands appear, and when people enter or leave.

Hunt Overlooked Places

Small parcels, noisy access points, awkward corners, steep slopes, wet crossings, thick cover, and spots close to roads can all be overlooked. Many hunters assume they must hike far. Sometimes that is true. Other times, the best deer movement is in a place people dismiss because it does not look perfect on a map.

Adjust Timing

Pressure often changes deer movement after opening morning. Midday sits can be valuable when other hunters leave the woods. Evening hunts can work near food or transition cover if your exit route is clean. During the rut, all-day sits near funnels, doe bedding edges, and downwind travel routes may be worth the patience.

Stand and Ground Setup

Choose a setup that matches the property rules and your safety plan. Some areas allow portable tree stands, saddle setups, or ground blinds. Others restrict screw-in steps, cutting lanes, leaving stands overnight, or marking trees. Read the rules first, then keep your setup simple and mobile.

Tree Stand and Saddle Safety

If you hunt elevated, use a full-body harness and follow the stand manufacturer’s instructions. Inspect straps, platforms, ropes, and steps before each hunt. Public-land trees may look suitable from the ground but be unsafe when you climb. Dead trees, loose bark, hidden rot, and poor angles are not worth the risk.

Ground Setups

Ground setups can be very effective on public land because they are quiet, flexible, and less gear-heavy. Use natural cover, stay downwind, break up your outline, and clear only what is legal and necessary. A small stool or pad can make long sits more realistic. For ethics and shot discipline, review our guide to ethical hunting practices.

Public-Land Deer Hunting Gear

Public-land gear should help you move quietly, stay safe, and adapt. You do not need the most expensive setup, but you do need reliable basics: license and permits, legal weapon, safety harness if elevated, navigation, headlamp, knife, first-aid basics, water, weather-appropriate clothing, rangefinder if useful, drag or pack-out plan, and a way to contact help.

Pack Light but Complete

Heavy packs slow you down and make noise. Too little gear creates safety problems. Build your pack around the hunt length, weather, distance from the truck, and recovery plan. If you are new, our beginner outdoor shooting range equipment guide can help with basic safety gear habits, though hunting adds navigation, weather, and recovery needs.

Plan for Recovery

Before the shot, think through what happens after the shot. Know your tracking plan, tagging rules, local reporting requirements, and how you will move the deer legally and safely. In warm weather, recovery speed and meat care matter. In remote spots, a pack-out plan may be better than dragging over rough ground.

Safety and Ethics

Public land requires extra awareness because other hunters, hikers, dog walkers, horseback riders, or land managers may be present. Identify your target and what is beyond it. Wear required blaze orange. Avoid unsafe shot angles, skyline shots, and shots toward trails, roads, buildings, or unknown movement.

Respect Other Users

If another hunter is already set up, give space. Do not walk through someone’s active setup if you can reasonably avoid it. If a parking area is full, use a backup plan instead of forcing the same spot. Public land belongs to everyone, and the best hunters protect that access through good behavior.

Leave the Land Better

Pack out trash, follow stand removal rules, avoid unnecessary cutting, and report major violations through proper channels. Ethical public-land hunting protects future opportunity. The goal is not just to fill a tag; it is to keep public access respected and sustainable.

FAQ

Is public-land deer hunting harder than private-land hunting?

Public-land deer hunting can be harder because access is shared and deer may react to more human pressure. It can also be very productive if you scout well, understand pressure, and build multiple backup plans.

How far should I walk on public land?

Walk as far as the sign and pressure tell you to walk. Some good spots are deep. Others are overlooked pockets near access. Distance alone does not make a spot good; deer sign, wind, safety, and pressure matter more.

Can I leave a tree stand on public land?

It depends on the property rules. Some public lands allow stands to be left for a limited time with owner identification. Others require removal each day or prohibit certain equipment. Always check the exact agency rules before leaving gear.

What is the best time to hunt public land?

Opening days, cold fronts, rut periods, and late-season food patterns can all be productive. Midday can also be useful on pressured public land because other hunters may move deer when they enter or leave.

Do I need special permits for public-land deer hunting?

Sometimes. A normal hunting license may be enough on some properties, while refuges, military lands, quota hunts, and certain state areas may require special permits, drawings, or check-in steps. Verify before you hunt.

Final Thoughts

Public land deer hunting rewards hunters who prepare carefully and adapt without cutting corners. Confirm the rules, scout both deer movement and human pressure, choose safe setups, and keep backup plans ready. When you treat public land with respect and hunt it with patience, it can become one of the most valuable hunting opportunities available.

10 Best Hunting Backpacks for 2025 – Buying Guide and Reviews

Few pieces of gear matter more on a hunt than the pack on your back. A good pack carries everything needed for success optics, calls, game bags, water, and layers while keeping you balanced and comfortable for miles.

As more companies cater to backcountry hunters and whitetail hunters alike, sorting through dozens of packs can be overwhelming. This buying guide pares the list down to ten of the best hunting backpacks available on Amazon in 2025, highlighting the features that matter most and what each pack is best suited for.

When choosing a hunting backpack, capacity matters. A day‐pack needs to carry enough gear for a single day and should hug the body for stealth. Multi‐day packs must handle food, shelter, and extra layers without flopping around.

Suspension and frame systems distribute weight; waterproofing or rain covers protect gear in foul weather. Features like rifle/bow carriers, hydration sleeves, or meat‐shelf capacity set great packs apart.

The ten packs described here are organized roughly from smaller day‐packs to larger multi‑day loads. Each description references manufacturer specifications or detailed reviews to ensure accuracy.

1. Badlands Superday Pack

The Badlands Superday Pack is a versatile day pack built for hunters who want features without excess bulk. It offers a 1,440 cubic–inch capacity (roughly 23.6 L) and weighs 3.15 pounds according to Field & Stream.

Its molded foam suspension and adjustable shoulder straps balance loads comfortably, while a DWR water‑repellent coating and built‑in rain cover keep your gear dry. The pack includes a pistol/bow holster, bedroll straps, and a rifle/bow carrying system that tucks neatly away when not in use.

It’s hydration compatible and has pockets organized for binoculars, rangefinder, and snacks.

Pros

  • Lightweight yet capable of carrying a day’s worth of gear.
  • Molded foam suspension and adjustable straps provide comfort during long stalks.
  • Integrated rain cover and durable, quiet fabric protect gear from weather.
  • Rifle/bow carrying system is secure and easy to deploy.
  • Lifetime warranty from Badlands adds peace of mind.

Cons

  • The 1,440 cu in capacity is limiting for overnight trips.
  • Some users report that the hydration sleeve can be snug for large reservoirs.
  • Limited external compression straps make attaching bulky items harder.

Ideal Use

The Superday is ideal for day hunts in whitetail stands or western spot‑and‑stalk situations where stealth and quick access matter. It suits hunters who carry minimal gear and value comfort. Its small size and body‑hugging design mean it won’t bounce or hang up when crawling under brush.

2. Stone Glacier Sky Archer 6400

When hunts stretch into week‑long backpacking adventures, a bigger frame is essential. The Stone Glacier Sky Archer 6400 is a modular multi‑day pack designed for mountain hunting. With a mammoth 6,400 cubic‑inch capacity (about 105 L) and 5.8 lb weight, it can haul camp gear and meat back to the trailhead.

The pack features an internal spotting scope pocket and a 2,500‑cubic‑inch load shelf that separates from the main bag to carry meat or other heavy loads against the frame. Adjustable side compression straps allow the pack to compress down when partially full or expand when full.

Pros

  • Massive capacity suits multi‑day or extended backcountry hunts.
  • Modular design allows the bag to separate from the frame, creating a meat shelf to haul quarters easily.
  • The internal spotting scope pocket and side zip allow quick access to critical gear.
  • YKK zippers and high‑quality fabrics provide durability.

Cons

  • At nearly 6 pounds, the pack is heavier than some ultralight options.
  • The large main bag may require careful organization to avoid gear getting lost at the bottom.

Ideal Use

The Sky Archer 6400 is built for multi‑day elk or sheep hunts requiring significant gear and the ability to pack out animals. Its strong frame and load shelf excel when hauling quarters. For hunters on shorter hunts, Stone Glacier’s modular system allows using smaller bags on the same frame.

3. ALPS OutdoorZ Extreme Elite 3800

ALPS OutdoorZ markets a range of packs for price‑conscious hunters. The Extreme Elite 3800 is part of their “Extreme” line and bridges day‑pack and overnight capacity.

It provides a 3,800 cubic‑inch capacity and weighs 6 pounds 1 oz. Key features include an adjustable torso range that fits a variety of body sizes, a rain cover, and a detachable frame that can be used to haul meat separately. Load lifters and compression pockets help control loads, and the waist belt features pockets for a rangefinder and snacks.

Pros

  • Affordably priced compared to premium brands.
  • Adjustable torso length ensures a good fit for different heights.
  • Included rain cover and hydration compatibility protect gear and keep hunters hydrated【816710336638186†L197-L233】.
  • Detachable frame can be used independently as a meat hauler.

Cons

  • At 6 pounds, it’s heavier than some similarly sized packs.
  • The fabric may be noisier than high‑end packs, which could alert game at close range.

Ideal Use

This pack suits budget‑conscious hunters who occasionally need to stay overnight or haul game. It’s a compromise between a day pack and expedition pack, making it a versatile choice for whitetail hunts, turkey seasons, and light backcountry trips.

4. Mystery Ranch Treehouse 38

Mystery Ranch is known for high‑quality packs with innovative designs. The Treehouse 38 is a treestand‑oriented pack with a 1,890‑cubic‑inch capacity (31 L) and weighs 4.6 pounds. It features a stay‑open design so you can access gear quietly while suspended in a tree.

The rigid internal frame supports loads, and a face panel that opens to 45 degrees provides easy access to pockets. Purposeful pockets hold bow hangers, calls, and warm gear. The pack also has stand‑carry compression straps so you can strap it to a treestand when climbing or descending.

Pros

  • Stay‑open design allows quiet access to gear during treestand hunts.
  • Rigid frame and internal organization keep gear secure and accessible.
  • Stand‑carry straps free your hands when climbing.
  • Durable construction built to last many seasons.

Cons

  • At 1,890 cu in, the pack is strictly a day pack; it cannot haul meat or overnight gear.
  • The stiff frame can feel bulky when crawling or moving quickly on the ground.

Ideal Use

Treehouse 38 is aimed at treestand and saddle hunters who need to keep gear organized and accessible above ground. Its unique design reduces noise and movement when shifting gear, making it perfect for whitetail and black bear hunters.

5. Sitka Apex Pack

Sitka’s clothing and gear are known for quality, and the Apex Pack continues that reputation. It offers 1,800 cubic inches of capacity and weighs 36 oz (2.25 lb).

The body‑hugging waist belt includes multiple pockets and deployable cam cables to hang your bow when glassing or resting. Made of silent fabric, the pack moves quietly through brush and features compression straps to shrink the profile when not full. Despite its small volume, the Apex has loops to lash extra gear and a low‑profile top lid.

Pros

  • Lightweight design suits fast day hunts.
  • Body‑hugging waist belt with pockets keeps gear close without bouncing.
  • Deployable cam cables provide a place to rest your bow in the field.
  • Quiet fabric reduces noise while stalking game.

Cons

  • Limited meat‑hauling capacity; it cannot carry large loads.
  • The small volume means careful packing is necessary to avoid overloading.

Ideal Use

The Apex Pack is designed for minimalist hunters focusing on stealth and speed ideal for archery elk or deer hunts where the ability to move quietly matters more than carrying heavy loads.

6. Cabela’s Bow and Rifle Pack

Cabela’s Bow and Rifle Pack (often sold under their “Instinct” brand) holds 2,500 cubic inches of gear and weighs 4 lb 10 oz. Built from polyester and 600‑denier fabric, it is durable and includes an integrated rain cover and blaze orange flag for safety.

The pack’s unique feature is a foam shooting platform on the waist belt, allowing you to rest your rifle when taking a shot from a kneeling or seated position. It includes straps to carry either a bow or a rifle, hydration compatibility, and multiple pockets for organization.

Pros

  • Durable materials and integrated rain cover protect gear.
  • Foam shooting platform provides stability when aiming.
  • Bow/rifle straps adapt to multiple hunting styles.
  • Blaze orange flag enhances safety during rifle seasons.

Cons

  • Heavier than some packs of similar size.
  • The foam platform adds bulk and may catch on brush when stalking.

Ideal Use

This pack is a jack‑of‑all‑trades for hunters who need to carry a rifle or bow and want a stable rest without carrying separate shooting sticks. It suits whitetail, turkey, or mule deer hunts where you might sit for long periods but still need to hike into remote areas.

7. Eberlestock X2 Pack

Eberlestock’s X2 Pack is a compact, heavy‑duty pack designed for hunters who need to carry meat or overnight gear without adding bulk. It features an integrated Intex aluminum frame and oversized compression straps. The pack’s volume is 2,450 cubic inches and it weighs 5.5 lb.

The X2 opens via a front zipper and has a floating top lid, MOLLE webbing for attachments, and large side wings that collapse over the main bag. A centerline hydration opening facilitates hydration hoses, while large side pockets fit tripods or spotting scopes.

Pros

  • Rigid aluminum frame provides strong support for hauling heavy loads.
  • Oversized compression straps and MOLLE webbing allow attaching extra gear.
  • The front‑zip design and floating lid allow quick access to gear.
  • Built to last with heavy‑duty fabrics.

Cons

  • At 5.5 lb, it’s heavier than many day packs of similar volume.
  • The main bag’s front zip requires careful packing to prevent gear from spilling out when opened.

Ideal Use

The X2 is perfect for hunters who need a small but tough pack capable of handling moderate meat loads or overnight gear. It excels in western big‑game hunts where you may go out for a day but need the ability to haul meat back to the truck.

8. ALPS OutdoorZ Pursuit Pack

The ALPS OutdoorZ Pursuit is a do‑it‑all whitetail pack with a 44 L (2,700 cubic inch) capacity and weighs 4 lb 7 oz. A center aluminum stay and drop‑down pocket securely hold a bow or rifle.

A front lashing system carries extra layers or sheds antlers, and the pack includes a hydration port and bladder pocket. Large main and front pockets hold calls, rain gear, and a lunch.

Mesh side pockets and an organizational shelf inside the main compartment keep gear accessible. The waist belt has pockets for a rangefinder or wind checker, and the pack includes a rain cover and webbing loops for attachments.

Pros

  • Good compromise between capacity and weight; large enough for overnights.
  • Drop‑down pocket and center stay securely carry a bow or rifle.
  • Organizational shelf and pockets keep gear sorted.
  • Affordably priced.

Cons

  • The fabric is slightly noisy compared to premium packs.
  • The load lifter straps could be more adjustable.

Ideal Use

The Pursuit is a solid choice for whitetail and turkey hunters who need a comfortable pack with generous pockets and the ability to carry a bow or firearm. It’s particularly useful for mobile hunters who carry climbing sticks and saddles, thanks to its multiple attachment points.

9. Exo Mtn Gear K3 3200

Exo Mtn Gear’s K3 3200 is an ultralight yet capable pack for 3‑4‑day hunts. The bag features a quick‑access load shelf for hauling meat and a dedicated water‑bladder pocket. A wet storage compartment keeps bloody meat separate from sleeping bags and clothing.

The roll‑top design has zip‑access pockets in the lid for small items like headlamps and tags. Expanded 26‑inch zip access on the side allows you to reach gear anywhere in the bag without unpacking.

Deep side stretch pockets hold tripods or trekking poles, while a front stretch pocket stores rain gear or a puffy jacket. The pack weighs 5 lb 4 oz with the frame and lid and offers 3,690 cubic inches (60 L) of capacity. It’s constructed from 500D Cordura with MIL‑SPEC webbing and YKK zippers.

Pros

  • Ultra‑organized design with separate compartments for wet and dry gear.
  • Roll‑top closure protects gear from weather and compresses loads.
  • Quick‑access meat shelf eliminates the need to detach the bag.
  • High‑quality materials, including 500D Cordura and MIL‑SPEC webbing, ensure durability.

Cons

  • Pricey compared to many mainstream packs.
  • The minimalist lid pockets may not suit hunters who need more organization.

Ideal Use

The K3 3200 is best for ultralight hunters who prioritize efficient organization and quick access to meat. It is ideal for backcountry hunts lasting 3–4 days, especially where weight and durability matter.

10. KUIU Venture 2300 Day Pack

The KUIU Venture 2300 is a robust day pack built from 500‑denier Cordura fabric with a durable water‑repellent coating. It holds 2,300 cubic inches (38 L) of gear and weighs 3 lb 9.4 oz (1.64 kg). A horseshoe‑style main compartment allows wide access, while zippered front‑panel pockets hold smaller items.

Inside, a hydration sleeve and top zip secure a water bladder, and the pack uses an internal aluminum and polycarbonate frame for support. The waist belt is padded and removable, offering hip pockets for quick‑grab items.

External stuff‑it pockets allow stowing layers, and compression straps can be repositioned along a daisy‑chain system to secure gear. Dedicated bottom straps hold a bedroll or jacket, and the pack is compatible with KUIU’s bow/rifle holders.

Additional features include Duraflex hardware, YKK zippers, and water resistance. The pack’s 22 × 12.5 × 8.5 in dimensions accommodate most airline carry‑on regulations.

Pros

  • Durable 500D Cordura construction with DWR coating and quality zippers.
  • Horseshoe opening and front pockets allow excellent organization and access.
  • Removable waist belt offers versatility for day hikes or airport travel.
  • Compression straps are adjustable along a daisy chain and bottom straps carry additional gear.

Cons

  • Slightly heavier than some day packs at 3.6 pounds.
  • The internal aluminum frame can feel rigid when wearing light loads.

Ideal Use

The Venture 2300 is a rugged day pack for hunters who want bombproof materials and ample organization. It suits early season elk or mule deer hunts when you might stay mobile and need to haul meat back to camp in smaller loads.

How to Choose the Right Hunting Backpack

Selecting the right pack can be daunting given the variety of sizes and features. Consider the following factors when shopping:

Capacity

Capacity is measured in cubic inches or liters. Day packs (1,500–2,500 cu in) carry essentials like water, knives, calls, and a puffy jacket. Multi‑day packs (3,500‑6,500 cu in) add space for food, shelter, and meat. Your hunting style dictates the capacity needed.

Bowhunters stalking close may prefer smaller packs like the Sitka Apex, while elk hunters in the Rockies may require the carrying capacity of the Stone Glacier Sky Archer 6400.

Frame and Suspension

A pack’s frame and suspension determine how comfortably it carries weight. Internal frames (aluminum or carbon fiber) transfer weight to your hips. External frames allow meat to be carried between the frame and bag, which keeps the heaviest load close to your center of gravity.

Suspension systems include harnesses, load lifters, and waist belts; choose one that fits your torso length and spreads the weight evenly. The Exo Mtn Gear K3 3200’s quick‑access shelf exemplifies an internal frame that doubles as a meat shelf.

Materials and Durability

Durable fabrics like 500D Cordura, ripstop nylon, and 600‑denier polyester resist abrasion. Reinforced stitching, YKK zippers, and weatherproof coatings extend longevity.

Packs like the KUIU Venture 2300 use 500D Cordura with water‑repellent coatings, while the Stone Glacier Sky Archer uses high‑quality materials with YKK zippers. Durability matters more on extended hunts when your pack may scrape against rock and brush daily.

Weight

Lighter packs reduce fatigue but may sacrifice durability or load‑bearing capacity. The Sitka Apex Pack at 36 oz is ultralight, while the Eberlestock X2 at 5.5 lb sacrifices some weight savings for robustness. Multi‑day packs inevitably weigh more; consider your fitness and typical load when balancing weight and durability.

Organization and Accessibility

Pockets, zippers, and opening designs matter. Horseshoe or full‑zip openings allow you to access gear anywhere in the bag, as seen in the KUIU Venture 2300. Roll‑top designs like the K3 3200 protect gear but may limit quick access.

External pockets for rangefinders, calls, and snacks keep essentials accessible, while internal organization prevents small items from disappearing into the depths. Compression straps adjust the pack’s profile and secure bulky items.

Weapon and Meat Carrying

If you hunt with a rifle or bow, look for dedicated carrying options. Badlands Superday and ALPS Pursuit have integrated bow/rifle carriers. For multi‑day hunts where meat hauling is essential, a meat shelf or detachable frame is crucial.

Stone Glacier’s load shelf and Exo’s quick‑access shelf separate meat from other gear, keeping your pack cleaner and balanced.

Comfort and Fit

A pack should fit your torso length and waist size. Many packs come in multiple sizes or with adjustable torso lengths, such as the ALPS Extreme Elite 3800.

Load lifters and hip belts should be easy to adjust. Try on packs with weight to ensure the suspension doesn’t pinch or rub. Ventilation in the back panel helps reduce sweat during hot days.

Price

Hunting packs range from around $150 to over $600. Premium brands like Exo Mtn Gear and Stone Glacier command higher prices but offer top‑tier materials and features. Budget options like ALPS OutdoorZ still provide good functionality at a lower cost.

Determine how often you’ll use the pack and how long you want it to last. Investing in a durable pack may save money in the long run by avoiding replacements.

Tips for Packing a Hunting Backpack

Packing your backpack efficiently can make a huge difference on the mountain. Here are some tips:

  • Distribute weight properly. Heavier items should be close to your back and higher on the pack to keep your center of gravity stable. Meat should sit between the bag and frame if the pack has a meat shelf.
  • Use stuff sacks and dry bags. Separate clothing, food, and electronics into waterproof bags. This not only organizes your gear but also keeps items dry if your pack gets wet.
  • Pack frequently used items on top or in pockets. Rangefinders, headlamps, first‑aid kits, and snacks should be readily accessible. Avoid burying critical items deep in the main compartment.
  • Use compression straps. Tighten side and bottom straps to reduce bulk and prevent gear from shifting. External straps can also secure tripods or antlers.
  • Carry only essentials. Weight adds up quickly. Evaluate each item before adding it to your pack. Consider leaving non‑essentials like bulky camp chairs or heavy cookware at home.

Conclusion

Choosing the best hunting backpack depends on your hunting style, budget, and body shape. This guide covers ten of the most capable packs available in 2025, from the ultralight Sitka Apex and versatile Badlands Superday to heavyweight haulers like the Stone Glacier Sky Archer 6400 and Exo Mtn Gear K3 3200.

Whether you’re a whitetail hunter needing quiet access from a treestand or a backcountry elk hunter hauling meat over mountain passes, there is a pack here to suit your needs.

Best Hunting Backpacks for 2025: A Complete Buyer’s Guide

Heading into the backcountry without the right backpack is one of the easiest ways to ruin a hunt. A good pack keeps your gear organized, carries heavy loads comfortably and quietly and holds up to harsh conditions. In contrast, the wrong pack leaves you sore, disorganized and frustrated. This long‑form guide explains what differentiates hunting backpacks from ordinary packs, how to choose the right one for your style of hunting and highlights some of the best models available for the 2025 season.

Why hunting backpacks matter

Most hunters carry more than a day’s worth of gear. Modern backpack designs allow you to pack sleeping bags, shelters, optics, weapons and meat in a way that keeps weight balanced and your hands free. Hunting packs are also built from tough fabrics like Cordura and Xpac to resist abrasion and weather. Good packs are quiet, with buckles and fabric that won’t squeak when you slip through brush.

They include features like load‑lifters and adjustable frames to move the weight to your hips and away from your shoulders, hydration sleeves, compression straps to secure a rifle or bow and external pockets for quick access to essentials.

Key considerations when choosing a hunting backpack

Trip length and capacity

Before shopping, decide how long your hunts typically last. Backpacks are sized in cubic inches or liters. Day‑packs for treestand or whitetail hunting often hold 1 200–2 000 cubic inches (20–30 L) and focus on organization and quiet operation. Multi‑day backcountry packs start around 3 500 cubic inches and grow past 7 000 cubic inches for week‑long expeditions. The Outdoor Life editors note that backcountry elk hunters might need space for a tent, sleeping bag, food, optics and a rifle. Meanwhile, a whitetail hunter sitting in a stand may only need room for lunch and a few layers. Always choose a pack big enough to haul meat out as well as your gear.

Frame style

Hunting backpacks come in two general styles: internal frame packs and external frame systems with detachable bags. Internal frame packs are lighter, quieter and streamlined. They are perfect for day hunts or short trips where meat hauling isn’t the primary concern. External frame systems, like those offered by Stone Glacier and Kifaru, include a rigid frame and a separate bag. The frame provides a shelf between it and the bag where you can strap quarters and game bags. External frames also allow you to switch bags for different tasks and they often carry heavy loads more comfortably. The trade‑off is cost and complexity; external frames are typically more expensive and require more setup.

Fit and adjustability

Regardless of brand, a pack must fit your body. Outdoor Life recommends measuring your torso length by placing your hands on your hip bones (iliac crest) and measuring to the prominent vertebra at the base of your neck. Many manufacturers offer multiple

frame sizes and adjustable suspension systems. Stone Glacier’s packs, for example, allow you to choose belt lengths and adjust shoulder strap height. A pack that fits correctly shifts the weight to your hips via the padded waist belt; it should not feel like it is hanging from your shoulders.

Weight and materials

Weight matters, especially on long hikes. Ultralight hunters often choose packs built with fabrics like Xpac and 500D Cordura, which provide strength without excess weight. The Stone Glacier Solo 3600 weighs about 4 pounds 6 ounces yet can haul more than 150 pounds. Heavier expedition‑style packs like the Kifaru Dall weigh over 6 pounds but can handle 10‑day trips and 7 000+ cubic inches of gear. Evaluate your strength, typical loads and the length of your hunts when deciding how much weight you can accept.

Organization and accessibility

Good organization separates a hunting pack from a simple dry bag. Look for dedicated compartments for optics, hydration b

ladders, knives and tags. Large horseshoe or U‑shaped zippers, like those on Stone Glacier and Mystery Ranch packs, provide wide access to the main compartment so you don’t have to dig through from the top. Many packs include detachable pockets or lids that double as small daypacks for scouting trips. Quiet closure systems such as magnets or fleece flaps are beneficial for tree‑stand hunters who need to access gear silently.

Meat hauling capability

When you are successful, your pack must carry meat comfortably and securely. External frames often incorporate a “load shelf” where boned meat or quarters can be lashed between the frame and the bag. The Stone Glacier Solo offers a 2 500‑cubic‑inch expandable load shelf and 150‑pound load rating. The Kifaru Dall features an integral load shelf and can host additional pouches for long expeditions. Even some day packs, like the Mystery Ranch Treehouse, have bottom compression straps and front pockets designed to secure a stand or

Top hunting backpacks for 2025

The following models represent some of the best packs tested by hunting publications and professional gear reviewers. Each excels in a particular niche.

Best overall: Stone Glacier Solo 3600

The Solo has become a favorite among mountain hunters because it balances light weight and load‑hauling ability. The pack’s main bag holds 3 600 cubic inches and features a U‑shaped zipper for easy access. It rides on Stone Glacier’s X Curve frame and weighs about 4 pounds 6 ounces. A load shelf between the bag and frame adds over 2 500 cubic inches for meat or camp gear. Reviewers praise its compression straps, which secure rifles, tripods and trekking poles. The Solo is built with 500D Cordura and Xpac fabric and rated to carry more than 150 pounds. The downside is price and minimal pockets, but for those who want a durable ultralight mountain pack, the Solo is hard to beat.

Best for backcountry hunts: Stone Glacier Sky Archer 6400

Designed for long, self‑supported hunts, the Sky Archer offers 6 400 cubic inches of storage on the Krux frame and weighs roughly 5 pounds 2 ounces. It can compress down to a day‑pack or expand to haul meat thanks to its load shelf. Stone Glacier updated the 2025 version with a side‑zip pocket for accessories and a larger spotting scope pocket. Multiple frame and belt sizes allow a custom fit. Although set‑up can take time, once dialed the pack carries heavy loads well and remains lighter than most comparably sized models.

Quietest day‑pack: Sitka Fanatic Pack

Whitetail hunters who value stealth will appreciate the Sitka Fanatic. Instead of noisy buckles and zippers, it uses berber fleece material and a silent strap/latch system. The pack holds about 2 166 cubic inches and includes dozens of internal pockets for organizing calls, rangefinders and snacks. It is designed to hang open from a tree, giving you access to gear while seated in a stand. The lack of a rigid frame makes

it less suitable for ground hunts or heavy loads, but for treestand hunters who want the quietest pack available, the Fanatic is an excellent choice.

Best heavy‑hauler: Kifaru Dall

Kifaru’s packs are legendary among sheep and goat hunters for their durability and comfort under heavy loads. The Dall combines a simple roll‑top bag with the Duplex Lite frame and can haul 7 080 cubic inches of gear. It weighs around 6 pounds 2 ounces on the Duplex Lite frame and includes a built‑in load shelf for meat. The bag can attach three additional external pouches and Kifaru’s guide lids, allowing you to customize storage. Because the frame and bag are sold separately, the system is pricey, and fine‑tuning the fit takes time. However, hunters undertaking 10‑ to 14‑day expeditions will appreciate its capacity and comfort.

Best for saddle hunting: Mystery Ranch Treehouse 20

The Treehouse 20 was designed specifically for saddle and treestand hunters. The semi‑rigid 1 275‑cubic‑inch bag holds your camera, extra layers and other essentials while allowing you to strap climbing sticks or a lightweight stand to the exterior. Internal cinch pockets with silent closures organize gear, and a fuzzy polyester exterior reduces noise. A bottom compression strap and front stretch pocket secure larger items. This pack is not meant for hauling quarters, but it excels at keeping treestand gear quiet and accessible.

Best value pack: ALPS OutdoorZ Elite Frame + 3800

For hunters on a budget, the ALPS Elite Frame system provides excellent features at a lower price point. It pairs a six‑position adjustable torso frame with a 3 800‑cubic‑inch bag. Gear reviewers praise its comfortable air‑mesh suspension, load lifters and anti‑slip lumbar pad. The pack detaches from the frame quickly, and ALPS offers smaller day‑pack bags that clip on for shorter hunts. Features include waist‑belt pockets, an adjustable lashing system and a rifle/bow drop‑down pocket. The PU‑coated 500D Cordura fabric and included rain cover protect your gear.

Most durable: Stone Glacier Sky 5900

If durability is your priority, consider the Stone Glacier Sky 5900. Built on the XCurve frame, it uses carbon fiber composite stays and a Powerlock hip belt to distribute weight effectively. The bag itself weighs only 2.4 pounds yet handles over 100 pounds of meat and gear. It features a full‑panel zipper for easy access and attaches to the frame via tab‑style hooks and loops. The Sky 5900 is expensive but can handle anything from an overnight deer hunt to a multi‑week sheep hunt.

Most versatile: Mystery Ranch Metcalf

The Metcalf is a favorite among western hunters for its versatility. At roughly 4.5 pounds with the Guide Light MT frame, it offers 4 335 cubic inches of space plus an overload shelf for meat.

The split‑lid design and multiple compression straps adapt to loads of various shapes and sizes. Sturdy 500D LP Cordura fabric and quality buckles ensure durability. The Metcalf is pricey but can serve as your one‑pack solution for day hunts through week‑long backcountry trips.

Most comfortable: Badlands Vario System

Badlands developed the Vario system to offer custom comfort. The frame uses an aluminum structure with a thick molded foam back panel and adjustable shoulder yoke. Hunters can pair the frame with different bag sizes ranging from 1 800 to 6 500 cubic inches. Reviewers highlight its excellent ventilation and supportive hip belt. The modular design lets you choose the right bag for each hunt.

Best looking: Kuiu Pro LT 5500 Pack

While looks may be subjective, Kuiu’s Pro LT 5500 stands out for its sleek design and color options. Built from 330D HT nylon with a protective PE sheet, it weighs only about 3.5 pounds yet holds 5 500 cubic inches. An adjustable fr

ame fits a wide range of torso lengths. The pack includes numerous organization pockets, load lifters and side compression straps for securing weapons. Kuiu offers accessories like hydration reservoirs and hip‑belt pouches to customize your loadout.

Notable new packs for 2025

Hunting pack innovation continues. Bowhunting.com highlighted several new packs releasing in 2025. The Mystery Ranch Sawtooth 45 is a day pack built from durable Robic Kodra Ripstop and Cordura fabric with a 270‑degree horseshoe zipper, external accessory pockets and customizable compression straps. At 45 liters it is ideal for overnight trips and weighs about 5 pounds. The Mystery Ranch Beartooth 85 offers 85 liters of space for 3‑5 day adventures, with a dual split‑lid design, stretch‑woven side pockets and a removable lid that doubles as a day pack. For longer expeditions, the Mystery Ranch Marshall 105 provides 105 liters of capacity with dual torpedo pockets and an adjustable overload shelf. Saddle hunters may appreciate the Grit Pack from Tethrd; it offers about 1 700 cubic inches in the main compartment with another 340 cubic inches in a compression pocket and MOLLE straps for attaching sticks, platforms and accessories. It also features a waterproof bottom pocket for your kill kit.

Tips for packing and using your backpack

  1. Balance the load. Place heavy items like water, optics and meat close to your back and centered vertically. Lighter gear such as clothing and sleeping bags can go towards the outside or top.
  2. Use compression straps effectively. Tighten straps to prevent the load from shifting. Many packs let you thread the straps over a rifle or bow to secure it externally.
  3. Keep essentials accessible. Use hip‑belt pockets and top lids for frequently used items like headlamps, rangefinders, snacks and tags. Day hunters should choose packs with quiet closure systems for these pockets.
  4. Protect optics and electronics. Many packs have dedicated sleeves for s

potting scopes or hydration bladders. If yours doesn’t, pack optics in padded cases and place them near the top of the bag where they are protected.

  1. Practice with your load. Before the season, load your pack with gear and take it on training hikes. Adjust the hip belt, shoulder straps and load lifters to find the most comfortable fit.
  2. Care for your pack. After each hunt, remove meat and wash away blood with mild soap. Dry the pack thoroughly before storage to prevent mold or odors. Check buckles and straps for wear and replace as needed.

Conclusion

Hunting backpacks are more than just bags – they are essential tools for carrying gear safely and comfortably. When selecting a pack, consider the length of your hunts, the weight you expect to carry, the materials and frame design and whether you need specialized features like a quiet closure system or modular components. The models highlighted here have earned high marks from professional testers. The Stone Glacier Solo 3600 and Sky Archer 6400 lead the field for mountain and backcountry hunters, while packs like the Sitka Fanatic and Mystery Ranch Treehouse serve treestand and saddle hunters exceptionally well. Budget‑minded hunters can trust the ALPS OutdoorZ Elite Frame, and those undertaking long expeditions might invest in the Kifaru Dall or Stone Glacier Sky 5900. New offerings like the Mystery Ranch Sawtooth 45 and Grit Pack ensure that innovation continues. By investing in a quality pack that fits your body and matches your hunting style, you’ll be better prepared for the adventures that 2025 has in store.

Bow Stabilizers Explained: How They Work and How to Choose

A bow stabilizer is a weighted rod, or a set of rods, that attaches to a bow to influence balance, steady the aiming feel, and help manage vibration after the shot. A stabilizer does not guarantee accuracy by itself. It can make a bow easier to hold steady, but good shooting still depends on fit, form, tuning, and practice.

This guide explains what bow stabilizers do, the common types, how hunting and target setups differ, and how to think about balance without chasing unnecessary weight. It is an educational setup guide, not a product ranking or brand recommendation.

Table of Contents
  1. What a Bow Stabilizer Actually Does
  2. Common Types of Bow Stabilizers
  3. How to Fit a Stabilizer to Your Bow
  4. Hunting vs Target Setup Tradeoffs
  5. Setting Balance and Weight
  6. Common Mistakes to Avoid
  7. Related Archery Setup Guides
  8. Frequently Asked Questions

What a Bow Stabilizer Actually Does

A stabilizer adds weight away from the bow’s center. That changes how the bow balances and how it reacts while you aim and after you release. The common goals are steadier holding, better front-to-back balance, less hand shock, and a calmer feel during the shot cycle.

Archery stabilizers are common enough to have their own equipment category in references such as archery stabilizer descriptions, but the important point is practical: a stabilizer is a tuning aid. It helps the bow feel better matched to the archer. It does not replace a repeatable anchor, clean release, correct arrow setup, or practice.

A stabilizer setup can include a front bar, side bar, rear bar, removable weights, and a balance point that matches the archer.

Common Types of Bow Stabilizers

Stabilizers are usually described by where they mount and what role they play. The exact names vary by brand and bow type, but the main categories are consistent enough to understand before you shop or adjust your own bow.

Front Stabilizer Bar

The front bar mounts to the front of the riser and is the stabilizer most archers notice first. A longer front bar increases leverage and can make the bow feel steadier on aim. A shorter front bar is easier to carry and move through cover, which is why compact versions are common on hunting bows.

Side Bar and Rear Bar

Side and rear bars help fine-tune left-right and front-back balance. Target archers often use them to settle the bow more precisely. Hunters may skip them or use a smaller setup if weight, noise, and maneuverability matter more than fine balance control.

Weights and Dampeners

Removable weights let you adjust how the bow holds. Dampening components can change the feel of vibration after the shot. Add weight gradually, shoot groups, and pay attention to fatigue. A setup that feels excellent for three arrows may not feel as good after a full practice session or a long day in the field.

How to Fit a Stabilizer to Your Bow

Most modern compound bows have an accessory bushing for a front stabilizer, but fit still matters. Check your bow manual and stabilizer specifications for thread compatibility, weight guidance, and any installation limits. If you use side or rear bars, confirm that the mount works with your riser, sight, quiver, and rest setup.

Fit is not only about hardware. It also includes how much weight you can hold comfortably, how you carry the bow, whether you shoot from a stand or blind, and whether you compete under rules that limit stabilizer length or configuration. Competition rules can change, so use current rulebooks such as the World Archery rulebook when equipment class matters.

Hunting vs Target Setup Tradeoffs

Hunting and target setups often look different because they solve different problems. A target archer may accept a longer, heavier setup because the bow is used on a range or course. A hunter may choose a shorter stabilizer because the bow needs to move through trees, blinds, treestands, packs, and uneven terrain.

Setup factorHunting tendencyTarget tendency
LengthShorter and easier to maneuverLonger for steadier aim
WeightLighter for carrying and quick handlingHeavier for balance and hold feel
PriorityQuiet, compact, practical in coverMaximum steadiness and repeatability
Side barsOften minimal or skippedCommon for fine balance
EnvironmentStands, blinds, woods, 3D practiceKnown line, target range, tournament setup

These are tendencies, not rules. A hunter who shoots 3D archery may like a longer setup for practice. A target archer may prefer less weight for comfort. The best stabilizer is the one that helps your bow settle without making the whole setup harder to shoot well.

Setting Balance and Weight

The goal is a bow that holds naturally and returns calmly after the shot. Start with a simple front stabilizer, shoot enough arrows to feel the difference, then add or remove weight in small steps. If the bow wants to dip, roll, or fight your hand, balance may need adjustment.

Do Not Chase the Heaviest Setup

More weight can feel steady at first, but too much weight creates fatigue. Fatigue usually hurts form, and poor form can erase the benefit of any stabilizer. If you hunt, also think about carry weight, noise, and how the bow handles when you are wearing layers or moving in tight cover.

Change One Thing at a Time

Adjust stabilizer weight, bar length, or side-bar position one change at a time. Shoot enough arrows to know what changed. If you change the stabilizer, sight, arrow setup, and release routine all at once, you will not know which change helped or hurt.

Common Mistakes to Avoid

  • Expecting a stabilizer to fix weak form or poor tuning.
  • Adding too much weight and creating fatigue.
  • Buying a long target-style bar for tight hunting setups without considering maneuverability.
  • Ignoring thread compatibility, mount clearance, or class rules.
  • Changing too many setup variables at once.

Stabilizers are only one part of a complete setup. For broader practice structure, read the 3D archery setup guide. For other tuning components, see the arrow rest guide and the arrow spine guide. If you are building strength carefully, the guide on increasing draw weight safely is a useful next step.

Frequently Asked Questions

Do bow stabilizers really improve accuracy?

They can support more consistent shooting by improving balance and making the bow easier to hold steady. They do not guarantee accuracy. Form, tuning, fit, and practice are still the foundation.

What length stabilizer should I use?

There is no single correct length. Hunters often prefer shorter stabilizers for easier carrying and movement. Target archers often use longer bars for steadier aiming. Choose based on use, comfort, and any class rules.

Do I need a side bar or back bar?

Not always. A side or rear bar helps fine-tune balance, especially in target setups. Many hunting bows work well with a single compact front stabilizer.

Can I use the same stabilizer for hunting and target archery?

You can, but the ideal setup may differ. A moderate front stabilizer can work for both, while specialized target setups may feel too long or heavy for hunting.

Are stabilizers allowed in competition?

It depends on the organization, class, and current rulebook. Check the rules for the specific event before competing, especially if you use long bars, side bars, or unusual weight setups.

Why Eye and Ear Protection Matters When Shooting

Eye and ear protection matter when shooting because firearms create separate hazards for hearing and vision. Gunfire is a sudden loud impulse noise, and shooting can also involve ejected cases, debris, fragments, hot gases, dust, and other range hazards. Hearing protection helps reduce noise exposure, while eye protection helps guard against impact and debris.

This is general safety information for range, hunting, and sport-shooting contexts. It is not medical advice, and it does not replace your range rules, instructor guidance, equipment instructions, or advice from a qualified hearing or eye-care professional.

Why Shooters Need Eye and Ear Protection

Shooters wear eye and ear protection because the eyes and ears face different risks. Gunfire can create harmful noise exposure, especially indoors or near other shooters. Eye hazards can include ejected brass, blown debris, powder particles, fragments, and general range impact risks.

The CDC/NIOSH noise resources explain why noise exposure deserves prevention, and OSHA publishes general guidance on eye and face protection. For firearm handling rules, review the NSSF firearm safety rules.

Understanding Hearing Protection Ratings

Hearing protection in the United States is commonly labeled with a Noise Reduction Rating, or NRR. A higher NRR generally indicates more potential noise reduction under test conditions, but real-world protection depends heavily on fit and proper use.

Earplugs and earmuffs can both help, and some shooters use plugs and muffs together at indoor ranges or around louder firearms. Do not simply add two NRR numbers together; combined protection is more nuanced than that. Follow the manufacturer’s instructions and your range’s requirements.

Understanding Eye Protection Standards

Shooting eye protection should be impact-rated. Regular sunglasses may reduce glare, but they are not automatically suitable for range impact hazards. Look for safety eyewear that clearly states the impact standard it is designed to meet, fits securely, and offers good side coverage.

Replace scratched, cracked, or damaged lenses. Eye protection only helps when it stays clear, fits correctly, and remains in place during the activity.

Fit and Proper Use Matter

Protection only works when worn correctly. Earplugs need a proper seal in the ear canal. Earmuffs need the cup cushions to seal around the ears, and that seal can be affected by hair, hats, eyewear arms, or poor adjustment.

Eye protection should sit close enough to protect the eyes without blocking vision or becoming uncomfortable. If protection is distracting, fogged, loose, or painful, people are more likely to adjust or remove it at the wrong time. Fit checks are part of range preparation.

Protection TypeWhat to CheckWhy It Matters
EarplugsCorrect insertion and sealA shallow fit can reduce protection
EarmuffsFull cushion seal around the earHair, hats, or glasses can break the seal
Safety glassesImpact rating, side coverage, clear lensesOrdinary eyewear may not protect against range hazards

Range and Hunting Safety Context

At a range, keep eye and ear protection on whenever shooting is active or range rules require it. Nearby shooters can expose you to noise and debris too, so protection is not only about the firearm you are personally using.

While hunting, some people use electronic hearing protection that reduces impulse noise while still allowing environmental sounds. Whatever gear you choose, follow local rules, manufacturer instructions, and hunter education guidance. For more range habits, read our shooting range safety rules guide.

Where to Get Qualified Guidance

For personal hearing concerns, talk with an audiologist or physician. For eye concerns or protective eyewear needs, talk with an eye-care professional. For range practice, ask a range safety officer or certified instructor. A general article can explain why protection matters, but it cannot evaluate your hearing, vision, firearm, range, or medical situation.

If you are assembling basic range equipment, pair this guide with our essential shooting gear guide and beginner shooting stance guide.

Frequently Asked Questions

Do I need both eye and ear protection at the range?

Yes. They protect against different hazards. Hearing protection helps reduce noise exposure, while eye protection helps guard against debris, ejected cases, and impact risks. Always follow your range’s rules.

What does NRR mean on hearing protection?

NRR stands for Noise Reduction Rating. It is a labeled test rating for hearing protection, but real-world protection depends on fit, seal, and correct use.

Can I use regular sunglasses for shooting?

Do not assume regular sunglasses are enough. Shooting glasses should be impact-rated and designed for safety use, not just glare reduction.

Should I wear earplugs and earmuffs together?

Many shooters double up at indoor ranges or around louder firearms. Combined protection can help, but it does not equal the simple sum of both ratings. Fit still matters.

When should I replace eye or ear protection?

Replace damaged eyewear, scratched lenses, worn earmuff cushions, dirty reusable plugs, and any protection that no longer fits or seals properly. Follow the manufacturer’s maintenance instructions.

Final Safety Reminder

Eye and ear protection are basic range safety gear, not optional accessories. Choose impact-rated eyewear, use hearing protection correctly, check fit before shooting starts, and follow your range safety officer’s commands. When in doubt, ask qualified help before stepping to the firing line.

Can I Carry a Pistol While Bow Hunting? Laws, Safety, and Ethics

In many places, you may be able to carry a pistol while bow hunting, but the answer depends on the state, the land manager, the season, your permit status, and whether the handgun is carried only for defense or used to take game. Do not rely on a general internet answer for this one. Before a hunt, check the current regulation book for the state and unit you plan to hunt, then confirm unclear rules with the wildlife agency or local game warden.

The safest way to think about it is simple: your bow tag does not automatically give you permission to carry or use a sidearm. Some states allow a defensive handgun during archery season. Some restrict firearms in archery-only areas. Some allow carry but do not allow a pistol to be used for dispatching game. Public-land rules can add another layer, especially on state parks, national parks, national forests, wildlife refuges, and private land with written access rules.

Table of contents

Quick Answer: Can You Carry a Pistol While Bow Hunting?

Sometimes, yes. But it is not universal. A pistol may be legal for personal defense in one state and restricted in another. It may be legal on one type of public land and prohibited in a nearby park, refuge, or archery-only unit. It may be legal to possess but illegal to use for taking or finishing game during archery season.

If you need one rule to remember, use this: verify the hunting rule and the carry rule separately. Hunting regulations answer what equipment may be used to take game. Firearm and carry laws answer whether you may possess, conceal, transport, or openly carry a handgun. Those two rule sets do not always match.

A Practical Yes, No, or Maybe Framework

  • Likely yes: the state allows defensive carry during archery season, your permit or constitutional carry status is valid, and the land manager does not add a restriction.
  • Maybe: carry is allowed generally, but archery-only areas, state parks, refuges, or local ordinances may restrict firearms.
  • Likely no: the regulation says no firearms during archery-only seasons or on that specific property, or your permit is not valid in that state.

What to Check Before Carrying a Pistol on a Bow Hunt

Start with the current regulation book from the state wildlife agency. Search for the words handgun, firearm, archery season, sidearm, dispatch, concealed carry, open carry, and method of take. Then check the land manager rules for the specific place you will hunt. If the answer still is not clear, call the agency and write down the name, date, and answer you received.

For federal land, do not assume one federal rule controls everything. The National Park Service explains that firearm possession in park units generally has to comply with the law of the state where the park is located, while federal facilities such as visitor centers and ranger stations remain restricted. The U.S. Forest Service hunting page also tells hunters to follow state hunting laws and local forest rules. Those are good examples of why a hunt plan needs both state and land-manager checks.

The Five Questions That Matter Most

  1. Does the state allow handgun possession during the archery season you are hunting?
  2. Does your carry permit, reciprocity, or permitless carry status apply in that state?
  3. Does the specific property allow firearms during that season?
  4. Can the pistol be loaded, concealed, or carried in the way you plan?
  5. Is it legal to use the handgun for defense only, for dispatch, or for taking game?

Archery Season Rules Are the Big Catch

Archery seasons are designed around legal archery equipment. That does not always mean a sidearm is banned, but it does mean the handgun cannot be treated as backup hunting equipment unless the regulation clearly allows it. Many violations happen because a hunter reads the carry law but not the method-of-take rule.

This matters most for deer, elk, pronghorn, turkey, and other archery-only hunts. If the season is archery-only, a handgun may be allowed for personal defense yet still prohibited for harvesting game. Using it on an animal can turn a legal carry situation into an illegal take. When in doubt, assume the pistol is for emergency defense only until your state agency confirms otherwise.

Do Not Mix Carry Permission With Method-of-Take Permission

A carry permit means you may carry under certain conditions. It does not automatically mean you may use that firearm for hunting. A bow tag means you may hunt with legal archery equipment. It does not automatically authorize a handgun. Keep those permissions separate in your notes and your decision-making.

Public Land, Parks, and Refuges Can Change the Answer

Public land is not one rulebook. National forests, Bureau of Land Management land, state wildlife areas, national parks, state parks, and national wildlife refuges can all have different restrictions. Some places allow hunting but restrict discharge near roads, buildings, water, campgrounds, or developed recreation areas. Others allow carry outdoors but restrict firearms inside government buildings or visitor facilities. National wildlife refuges deserve extra care because refuge-specific rules can change what is allowed even when a state season is open.

Before you leave home, check the map boundary, the property name, and the managing agency. If you are hunting near a park boundary, private land edge, campground, trail system, or road, be extra careful. The U.S. Forest Service notes that private land may be interspersed with public land and that hunters need maps and permission where required. That same planning mindset applies to firearm carry rules.

National Parks Are Not the Same as National Forests

National parks commonly have different hunting access and firearm-use rules from national forests. A national forest may allow hunting under state seasons and local forest rules. A national park may prohibit hunting unless specifically authorized. Even where firearm possession is lawful, federal facilities can still be off limits. Refuges add another layer because the eCFR rules for the National Wildlife Refuge System include both general prohibited-act rules and refuge-by-refuge hunting entries. Check the exact unit, not just the agency name.

Concealed Carry vs Open Carry While Bow Hunting

The carry method matters. A chest holster, belt holster, pack-mounted holster, concealed waistband holster, or open hip rig may be treated differently under state law and property rules. Some states require a permit for concealed carry but not open carry. Others limit open carry in certain places. Some land managers may also restrict visible firearms around campgrounds, visitor areas, or developed sites.

From a field-use perspective, concealed is not always better and open is not always safer. The holster must stay secure during climbing, crawling, glassing, kneeling, drawing a bow, and wearing layers. If the handgun shifts into your bowstring path or snags on your pack strap, it creates a safety issue even if it is legally carried.

Carry Position Should Not Interfere With Your Shot

Test the full bow draw at home with an unloaded firearm and the exact clothing you will wear. Check your anchor point, bow arm, release hand, safety harness, pack straps, binocular harness, and rangefinder. If the holster changes your draw or causes you to move awkwardly, choose a different carry setup or leave the handgun at home.

Defense Carry Is Different From Using a Handgun on Game

Most hunters who ask this question are thinking about protection from bears, feral hogs, mountain lions, aggressive dogs, or people. That is a different issue from taking game. A defensive emergency is rare and immediate. A hunting decision is planned and regulated by season, tag, weapon type, and method of take.

Do not use a pistol to finish a wounded animal unless your state clearly allows it for that species, season, and tag. Some states may allow certain dispatch methods. Others may not. The ethical goal is a quick recovery, but ethics do not erase the regulation. If the rule is unclear, contact the agency before the hunt instead of deciding under pressure in the field.

Warning Shots Are Usually a Bad Plan

Older advice sometimes mentions firing a pistol as an emergency signal. That can be unsafe, illegal, or misunderstood depending on location. A whistle, satellite messenger, phone, radio, headlamp, map, and trip plan are better emergency tools. Use a firearm only within the law and only when you can account for the target, backstop, and surroundings.

How to Carry a Pistol Safely With Bowhunting Gear

If the law allows carry and you decide it is necessary, use a retention holster that protects the trigger and keeps the handgun in place through real hunting movement. Avoid loose pockets, open pack compartments, and soft sleeves that do not cover the trigger. The handgun should stay secure when you climb, sit, crawl, drag, quarter, or remove layers.

Safety also means planning around tree stands, ground blinds, and vehicle transport. Know whether the handgun must be unloaded while traveling, while in a vehicle, or while entering certain public areas. If you hunt from a stand, use the same careful process you use with a bow or firearm: secure gear, avoid climbing with loose equipment, and keep control of every weapon at all times.

Field Safety Checklist

  • Use a holster with trigger coverage and retention.
  • Confirm the holster does not block your bow draw.
  • Keep the muzzle direction controlled during all movement.
  • Know the loaded/unloaded transport rule for your state and property.
  • Keep the handgun away from children, camp visitors, and untrained partners.
  • Review firearm safety rules before the season, not during an emergency.

The Ethical Check: Should You Carry One?

Legal is the first gate. Ethical and practical are the next two. If carrying a pistol makes you less careful with shot selection, less patient during recovery, or more likely to enter a risky situation, it is not helping. A sidearm should not become an excuse to push into unsafe conditions or take lower-quality shots with a bow.

Good bowhunting still starts with close-range discipline, clear shooting lanes, sharp broadheads where legal, a tuned bow, honest range limits, and careful recovery. If you want a broader field conduct refresher, our guide to ethical hunting practices pairs well with this article.

When Leaving It Home May Be Smarter

Leave the pistol at home if you cannot confirm the rule, if your carry setup interferes with your bow, if you are crossing multiple jurisdictions, or if the property owner does not allow firearms. Also consider leaving it behind when the extra weight and complexity do not match the real risk of the hunt.

Pre-Hunt Legal and Safety Checklist

Use this checklist before each season because laws, season structures, and property rules can change. Do not assume last year’s answer is still correct.

  • Read the current state hunting regulation book for your species and season.
  • Search specifically for archery-only firearm restrictions.
  • Confirm carry law, permit rules, and reciprocity for the state.
  • Check the land manager page for the exact property.
  • Call the state wildlife agency if the written rule is unclear.
  • Ask private landowners for written permission and property-specific firearm rules.
  • Test your holster with your bow, pack, harness, and cold-weather layers.
  • Carry non-firearm emergency tools such as a whistle, light, map, and communication device.

Sources Worth Checking Every Season

For public-land hunters, start with official pages such as the National Park Service firearm guidance, the U.S. Forest Service hunting guidance, the U.S. Fish and Wildlife Service refuge overview, and the eCFR rules for refuge prohibited acts and refuge hunting and fishing. Then verify state-specific hunting regulations through your state wildlife agency. For field preparation, our beginner hunting trip planning guide can help you organize the non-legal parts of the hunt.

FAQ

Can I carry a pistol while bow hunting on public land?

Maybe. Public land rules depend on the state, agency, property, season, and carry method. Check both the state hunting regulations and the land manager’s rules for the exact area.

Can I use a pistol to finish a deer during archery season?

Only if your state clearly allows it for that season and species. Many archery seasons restrict firearms as a method of take, even if defensive carry is allowed.

Does a concealed carry permit override hunting regulations?

No. A carry permit may let you possess or carry a handgun, but hunting regulations still control what equipment can be used to take game.

Is a pistol legal in national parks during a bow hunt?

It depends on the park, the state, and where you are inside the park. The National Park Service says possession generally has to comply with state law, but federal facilities are restricted and hunting is not automatically allowed in every park unit.

What is the safest holster for bow hunting?

The safest choice is a secure retention holster that covers the trigger and does not interfere with your bow draw, safety harness, pack straps, or layers. Test it unloaded before the hunt.

Should every bowhunter carry a pistol?

No. Carrying a pistol adds legal responsibility, weight, safety complexity, and possible property restrictions. It only makes sense when it is legal, practical, and matched to a real risk.

Final Thoughts

You may be able to carry a pistol while bow hunting, but the responsible answer is never a blanket yes. Check the state hunting rule, the carry law, the property rule, and the season rule before you go. If any part is unclear, ask the agency before the hunt. A sidearm can be a defensive tool in some situations, but it should never replace legal planning, safe handling, ethical shot choices, and good bowhunting judgment.

Lessons Learned While Raising a Hunter

Raising a hunter is not really about teaching a child to fill a tag. It is about building patience, safety habits, respect for wildlife, and enough judgment to know when not to take a shot. The best lessons happen slowly, through small routines repeated before, during, and after each season.

This guide is for parents, relatives, and mentors who want to introduce a young person to hunting responsibly. It focuses on safety, confidence, field behavior, and realistic expectations rather than trophy pressure or gear obsession.

Table of contents

Quick Answer

The biggest lessons from raising a hunter are simple: start with safety, keep early trips short, practice before the season, teach respect for land and wildlife, and make the experience bigger than the harvest. A young hunter who feels safe, included, and unpressured is more likely to build good habits for life.

Do not rush responsibility. Match every step to the young person’s maturity, attention span, legal requirements, and comfort level. The goal is not to create a perfect hunter in one season. The goal is to build a responsible outdoorsperson over time.

A good mentor also watches for fatigue, cold, hunger, frustration, and nervousness. Those small signals matter. When a young hunter feels heard, they are more likely to ask questions, admit uncertainty, and speak up when something feels unsafe.

Safety Comes Before Success

Safety is the first lesson and the lesson that never ends. Before a youth hunt, review safe direction, trigger discipline, clear communication, firearm or bow handling, and what to do when anyone feels unsure. Keep the rules short enough to remember and repeat them often enough that they become normal.

The NSSF firearm safety rules are a useful baseline for any firearm-related activity. For hunter education, Hunter Ed can help families find state-approved course information and safety training resources.

If the hunt involves archery, the same mindset applies: controlled direction, safe broadhead handling, checked equipment, and clear communication. Young hunters should understand that safety rules apply even when the animal is close, the group is excited, or the moment feels urgent.

Patience Is The First Real Skill

Adults often remember the harvest. Young hunters often remember the walk in, the snack break, the cold toes, the quiet whispering, and whether the adult beside them stayed calm. Patience is easier to learn when the mentor models it.

Short early sits can be better than long miserable ones. A one-hour hunt that ends with curiosity can be more valuable than a full day that ends with frustration. Build attention span gradually and celebrate small wins: finding tracks, identifying birds, noticing wind, or staying quiet for ten more minutes.

Bring enough flexibility to leave before the experience turns sour. A young hunter who asks to go home is not failing. They may be cold, tired, overstimulated, or simply done learning for the day. Ending on a calm note keeps the door open for the next trip.

Practice Should Feel Calm And Repeatable

Practice should not feel like a test every time. Young hunters need calm repetition, clear feedback, and enough breaks to stay focused. Keep range sessions short, safe, and specific. Work on one skill at a time: safe handling, a stable position, smooth trigger control, bow form, or target identification.

Practice should also include what happens before and after the shot. Talk through when not to shoot, how to recognize an unsafe backstop, how to wait for a better angle, and how to tell an adult immediately if something feels wrong. Our gun safety course benefits guide explains why formal instruction can support family teaching.

Ethics Matter More Than The Harvest

Ethics are learned by watching. A young hunter notices how adults talk about animals, landowners, missed chances, wounded game, other hunters, and rules. If adults treat hunting as a responsibility, young hunters are more likely to do the same.

  • Only take shots that match the hunter’s practiced ability.
  • Respect property boundaries and landowner rules.
  • Follow current regulations, tags, seasons, and reporting requirements.
  • Recover game carefully and use as much of the animal as possible.
  • Leave gates, blinds, trails, and camps better than you found them.

These lessons can matter more than any single animal. They shape how a young person sees hunting, conservation, and responsibility.

Keep Gear Simple And Comfortable

Young hunters do not need complicated gear to learn well. They need clothing that keeps them reasonably warm and dry, hearing and eye protection when appropriate, a safe firearm or bow setup that fits them, and a mentor who pays attention before discomfort becomes a problem.

Fit matters. Oversized packs, heavy layers, loud clothing, hard-to-use gloves, and poorly fitted equipment can make a young hunter feel clumsy or discouraged. For day trips, use a simple checklist and pack only what the hunt requires. Our day hunting packing checklist is a helpful starting point.

Comfort is not softness; it is part of learning. A young hunter who can stay warm, hear instructions, see clearly, and move safely has more attention left for the important lessons.

Field Lessons Young Hunters Remember

Slow Down Before Every Decision

The field rewards calm decisions. Teach young hunters to pause, breathe, identify clearly, check the background, and listen before acting. Slowing down helps prevent unsafe choices and builds confidence.

Notice Sign, Weather, And Wind

Tracks, droppings, rubs, feathers, feeding areas, wind direction, and changing weather all make the day more interesting. When there is no harvest, these observations still give the young hunter something real to learn.

Let The Young Hunter Own Small Jobs

Small jobs build investment. Let them carry a light item, check the list, mark the wind, help glass a field, or choose the snack stop. Responsibility should grow in steps, not all at once.

Talk After The Hunt

A calm after-hunt conversation can teach more than a lecture. Ask what they noticed, what felt hard, what felt fun, and what they want to practice next. This keeps the experience collaborative instead of pressured.

For broader mindset and field habits, see our guide on the key to success in hunting.

FAQ

What is the best age to start teaching a child about hunting?

There is no single age that fits every child. Start with nature walks, safety language, animal identification, and respect for rules. Actual hunting should wait until the child meets legal requirements and shows the maturity to follow instructions consistently.

How long should a first youth hunt be?

Short is usually better. A positive one- or two-hour sit can build more enthusiasm than an all-day hunt that feels cold, boring, or stressful. Increase time gradually.

How should I handle a missed shot?

Stay calm. Check safety first, then talk through what happened without shame. A missed shot can teach range judgment, breathing, patience, and the importance of practice.

How do I keep hunting from becoming too much pressure?

Measure the day by learning, safety, and time together. Do not make the harvest the only success. Young hunters are more likely to stay interested when the experience feels meaningful even without a filled tag.

Final Takeaway

The best lessons from raising a hunter are safety, patience, ethics, practice, and respect. A young hunter who learns to slow down, follow rules, care about wildlife, and enjoy the whole experience is already succeeding, even before the first harvest happens.

Exit mobile version