Trijicon ACOG vs VCOG — Side-by-Side Review

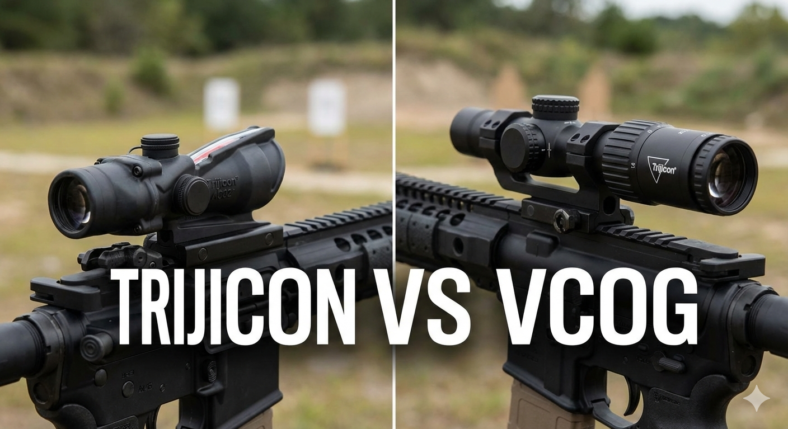
When it comes to combat-proven rifle optics, few brands command the same level of respect as Trijicon. For decades, Trijicon ACOG vs VCOG scopes have been trusted by military units, law enforcement, and professional shooters around the world. Among their most iconic products are the ACOG (Advanced Combat Optical Gunsight) and the VCOG (Variable Combat Optical Gunsight). While both are built for extreme durability and battlefield reliability, they are designed around very different optical philosophies.

This in-depth side-by-side review compares the Trijicon ACOG and VCOG across optical performance, magnification, reticle systems, durability, weight, use cases, and overall value, helping you decide which optic best suits your shooting needs.

Understanding the Trijicon ACOG

The Trijicon ACOG is a fixed-magnification prism scope originally developed for military use in the late 1980s. It was designed to provide fast target acquisition, crystal-clear glass, and unmatched ruggedness without relying on batteries. Over the years, the ACOG has become legendary for its ability to withstand harsh environments, heavy recoil, and continuous field use while maintaining zero and optical clarity.

One of the defining characteristics of the ACOG is its simplicity. Because it uses a fixed magnification—most commonly 4x, though other variants exist—the internal optical system contains fewer moving parts. This reduces mechanical complexity and increases long-term reliability. The reticle is typically illuminated using a combination of fiber optics for daylight and tritium for low-light conditions, allowing the scope to function without any external power source. This makes the ACOG especially attractive for military and survival applications where battery dependency is a concern.

Optically, the ACOG offers a wide field of view for its magnification level, excellent edge-to-edge sharpness, and high contrast. Its design supports the Bindon Aiming Concept, which allows shooters to keep both eyes open and use the illuminated reticle almost like a red dot at close range, while still benefiting from magnification for mid-range engagements.

Understanding the Trijicon VCOG

The Trijicon VCOG represents a more modern evolution of the combat optic. Instead of fixed magnification, it features a variable zoom system, commonly ranging from 1–6x or 1–8x depending on the model. This allows the shooter to transition seamlessly from close-quarters engagements at true 1x to precision shooting at extended distances with higher magnification.

The VCOG is built with the same durability standards as the ACOG but incorporates advanced features such as a first focal plane reticle, battery-powered illumination, and precision adjustment turrets. The first focal plane design means the reticle subtensions remain accurate across all magnification levels, which is particularly valuable for ranging targets and applying ballistic holds.

While the VCOG is heavier and more complex due to its variable lens system, it is engineered to withstand extreme recoil, shock, and environmental exposure. It is often described as one of the most rugged variable-power scopes on the market, combining the flexibility of a low-power variable optic with the toughness expected from a military-grade sighting system.

Optical Clarity and Image Quality

Both the ACOG and VCOG deliver excellent optical performance, but they achieve it in slightly different ways. The ACOG’s fixed-power design allows Trijicon to optimize the lens system for one specific magnification. This results in exceptional sharpness, minimal distortion, and a bright image even in challenging lighting conditions. The simplicity of the optical path also contributes to fast eye alignment and consistent performance.

The VCOG, with its variable magnification, must balance optical performance across a range of zoom levels. Despite this added complexity, Trijicon’s high-quality glass and coatings ensure that image clarity remains outstanding throughout the magnification range. At low power, the VCOG provides a wide field of view suitable for close-quarters situations, while at higher magnifications it offers the resolution needed for precise shot placement at distance.

Magnification and Versatility

The most fundamental difference between the ACOG and VCOG lies in their magnification systems. The ACOG uses fixed magnification, which means the shooter always views the target at a constant zoom level. This can be an advantage in scenarios where engagement distances are predictable and rapid response is critical. There is no need to adjust magnification, and the shooter can focus entirely on target acquisition and trigger control.

The VCOG, by contrast, offers adjustable magnification, making it far more versatile in dynamic environments. At 1x, it can function similarly to a red dot, allowing fast target transitions and situational awareness. As magnification increases, it becomes suitable for longer-range precision shooting. This adaptability makes the VCOG particularly well-suited for mixed-distance engagements, competition shooting, and tactical roles where a single optic must cover multiple scenarios.

Reticle Design and Illumination

ACOG reticles are typically etched and illuminated using fiber optics and tritium. During the day, ambient light gathered by the fiber optic brightens the reticle automatically. In low light, the tritium provides a constant glow. This system is extremely reliable and requires no batteries, but brightness control is limited and depends on environmental lighting conditions.

VCOG reticles, on the other hand, are usually first focal plane designs with battery-powered LED illumination. This allows precise control over brightness levels and ensures compatibility with night-vision devices. Because the reticle scales with magnification, holdovers and ranging marks remain accurate at any zoom setting, which is a significant advantage for precision shooting and long-range engagements.

Durability and Build Quality

Both optics are built to military specifications and are designed to survive extreme abuse. The ACOG’s fixed design contributes to its legendary durability, as there are fewer internal components that can shift or fail. Its housing is forged from high-strength aluminum and sealed against water and dust.

The VCOG, despite its variable zoom system, is equally robust. Its reinforced housing, integrated mount, and shock-resistant construction allow it to handle heavy recoil and harsh environmental conditions. While it contains more moving parts than the ACOG, it is engineered to maintain zero and optical alignment even under severe stress.

Weight and Handling

The ACOG is generally lighter and more compact than the VCOG, making it well-suited for lightweight rifle setups and extended carry. Its smaller footprint also contributes to better balance on shorter carbines.

The VCOG is heavier due to its larger lens system and zoom mechanism. While this adds some weight to the rifle, many shooters accept this trade-off for the increased capability and flexibility that variable magnification provides.

Side-by-Side Comparison Table

FeatureTrijicon ACOGTrijicon VCOG
MagnificationFixed (e.g., 3.5x, 4x, 5.5x)Variable (1–6x, 1–8x)
Reticle TypeEtched, fiber optic & tritiumFirst focal plane, LED illuminated
Power SourceNo battery (most models)Battery powered
WeightLighter, more compactHeavier, more robust
Best UseFast mid-range engagementsClose to long-range versatility
DurabilityExtremely ruggedExtremely rugged with modern design

Pros and Cons

Trijicon ACOG Pros

  • Battery-free illumination
  • Extremely durable and reliable
  • Fast target acquisition
  • Lightweight and compact
  • Proven military track record

Trijicon ACOG Cons

  • Fixed magnification limits versatility
  • Less control over reticle brightness
  • Not ideal for very close or very long-range precision work

Trijicon VCOG Pros

  • Variable magnification for multiple engagement distances
  • First focal plane reticle for accurate ranging and holds
  • Adjustable illumination
  • Outstanding optical clarity
  • Built to extreme durability standards

Trijicon VCOG Cons

  • Heavier and bulkier
  • More expensive
  • Requires batteries for illumination

Which One Is Right for You?

The choice between the ACOG and VCOG depends largely on your intended use. If your priority is simplicity, speed, and absolute reliability with minimal maintenance, the ACOG remains one of the best fixed-power combat optics ever made. It is ideal for users who operate primarily at medium ranges and value battery-free operation.

If you need a single optic capable of handling close-quarters engagements, mid-range shooting, and longer-range precision, the VCOG offers unmatched versatility. Its variable magnification, advanced reticle system, and modern features make it a strong choice for tactical professionals, competition shooters, and enthusiasts who demand adaptability.

Frequently Asked Questions

Is the ACOG better for military use than the VCOG?
Both are suitable for military use, but the ACOG is often preferred for its simplicity and battery-free operation, while the VCOG is chosen for missions requiring variable engagement distances.

Does the VCOG replace the ACOG?
Not entirely. The VCOG offers more versatility, but the ACOG remains relevant for roles where fixed magnification and extreme reliability are priorities.

Which optic is better for civilian shooters?
Civilian shooters who participate in competitions or varied-distance shooting may benefit more from the VCOG. Those who prefer a lighter, simpler setup may find the ACOG more suitable.

Final Verdict

The Trijicon ACOG and VCOG both represent the pinnacle of combat-grade optic design, each excelling in its own domain. The ACOG stands as a symbol of proven reliability and speed, while the VCOG embodies modern versatility and precision. Choosing between them is not a matter of which is superior overall, but which one aligns more closely with your shooting environment, mission requirements, and personal preferences.

Long Range Scope Settings for Windy Conditions: Holds, Turrets, and Parallax

Long-range scope settings in windy conditions are less about finding one perfect number and more about building a repeatable wind process. Start with a confirmed zero, a level scope, correct parallax, reliable ballistic data, and a reticle or turret system you understand. Then estimate wind speed and direction, convert it into a hold or dialed correction, fire carefully, watch impact, and update the correction as conditions change.

For most shooters, the safest and most practical approach is to hold for wind with the reticle when wind is changing, and dial elevation only after the rifle is properly zeroed. Wind can shift between the shooter and target, so a correction that worked one minute may be wrong the next. That is why wind calls should be treated as educated estimates, not permanent settings.

Table of contents

Quick Answer

For windy long-range shooting, confirm your zero first, level the scope, set parallax for the target distance, estimate wind speed and direction, use your ballistic data to convert that estimate into MOA or MIL correction, and favor reticle holds when wind is shifting. Dialing wind can work in steady conditions, but holding is usually faster when the wind changes between shots.

Do not chase wind corrections until your fundamentals are stable. A poor trigger press, inconsistent position, bad zero, loose mount, or parallax error can look like a wind problem. Fix the rifle and shooter system first, then work on wind.

How Wind Affects Long-Range Shots

Wind pushes a bullet sideways while it is in flight. The farther the target, the longer the bullet is exposed to wind. Drift depends on distance, wind speed, wind direction, bullet velocity, ballistic coefficient, air density, and whether the wind is steady or changing along the bullet path.

Full-Value and Half-Value Wind

A wind blowing directly from 3 o’clock or 9 o’clock is often called full-value because it has the strongest sideways effect. A wind from an angle has less effect. A headwind or tailwind usually affects vertical impact more than horizontal drift, though real-world terrain can make wind behave unpredictably.

Wind Is Not the Same Everywhere

The wind at the firing line may not match the wind near the target. Grass, mirage, dust, trees, terrain, and target movement can all show different clues. Weather services such as NOAA/National Weather Service wind safety guidance are useful for understanding wind terms, but range wind still has to be read locally.

Zero, Scope Level, and Parallax

Before adjusting for wind, make sure the rifle and scope are mechanically ready. A bad zero, canted scope, loose mount, or parallax error can create horizontal misses that look like wind drift. That makes learning wind nearly impossible.

Confirm Zero First

Confirm zero on paper before long-range work. If the rifle is not centered at your chosen zero distance, wind practice becomes guesswork. If you need a refresher, see our guide on how to zero a scope for .308; the same basic zeroing discipline applies beyond that cartridge.

Level the Scope

Scope cant matters more as distance increases. If the rifle is tilted, dialing elevation can also move impact sideways. Use a level setup, consistent rifle position, and repeatable cheek weld. A level bubble can help if used without distracting from safety and fundamentals.

Set Parallax Carefully

Parallax error can shift the apparent reticle position if your eye is not centered. Set parallax for the target distance when your scope allows it, then keep your head position consistent. Our rifle scope parallax adjustment guide explains this in more detail.

Reading Wind Speed and Direction

Wind reading is the hard part because wind changes constantly. Use multiple clues: meter readings, grass, leaves, mirage, dust, target movement, flags, and previous impacts. Do not depend on one clue if others disagree.

Estimate Speed

A handheld wind meter can measure wind at your position, but it does not measure wind downrange. Use it as a baseline, then compare with what you see through the scope or spotting optic. Mirage can be especially useful on warm days, though it takes practice.

Estimate Direction

Wind direction matters as much as speed. A 10 mph wind from the side is not the same as a 10 mph wind from behind you. Convert direction into a practical value before applying a correction. Many shooters think in clock positions because it is quick and easy to communicate.

Using Reticle Wind Holds

Reticle holds are often the fastest way to manage changing wind. If your ballistic data says you need 0.6 MIL or 2 MOA of wind, you can hold that amount into the wind using the reticle instead of touching the windage turret.

Why Holding Is Popular

Holding lets you update quickly. If the wind drops or switches, you can change the hold for the next shot without dialing back and forth. This is useful for target shooting, hunting practice, and any situation where wind is not steady.

Know Your Reticle

A wind hold only works if you understand your reticle marks. MIL and MOA systems are both useful, but mixing them carelessly creates mistakes. Match your ballistic data to your scope system and practice reading the reticle before relying on it.

Dialing Wind Corrections

Dialing wind means turning the windage turret to move the point of impact. It can work in steady conditions, especially from a stable position on known-distance targets. The problem is that wind often changes before the next shot.

When Dialing Makes Sense

Dialing may make sense when the wind is stable, the target distance is known, and you have time to reset the turret. It can also help when the correction is large and your reticle hold would be hard to manage precisely.

Risks of Dialing

The main risk is forgetting to return to zero or chasing every wind change with the turret. If you dial wind, keep a clear habit for tracking what is on the turret. Many shooters dial elevation and hold wind to reduce that risk.

Spotting Misses and Updating Corrections

Your first wind call is only a starting point. Watch the bullet trace, splash, target movement, or impact when safe and possible. A spotter can help. If the shot lands left or right and your fundamentals were clean, update the wind hold.

Call the Shot First

Before blaming wind, ask whether the shot broke cleanly. If you pulled the shot or lost position, the impact may not be useful wind data. Good follow-through helps you tell the difference.

Use Small Adjustments

Make measured corrections instead of guessing wildly. If the impact is 0.5 MIL left, add about 0.5 MIL of correction if conditions appear unchanged. If the wind changed during the shot, update based on both impact and observation.

Practice Drills

Wind practice should be structured. Random shooting in wind can teach bad habits if you do not record conditions, holds, and impacts. Use a notebook or app to track your calls.

Known-Distance Drill

Set a known distance, estimate wind, choose a hold, fire a careful shot, and record the result. Repeat after wind changes. The goal is not only hits; it is learning how your estimates compare with real impacts.

No-Turret Wind Drill

Dial elevation only and hold all wind in the reticle. This builds reticle fluency and prevents turret confusion. It also teaches how quickly wind calls can change.

Common Mistakes

The most common mistake is treating wind as a fixed setting. Wind changes. The second mistake is blaming wind for every miss. Poor position, trigger control, zero, mount, ammo, and parallax can all create horizontal error. Build the whole system carefully.

Using Too Much Magnification

High magnification can make mirage and wobble harder to manage. Use enough magnification to aim precisely, but not so much that you lose field of view, target tracking, or stable sight picture. Our guide on how to use a scope for long-range shooting covers broader optic setup habits.

Ignoring Safety

Long-range shooting requires a safe range, safe backstop, known target area, and clear rules. Never shoot at unknown distances or uncertain backgrounds. If you are practicing at a range, follow all range commands and etiquette.

FAQ

Should I dial or hold wind at long range?

Many shooters dial elevation and hold wind because wind changes quickly. Dialing wind can work in steady conditions, but holding is usually faster and easier to update between shots.

What scope setting matters most in wind?

A confirmed zero, level scope, correct parallax, and a reticle/turret system you understand matter most. Wind correction cannot be trusted if the basic scope setup is wrong.

Does wind affect every bullet the same way?

No. Drift depends on velocity, ballistic coefficient, distance, air conditions, and wind. Two cartridges can need very different wind holds at the same distance.

How do I learn to read wind better?

Practice with known distances, record wind estimates and impacts, watch mirage and vegetation, use a wind meter as a baseline, and compare your calls to real results. Wind reading improves through structured feedback.

Can parallax look like a wind problem?

Yes. If parallax is not set correctly and your eye position changes, the reticle can appear to shift on target. That can create horizontal or vertical error that gets mistaken for wind.

Final Thoughts

Windy long-range shooting is a process, not a magic scope setting. Confirm the rifle, level the scope, set parallax, estimate the wind, use reliable ballistic data, hold or dial thoughtfully, and update based on impacts. The more disciplined your process, the less mysterious wind becomes.

Shooting Stance for Beginners: A Detailed Range-Safety Guide

A good beginner shooting stance is a stable, balanced body position that helps you support the firearm comfortably, manage recoil, and keep the muzzle pointed in a safe direction. For most new shooters at a supervised range, that means feet about shoulder-width apart, knees soft, weight slightly forward, and a relaxed but firm grip.

This guide explains stance basics in a range and sport-shooting context. It does not replace direct instruction from a certified instructor, range safety officer, firearm manual, or posted range rules.

Safety First

Safety comes before stance. Before thinking about footwork or grip, confirm that you are following the universal firearm safety rules and the posted rules of your range. The NSSF firearm safety rules are a useful starting point for reviewing the fundamentals.

  • Treat every firearm as if it is loaded.
  • Keep the muzzle pointed in a safe direction.
  • Keep your finger outside the trigger guard until you are ready to fire.
  • Be sure of your target and what is beyond it.
  • Follow instructions from the range safety officer.

New shooters benefit most from direct supervision. A qualified instructor or range safety officer can correct stance and handling errors in real time, which a written guide cannot do.

What a Shooting Stance Is

A shooting stance is the way you position your feet, legs, hips, torso, arms, head, and eyes while shooting. A consistent stance helps create a repeatable platform, reduces unnecessary movement, and helps you return to the sights between shots.

Stance is only one part of the fundamentals. Grip, sight alignment, sight picture, breathing, and trigger control all matter too. If you are working on accuracy, pair stance practice with our guide on the importance of trigger control for shooting accuracy.

Common Beginner Stances

Two handgun stances are commonly introduced to beginners: the isosceles stance and the Weaver stance. Rifle and shotgun positions are different, so confirm the correct setup for your firearm type with an instructor.

The Isosceles Stance

In the isosceles stance, the shooter faces the target squarely, with both arms extended evenly. Many beginners find it simple because the body position feels balanced and symmetrical.

The Weaver Stance

In the Weaver stance, the body is angled slightly, with the support-side foot forward and the firing-side foot back. Some shooters like the added tension and support, but it can take more coaching to learn comfortably.

Choosing Between Them

There is no single stance that fits every shooter. Body size, strength, mobility, firearm type, and range setup all matter. Try beginner stances under supervision and keep the one that feels stable, comfortable, and repeatable.

How to Build a Stable Stance Step by Step

Build stance from the ground up while keeping the muzzle in a safe direction. Small details matter, but the goal is not to look perfect. The goal is a repeatable position you can maintain safely.

AreaBeginner CueWhy It Helps
FeetAbout shoulder-width apartCreates a stable base
KneesSoft, not lockedReduces stiffness and fatigue
WeightSlightly forwardHelps manage recoil without leaning back
ShouldersRelaxed and levelReduces unnecessary tension
HeadUpright and naturalImproves comfort and sight alignment

For broader accuracy fundamentals after stance, see our guide on how to improve shooting accuracy.

Eye and Ear Protection

Eye and ear protection should be in place before you step to the firing line. Hearing protection helps reduce noise exposure, and eye protection helps guard against ejected cases, fragments, and other range hazards. The CDC/NIOSH noise and hearing loss prevention resources explain why hearing protection matters, and OSHA publishes guidance on eye and face protection.

Always follow your range’s specific PPE requirements. If your range requires a certain rating or style of protection, the range rule comes first.

Common Beginner Mistakes

  • Leaning backward instead of staying balanced and slightly forward.
  • Locking the knees and becoming stiff.
  • Over-tensing the shoulders, hands, or arms.
  • Letting the muzzle drift while adjusting foot placement.
  • Trying advanced positions before the basics are consistent.

Outside feedback helps. Ask a range safety officer or instructor to watch your stance during a supervised session. A small correction early can prevent a habit from becoming hard to change later.

Frequently Asked Questions

What is the best shooting stance for beginners?

Many beginners start with the isosceles stance because it is simple and symmetrical. The best stance is the one you can repeat safely and comfortably under supervision.

Does a good stance improve accuracy?

A stable stance supports accuracy, but it does not guarantee it. Accuracy comes from combining stance with grip, sight alignment, breathing, trigger control, and safe practice over time.

Should beginners learn stance from an instructor?

Yes, if possible. Written guidance can explain the basics, but an instructor or range safety officer can correct unsafe handling, balance problems, and posture issues in real time.

Is the stance the same for handguns and long guns?

No. Handgun stances such as isosceles and Weaver are different from rifle and shotgun positions. Confirm the right setup for your firearm type with a qualified instructor.

How long should I practice my stance?

Use short, focused, supervised sessions and stop when you become tired. Quality and safety matter more than long sessions.

Final Range-Safety Reminder

A good shooting stance should feel stable, repeatable, and safe. Keep the muzzle in a safe direction, wear proper eye and ear protection, follow range commands, and ask for qualified help whenever you are unsure. For more safety-first range basics, read our shooting range safety rules guide.

Legal Hunting Gear: Responsible Hunter Checklist

Legal hunting gear is not just the equipment you own; it is the equipment you are allowed to use for the species, season, state, public-land unit, and method of take. Before every hunt, verify current rules with your state wildlife agency, confirm your license and tags, and make sure your firearm, bow, ammunition, clothing, lights, electronics, and transport plan match the regulation booklet for that exact hunt.

Table of Contents
  1. Quick Answer
  2. Licenses, Tags, and Hunter Education
  3. Firearms, Bows, and Legal Methods
  4. Ammunition, Arrows, and Broadheads
  5. Blaze Orange and Required Clothing
  6. Lights, Electronics, and Calls
  7. Public-Land and Access Rules
  8. Transport and Storage
  9. How To Verify Gear Rules
  10. Pre-Hunt Compliance Checklist
  11. FAQ

Quick Answer

The safest way to choose legal hunting gear is to start with the regulation source, not the gear aisle. Check the current season rules, species rules, weapon restrictions, required clothing, ammunition limits, public-land rules, and transport laws before packing. This article is a planning guide, not legal advice.

Use Official Sources First

For hunting rules, your state wildlife agency is the authority. National resources such as the U.S. Fish and Wildlife Service, Hunter-Ed, and the International Hunter Education Association can support learning, but they do not replace current local regulations.

Do Not Assume Last Year Still Applies

Rules can change by year, county, zone, public-land unit, species, and season. If a rule matters to your hunt, verify it again before you go.

Licenses, Tags, and Hunter Education

Legal gear starts with legal permission to hunt. Licenses, permits, tags, stamps, hunter-education requirements, and reporting rules vary by state and species. Carry proof in the format your state accepts, and know whether electronic copies are valid where you hunt.

Hunter Education

Many states require hunter education based on age or hunting method. Even when not required, hunter education is useful because it covers safe handling, ethics, wildlife identification, and basic legal responsibilities.

Tags and Reporting

Know how to validate a tag, attach it if required, report harvest, and meet check-station or digital reporting rules. A successful hunt can still create problems if the reporting step is missed.

Firearms, Bows, and Legal Methods

Legal weapon rules can be specific. A rifle, shotgun, muzzleloader, crossbow, compound bow, or air rifle may be allowed for one hunt and restricted for another. Confirm method-of-take rules before choosing the setup.

Firearm Rules

Check cartridge, caliber, magazine, shotgun, muzzleloader, suppressor, and public-land firearm rules where applicable. For safe handling fundamentals, review the NSSF firearm safety rules.

Archery and Crossbow Rules

Archery seasons may have minimum draw weight, broadhead, bow type, crossbow, or disability-permit rules. Do not assume a crossbow is legal during every archery season.

Ammunition, Arrows, and Broadheads

Ammunition and projectile rules can affect both legality and ethics. Some areas restrict lead ammunition, shot size, broadhead type, bullet type, or minimum energy. Confirm both the law and your equipment’s compatibility.

Ammunition Compatibility

Use ammunition that matches the firearm marking and manual. For safety context, SAAMI publishes information about unsafe firearm and ammunition combinations.

Non-Lead and Area Restrictions

Some places require non-lead ammunition or restrict certain projectiles to protect wildlife. Check the exact unit and species rules before assuming your usual ammunition is allowed.

Blaze Orange and Required Clothing

Many states require blaze orange or blaze pink during firearm seasons, youth hunts, or specific public-land hunts. Requirements may include hat, vest, square inches, visibility from all sides, or exceptions for certain methods.

Pack Required Clothing Early

Do not leave required clothing as a last-minute decision. Keep a dedicated legal-visibility layer in your hunting bag so it is available when the season or property requires it.

Lights, Electronics, and Calls

Electronics rules vary widely. Electronic calls, night-vision devices, thermal optics, artificial lights, drones, trail cameras, radios, GPS units, and tracking devices may be regulated differently depending on state and species.

Night and Predator Hunting

Night hunting rules are especially variable. Some states allow lights or thermal optics for certain predators, while others restrict them. Verify the species, season, weapon, and land type before using any night equipment.

Drones and Trail Cameras

Drones and cellular trail cameras can create legal and fair-chase issues. Confirm current rules before using electronic scouting tools in connection with a hunt.

Public-Land and Access Rules

Public land can add its own requirements. A gear setup that is legal statewide may still be restricted on a wildlife management area, national wildlife refuge, park, forest, or private-access program.

Check Unit-Specific Rules

Look for access permits, parking rules, weapon restrictions, stand rules, camping limits, retrieval rules, and vehicle restrictions. Read the unit page, not just the statewide season summary.

Transport and Storage

Transport rules can cover unloaded firearms, cases, vehicles, boats, public roads, ammunition storage, and crossing state lines. Secure storage also matters at home, camp, and in vehicles. Project ChildSafe offers firearm storage resources for responsible owners.

Before You Drive

Before leaving, confirm how your firearm or bow must be transported, where ammunition should be stored, and whether local rules differ across your route. Crossing jurisdictions can change the rules.

How To Verify Gear Rules

Do your rule check in layers. First, confirm the statewide season and method-of-take rules. Second, check the species page or regulation table for weapon, ammunition, tag, and reporting requirements. Third, read the public-land, refuge, or private-access page for property-specific restrictions. Finally, check the date on the source and make sure you are reading the current season, not an old PDF or cached search result.

Save Proof the Right Way

If your state allows digital proof, keep offline copies or screenshots of licenses, tags, permits, and key regulation pages. If your state requires paper copies or physical tags, pack them before the trip. Digital convenience does not help if the phone battery dies, there is no service, or the rule requires a physical document.

Ask Before You Guess

If a rule is unclear, contact the wildlife agency, land manager, or local conservation officer before the hunt. Guessing on gear legality can cost more than a missed hunt; it can risk citations, confiscated gear, or unsafe decisions in the field.

Pre-Hunt Compliance Checklist

  • Verify current state wildlife agency rules for species, season, unit, and method.
  • Confirm license, tags, permits, stamps, and reporting requirements.
  • Check legal weapon, ammunition, arrow, broadhead, and magazine rules.
  • Pack required blaze orange or other visibility clothing.
  • Confirm electronic device, light, call, and trail-camera rules.
  • Read public-land or property-specific access rules.
  • Confirm transport and storage requirements before traveling.
  • Keep screenshots or printed references where allowed, but rely on official current sources.

FAQ

Is this article legal advice?

No. This is a planning guide. Always verify current rules with the state wildlife agency or official land manager for your specific hunt.

Can hunting gear be legal in one state and illegal in another?

Yes. Firearm, bow, ammunition, lighting, electronics, and clothing rules vary by state and sometimes by unit, season, or species.

Do I need blaze orange for every hunt?

Not always. Requirements depend on state, season, land type, weapon, and species. Check the current regulation booklet before you hunt.

Are electronic calls and thermal optics legal?

Sometimes, but not everywhere or for every species. These rules change often enough that you should verify them directly with the current state or land-manager source.

Final Takeaway

Responsible hunters choose gear after checking the rules, not before. Build your setup around current official regulations, safe handling, ethical shot choices, and the specific species and place you plan to hunt.

Shooting Range Safety Rules: A Beginner-Friendly Guide

Shooting range safety comes down to a small set of rules followed every single time: keep the muzzle pointed in a safe direction, keep your finger off the trigger until you are ready to fire, treat every firearm as loaded, know your target and what is beyond it, and follow the range officer’s commands without exception. These habits do not change with experience level. A first-time shooter and a lifelong competitor follow the same core rules because range safety depends on consistency, not skill.

This guide explains the universal handling rules, how range commands work, what to do before and during a cease-fire, why eye and ear protection matter, and the hygiene steps that reduce lead exposure at indoor ranges. Range rules vary by facility, so always read and follow the posted rules and the range officer’s instructions at the range you are using.

The Core Firearm Safety Rules

The core firearm safety rules are the foundation of every range, and they apply whether you are handling a rifle, pistol, or shotgun. Most range incidents trace back to breaking one of these basics, so they are worth knowing before you ever step up to the firing line. The National Shooting Sports Foundation’s firearm safety rules are a useful authority reference for these habits.

Always Point the Muzzle in a Safe Direction

A safe direction is one where an accidental discharge would not strike a person or cause unintended harm. At a range, that almost always means pointing the muzzle downrange toward the backstop or target line. Never let the muzzle cross your body or another person, including while picking up, setting down, or carrying a firearm.

Keep Your Finger Off the Trigger Until Ready to Fire

Rest your trigger finger straight along the frame or receiver, outside the trigger guard, until your sights are on the target and you have decided to shoot. This single habit prevents many unintentional discharges and pairs naturally with safe stance and grip practice.

Treat Every Firearm as If It Is Loaded

Handle every firearm as though it can fire, even one you believe is empty. Visually and physically confirm the chamber is clear when you pick one up, and do not rely only on someone else’s word that it is unloaded.

Know Your Target and What Is Beyond It

Be sure of your target and the area behind and around it before firing. At a supervised range the backstop handles this, but you are still responsible for placing shots where the range allows and not firing at anything other than your authorized target.

How Range Commands Work

Range commands are verbal instructions a range safety officer uses to control what everyone on the line does at the same time. Following them immediately is one of the most important safety behaviors at any supervised range because they keep all shooters synchronized.

Common Commands You May Hear

  • Commence fire or the range is hot: shooters at the firing line may load and fire at authorized targets.
  • Cease fire: stop shooting immediately, take your finger off the trigger, and wait for the next instruction. Anyone may call a cease-fire if they see a hazard.
  • Make safe or unload and show clear: unload the firearm, remove the magazine if applicable, open the action, and confirm the chamber is empty.
  • The range is cold: no one handles firearms. This is when shooters may go forward of the line to set or retrieve targets.

Exact command wording can vary by facility, so the range officer and posted range rules always override generic online guidance.

Never Touch a Firearm During a Cold Range

When the range is cold and people may be downrange, do not touch any firearm for any reason, even to case it or move it. Step back from the bench and keep your hands away until the range is called hot again.

Before You Step to the Firing Line

Before you approach the firing line, confirm a few things so you arrive ready and do not create a hazard while setting up. Good preparation reduces fumbling on the line, which is where many handling mistakes happen.

  • Bring firearms to the range unloaded and cased unless the range directs otherwise.
  • Read posted rules, ammunition restrictions, target rules, and lane procedures.
  • Put on eye and ear protection before entering or approaching the active firing area.
  • Keep ammunition, magazines, and gear organized so you do not need to turn around with a firearm in hand.

Cease-Fire Behavior

A cease-fire means stop firing now, and it can be called by the range officer or by any shooter who sees a problem. Stop shooting, remove your finger from the trigger, keep the muzzle pointed in a safe direction, and wait for instructions.

Do not finish your shot, do not turn around with the firearm in hand, and do not ask why before making the firearm safe if instructed. Once the situation is resolved, the range officer will call the range hot again before anyone resumes.

Eye and Ear Protection

Eye and ear protection are required at most ranges because gunfire produces noise that can permanently damage hearing and debris that can injure unprotected eyes. The OSHA eye and face protection overview is a helpful source for understanding why eye protection matters, although range-specific rules still come from the facility.

Hearing Protection

Use earplugs, earmuffs, or both together for higher protection, especially indoors or next to large-caliber firearms. Hearing damage from impulse noise can be permanent and is not always noticeable right away.

Eye Protection

Wear impact-rated safety glasses to guard against ejected casings, fragments, and unburned powder. Side coverage helps, and ordinary prescription glasses are not a substitute unless they meet an appropriate safety rating.

Indoor Range Lead and Noise Hygiene

Indoor ranges carry two extra considerations: lead exposure from primer residue and airborne particles, and concentrated noise in an enclosed space. The CDC/NIOSH indoor firing range guidance explains why ventilation, hygiene, and hearing protection matter in these spaces.

  • Wash your hands and face before eating, drinking, or leaving the range.
  • Avoid eating, drinking, or touching your face on the firing line.
  • Keep range clothing separate from other laundry when practical.
  • Use strong hearing protection indoors because reflected sound can make gunfire feel louder.

A Simple Range Safety Checklist

Use this quick checklist before and during a range trip. It is not a replacement for facility rules, but it helps keep the most important habits visible.

  • Firearm transported unloaded and cased.
  • Posted range rules and range officer instructions read and understood.
  • Eye protection on and appropriate for impact risk.
  • Ear protection on, doubled up indoors or near louder firearms when needed.
  • Muzzle always pointed downrange in a safe direction.
  • Finger off the trigger until ready to fire.
  • Every firearm treated as loaded.
  • Target and backstop confirmed before firing.
  • Immediate stop on any cease-fire call.
  • No firearm handling when the range is cold and people are downrange.
  • Hands and face washed before eating or leaving the range.

Frequently Asked Questions

What are the most important shooting range safety rules?

The most important rules are to keep the muzzle pointed in a safe direction, keep your finger off the trigger until ready to fire, treat every firearm as loaded, know your target and what is beyond it, and follow the range officer’s commands immediately.

Can anyone call a cease-fire at a shooting range?

Yes. Any shooter who sees a hazard can call cease-fire. Everyone on the line should stop firing immediately, remove their finger from the trigger, and wait for instructions.

Do I need both eye and ear protection at the range?

Yes. Eye protection guards against ejected casings and fragments, and ear protection helps reduce hearing risk from gunfire noise. Wear both whenever you are on or near an active firing line.

Why is lead hygiene important at indoor ranges?

Indoor shooting can produce airborne lead particles and residue from primers. Washing your hands and face, avoiding food and drink on the line, and separating range clothing help reduce exposure.

Are shooting range rules the same everywhere?

The core handling rules are consistent, but each range sets its own rules for calibers, rapid fire, holster use, targets, and procedures. Always follow the posted rules and the range officer at the facility you are using.

What to Pack for a Day Hunting: The Complete Field Checklist

For a one-day hunt, pack the gear that keeps you legal, visible, hydrated, oriented, warm enough, and able to handle small problems without overloading your pack. The exact list changes by species, season, state rules, weather, terrain, and how far you will be from the truck. Use this as a field checklist, then confirm current regulations and property rules before you leave.

Table of Contents
  1. Quick Answer
  2. Day Hunting Pack Checklist
  3. Legal and Safety Items
  4. Navigation and Communication
  5. Water, Food, and Weather Protection
  6. Field Care and Cleanup
  7. How to Organize the Pack
  8. Common Packing Mistakes
  9. FAQ
  10. Final Takeaway

Quick Answer

For a day hunt, pack your license and tags, required blaze orange or visibility gear, water, snacks, first aid, navigation, communication, weather layers, headlamp, knife or field-care items, gloves, bags, and any species-specific gear required by the hunt. Keep the pack light enough to carry all day, but do not cut safety, legal, or weather-preparation items just to save a few ounces.

A good day-hunting pack starts with legal items, visibility, water, navigation, first aid, weather layers, and field-care basics.

Day Hunting Pack Checklist

  • License, tags, permits, and ID: Keep them dry and easy to reach.
  • Current regulations: Save or print season dates, limits, legal methods, and property rules.
  • Visibility gear: Pack required blaze orange or other visibility items for your state and hunt type.
  • Water and snacks: Carry more water than you expect to need, especially in warm weather or steep terrain.
  • Navigation: Bring a charged phone, map, compass, GPS, or offline map plan.
  • Communication: Tell someone your plan and carry a way to contact help if coverage allows.
  • First aid and emergency items: Include blister care, bandages, medications, fire starter, and an emergency blanket.
  • Weather layer: Pack rain, wind, or insulation layers based on the forecast.
  • Headlamp: Carry a headlamp even for morning-only or afternoon-only hunts.
  • Field-care items: Gloves, bags, wipes, and a knife where appropriate and legal.

The National Park Service Ten Essentials framework is useful for thinking beyond hunting gear: navigation, light, sun/weather protection, first aid, shelter, water, food, and repair items all matter outdoors. Hunter education resources such as Hunter Ed are also helpful reminders that field preparation and safe decisions go together.

Start with what proves you are legal and what keeps you visible. A license, tag, permit, written permission where needed, and saved regulation summary should be packed before any comfort item. Do not rely on memory for season dates, legal methods, tagging rules, or public-land boundaries. Regulations can change by state, unit, species, season, and property type.

Visibility and Identification

Blaze orange or other visibility requirements vary, so check your state wildlife agency before hunting. Even where it is not required, visibility can matter around other hunters, access roads, and low-light movement. Keep tags, ID, and permission paperwork in a waterproof pouch or phone folder that works offline.

First Aid and Emergency Basics

A small first-aid kit should cover cuts, blisters, minor sprains, personal medication, and basic discomfort. Add a whistle, fire starter, emergency blanket, and a simple repair item such as tape or cord. The goal is not to pack for every disaster; it is to avoid turning a small problem into a long walkout problem.

If you are new or returning after a long break, hunter education organizations such as IHEA-USA are a useful starting point for safety mindset, responsible planning, and understanding why preparation matters before the hunt begins.

Carry a navigation plan that still works if cell service drops. Offline maps, a paper map, compass, GPS, or marked access points can keep a short hunt from becoming confusing after dark. If you use a phone, start with a full battery and consider a small power bank for cold weather or long sits.

Tell someone where you are going, where you plan to park, and when you expect to return. If your route changes, update that person when possible. This simple habit is one of the most valuable things in your pack even though it weighs nothing.

Water, Food, and Weather Protection

Water is easy to underpack because day hunts feel short. Bring enough for the weather, terrain, and distance from the vehicle. Add compact snacks that will not crush easily and that you will actually eat when cold, tired, or focused on the hunt.

Layer for the Worst Part of the Day

Pack for the coldest, wettest, or windiest part of the hunt, not just the weather at the truck. A light rain layer, gloves, warm hat, or insulating layer can make a long sit safer and more comfortable. Avoid cotton layers when wet weather or sweating is likely.

Field Care and Cleanup

If your hunt could involve field care, pack disposable gloves, game bags or legal transport materials, wipes, a sharp knife, and a small trash bag. Keep these items separate from food and clothing. Know the tagging, evidence-of-sex, transport, and check-in requirements before the hunt, because those rules are not the same everywhere.

For bird, small-game, or waterfowl hunts, your field-care kit may look different from a deer hunt. Keep the list species-specific rather than carrying every tool you own.

How to Organize the Pack

Put high-use and safety items where you can reach them without dumping the pack. License, tags, headlamp, first aid, gloves, water, and navigation should be easy to find. Less urgent gear can ride deeper in the pack. Use small pouches so loose items do not sink to the bottom.

Light but Not Bare

The best day-hunting pack is not the heaviest one or the emptiest one. It is the pack that covers likely needs without making you slow, noisy, or uncomfortable. After each hunt, remove what you did not use, replace what you did use, and keep the legal/safety core consistent.

Common Packing Mistakes

  • Forgetting tags, permits, or written permission.
  • Assuming last year’s regulations are still current.
  • Skipping water because the hunt is “only a few hours.”
  • Carrying a headlamp with weak or untested batteries.
  • Overpacking comfort gear while underpacking emergency basics.
  • Leaving field-care gloves or bags in another pack.
  • Failing to tell someone the hunt plan.

FAQ

What should every day hunter pack first?

Pack license, tags, required visibility gear, water, navigation, communication, first aid, weather protection, and a headlamp first. Then add species-specific items.

Do I need a full survival kit for a day hunt?

You do not need a huge pack, but you should carry basic emergency items for weather, darkness, injury, and navigation problems. A day hunt can still become longer than planned.

Should I pack different gear for public land?

Often, yes. Public land may require extra attention to boundaries, parking rules, hunter visibility, pack-out distance, and current agency regulations.

How much water should I bring?

Bring enough for the weather, terrain, and expected time out, with extra margin for a delayed return. Heat, steep terrain, and long walks increase the need quickly.

Final Takeaway

A good day-hunting pack is built around legal readiness, safety, weather, navigation, hydration, and field care. Keep it light, but do not make it fragile. Confirm current rules, tell someone your plan, and pack the items that help you come home safely even when the hunt changes.

Best Ear Protection for Shooting Range: Complete Buyer’s Guide

Spending time at a shooting range without proper ear protection can permanently damage your hearing. Firearms produce impulse noise that often exceeds 140–170 decibels, far above the safe hearing threshold. Even a single unprotected gunshot can cause irreversible hearing loss or tinnitus. That’s why choosing the best ear protection for shooting range use is not optional it’s essential.

In this in-depth guide, we’ll explore how shooting noise affects your ears, the different types of hearing protection available, what features matter most, and how to choose the right option based on your shooting style and environment.

Why Ear Protection Is Critical at a Shooting Range

Gunshots are classified as impulse noise, which is more damaging than continuous noise because it delivers a sudden, extremely loud sound wave. Indoor ranges are especially dangerous since sound reflects off walls and ceilings, amplifying exposure. Repeated exposure without adequate protection can lead to:

  • Permanent noise-induced hearing loss
  • Ringing in the ears (tinnitus)
  • Reduced ability to hear conversations or range commands
  • Increased sensitivity to everyday sounds

Quality ear protection reduces sound levels to safe ranges while still allowing situational awareness.

Understanding Noise Reduction Rating (NRR)

The Noise Reduction Rating (NRR) is one of the most important metrics when selecting ear protection for shooting. It indicates how many decibels of noise the device can reduce.

For shooting ranges:

  • Minimum recommended NRR: 22 dB
  • Ideal NRR for indoor ranges: 26–33 dB

Higher-caliber firearms and indoor environments require higher NRR values. Many experienced shooters even double up by wearing earplugs under earmuffs for maximum protection.

Types of Ear Protection for Shooting Ranges

Foam Earplugs

Foam earplugs are one of the most affordable and effective solutions when used correctly. They expand inside the ear canal to create a tight seal that blocks noise.

They are lightweight, disposable, and offer high NRR ratings often up to 33 dB. However, they must be inserted properly to be effective, and they don’t allow you to hear conversations or range commands clearly.

Foam earplugs are best suited for shooters who prioritize maximum noise reduction and don’t mind limited communication.

Reusable Earplugs

Reusable earplugs are typically made from silicone or rubber and are designed for long-term use. They are easier to insert than foam plugs and more environmentally friendly.

While their NRR is usually slightly lower than foam plugs, they are comfortable for extended sessions and ideal for shooters who visit the range frequently.

Some models include acoustic filters that reduce harmful noise while letting lower-level sounds pass through.

Passive Earmuffs

Passive earmuffs cover the entire ear and block noise through sound-dampening materials. They are easy to put on and take off, making them popular among beginners.

Most passive earmuffs offer NRR ratings between 22 and 30 dB. They work well at outdoor ranges but can interfere with cheek weld when using rifles or shotguns.

They are a solid choice for casual shooters and guests at the range.

Electronic Earmuffs (Best Overall Choice)

Electronic earmuffs are widely considered the best ear protection for shooting range use, especially for regular shooters. These muffs use built-in microphones to amplify low-level sounds like speech while instantly cutting off harmful gunshot noise.

This allows you to:

  • Hear range commands clearly
  • Communicate with other shooters
  • Maintain situational awareness

High-quality electronic earmuffs typically offer NRR ratings around 22–26 dB and are ideal for both indoor and outdoor shooting.

Custom Molded Ear Protection

Custom molded earplugs are created from impressions of your ears, providing a perfect fit and superior comfort. They offer consistent protection and are excellent for long shooting sessions.

Although more expensive, they are popular among competitive shooters, instructors, and professionals who spend hours at the range.

Some advanced versions include electronic sound enhancement similar to electronic earmuffs.

Best Ear Protection Based on Shooting Environment

Indoor Shooting Ranges

Indoor ranges are louder due to sound reflection. For these environments, the best option is double hearing protection foam earplugs combined with electronic or passive earmuffs.

This setup can provide a combined protection level suitable for high-caliber firearms and prolonged sessions.

Outdoor Shooting Ranges

Outdoor ranges disperse sound more effectively. High-quality electronic earmuffs or high-NRR earplugs are usually sufficient, depending on firearm caliber.

Electronic earmuffs are especially beneficial outdoors, where communication and awareness are important.

Key Features to Look for in Shooting Ear Protection

Comfort is critical, especially during long sessions. Look for padded ear cups, adjustable headbands, and lightweight designs.

Durability matters as well. Shooting ear protection should withstand frequent use, temperature changes, and minor impacts.

Low-profile ear cups are important for rifle shooters to avoid interference with stock positioning.

Battery life is another factor for electronic earmuffs. Models with automatic shutoff features help conserve power.

How to Properly Wear Ear Protection

Even the best ear protection won’t work if worn incorrectly. Foam earplugs should be rolled tightly, inserted deeply, and allowed to expand fully. Earmuffs must create a tight seal around the ears without gaps caused by glasses or hats.

For maximum safety, especially indoors, combining earplugs with earmuffs provides the highest level of hearing protection.

Final Thoughts

The best ear protection for shooting range activities depends on your shooting frequency, environment, and firearm type. For most shooters, electronic earmuffs paired with high-NRR earplugs offer the best balance of safety, comfort, and awareness.

Protecting your hearing is a lifelong investment. Unlike other gear, hearing loss cannot be repaired only prevented. Choosing the right ear protection ensures you can enjoy shooting sports safely for years to come.

Budget Rifle Scope for Beginners: What Actually Matters


A good budget rifle scope for a beginner is one with clear glass at the magnification you will use, a simple reticle you understand, repeatable adjustments that hold zero, solid sealed construction, and a manufacturer warranty that stands behind it. You do not need to spend the most to get a scope that works for learning, but a few features matter far more than price. This guide explains what to look for, what to skip, and how to shop smart so you buy a scope that helps you learn instead of one you fight or outgrow quickly.

Table of contents

What Matters Most in a Beginner Scope

For a beginner, the features that matter most are clear glass at usable magnification, a reticle you can read and understand, adjustments that move reliably and return to zero, a sealed and shock-resistant body, and a warranty you can actually use. Price is real, but a slightly higher price that buys repeatable adjustments and a fog-proof seal is usually worth it over the cheapest option that fails on either. Focus your budget on those fundamentals before fancy features.

Before mounting anything, confirm safe handling habits. The NSSF firearm safety rules are a clear, free reference for treating every firearm safely while you sight in and practice.

Glass Clarity and Coatings

Clarity is how sharp and bright the image looks through the scope, and it is the feature you will notice every time you use it. Look for lenses described as fully multi-coated, which means all air-to-glass surfaces have multiple coatings to reduce glare and improve light transmission. You do not need top-tier glass to learn, but a dim or fuzzy image makes it harder to aim and tires your eyes, especially in early morning or late evening light.

Magnification Range

For most beginners, a modest variable range such as 3-9x or 4-12x covers nearly everything you will do at the range and in the field. More magnification is not automatically better; higher power narrows your field of view, magnifies wobble, and can be harder to use offhand. Pick a range that matches your typical distance, and learn to shoot at the lower end first. For a fuller explanation, see our guide on rifle scope magnification for beginners.

Reticle Choice

The reticle is the aiming pattern you see through the scope. For a beginner, a simple duplex reticle, thick outer lines that taper to a fine center, is easy to read and fast to aim with. Busy reticles packed with dots and numbers can help experienced shooters who have practiced with them, but they often confuse newcomers and slow things down. Start simple and add complexity only when you have a clear reason.

First focal plane vs second focal plane

Most budget scopes use a second focal plane reticle, where the reticle stays the same visual size as you change magnification. That is fine for beginners. If you want to understand the difference and when it matters, see our explainer on the difference between FFP and SFP rifle scopes.

Adjustments and Holding Zero

The adjustment turrets move your point of impact for elevation and windage, and the most important quality in a beginner scope is that they move predictably and return to the same point reliably. A scope that does not track or hold zero will frustrate you no matter how clear the glass is. When you sight in, a scope with repeatable clicks lets you make a correction and trust it. Capped turrets are common and helpful on a beginner scope because they protect the setting from accidental movement.

Durability and Sealing

Look for a scope described as waterproof, fog-proof, and shockproof, usually achieved by sealing the tube and purging it with a dry gas such as nitrogen. Sealing keeps moisture from fogging the inside of the scope in temperature swings, and shock resistance helps the scope survive recoil and handling. These are common features even at lower prices, and they are worth confirming before you buy.

Warranty and Support

A warranty matters more on a budget scope than many beginners expect. Several optics makers offer strong, often transferable warranties that cover defects and accidental damage, which can make a moderately priced scope a better long-term value than the cheapest option with no real support. Read the warranty terms on the manufacturer’s own page before you buy, and keep your proof of purchase.

How to Shop Smart on a Budget

Do not spend the entire budget on the optic alone. Rings, bases, bore-sighting help, and range ammunition all affect the real cost of a beginner setup. If you buy a scope that seems affordable but then pair it with weak rings or mount it with poor eye relief, the setup may shift, feel uncomfortable, or be harder to shoot consistently. A practical beginner budget should leave room for a secure mount and at least one careful sight-in session.

  • Decide your typical shooting distance first, then pick a magnification range that fits it.
  • Prioritize repeatable adjustments and a sealed body over extra magnification or a busy reticle.
  • Choose a simple reticle while you are learning the fundamentals.
  • Read the manufacturer’s warranty terms directly on their site, not just a retailer summary.
  • Budget for quality rings or a mount; a good scope on a poor mount will not hold zero. Our eye relief guide can also help you check comfort and safe head position before settling on a setup.
  • Plan to spend range time sighting in and practicing; no scope replaces practice.

Frequently Asked Questions

What magnification is best for a beginner rifle scope?

A modest variable range such as 3-9x or 4-12x suits most beginners and covers common range and field distances. Higher magnification narrows your view and magnifies wobble, so start at the lower end and learn the fundamentals first.

Do I need expensive glass to start?

No. You can learn on a moderately priced scope as long as the image is clear at your magnification, the adjustments hold zero, and the body is sealed. Spend on those fundamentals before premium glass or extra features.

Why does the warranty matter on a budget scope?

A strong warranty can make a moderately priced scope a better long-term value than the cheapest one with no support. Several makers cover defects and even accidental damage. Read the terms on the manufacturer’s site and keep your receipt.

What reticle should a beginner choose?

A simple duplex reticle is the easiest for beginners to read and aim with quickly. Busy reticles with many dots and numbers can help experienced shooters but often slow newcomers down, so start simple.

Final Takeaway

A smart budget scope choice for a beginner comes down to clear glass at a magnification you will use, a simple reticle, adjustments that hold zero, a sealed and shock-resistant body, and a warranty that backs it up. Put your money into those fundamentals, add quality rings, and plan for range time to sight in and practice. A well-chosen entry scope will support your learning for a long time without overspending on features you do not yet need.

Military Sunglasses for Outdoor Shooting: Safety Ratings, Tint, and Fit

Military-style sunglasses for outdoor shooting should be judged first as eye protection, not as a fashion accessory. The right pair needs impact-rated lenses, good side coverage, clear vision in changing light, and a fit that stays stable when you mount a rifle or shotgun.

Be careful with words like “military,” “tactical,” and “ballistic.” Those words do not prove a lens meets a protective standard. Before buying, check the actual markings, product documentation, and manufacturer claims for impact rating, UV protection, lens tint, and compatibility with your hearing protection or prescription needs.

Table of Contents

Quick Answer

For outdoor shooting, choose sunglasses or shooting glasses that are impact rated, wrap well around the eyes, block UV, stay clear in your light conditions, and fit comfortably under ear protection. If a pair only looks tactical but does not show a real safety rating, treat it as normal sunglasses, not shooting eye protection.

Clear, amber, bronze, gray, and rose lenses all have a place depending on the range, target color, background, and sunlight. The best lens is the one that protects your eyes while helping you see the sights, target, and surroundings without strain.

What Matters Most

Outdoor shooting glasses should protect against impact hazards, wind, dust, glare, ejected brass, target fragments, and small debris. They also need to stay comfortable enough that you keep them on the entire time you are around firearms.

Impact protection comes first

Look for protective eyewear markings and documentation, not just marketing copy. General sunglasses may reduce glare, but they are not automatically suitable for shooting.

Vision still matters

A lens that is too dark, too distorted, or the wrong color can make sight alignment and target contrast worse. Check clarity at the distances and lighting conditions where you actually shoot.

Comfort keeps protection on your face

Heavy frames, pressure under earmuffs, fogging, or slipping can make shooters remove glasses between strings of fire. A good fit helps keep protection in place.

Impact Ratings and Safety Standards

Protective eyewear is often discussed around ANSI Z87.1 markings in the United States. For workplace eye and face protection background, OSHA has a helpful eye and face protection overview. For shooting safety habits, the NSSF firearm safety rules are a useful public reference.

Some eyewear may also claim military ballistic standards, but the claim should be backed by exact documentation. Do not assume a pair has projectile-impact protection because the frame shape looks military or the product name uses tactical language.

Check the markings

Look for markings on the lens or frame and compare them with the product documentation. If the listing is vague, ask the manufacturer or choose a clearer product.

Do not rely on style alone

A wraparound shape is useful, but shape alone does not prove impact performance. Lens material, thickness, certification, and fit all matter.

Eye injuries are worth preventing

The American Academy of Ophthalmology has general guidance on protective eyewear and eye injury prevention. For shooters, that point is simple: eye protection should be worn before handling firearms, ammunition, or targets on the range.

Lens Tint and Visibility

Lens tint changes how targets, sights, and backgrounds look. There is no single best color for every shooter and every range. The right tint depends on light, target color, terrain, and your eyes.

Clear lenses

Clear lenses are useful indoors, in low light, under covered firing lines, and during cloudy conditions. They protect without darkening the view.

Gray and smoke lenses

Gray lenses reduce brightness while keeping colors fairly natural. They can work well in bright sun, but they may be too dark for shaded ranges.

Amber, bronze, and rose lenses

Warm tints can improve contrast for some shooters, especially against certain backgrounds. Try them with your target type before assuming they are better for all conditions.

Polarized lenses

Polarization can cut glare from water, glass, and bright surfaces. It may also change how some screens, red dots, or electronic displays appear, so test compatibility with your gear.

Fit, Coverage, and Comfort

Outdoor shooting often means sun, wind, dust, sweat, and hearing protection. Glasses that fit poorly can fog, slide, pinch under earmuffs, or leave gaps near the eyes.

Side coverage

Wraparound lenses or side protection help reduce exposure from ejected brass and debris. Check coverage from shooting positions, not just while standing in front of a mirror.

Earmuff compatibility

Thick temples can break the seal of electronic or passive earmuffs. Thin, flat temples may be more comfortable for long range sessions and can help preserve hearing protection fit.

Anti-fog performance

Ventilation, lens coating, and fit affect fogging. If you shoot in humidity, cold weather, or high exertion, anti-fog performance matters as much as tint.

Prescription options

Prescription shooters may need inserts, prescription-rated safety lenses, or a frame designed for corrective lenses. Do not stack normal prescription glasses under loose safety glasses unless the setup still protects and fits correctly.

Outdoor Shooting Conditions

Outdoor conditions change during the day. Morning shade, bright midday sun, dust, rain, and low-angle glare can all affect lens choice. Interchangeable lenses can help if you shoot in mixed light.

Rifle and shotgun use

Check cheek weld, eye relief, and sight picture with the glasses on. A frame that feels fine casually may interfere when your face is behind a stock.

Pistol and range use

Pistol shooters should check front sight clarity, red-dot visibility, and side coverage from their normal stance. Brass can come from your own firearm or another shooter nearby.

Hunting and field use

For hunting, glasses should balance eye protection with enough light transmission to identify targets safely. Do not use a tint that makes low-light identification harder.

Buying Checklist

Before buying military-style sunglasses for shooting, check the practical details. A serious pair should make its protective claims easy to verify.

  • Impact rating: look for clear markings and documentation, not just tactical styling.
  • UV protection: confirm the product blocks UV for outdoor use.
  • Lens tint: match tint to light, target color, and sight type.
  • Coverage: check side protection from real shooting positions.
  • Comfort: test nose pads, temple pressure, and fit with earmuffs.
  • Fog control: look for ventilation or anti-fog coating if you shoot in humid or cold conditions.
  • Prescription support: confirm insert or prescription options if needed.
  • Replacement lenses: check whether clear and tinted lenses are available.

For related TSG reading, see our guides on shooting eye and ear protection, shooting glasses and ricochet protection, and shooting glasses for sporting clays.

FAQ

Are military sunglasses the same as shooting glasses?

No. Some military-style sunglasses may also be protective shooting glasses, but the style alone does not prove impact protection. Check the actual rating and documentation.

What lens color is best for outdoor shooting?

Gray works well in bright sun, clear works well in low light, and amber or bronze may improve contrast for some targets. Test tint with your range and firearm setup.

Do normal sunglasses protect against brass and fragments?

Normal sunglasses may reduce glare, but they are not automatically protective eyewear. Use shooting glasses or sunglasses with a verified impact rating for range use.

Should shooting sunglasses be polarized?

Polarized lenses can reduce glare, but they may affect how some electronic sights or screens appear. Test them with your red dot, rangefinder, or display before relying on them.

Can I wear prescription glasses instead?

Regular prescription glasses are not automatically impact-rated safety glasses. If you need correction, look for prescription safety eyewear, inserts, or a compatible rated system.

Bottom Line

The best military-style sunglasses for outdoor shooting are the ones that prove their protection, fit your face and hearing protection, and keep your vision clear in real range conditions. Treat “military” as a style or use-case clue, not proof of impact safety.

Is a 1-4×24 LPVO Good for Hunting?

A 1-4×24 LPVO can be good for hunting when most shots are close to moderate range, the cover is thick, and you value fast target acquisition more than high magnification. It is not the best choice for long open-country shots, tiny targets, or hunters who need strong low-light detail at higher magnification.

The short answer: use a 1-4×24 LPVO for woods hunting, driven hunts, hogs, coyotes at closer ranges, and general rifles where speed matters. Choose a higher-magnification scope if your hunting regularly stretches beyond the range where 4x gives you enough target detail for an ethical shot.

Table of Contents

Quick Verdict

A 1-4×24 LPVO is best when your hunting is built around quick shots, brush, timber, food plots, stands, or short lanes. At 1x, it can feel much faster than a traditional high-power scope. At 4x, it gives enough precision for many realistic short-to-mid-range hunting shots. The limitation is simple: it gives up magnification and some low-light performance compared with larger scopes.

A 1-4×24 LPVO makes the most sense when close range, eye relief, reticle visibility, weight, and ethical shot distance all match your hunt.

LPVO Hunting Selection Checklist

Before choosing a 1-4×24 LPVO, answer these questions. If most answers fit your hunting style, the optic makes sense. If several answers point toward longer distances or low-light identification, consider a 2-10x, 3-9x, 3-12x, or similar hunting scope instead.

  • Range: Are most shots close enough that 4x gives clear target detail?
  • Cover: Are you hunting timber, brush, stands, hog blinds, or short shooting lanes?
  • Speed: Do you need fast target acquisition more than high magnification?
  • Light: Do you hunt mostly legal daylight with enough visibility to identify the animal clearly?
  • Reticle: Can you see the aiming point quickly at 1x and precisely enough at 4x?
  • Ethical range: Can you pass shots when the target is too small or unclear at 4x?

What 1-4×24 Means

The “1-4x” part means the optic can adjust from roughly 1x to 4x magnification. The “24” refers to a 24 mm objective lens. In plain terms, it is a low-power variable optic designed for speed at the low end and modest precision at the high end. For background on how telescopic sights work, the telescopic sight overview is a useful general reference.

Why 1x Matters

At or near 1x, the optic can be faster for close targets because the image appears less zoomed-in. This can help when an animal steps out quickly at close range or when you are tracking movement through brush. It still requires safe firearm handling and target identification; speed is only useful after you know exactly what you are aiming at.

Why 4x Can Be Limiting

Four-power magnification is enough for many close and moderate shots, but it does not show the same detail as a higher-power hunting scope. If you need to judge small antler points, pick a precise spot at longer distance, or see through dim timber at the edge of legal light, 4x may feel limiting.

Where a 1-4×24 LPVO Works Well

This optic class works best when the hunting environment rewards quick handling. Thick woods, hog hunting, short food-plot lanes, and compact rifles are all natural fits. It can also make sense for hunters who keep shots conservative and want one optic that feels fast up close while still offering more precision than a red dot at distance.

Close-Range Deer and Hog Hunting

For close-range deer or hog hunting, a 1-4×24 LPVO can be comfortable because you can leave it low while scanning a lane, then turn up magnification if the animal stops and the shot is still inside your confident range. It is especially useful when targets may appear quickly and high magnification would make it harder to find the animal in the scope.

Compact Rifles and Field Carry

Many 1-4x optics are relatively compact compared with larger hunting scopes. That can help rifle balance, especially on carbines or lightweight field rifles. Balance still depends on the mount, rings, rifle, and optic weight, so check the full setup rather than judging by magnification alone.

Where It Falls Short

A 1-4×24 LPVO is not ideal for every hunt. If you hunt large fields, mountain country, crop edges with long shots, or small varmints, the top-end magnification may be too low. It also may not be the best choice if your biggest need is late-evening brightness and target detail.

The ethical answer is to match the optic to the shot you can clearly identify and place. Hunter education resources emphasize planning and preparation before the hunt; the same idea applies to optics. Use resources such as Hunter Ed for broader hunting safety and planning context, then match your scope to your real conditions.

Low-Light Reality

A 24 mm objective is not automatically bad in low light, but it has limits. Glass quality, coatings, reticle visibility, exit pupil, eye position, and magnification all matter. At lower magnification, the image may still look usable. At 4x, you may notice the difference compared with a larger-objective hunting scope in dim conditions.

Do not use magnification to compensate for poor target identification. If you cannot identify the animal and what is beyond it, do not shoot. The NSSF firearm safety rules are a good reminder that every hunting optics decision still sits under basic safety rules.

Reticle and Eye Relief

The reticle can make or break a 1-4x hunting optic. A center aiming point that is easy to find at low power is helpful for close shots, while enough detail at 4x helps with more deliberate shots. Illumination can help in some light, but it should not be your only way to see the reticle.

Eye Box and Mounting

Eye relief and eye box matter because hunting shots are not always taken from a perfect bench position. The optic should come up naturally when you shoulder the rifle. If you have to crawl the stock or shift your head to see a full image, the scope may be mounted poorly or may not fit your setup.

Who Should Use One

Choose a 1-4×24 LPVO if you hunt close cover, value quick sight acquisition, keep shots inside a conservative range, and want a compact optic with some magnification flexibility. Skip it if your hunts require frequent long shots, detailed antler judging at distance, or stronger low-light performance than a small objective can provide.

A good rule is this: if you would be comfortable with a red dot but want a little magnification, a 1-4x LPVO may be a smart upgrade. If you often wish for more detail than 4x can provide, choose a higher magnification hunting scope instead.

FAQ

Is a 1-4×24 LPVO good for deer hunting?

Yes, for close-range deer hunting in woods, brush, or short lanes. It is less ideal for long fields or situations where you need more magnification for detail.

How far is a 1-4x LPVO good for hunting?

There is no universal distance. It depends on the animal, light, reticle, rifle, shooter skill, and whether you can identify the target clearly. Use 4x only inside your confident ethical range.

Is a 1-4×24 LPVO good in low light?

It can be usable in reasonable light, especially at low magnification, but a larger hunting scope may show more detail in dim conditions. Never shoot if the target is not clearly identified.

Is an LPVO better than a 3-9x scope?

It depends on the hunt. A 1-4x LPVO is faster up close. A 3-9x scope is usually better when you need more magnification and target detail at distance.

Final Takeaway

A 1-4×24 LPVO is a strong hunting choice for close cover, fast shots, and compact rifle setups. It is not a do-everything optic. Buy it when your real hunting distances fit the 1-4x range, and pass on it when low-light detail or longer-range precision matters more.

Exit mobile version