How to Store and Transport Ammunition Safely


Store ammunition in a cool, dry location, away from heat, open flame, solvents, petroleum products, acids, ammonia, and other chemicals. Keep it in the original box or purpose-designed ammunition packaging when possible, and keep it inaccessible to children, guests, and other unauthorized people.

`r`n`r`n
A safe ammunition routine starts with cool dry storage, closed packaging, clear labels, secure access, and current transport rules.
`r`n`r`n

This guide explains safe ammunition storage and transport basics without pretending one article can replace current local law, product labels, or manufacturer instructions. It does not cover reloading, powder or primer storage, disposal, firefighting tactics, or state-by-state legal advice.

Table of Contents

Quick Answer: How To Store Ammunition Safely

The safest general approach is simple: keep ammunition cool, dry, properly packaged, separated from chemicals and heat sources, and controlled so unauthorized people cannot access it. That matches the practical direction in SAAMI ammunition storage and handling guidance.

  • Cool and dry: avoid hot, damp, or rapidly changing storage conditions.
  • Away from heat and chemicals: do not store ammunition next to solvents, petroleum products, acids, ammonia, open flame, or heat sources.
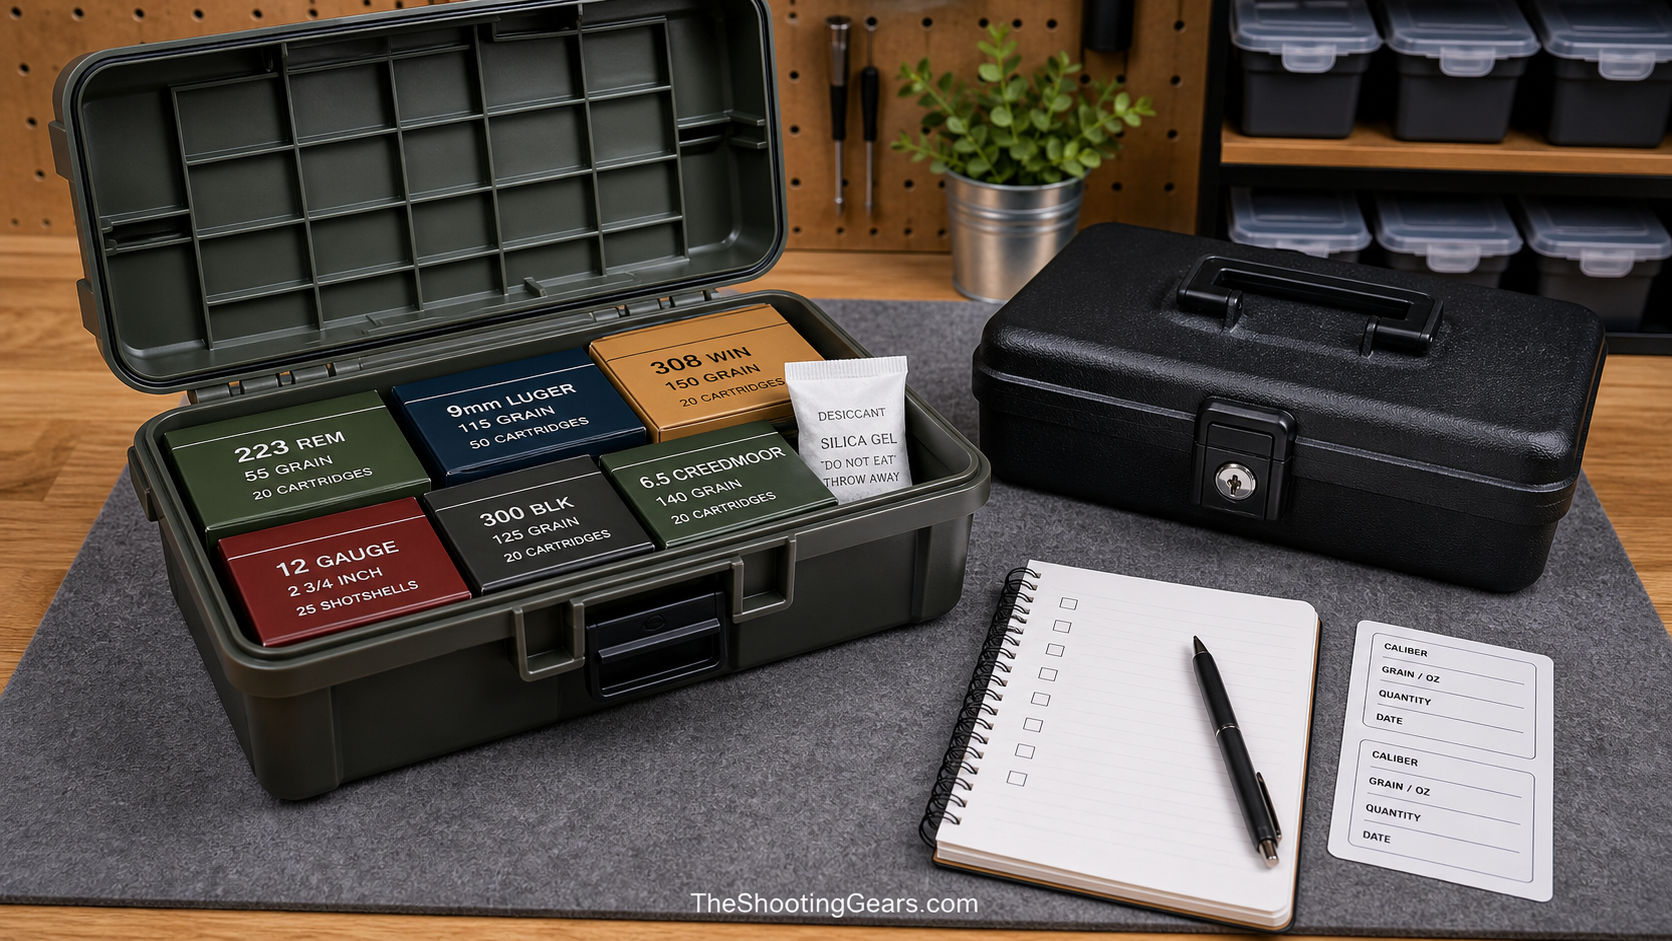
  • Properly packaged: use original packaging or a purpose-designed ammunition container that keeps rounds identified and protected.
  • Access-controlled: prevent access by children, guests, and anyone who should not handle it.

Why Ammunition Storage Conditions Matter

Storage conditions matter because heat, moisture, chemical exposure, and rough handling can affect ammunition over time. Good storage is mostly about controlling those risks before they become a problem.

Heat and humidity

Choose a location that stays moderate and dry rather than hot, humid, or exposed to wide temperature swings. A hot attic, damp basement, or vehicle interior is usually a poor default unless the environment is controlled.

Water and chemical exposure

Keep ammunition away from direct water contact and away from cleaning chemicals, fuels, petroleum products, acids, ammonia, and solvents. A separate shelf or cabinet away from gun-cleaning supplies is usually a cleaner setup than mixing everything together.

Physical damage and inspection

Handle ammunition carefully and keep it protected in proper packaging. Do not use ammunition that looks damaged, corroded, deformed, wet, or otherwise suspect.

Where To Store Ammunition At Home

A good home storage location is boring in the best possible way: dry, stable, labeled, and access-controlled. A cabinet, shelf, or dedicated storage container can work if it stays away from heat, moisture, chemicals, and unauthorized access.

Original boxes help you identify caliber, load, manufacturer, and lot information. If you move ammunition into a different purpose-designed container, keep it clearly labeled and avoid mixing loose, unidentified rounds.

For households with children or frequent visitors, access control matters as much as the environment. Project ChildSafe and the NSSF Project ChildSafe program are useful starting points for broader secure-storage thinking.

Where Not To Store Ammunition

  • Direct sunlight or hot vehicles: temperatures can rise quickly and are hard to control.
  • Damp basements without moisture control: moisture works against the dry-storage goal.
  • Near solvents, oils, acids, ammonia, or fuels: keep ammunition away from chemical exposure.
  • Loose in random containers: mixed loose rounds make identification and inspection harder.
  • Accessible drawers or open shelves: any location reachable by children, guests, or unauthorized users fails the access-control test.

How To Transport Ammunition Safely

For normal range trips, keep ammunition packaged, protected from impact, and separated from loose tools, liquids, and cleaning chemicals. Use a sturdy range bag or container that keeps boxes from opening and keeps the ammunition identifiable.

Transport rules can change by state, locality, range, and travel method. This article does not give legal transport advice. If you are crossing state lines, flying, or transporting firearms and ammunition in a regulated situation, check current official rules before you travel.

Ammunition Storage Checklist

Use this checklist before you settle on a storage spot. It is not a legal checklist; it is a practical safety screen.

CheckSafe directionWhy it matters
TemperatureCool, stable locationReduces avoidable heat exposure
MoistureDry storage areaHelps avoid dampness and corrosion risk
PackagingOriginal or purpose-designed packagingKeeps ammunition identified and protected
ChemicalsAway from solvents, petroleum products, acids, ammonia, and other chemicalsAvoids chemical exposure
AccessInaccessible to children, guests, and unauthorized personsSupports responsible home storage
FirearmsConsider separate storage based on household risk and local rulesAdds another layer of access control
ConditionDo not use damaged or suspect ammunitionPrevents use of questionable rounds

What This Guide Does Not Cover

  • Reloading procedures: no powder charges, primer substitutions, recipes, or troubleshooting are covered here.
  • Powder and primer storage: those components need separate guidance.
  • Disposal: contact a source-backed option such as local law enforcement, a shooting facility, the manufacturer, or local waste authority for damaged or unwanted ammunition.
  • Firefighting tactics: follow local fire department and official emergency guidance.
  • State-by-state law: requirements vary, so verify current rules where you live and travel.

Frequently Asked Questions

Can ammunition be stored in a garage?

A garage can work only if it stays cool, dry, chemical-free, and access-controlled. Many garages get hot, humid, or hold solvents and fuels, which are the conditions to avoid. If a garage cannot stay controlled, choose a better indoor location.

Should ammo stay in the original box?

Original packaging is usually the best default because it helps identify the ammunition and protects it from unnecessary handling damage. Purpose-designed ammunition containers can also work if they keep the contents clearly labeled and protected.

Can ammo be stored with a firearm?

It depends on household risk, space, and current local rules. Storing ammunition separately from firearms is a commonly cited safety practice because it adds another access-control layer, but this article does not claim one universal legal rule applies everywhere.

What should I do with damaged ammunition?

Do not use ammunition that looks damaged, corroded, wet, deformed, or otherwise suspect. For disposal, contact local law enforcement, a shooting facility, the manufacturer, or a local waste authority. Do not guess or improvise disposal methods.

Is ammunition dangerous in a house fire?

Ammunition can be affected by fire, which is one reason storage guidance emphasizes keeping it away from heat sources and open flames. This article does not provide firefighting tactics; follow your local fire department and official emergency guidance.

Is this legal advice for transporting ammunition?

No. This is a safety and organization guide, not legal advice. Transport rules vary by location and travel method, so check current official rules before transporting ammunition, especially across state lines or by air.

Final Recommendation

The practical ammunition-storage standard is consistent: cool, dry, away from heat and chemicals, properly packaged, and inaccessible to unauthorized persons. Do not use damaged or suspect ammunition, keep it away from cleaning chemicals, and verify current local rules for storage or transport questions.

Low-Light Shooting Tips: Safety and Accuracy Guide

Low-light shooting is harder because the target, sights, background, and safety risks are all less obvious. The safest improvement is not simply “add more light.” It is learning when not to shoot, how to identify the target and what is beyond it, how your sights behave in dim light, and how to practice under controlled range conditions.

This guide is written for responsible range practice, hunting preparation, and general marksmanship awareness. Always follow your firearm manual, local laws, range rules, and the core safety rules. The NSSF firearm safety rules are the baseline before any low-light practice.

Table of Contents
  1. Quick Low-Light Shooting Checklist
  2. Why Low Light Is Different
  3. Identify Before Shooting
  4. Sights and Optics
  5. Safe Practice Plan
  6. Hunting Considerations
  7. Common Mistakes
  8. Related Guides
  9. FAQ
  10. Final Recommendation

Quick Low-Light Shooting Checklist

CheckWhat to confirmWhy it matters
Legal lightHunting or range activity is allowed at that time and locationLow light can create legal and ethical problems fast.
Target IDYou can clearly identify the target, not just a shape or soundNever shoot at an uncertain target.
BackstopYou know what is behind and around the targetBackgrounds are harder to read in dim light.
Sight pictureYour sights, reticle, or dot are visible without covering the targetAiming errors increase when contrast drops.
Light disciplineYou know how your light affects vision and target visibilityToo much or too little light can both cause problems.
Practice settingLow-light drills happen only at an approved range or safe setupControlled practice beats guessing in the field.
Stop ruleYou know when visibility is too poor to continueThe best low-light skill is knowing when not to shoot.

Why Low Light Is Different

Low light reduces contrast. That makes it harder to judge distance, see sight alignment, read terrain, and confirm what is beyond the target. It can also change how your eyes respond to muzzle flash, bright lights, shadows, and reflective surfaces.

Accuracy problems in low light are often decision problems before they are trigger problems. If the target is unclear, the backstop is uncertain, or the sight picture is not reliable, the correct choice is to stop. Better equipment cannot fix a bad identification decision.

Identify the Target Before Shooting

Target identification is the central rule. A shooter must know what the target is, where the safe backstop is, and what else is nearby. Low-light conditions make shapes and movement easier to misread, so do not treat movement, noise, or outline alone as enough information.

For secure storage and safe firearm habits around the home, Project ChildSafe is also worth referencing. Low-light awareness should include the full safety picture, not only aiming technique.

Understand Your Sights and Optics in Dim Light

Iron sights, illuminated reticles, red dots, scopes, and night sights all behave differently as light fades. A bright dot can bloom and cover detail. A non-illuminated reticle may disappear against a dark target. A scope can show a clearer image than the naked eye, but it does not remove the need to identify the target and background.

Practice with the same sighting system you plan to use. Check brightness settings, battery status, reticle visibility, and how the sight appears from different positions. If your optic has illumination, use the lowest setting that gives a clear aiming reference without washing out the target.

Build a Safe Low-Light Practice Plan

Low-light practice should happen only where it is allowed and controlled. Confirm range rules, target setup, backstop, emergency lighting, and supervision if needed. Start with simple drills: clear target identification, slow groups, sight visibility checks, and safe reload or handling practice only if the range permits it.

Do not add speed until safety and visibility are reliable. Record what worked: lighting level, sight setting, distance, target color, and whether you could call your shots. That information is more useful than trying to “win” a dark practice session.

Low-Light Hunting Considerations

Hunting adds legal and ethical limits. Shooting hours, species identification, blaze-orange rules, artificial-light rules, and property boundaries vary by place. Check your local wildlife agency before relying on any general advice. When visibility is marginal, passing the shot is often the responsible choice.

For competitive and formal marksmanship pathways, USA Shooting is a useful authority source. For hunting, pair marksmanship practice with local regulations and hunter education before field use.

Common Low-Light Shooting Mistakes

  • Shooting before the target and backstop are clearly identified.
  • Using an optic illumination setting that is too bright.
  • Assuming a scope can replace safe visual confirmation.
  • Practicing low-light handling in an unsafe or unapproved place.
  • Ignoring local hunting-hour or artificial-light laws.
  • Forgetting that fatigue and darkness make judgment worse.

FAQ

What is the most important low-light shooting rule?

The most important rule is target identification. If you cannot clearly identify the target and what is beyond it, do not shoot.

Do illuminated reticles help in low light?

They can help, but only when set correctly. Too much brightness can cover detail or reduce your ability to see the target clearly.

Can I practice low-light shooting at home?

Live-fire practice belongs only in approved safe locations. Dry practice should follow your firearm manual, strict unloading procedures, safe direction, and secure ammunition separation.

Is low-light hunting always legal?

No. Legal shooting hours, artificial-light rules, and species rules vary by location. Check your local wildlife agency before hunting in low-light conditions.

Final Recommendation

Low-light shooting should be treated as a decision-making and safety problem first, and an accuracy problem second. Practice in controlled settings, learn how your sights behave, verify every target and backstop, and stop when visibility is not good enough. That discipline matters more than any single piece of gear.

Shooting Eye and Ear Protection Checklist for Range Day

Before a range session, eye and ear protection should be checked before ammunition, targets, tools, or accessories. Good protective gear is not decoration; it is part of the basic safety setup for every shooter, observer, coach, and range guest.

This page is a quick range-day checklist. For the fuller explanation of why protection matters, see our main guide: why eye and ear protection matters when shooting.

Table of Contents

Quick PPE Checklist Before Shooting

CheckWhat to confirmWhy it matters
Eye protectionSafety glasses are impact-rated, clean, and fit securely.Helps protect against fragments, gas, dust, debris, and case-related incidents.
Ear protectionEarplugs, earmuffs, or both are worn correctly before firing begins.Gunfire can expose shooters to hazardous impulse noise.
FitGlasses do not slide; ear muffs seal around glasses and hair as well as possible.Poor fit can reduce protection.
GuestsObservers, new shooters, and helpers have PPE before entering the firing area.Safety applies to everyone near the firing line.
Spare gearBackup foam plugs or spare glasses are in the range bag.Forgotten or damaged PPE should not end the safety plan.

Eye Protection Checks

Use shooting glasses or safety glasses that fit securely and are appropriate for range use. Before the session starts, check that lenses are clean, not badly scratched, and not loose in the frame. If you wear prescription glasses, ask the range or eye-care provider what protective option is appropriate instead of assuming ordinary eyewear is enough.

Eye protection matters because shooting can involve ejected cases, gas, target debris, dust, cleaning residue, and other small hazards. The NSSF eye and ear protection guidance gives a clear baseline: wear protection every time you shoot.

Ear Protection Checks

Choose ear protection before the first shot, not after the range gets loud. Foam plugs must be inserted correctly to work as intended. Earmuffs need a seal around the ear, and that seal can be affected by glasses, hats, hair, and poor adjustment.

Indoor ranges and high-volume sessions can be especially loud. The CDC/NIOSH indoor firing range guidance discusses noise and exposure concerns in range environments. For many shooters, doubling up with plugs plus muffs is worth considering when the range is loud or enclosed.

Fit And Comfort Matter

Protection that is uncomfortable or loose is less likely to stay in place. Check fit before the session starts. Glasses should sit securely when you mount a firearm or change position. Earmuffs should not lift away from the head when you put on a hat or cheek the stock.

If the shooter is a child, new shooter, or guest, do not assume adult-size gear fits. Give them time to adjust PPE before any live fire begins, and stop the session if protection shifts or becomes uncomfortable.

What To Pack In Your Range Bag

  • Primary shooting glasses or safety glasses.
  • Backup clear glasses for low-light indoor lanes.
  • Primary earmuffs or electronic muffs.
  • Foam earplugs for backup or double protection.
  • Lens cloth or safe lens cleaner.
  • A small case or pouch so PPE does not get crushed.
  • Extra PPE for a guest or new shooter.

Common Mistakes To Avoid

  • Putting on ear protection only after the first shot.
  • Wearing scratched lenses that make it harder to see clearly.
  • Using muffs that do not seal because of hat, hair, or glasses interference.
  • Forgetting PPE for observers or guests.
  • Assuming outdoor shooting is quiet enough to skip hearing protection.
  • Leaving backup plugs or spare glasses at home.

Frequently Asked Questions

Do I need both eye and ear protection when shooting?

Yes. Eye protection and ear protection solve different safety problems. Glasses help protect your eyes from physical hazards, while ear protection helps reduce hazardous noise exposure.

Should I double up with earplugs and earmuffs?

Double protection can be useful at indoor ranges, busy firing lines, or with louder firearms. It also gives a backup layer if one form of hearing protection is not sealing perfectly.

Can regular glasses replace shooting glasses?

Do not assume ordinary prescription or fashion glasses provide the same protection as safety-rated eyewear. If you need prescription correction, look for a safety-rated option or ask an eye-care professional what is appropriate for range use.

Should observers wear protection too?

Yes. Anyone near the firing line or range area should follow the range’s PPE rules. New shooters and guests should have eye and ear protection before entering the active shooting area.

Final Range-Day Reminder

Make eye and ear protection part of the first check every time you shoot. Put it on before the line goes hot, keep spare gear in your bag, and pause the session if a guest, child, or shooter loses their fit or comfort. The best safety habit is the one you repeat before every shot, not the one you remember after the range gets loud.

What To Check Before Choosing a Firearm for Hunting

Before choosing a firearm for hunting, check the animal you plan to hunt, legal equipment rules, cartridge suitability, firearm fit, recoil tolerance, safe handling, sighting system, carry weight, and your real practice time. The best hunting firearm is not the biggest or most expensive one; it is the one you can use safely, legally, accurately, and ethically.

This guide is a pre-purchase checklist, not a product recommendation or legal guide. Hunting rules vary by state, season, property, species, and weapon type, so verify current official regulations before buying or hunting.

Table of Contents

Quick Checklist

CheckWhat to confirmWhy it matters
Legal rulesSpecies, season, caliber/gauge, magazine, ammunition, and property rulesA legal setup in one place may not be legal somewhere else
Game sizeFirearm and cartridge/gauge match the animal and expected distanceSupports ethical shot placement and performance
FitLength of pull, stock shape, eye alignment, and controls feel manageablePoor fit makes safe, accurate shooting harder
RecoilYou can practice without flinching or avoiding range timeAccuracy matters more than raw power
Optics/sightsSighting system matches terrain and distanceDifferent hunts need different sight pictures
Carry weightYou can carry the firearm safely for the full huntHeavy gear changes real field performance
TrainingYou have time and access to practice before huntingConfidence should come from verified practice, not assumptions

Start With Legal Hunting Rules

Do not choose a firearm before checking the rules for your actual hunt. State wildlife agencies may regulate firearm type, caliber, gauge, cartridge, magazine capacity, ammunition type, hunting method, season dates, public-land rules, and special zones.

Rules also change. A setup that worked for one hunter last season may not be correct for your state, species, or property. Treat legal verification as the first checklist item, not the last.

Match The Firearm To The Game

The firearm, cartridge or gauge, and ammunition should match the animal, distance, and shot angles you can handle. Small-game hunting, deer hunting, turkey hunting, hog hunting, and predator hunting can require different setups.

Avoid choosing based on power alone. Too little performance can be unethical, but too much recoil can reduce accuracy and practice time. Ethical hunting depends on knowing your limit and staying inside it.

Check Fit, Controls, And Handling

A hunting firearm should fit your body and field position. Check length of pull, cheek weld, eye alignment, safety location, bolt or action access, trigger reach, and how naturally the firearm points from standing, sitting, kneeling, or supported positions.

Fit matters for safety too. If you struggle to reach the safety, manage the action, or keep the muzzle controlled, the firearm is not a good match yet.

Think About Recoil Before Power

The firearm you shoot accurately is usually better than the one that looks impressive on paper but makes you flinch. Recoil, stock fit, firearm weight, shooting position, and practice volume all affect real accuracy.

If a firearm is uncomfortable at the range, you may not practice enough to use it responsibly in the field. Choose a setup you can verify with realistic practice.

Sight System And Distance

Open sights, red dots, low-power scopes, and higher-magnification scopes all have different strengths. Thick woods, short-range drives, open fields, and mountain hunts do not ask for the same sighting system.

Whatever you choose, sight it in properly and confirm point of impact with the ammunition you will actually hunt with. Do not assume a new optic or new ammunition is ready without range verification.

Safety And Storage Checks

Firearm choice is tied to safe ownership. The NSSF rules for firearm safety are a useful baseline before handling any firearm, and Project ChildSafe’s safety habit guidance reinforces safe behavior and secure storage thinking.

  • Keep the muzzle pointed in a safe direction.
  • Keep your finger off the trigger until ready to shoot.
  • Know your target and what is beyond it.
  • Use the correct ammunition for the firearm.
  • Store firearms so unauthorized people cannot access them.
  • Use a case, sling, lock, or safe storage method that fits your situation and local rules.

Practice Before Hunting

Practice from realistic field positions, not only from a perfect bench. Confirm the firearm from supported positions, sitting or kneeling when appropriate, and the distance ranges you expect in the field. Practice should also include safe loading, unloading, carrying, and using the safety under calm range conditions.

If you cannot place shots consistently at a certain distance, that distance is outside your hunting limit for now. Shortening the shot is better than stretching skill you have not verified.

Frequently Asked Questions

What is the most important thing to check before choosing a hunting firearm?

Start with current legal rules for your species, season, and location. After that, check firearm fit, recoil, cartridge or gauge suitability, safe handling, and your ability to practice enough before hunting.

Should beginners choose the most powerful firearm they can handle?

No. Beginners should choose a legal, ethical setup they can shoot accurately and practice with consistently. Too much recoil can create flinching and reduce real-world accuracy.

Does firearm fit really matter for hunting?

Yes. Fit affects sight alignment, recoil control, comfort, safety manipulation, and confidence from field positions. A poorly fitting firearm can make a good cartridge harder to use well.

Can one firearm work for every hunt?

Usually no. Some firearms are versatile, but species, local rules, terrain, distance, and ammunition requirements vary. A single setup may cover several hunts, but it will not be ideal for everything.

Final Recommendation

Before choosing a hunting firearm, confirm the rules, match the setup to the animal and distance, choose a firearm that fits, keep recoil manageable, verify sights and ammunition at the range, and plan safe storage. The right firearm is the one you can use safely, legally, accurately, and responsibly on the hunt you actually plan to take.

How To Remove Rust From a Gun Safely

Rust on a firearm should be handled slowly and safely. Before any cleaning, unload the firearm, remove ammunition from the work area, follow the manual, and inspect the rust level. Light surface rust may be manageable with proper gun oil and gentle cleaning, but deep pitting, bore rust, or rust around critical parts should be checked by a qualified gunsmith.

This guide is a conservative maintenance checklist, not a shortcut for damaged firearms. Start with the NSSF firearm safety rules, work in a ventilated area, and avoid harsh chemicals or abrasive methods unless the firearm maker specifically recommends them.

Table of Contents
  1. Quick Rust Removal Checklist
  2. Safety Before Cleaning
  3. Inspect the Rust Level
  4. Light Surface Rust
  5. When To Stop and Use a Gunsmith
  6. How To Prevent Rust
  7. Common Mistakes
  8. Related Guides
  9. FAQ
  10. Final Recommendation

Quick Rust Removal Checklist

StepWhat to doWhy it matters
Unload firstRemove magazine, open action, check chamber, and remove ammunition from the roomMaintenance starts with safe handling.
Identify rust levelSeparate light surface rust from pitting, bore rust, or damaged partsDifferent rust levels need different decisions.
Use proper productsUse firearm-safe oil, cloth, nylon brush, or approved toolsHarsh abrasives can damage finish and metal.
Work gentlyUse light pressure and check progress oftenRemoving finish can make future rust worse.
Avoid risky chemicalsDo not mix chemicals or use unknown household acids/cleanersChemical damage can be permanent or unsafe.
Stop for deep rustUse a gunsmith for pitting, bore obstruction, action rust, or structural concernsSome rust is a safety issue, not a cleaning task.
Prevent recurrenceDry, lightly oil, inspect, and store correctlyPrevention is easier than repair.

Safety Before Cleaning

Point the firearm in a safe direction, remove the magazine, open the action, and visually and physically confirm the chamber is clear. Move all ammunition away from the cleaning area. If you are not comfortable disassembling the firearm according to the manual, stop and get help from a qualified person.

Use gloves and ventilation when working with oils, solvents, or rust-removal products. The OSHA chemical hazards resource is a useful reminder that cleaning chemicals should be treated with care, labels, and ventilation.

Inspect the Rust Level

Light surface rust often appears as a thin orange or brown film on exterior metal. Deeper rust may show pitting, rough texture, flaking finish, bore damage, or rust around screws, action parts, sights, or the muzzle. Deep rust is not just cosmetic.

Check the bore only after the firearm is confirmed unloaded and safe to inspect. If the bore looks obstructed, heavily rusted, bulged, or damaged, do not fire the gun. Have it inspected by a gunsmith.

How To Handle Light Surface Rust

For light surface rust, apply a small amount of firearm-safe oil to a soft cloth and let it sit briefly. Wipe gently and check the surface often. A nylon brush can help in textured areas, but avoid aggressive scraping. The goal is to remove rust without cutting through the finish.

After the rust is removed, wipe away excess oil and apply a light protective film. Too much oil can collect dust or migrate into areas where it does not belong. Follow the firearm manual for lubrication points.

When To Stop and Use a Gunsmith

Stop and use a gunsmith if rust is deep, pitted, inside the bore, around the chamber, on locking surfaces, near the action, or on parts that affect safe operation. Also stop if a screw strips, a part will not move normally, or you are unsure whether the firearm is safe to fire.

Cosmetic rust and safety-critical rust are different problems. A firearm can look mostly fine and still need professional inspection if rust affects the bore, chamber, action, or structural surfaces.

How To Prevent Rust

Rust prevention starts with moisture control. Dry the firearm after rain, sweat, snow, or humid storage. Wipe metal surfaces with a light protective oil, inspect periodically, and store firearms in a stable, secure location. Avoid foam cases or damp bags for long-term storage.

Secure storage also matters. Project ChildSafe is a useful resource for responsible storage habits, especially when maintenance and storage routines overlap at home.

Common Rust-Removal Mistakes

  • Cleaning before confirming the firearm is unloaded.
  • Using harsh abrasives that remove finish and expose more metal.
  • Mixing chemicals or using household cleaners not intended for firearms.
  • Ignoring rust in the bore, chamber, or action.
  • Storing a firearm in a damp case after cleaning.

FAQ

Can light rust be removed from a gun at home?

Light surface rust may be manageable at home with firearm-safe oil, a soft cloth, and gentle pressure. Deep rust, bore rust, or rust near operating parts should be inspected by a gunsmith.

Should I use abrasive tools on gun rust?

Avoid aggressive abrasives unless the firearm maker or a qualified gunsmith recommends a specific method. Removing finish can expose more metal and make future rust worse.

Is rust inside a barrel dangerous?

It can be. Rust inside the bore or chamber may affect safety and accuracy. If the bore looks pitted, obstructed, or heavily rusted, do not fire the firearm until it is inspected.

How can I prevent gun rust after cleaning?

Dry the firearm, apply a light protective oil where appropriate, avoid damp storage, and inspect regularly. Moisture control is the best rust prevention habit.

Final Recommendation

Treat rust removal as firearm maintenance, not a cosmetic shortcut. Handle the firearm safely, use gentle firearm-safe products, stop when rust looks deep or structural, and prevent future rust with dry storage and regular inspection.

Exit mobile version