Hunting Season Regulations: Official Checklist Before You Go

Hunting regulations change by state, species, zone, weapon type, land type, and season. The safest rule is simple: before every hunt, verify the current regulation from the official state wildlife agency or the federal land/refuge manager for the exact place and species you plan to hunt. Keep that habit every season.

This guide is an evergreen checklist, not legal advice and not a substitute for your current rulebook. Use it to know what to check before you buy tags, pack gear, or step into the field.

Table of Contents

Quick Answer

Before hunting, confirm five things from official sources: the open season date, the legal species and zone, the license or tag requirement, the legal hunting method, and any reporting or check-in rule. If any one of those is unclear, do not hunt until you verify it.

Use a regulations checklist before each hunt: license, season dates, tags, zone, legal method, reporting, and land-specific rules.

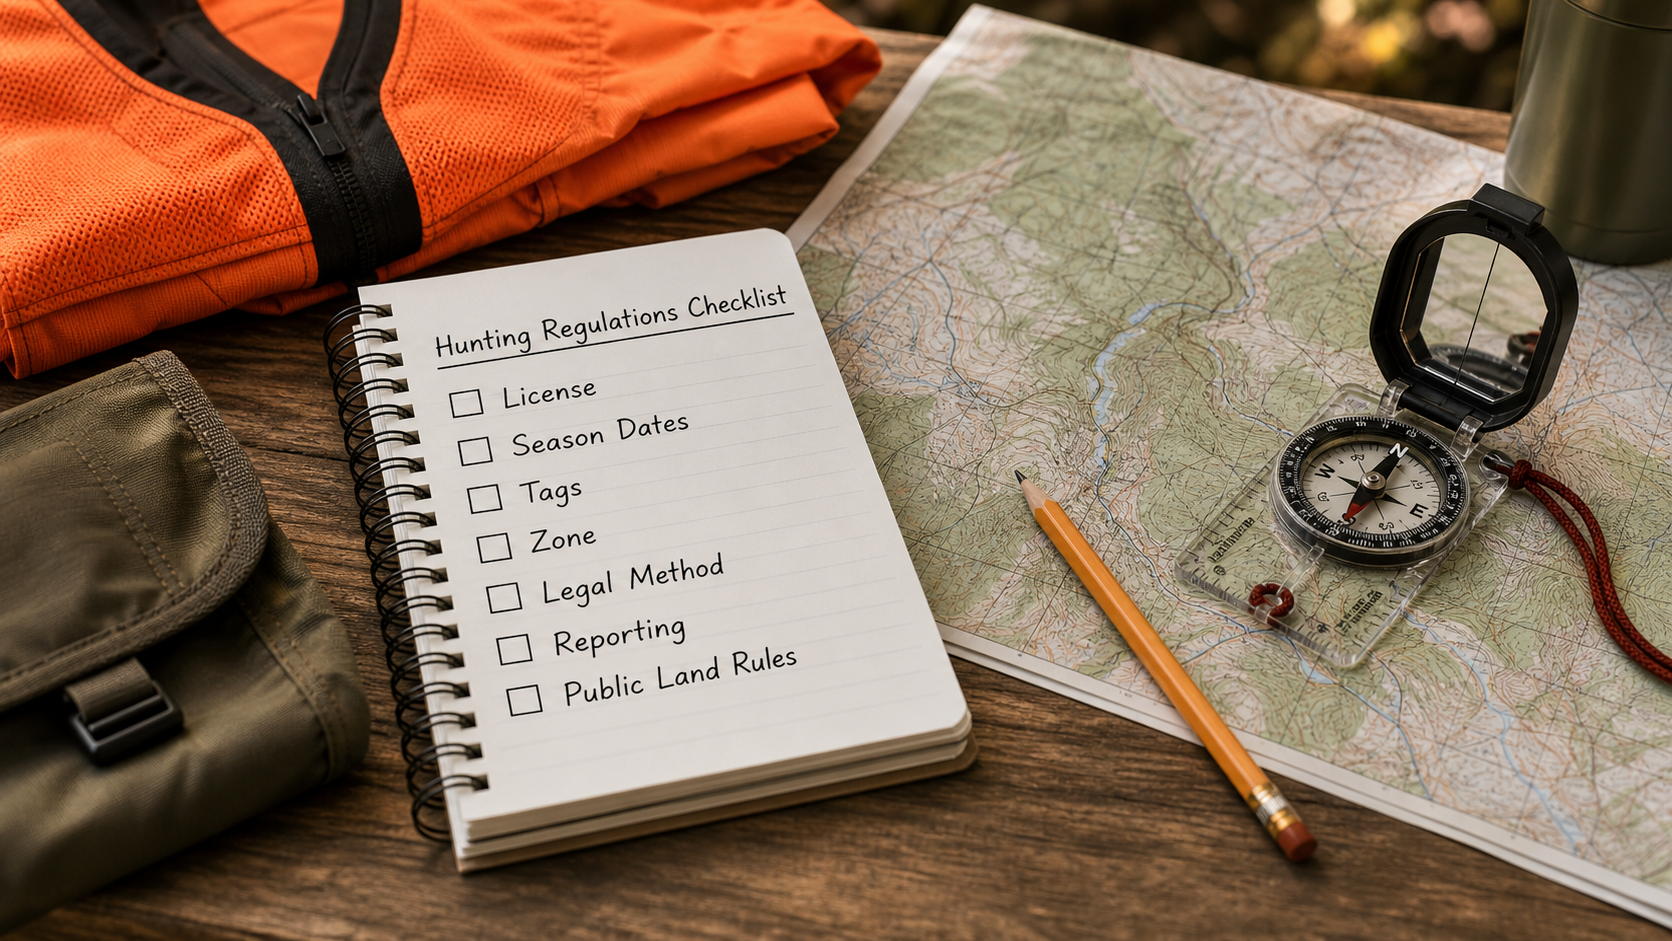
Hunting Regulations Checklist

A good regulation check starts before you buy gear. Work through this list for the exact hunt you are planning, not for a general state or species page you read weeks earlier.

  • Species: Confirm the exact animal, sex, age class, and any antler or size rule.
  • Season: Check opening and closing dates, including youth, archery, muzzleloader, firearm, and special seasons.
  • Zone: Verify the unit, county, zone, wildlife management area, or refuge boundary.
  • License and tags: Confirm what you need before hunting and whether tags are limited, draw-only, over-the-counter, or landowner-specific.
  • Method: Check legal weapons, ammunition, broadheads, draw weights, magazine restrictions, baiting, dogs, lights, calls, and electronic devices.
  • Reporting: Know whether harvest reporting, check stations, tagging, telecheck, or biological sampling is required.
  • Land rules: Separate statewide rules from public-land, private-land, federal refuge, and local access rules.

Where to Verify Rules

Your state fish and wildlife agency should be the first source for seasons, bag limits, licenses, and harvest reporting. Federal lands may add separate rules, so check the managing agency for national wildlife refuges, national forests, military lands, and other special areas. The U.S. Fish and Wildlife Service hunting page is a useful starting point for refuge-related hunting information.

Do Not Rely on Old Screenshots

Regulation screenshots, social media posts, forum comments, and old PDF downloads can be outdated. Save the current official PDF or page for your hunt, but also check for emergency changes, closures, disease-related rules, fire restrictions, and access updates before you leave.

Call When a Rule Is Unclear

If a rule is confusing, contact the agency or local conservation officer before hunting. A quick call is better than guessing. This matters most for boundary questions, weapon rules, public-land access, baiting, night hunting, transport rules, and special permits.

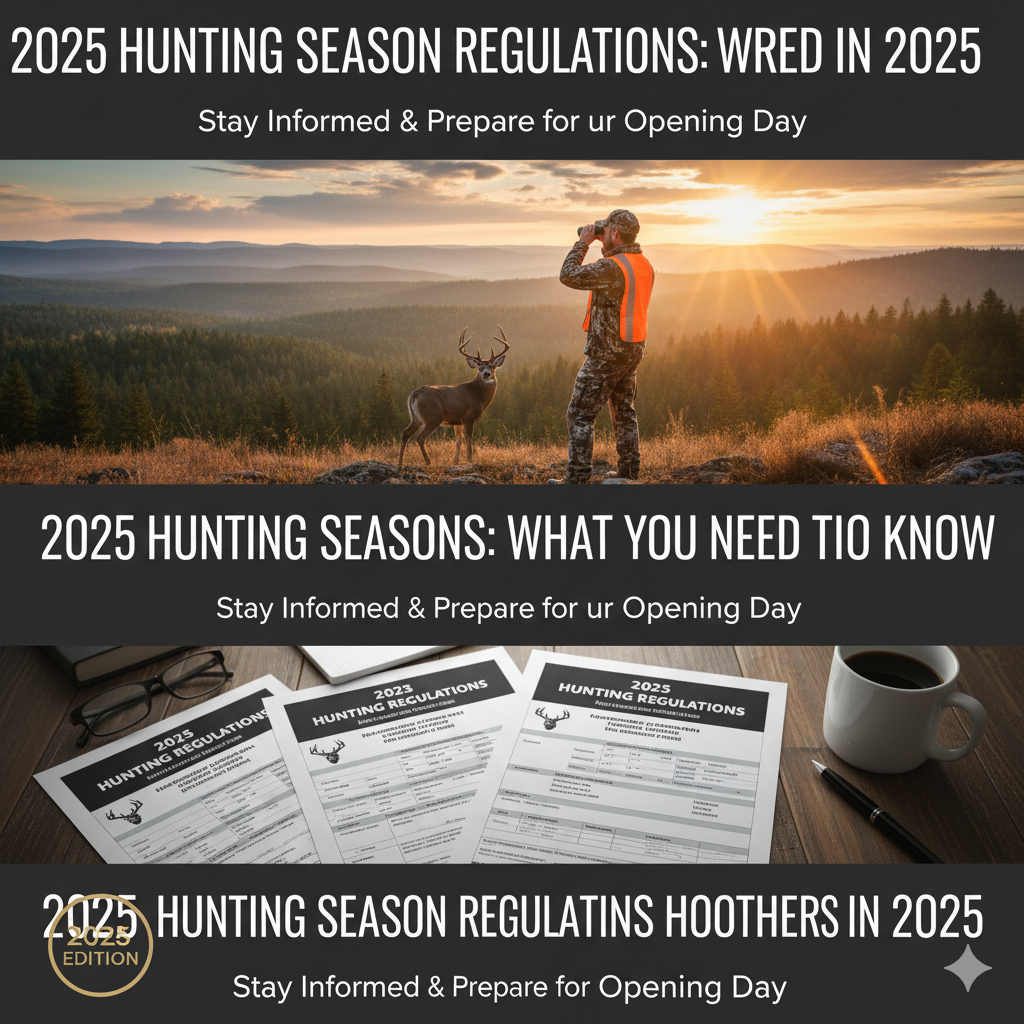
Season Dates and Zones

Season dates can change between species, zones, and weapon types. A deer archery season may not match firearm season. A turkey spring season may have different dates from fall. Waterfowl seasons may be split by zone or flyway. Small-game seasons can also have exceptions by land type.

Pay attention to the map. A county line, river, highway, or refuge boundary can change what is legal. If you use a mapping app, confirm that its boundary data matches the official agency map for the current season.

Licenses, Tags, and Reporting

A license alone may not be enough. Many hunts require a species tag, permit, stamp, draw result, habitat validation, hunter education proof, or land access permit. Some states also require immediate tagging or electronic harvest reporting within a set time.

Keep Proof With You

Carry the proof required by your state, whether that is a paper license, mobile app, tag, permit, or confirmation number. If your phone is your proof, consider battery life and service. Some areas have poor reception, and you still need to follow the reporting rule.

Legal methods can include weapon type, caliber or gauge limits, archery equipment rules, crossbow rules, broadhead requirements, ammunition restrictions, suppressor rules, magazine limits, blaze orange, baiting, dogs, calls, drones, thermal devices, and night-hunting rules. Do not assume that legal gear in one state is legal in another.

General safety rules still apply even when the method is legal. Review the NSSF firearm safety rules for firearm hunts and complete the hunter education required by your state before going afield.

Public Land vs. Private Land

Public land may have special access hours, parking rules, quota permits, weapon restrictions, check-in requirements, closed areas, or species-specific rules. Private land may require written permission, landowner tags, or different access rules. Do not treat a statewide season as permission to hunt any property.

Ethical hunting includes legal access, safe shot selection, respect for other users, and a plan for recovery. Hunter education resources such as Hunter Ed can help newer hunters think beyond the minimum rulebook and prepare responsibly.

Day-Before Verification

Regulation checks should not happen only once at the start of the season. The day before a hunt, confirm the official page still shows the same season, boundary, access, and reporting information. Check for emergency closures, wildfire restrictions, flooding, road closures, disease-control zones, refuge notices, quota updates, and weather-related access changes.

If you hunt with a group, make sure every person has the same current information. One hunter using last year’s map or an old screenshot can create problems for everyone. Save the official page or PDF for reference, but treat the live agency notice as the stronger source when it has been updated.

Common Regulation Mistakes

The most common mistakes are preventable. Hunters often read last year’s rules, hunt the wrong zone, forget a tag, miss a reporting deadline, rely on a non-official app, or assume a weapon rule applies statewide. Another common mistake is checking rules at home but not checking local closures or access notices the day before the hunt.

Build a pre-hunt habit: official rulebook, official map, license and tags, legal method, land access, reporting requirement, and emergency changes. If the hunt involves another state, new public land, a new species, or a new weapon type, slow down and verify everything twice.

FAQ

Where can I find current hunting regulations?

Start with your official state fish and wildlife agency. For federal refuges or special public lands, also check the managing agency page for that property.

Do hunting regulations change every year?

They can. Dates, zones, bag limits, reporting rules, disease restrictions, and weapon rules may change. Check the current season before each hunt.

Can I trust hunting apps for regulations?

Use apps as planning tools, not final legal authority. Verify regulations, boundaries, and access rules with official agency sources before hunting.

What if the regulation book is confusing?

Contact the state wildlife agency, local conservation officer, or property manager before hunting. Do not guess when a rule affects legality or safety.

Final Takeaway

The best regulation habit is boring and reliable: check the official source, match the rule to your exact species and location, carry the required proof, and verify changes before you hunt. That protects you, the resource, and the future of legal hunting access.

Best Mobile Apps for Hunters and Shooters 2025 | Top Free Picks

Technology is revolutionizing the way we hunt and shoot. From GPS mapping and ballistics calculators to wind readings and shooting logs your smartphone has quietly become one of the most powerful tools in your hunting pack.

In 2025, mobile apps for hunters and shooters are smarter, faster, and more data-driven than ever before. Whether you’re chasing elk in rugged terrain or fine-tuning long-range accuracy at the range, the right app can mean the difference between success and frustration.

In this guide, we’ll explore the best mobile apps for hunters and shooters 2025, both free and premium, designed for Android and iOS users alike. We’ll also share expert insights, selection tips, and how to avoid common mistakes so you can make the most of your digital hunting companion.

Why Mobile Apps Matter for Modern Hunters and Shooters

The digital landscape has completely transformed hunting and shooting. A decade ago, shooters relied on paper maps, printed range cards, and handwritten logs. Today, mobile technology provides real-time data that improves accuracy, safety, and efficiency.

Here’s why mobile apps for hunters and shooters 2025 are game-changers:

  • Real-time ballistics & weather data: Adjust your aim based on precise wind, temperature, and elevation metrics.
  • Offline GPS tracking: Navigate remote hunting areas even without network coverage.
  • Digital shot logs: Track every session to improve consistency and marksmanship.
  • Community & learning tools: Connect with expert shooters, share data, and get training resources.

In short, these apps are no longer “nice to have.” They’re essential tools for serious outdoorsmen.

How to Choose the Right App for Your Needs

Not all apps are created equal. Whether you’re a hunter or precision shooter, your priorities may differ. Before downloading anything, consider these key factors:

1. Purpose

Are you looking for:

  • Hunting tools (maps, game tracking, moon phases)?
  • Shooting apps (ballistics calculators, wind meters, range logs)?
  • All-in-one solutions that combine both?

2. Device Compatibility

Most apps are optimized for Android and iOS, but some perform better on specific devices. Check the version compatibility before installing.

3. Offline Functionality

When you’re deep in the woods, signal is unreliable. Always look for apps with offline maps and tracking features.

4. Accuracy and Updates

Choose apps that offer regular updates, verified ballistics libraries, and community-verified accuracy reports.

5. User Interface

Hunting and shooting often happen in harsh conditions cold, rain, gloves on. A clean, simple interface is vital for quick, no-nonsense access.

Top Mobile Apps for Hunters and Shooters 2025

Below are the standout options based on performance, popularity, and expert testing covering both free and premium tools.

1. BallisticARC (Best Long Range Shooting App 2025)

Platform: Android & iOS
Price: Free version available; premium upgrade optional

Overview:
BallisticARC remains a favorite among competitive shooters and hunters who demand accuracy at long distances. This app combines ballistic solvers, wind meters, and GPS overlays in one sleek interface.

Key Features:

  • Advanced ballistic solver with G1/G7 drag models
  • Offline range cards and drop charts
  • Wind correction calculations based on real-time weather
  • Rangefinder integration (Kestrel, Leica, etc.)

Why It’s Great:
For anyone serious about long range shooting apps, BallisticARC delivers precise data that rivals dedicated handheld ballistics computers.

2. HuntStand 2025 (Best Overall Hunting App)

Platform: Android, iOS
Price: Free with optional subscription

Overview:
HuntStand is a powerhouse for hunters offering everything from mapping and stand placement to weather forecasts and property boundary data.

Top Features:

  • Detailed 3D satellite and topo maps
  • Real-time wind and weather overlays
  • Land ownership boundaries (US-only)
  • Hunt area sharing with groups

Why It’s Great:
It’s like carrying an entire hunt management system in your pocket. The 2025 update adds faster map loading and improved GPS accuracy.

3. Strelok Pro+ (Precision Ballistics App)

Platform: Android
Price: Paid (worth every cent)

Overview:
Strelok Pro+ continues to dominate the mobile apps for hunters and shooters 2025 Android category. It supports over 700 reticles and integrates with top optics brands.

Key Features:

  • Supports multiple ballistic coefficients and rifle profiles
  • Reticle visualization and zoom
  • Adjustable zeroing tools
  • Wind, spin drift, and Coriolis effect calculations

Why It’s Great:
If you value accuracy over aesthetics, this is the go-to ballistic calculator. Perfect for reloaders and competitive shooters.

4. onX Hunt (Best Mapping App for Hunters 2025)

Platform: Android, iOS
Price: Free trial; premium subscription

Overview:
onX Hunt has long been a staple for serious hunters. It provides offline GPS navigation, detailed land ownership info, and custom waypoint tracking.

Key Features:

  • High-resolution offline maps
  • Public and private land boundaries
  • Real-time GPS tracking and sharing
  • Waypoint marking and trail tracking

Why It’s Great:
Ideal for backcountry hunters who venture off the grid. The new 2025 version adds expanded map coverage across North America.

5. Shooter’s Diary (Best Free Mobile App for Tracking Progress)

Platform: Android
Price: Free

Overview:
A simple yet effective tool that helps shooters log every range session. You can track weapon configurations, ammunition, targets, and group size.

Top Features:

  • Custom rifle profiles
  • Range and accuracy statistics
  • Ammunition performance tracking
  • Visual charts for improvement

Why It’s Great:
If you want a free mobile app for hunters and shooters 2025 that focuses on skill improvement, Shooter’s Diary is perfect for beginners and advanced users alike.

6. Windy (Best App for Wind & Weather Data)

Platform: Android, iOS
Price: Free

Overview:
Accuracy starts with understanding your environment. Windy provides hyperlocal wind, temperature, and barometric data ideal for long-range shooting adjustments.

Key Features:

  • Live wind direction and speed mapping
  • Multi-layer radar visualization
  • Offline mode and customizable alerts

Why It’s Great:
Combining Windy with a ballistics app like Strelok or BallisticARC gives shooters unmatched precision.

Bonus: Other Notable Mentions

  • Geo Tracker: Reliable for hunters needing breadcrumb trails in remote zones.
  • BaseMap: Great for scouting new hunting territories with integrated topo layers.
  • Range Buddy: Ideal for precision shooters testing new ammunition.

Free vs. Paid Mobile Apps: What’s Worth It in 2025

There’s no shortage of mobile apps for hunters and shooters 2025 free download options, but are they as good as paid tools?

FeatureFree AppsPaid Apps
Offline AccessLimitedFull offline GPS, weather, ballistics
AccuracyGood for beginnersProfessional-grade precision
UpdatesLess frequentRegularly maintained
IntegrationStandaloneSupports devices (Kestrel, Garmin, Leica)

Pro Tip: Start with free apps like HuntStand or Shooter’s Diary, and upgrade once you identify your specific needs.

Essential Features to Look For in 2025 Apps

When downloading any app, prioritize these must-have features to ensure reliability in the field:

  • Offline mapping — For remote hunting areas
  • Ballistic calculator — Essential for accurate long-range shots
  • Weather data integration — Temperature, pressure, wind, and humidity
  • Custom rifle/ammo profiles — For precise shot predictions
  • GPS tracking & waypoint marking — To trace routes and stands
  • Cloud backup — Prevents data loss

Tips for Getting the Most Out of These Apps

  1. Keep your data updated: Regularly input your rifle zero, new loads, and environmental changes.
  2. Use external sensors: Pair with devices like Kestrel wind meters for enhanced precision.
  3. Test before the hunt: Don’t wait until game day familiarize yourself with the app’s layout and features.
  4. Download offline maps early: Always prepare for no-signal areas.
  5. Stay battery smart: Keep a power bank; mapping and GPS features drain your phone fast.

Common Mistakes Hunters Make with Mobile Apps

Even the best app won’t help if used incorrectly. Avoid these frequent pitfalls:

  • Relying solely on digital tools: Always carry a physical map and compass backup.
  • Ignoring calibration: Re-zero and calibrate your rifle data after every major weather change.
  • Using outdated versions: Apps evolve fast; outdated ones can produce errors.
  • Not testing offline mode: Always verify that key functions work without connectivity.

Expert Insights: What’s Next for Hunting & Shooting Apps

2025 marks a shift toward AI-assisted ballistics and augmented reality (AR) integration. Expect apps to:

  • Provide real-time AR overlays showing bullet trajectories through your phone camera.
  • Sync directly with smart scopes and wearable sensors.
  • Offer AI-based shooting recommendations (e.g., “Adjust 0.5 MOA left due to wind”).

The future of mobile shooting assistance is about merging data, precision, and accessibility right in your pocket.

Final Thoughts: The Smart Shooter’s Advantage

In 2025, the line between shooter and technologist is blurring fast. The best hunters and marksmen aren’t just relying on skill they’re leveraging data-driven tools that amplify their performance.

Whether you prefer the all-in-one management of HuntStand, the pinpoint ballistics of Strelok Pro+, or the navigation power of onX Hunt, today’s mobile apps for hunters and shooters 2025 can take your accuracy, safety, and success to new heights.

👉 Check out our latest gear reviews, tech breakdowns, and pro tips at TheShootingGears.com.

Or subscribe to our newsletter for exclusive updates on hunting technology, optics, and precision shooting equipment.

Quick Summary Table

CategoryBest AppKey Strength
OverallHuntStandAll-in-one hunting management
Long-RangeBallisticARCPrecision ballistic calculations
MappingonX HuntOffline GPS navigation
Android BallisticsStrelok Pro+Professional-grade solver
Free AppShooter’s DiaryShot tracking & improvement
WeatherWindyReal-time environmental insights

Conclusion

The evolution of mobile apps for hunters and shooters 2025 has completely changed how enthusiasts plan, shoot, and succeed in the field. These digital tools have become indispensable combining precision, convenience, and real-time intelligence to enhance every moment of your hunt or shooting session.

Whether you’re mapping terrain with onX Hunt, analyzing long-range ballistics through BallisticARC or Strelok Pro+, or logging your progress with Shooter’s Diary, each app gives you a tactical edge. The best part? Most of these tools are free or affordable, and many work seamlessly offline, making them perfect for any outdoor environment.

But remember technology is only as effective as the shooter using it. Spend time testing these apps, input accurate data, and practice regularly to build trust in your digital tools. When combined with skill and experience, they’ll help you shoot more precisely, hunt more efficiently, and stay safer in the wild.

As the 2025 season unfolds, don’t fall behind. Download one or two of these best mobile apps for hunters and shooters 2025, experiment with their features, and see how they elevate your performance.

Best Hunting Boots for Cold Weather

The best hunting boots for cold weather depend on how you hunt. If you sit still for hours in wet, freezing conditions, a tall insulated rubber boot usually makes more sense. If you hike, glass, climb, or cover uneven ground, an insulated leather lace-up gives better support and control. This guide keeps the list to seven boots because those are the rows with the strongest source and buyer-path evidence in this update.

Insulation grams are comparison points, not temperature guarantees. Your socks, circulation, activity level, wind, moisture, and how long you sit still all change how warm a boot feels. We do not claim current price, stock, Prime status, ratings, or review counts here because live Amazon availability could not be reliably refreshed during this pass.

Affiliate disclosure: As an Amazon Associate, TheShootingGears.com earns from qualifying purchases.

Quick Picks

  • Best active mountain boot: Kenetrek Mountain Extreme 400.
  • Best traditional leather lace-up: Irish Setter Elk Tracker XD.
  • Best cold, wet stand-sit boot: LaCrosse Alphaburly Pro 18-inch 1600G.
  • Best colder active mountain boot: Kenetrek Mountain Extreme 1000.
  • Best crossover utility boot: Muck Arctic Sport Mid.
  • Best women’s active lace-up: Irish Setter VaprTrek Women’s.
  • Best women’s cold/wet rubber boot: LaCrosse Women’s Alpha Agility 15-inch 1200G.

Comparison Table

BootBest ForInsulationHeightAmazon
Kenetrek Mountain Extreme 400Active mountain hunts400g Thinsulate10 inView
Irish Setter Elk Tracker XD 3983Leather lace-up terrain support400g PrimaLoft10 inView
LaCrosse Alphaburly Pro 18-inch 1600GCold, wet stand sits1600g Thinsulate Ultra18 inView
Kenetrek Mountain Extreme 1000Colder active mountain hunts1000g Thinsulate10 inView
Muck Arctic Sport MidWet/cold utility and lowland huntsFleece, 5mm neoprene, thermal foam12 inView
Irish Setter VaprTrek Women’s 3945Women’s active lace-up hunts400g PrimaLoft8 inView
LaCrosse Women’s Alpha Agility 15-inch 1200GWomen’s cold, wet rubber-boot use1200g Thinsulate Ultra15 inView

How We Chose

We built this update from manufacturer spec pages and a prior ASIN identity review, not from hands-on field testing. We prioritized cold-weather roles that readers actually need: active mountain lace-ups, traditional leather hunting boots, tall insulated rubber boots, wet-cold utility boots, and women’s-specific options.

We excluded old products from the previous live article when the row did not match the stronger seven-product route. We also excluded old product images because the current package does not document image rights or exact variant proof for those files. That is why this version uses direct Amazon CTAs and original non-branded editorial visuals instead of individual product photos.

Best Hunting Boots for Cold Weather

Best Active Mountain Boot: Kenetrek Mountain Extreme 400

Best for: active mountain and backcountry cold-weather hunts where lace-up support matters more than maximum insulation.

The Kenetrek Mountain Extreme 400 is the lighter-insulation mountain boot in this lineup. Manufacturer specs list 400 grams of Thinsulate insulation, a 2.8mm leather upper, Windtex waterproof and breathable membrane, K-Talon outsole, 10-inch height, and 4.2 pounds per pair. It also lists Medium, Narrow, and Wide width options, which helps when fit matters on long hikes.

This is the boot to consider when you move enough to generate heat but still need insulation, waterproofing, ankle support, and traction. It is not the best choice for a motionless all-day stand sit in deep cold because 400 grams is moderate insulation compared with the higher-gram rubber boots below.

  • Pros: supportive mountain build; multiple width options; waterproof/breathable membrane; strong terrain-control role.
  • Cons: premium, stiff, and break-in dependent; moderate insulation only.
  • Skip this if: you sit still for hours in deep cold and need maximum warmth more than hiking support.

Best Traditional Leather Lace-Up: Irish Setter Elk Tracker XD

Best for: hunters who want a traditional 10-inch leather lace-up with waterproofing, insulation, and rough-terrain support.

The Irish Setter Elk Tracker XD, Style 3983, is the more traditional leather boot in this group. Manufacturer specs list 400 grams of PrimaLoft insulation, UltraDry waterproofing, waterproof nubuck leather, a Vibram Bulls-Eye Air Bob Aggressive outsole, 10-inch height, and men’s sizes 8-14 in Regular D and Wide EE. Weight was not source-backed in this pass, so we are not listing one.

Compared with the Kenetrek Mountain Extreme 400, the Elk Tracker XD feels like the conventional hunting-boot lane: leather support, aggressive outsole, and wide sizing without the same mountain-stiff identity. It is still a 400-gram active-use boot, not a deep-cold stationary rubber boot.

  • Pros: traditional leather support; Wide EE option; waterproofing system; aggressive outsole.
  • Cons: no source-backed weight in this pass; no temperature guarantee; not a tall rubber boot.
  • Skip this if: you mostly hunt flooded fields, deep snow, or long stationary sits.

Best for Cold, Wet Stand Sits: LaCrosse Alphaburly Pro 18-inch 1600G

Best for: very cold, wet stand sits, muddy whitetail hunts, and tall rubber-boot coverage.

The LaCrosse Alphaburly Pro 18-inch Realtree Edge 1600G is the dedicated cold-and-wet rubber boot in this article. Manufacturer specs list 1600 grams of Thinsulate Ultra insulation, waterproof hand-laid premium natural rubber over insulating neoprene, Alpha Construction, jersey liner, Burly Pro outsole, 18-inch height, and 5.5 pounds per pair.

This boot is built for wet ground and still cold sits rather than long, steep hikes. The height and rubber build help with mud and snow, but the slip-on fit will not feel as precise as a lace-up on sidehills. Also remember that waterproof construction does not stop water from entering over the top or sweat from building inside.

  • Pros: high insulation; tall 18-inch coverage; waterproof rubber/neoprene construction; strong stand-sit role.
  • Cons: heavy; less precise fit than lace-up boots; too much boot for many active hunts.
  • Skip this if: you hike long distances or hunt milder conditions where heavy rubber becomes tiring.

Best Colder Active Mountain Boot: Kenetrek Mountain Extreme 1000

Best for: colder active mountain hunts where you still need lace-up support and terrain control.

The Kenetrek Mountain Extreme 1000 keeps the mountain-support role of the 400-gram model but steps insulation up to 1000 grams of Thinsulate. Manufacturer specs list a 2.8mm leather upper, Windtex waterproof and breathable membrane, K-Talon outsole, 10-inch height, 4.5 pounds per pair, and men’s Medium width in sizes 8-12, 13, and 14.

This is the Kenetrek choice when temperatures drop but you are still moving through mountain terrain. It is not as width-flexible as the 400-gram model in this source pass, and the added insulation can be too warm for mild days or constant uphill movement.

  • Pros: warmer than the 400g version; mountain-support build; waterproof/breathable membrane; durable leather role.
  • Cons: Medium-width-only verified; heavier and warmer; still not a tall rubber boot.
  • Skip this if: you need multiple width options or you overheat easily while hiking.

Best Crossover Utility Boot: Muck Arctic Sport Mid

Best for: mud, snow, chores, lowland hunts, and wet/cold utility use when you want easy on/off convenience.

The Muck Arctic Sport Mid is the crossover boot here. Manufacturer specs list fleece and warm lining, a 5mm neoprene bootie, 2mm thermal foam under the footbed, 100% waterproof and MUCKPROOF rubber/neoprene construction, MS-1 lug outsole, 12-inch full height, and average weight of 2.50 pounds for a men’s size 10. Muck lists a comfort range, but we treat that as manufacturer guidance rather than a TSG guarantee.

This boot makes sense when you want a wet/cold boot for mixed duties. It is easier than tall rubber boots for quick use, but it offers less height than 15- or 18-inch options and less fitted support than a leather lace-up.

  • Pros: easy on/off; waterproof rubber/neoprene construction; useful mid-height role; lighter than many tall rubber boots.
  • Cons: less coverage than tall boots; not a lace-up support boot; manufacturer comfort range is not a guarantee.
  • Skip this if: you need either maximum stand-sit warmth or mountain-boot ankle support.

Best Women’s Active Lace-Up: Irish Setter VaprTrek Women’s

Best for: women hunters who want a lighter lace-up boot for active cold-weather hunts.

The Irish Setter VaprTrek, Style 3945, is the women’s active lace-up row in this guide. Manufacturer specs list 400 grams of PrimaLoft insulation, UltraDry waterproofing, full-grain waterproof leather, abrasion-resistant nylon, Rubber Hex Lite outsole, 8-inch height, and women’s sizes 5-11 in Regular B and Wide D. Weight was not source-backed in this pass.

This boot fits the mobility lane: more precise than a slip-on rubber boot, easier for active walking, and available in women’s Regular and Wide widths. It does not have the height or heavy insulation of the tall rubber options, so it is not the best fit for long cold sits in wet ground.

  • Pros: women’s-specific sizing; Regular and Wide widths; active lace-up role; waterproof leather/nylon upper.
  • Cons: only 8-inch height; 400g insulation is moderate; no source-backed weight.
  • Skip this if: you need tall rubber coverage for deep mud, wet snow, or cold still sits.

Best Women’s Cold/Wet Rubber Boot: LaCrosse Women’s Alpha Agility 15-inch 1200G

Best for: women hunters who need a tall insulated rubber boot for cold, wet ground.

The LaCrosse Women’s Alpha Agility 15-inch 1200G is the women’s tall rubber option. Manufacturer specs list 1200 grams of Thinsulate Ultra insulation, waterproof premium hand-laid rubber over 5mm neoprene, jersey liner, Alpha Construction, and 15-inch height. Weight and exact width options were not resolved in this source pass, so verify fit on the live listing before buying.

This is the better women’s choice for cold wet grass, mud, shallow snow, and lower-movement hunts. It is not meant to replace a fitted leather lace-up for steep hikes or sidehill-heavy terrain.

  • Pros: tall 15-inch rubber coverage; 1200g insulation; waterproof neoprene/rubber build; women’s sizing lane.
  • Cons: width and weight unresolved; less terrain support than lace-ups; can be too warm for high-output days.
  • Skip this if: you need lace-up ankle support or a lighter active boot.

Buying Guide: How To Choose Cold-Weather Hunting Boots

Start with the way you hunt. A boot that is perfect for a tree stand can feel miserable on a mountain hike. A supportive lace-up that feels great while moving may not hold enough warmth when you sit still for hours.

Insulation

Lower insulation, such as 400 grams, usually fits active hunters better. Higher insulation, such as 1000 to 1600 grams, makes more sense for colder and lower-movement hunts. Treat the gram number as a comparison tool, not a comfort promise.

Rubber vs leather

Rubber boots are strong for wet ground, mud, and still sits. Leather lace-ups are better for sidehills, long walks, and precise fit. Many serious hunters eventually keep one of each because the roles are different.

Boot height

An 8- to 10-inch boot is easier to walk in and still gives ankle coverage. A 15- to 18-inch rubber boot is better for mud, snow, and shallow water, but it adds weight and bulk.

Fit and sock room

Cold-weather boots should leave room for your actual hunting socks without crushing your toes. Tight boots can reduce comfort and make feet feel colder. Width options matter, especially if you wear thicker socks or have wider feet.

For broader cold-weather planning, the CDC/NIOSH cold stress guidance explains why keeping extremities dry and protected matters in cold conditions. The National Shooting Sports Foundation is also a useful broader resource for responsible hunting and shooting-sports preparation.

Cold-Weather Foot Safety

Cold feet are a comfort and safety concern. Keep feet dry, avoid socks that bunch or crowd your toes, and carry spare dry socks on long wet hunts. If your feet become numb or painful, warm up and reassess instead of pushing through.

Waterproof boots reduce water entering through the boot material, but they do not make your feet dry in every situation. Water can enter over the top, and sweat can build inside during hard hiking. Boot choice, sock choice, and pacing all work together.

Frequently Asked Questions

How many grams of insulation do I need for cold-weather hunting?

Active hunters often do better with moderate insulation, while hunters who sit still in deep cold often prefer higher insulation. Use the gram rating to compare boots, not as a guaranteed temperature rating.

Are rubber boots or leather boots warmer?

Neither material is automatically warmer. Insulation, fit, sock system, and activity level matter more. Rubber boots shine in wet, stationary conditions; leather lace-ups shine when you need support and control while moving.

Do waterproof hunting boots keep feet completely dry?

Not always. Waterproof construction helps stop water from soaking through the boot, but water can still enter over the top, and sweat can collect inside. Carrying dry socks helps on long hunts.

Can one pair of boots work for both hiking and stand sits?

A crossover boot can work for mixed use, but no single boot is perfect for steep active hunts and long deep-cold sits. If you do both often, consider an active lace-up and a tall insulated rubber boot.

Should women choose a women’s-specific hunting boot?

If the fit is better, yes. Women’s-specific sizing and width options can help, but the same rules apply: match insulation, height, support, and waterproofing to the way you hunt.

Final Recommendation

For active mountain hunts, start with the Kenetrek Mountain Extreme 400, or step up to the Kenetrek Mountain Extreme 1000 when colder conditions call for more insulation. For traditional leather support, the Irish Setter Elk Tracker XD is the most familiar lace-up option here.

For cold, wet, lower-movement hunts, the LaCrosse Alphaburly Pro 18-inch 1600G is the strongest stand-sit choice. The Muck Arctic Sport Mid is the easiest crossover utility boot. Women hunters should compare the Irish Setter VaprTrek for active lace-up hunts against the LaCrosse Women’s Alpha Agility for cold, wet rubber-boot use.

Why Use a Prism Scope in Your AR-Style Build

When you’re building or upgrading your AR-style rifle, one of the key decisions you’ll face is choosing the right optic. Red dots, holographic sights, and traditional rifle scopes each have their advantages but prism scopes have become increasingly popular among shooters looking for a balance between speed and precision.

In this article, we’ll explore what prism scopes are, how they work, and why they’re a great choice for many AR platforms. Whether you’re setting up a rifle for home defense, competition, or general range shooting, understanding the benefits of prism optics can help you make an informed decision.

What Is a Prism Scope?

A prism scope (short for prismatic scope) uses a glass prism to focus and flip the image, instead of the multiple lenses found in traditional scopes. This design allows for a more compact, durable, and optically efficient sighting system.

Here’s what makes it different:

  • Compact Design: Shorter and sturdier than traditional scopes.
  • Etched Reticle: The reticle is etched directly onto the glass—so even if your battery dies, you still have a usable aiming point.
  • Fixed Magnification: Most prism scopes offer 1x to 5x magnification, perfect for medium-range shooting.
  • Improved Eye Relief and Clarity: Clear image with minimal distortion, even for users with astigmatism.

In short, prism scopes combine the speed of red dots with the clarity and precision of magnified optics.

Why Prism Scopes Are Ideal for AR Builds

Your AR platform is versatile it can be tuned for close-quarters combat, target shooting, or mid-range accuracy. Prism scopes fit this flexibility perfectly. Let’s break down why they’re a great match.

1. Excellent for Shooters With Astigmatism

One of the biggest reasons to choose a prism scope over a red dot is astigmatism correction.
If you’ve ever looked through a red dot sight and noticed the dot looks blurry, star-shaped, or smeared, that’s likely due to astigmatism in your eyes.

A prism scope’s etched reticle doesn’t rely solely on a projected LED dot so it remains crisp and clear, even for shooters with eye conditions. The etched reticle is always visible, and the optional illumination simply enhances visibility in low-light conditions.

Key Benefit: Sharp, defined reticle regardless of vision issues.

2. Combines Speed and Precision

AR rifles are often used in situations where you need to transition quickly between close and mid-range targets. Prism scopes, especially 1x and 3x models, provide:

  • Quick target acquisition similar to red dots.
  • Magnification that helps you identify and engage targets out to 300–400 yards.

For instance, a 3x prism scope offers enough zoom to accurately hit steel plates or vital zones on targets without the bulk of a full-size scope.

Key Benefit: Versatile for both fast and accurate shooting.

3. Durable and Compact Design

Because prism scopes use a single internal prism instead of multiple moving lenses, they’re inherently more rugged and shock-resistant. They can take a beating and still hold zero, which is crucial for AR builds that might experience heavy recoil, rough handling, or outdoor conditions.

Many popular prism scopes like those from Primary Arms, Vortex, and Burris are built from aircraft-grade aluminum and sealed against water and dust.

Key Benefit: Built like a tank reliable under all conditions.

4. Battery Independence

Unlike red dot sights, which go completely dark when the battery dies, prism scopes feature an etched reticle that remains visible without illumination. This means:

  • You’re never left without an aiming point.
  • The battery life is extended because you don’t need illumination in bright conditions.

Key Benefit: Always ready, even with no power.

5. Clearer Reticle Designs

Prism scopes come with a variety of reticle options—ranging from simple crosshairs to advanced ACSS (Advanced Combined Sighting System) or BDC (Bullet Drop Compensator) reticles.
These designs allow you to:

  • Estimate range
  • Compensate for bullet drop
  • Lead moving targets

For example, the Primary Arms 3x SLx with ACSS reticle allows for quick holdovers from 100 to 600 yards ideal for .223/5.56 AR builds.

Key Benefit: Reticle intelligence helps improve shot accuracy and confidence.

6. Perfect Balance Between Red Dots and LPVOs

Let’s compare how prism scopes stack up:

FeatureRed Dot SightPrism ScopeLPVO (Low Power Variable Optic)
Magnification1x1x–5x (fixed)1x–10x (variable)
Battery DependenceYesOptionalOptional
WeightVery LightModerateHeavier
DurabilityGoodExcellentGood
Astigmatism FriendlyNoYesYes
Price RangeLow–MediumMediumMedium–High

As the table shows, prism scopes sit in the middle ground offering more precision and clarity than red dots, but without the bulk or price of an LPVO.

Key Benefit: The ideal middle ground for most AR shooters.

When to Use a Prism Scope on Your AR

Here are a few scenarios where a prism scope shines:

  • CQB to mid-range shooting (0–400 yards): Perfect for balancing speed and distance.
  • Rugged environments: Where durability and reliability matter.
  • Backup to battery-powered optics: Provides a visible reticle at all times.
  • Astigmatism or eye fatigue: Delivers crisp aiming points without distortion.
  • Tactical and defensive use: Quick target transitions with magnified precision.

If you often switch between short-range drills and longer-distance shots, a 3x or 5x prism scope might be your best all-around choice.

Recommended Prism Scopes for AR Builds

Here are some top-rated options to consider:

  1. Primary Arms SLx 3x Gen II Prism Scope (ACSS Reticle)
    • Excellent optical clarity
    • Reticle supports bullet drop and wind holds
    • Great value for AR platforms
  2. Vortex Spitfire 3x Prism Scope
    • Compact and durable
    • Crisp, bright reticle
    • Lifetime warranty
  3. Burris AR-332 3x Prism Scope
    • Reliable performance and clear optics
    • Built-in bullet drop compensation
    • Rugged, military-style build
  4. Monstrum 3x Ultra-Compact Prism Scope
    • Budget-friendly option
    • Solid performance for the price
    • Etched reticle with optional illumination

Final Thoughts

If you’re building an AR-style rifle, a prism scope offers one of the best combinations of clarity, reliability, and versatility.
It bridges the gap between red dots and full-sized scopes offering speed for close targets and accuracy for mid-range engagements.

For shooters with astigmatism, durability demands, or multi-purpose AR setups, prism scopes provide an unbeatable value.

So the next time you’re considering optics for your AR, give the prism scope a serious look it might just be the perfect optic for your build.

Tactical Rifle Scopes for Law Enforcement vs Civilian Use: What You Need to Know

When it comes to tactical rifle scopes, not all optics are created equal. The differences between law enforcement scopes and civilian rifle optics go far beyond branding or price tags they reflect distinct missions, accountability standards, and operational environments.

Law enforcement officers rely on optics that perform flawlessly in life-or-death scenarios, where precision, durability, and speed matter most. Civilians including hunters, sport shooters, and competitors value versatility, affordability, and application-specific performance.

In this comprehensive guide, we’ll explore the key differences between tactical rifle scopes for law enforcement and civilian use, breaking down everything from magnification and reticle design to durability, legal standards, and training requirements. Whether you’re a professional or an enthusiast, this will help you make an informed decision before your next optic upgrade.

1. Mission Defines the Scope: How Purpose Shapes Optic Design

Law Enforcement Needs

Law enforcement rifles serve in unpredictable, high-pressure environments from urban settings and barricade situations to open-field operations. Officers may need to switch from close-quarters engagement to precision shots at 200–300 meters within seconds.

Key Requirements:

  • Rapid target acquisition
  • Low-light and night vision compatibility
  • Rugged reliability under stress
  • Repeatable zero and turret adjustments
  • Accountability through documentation and maintenance logs

A patrol rifle optic must be battle-ready every time, holding zero through rough handling, vehicle vibrations, and varied weather conditions. That’s why Low-Power Variable Optics (LPVOs) like 1–6x or 1–8x scopes have become the gold standard for law enforcement.

Civilian Needs

Civilians, on the other hand, have more diverse shooting applications:

  • Hunters need optics that perform well in dawn or dusk conditions.
  • Precision shooters need long-range accuracy and fine adjustments.
  • Home-defense owners need fast-acquisition, low-magnification scopes or red dots.

Key Requirements:

  • Versatility
  • Cost-effectiveness
  • Comfort and usability
  • Feature balance over extreme ruggedness

Civilians often seek scopes that deliver maximum value for their budget, with customizable features for their shooting style rather than strict duty specifications.

2. Magnification: Range vs Speed

Law Enforcement

Police and tactical units prioritize speed and clarity over extreme zoom.
Their typical engagement distances are within 300 meters sometimes less than 50. LPVOs (1–6x, 1–8x, 2–10x) provide:

  • A true 1x setting for both-eyes-open aiming (like a red dot).
  • Higher magnification for medium-range precision shots.

The result is a flexible optic that bridges close-quarters speed with enough reach for decisive accuracy.

Civilian Shooters

Civilians have the freedom to specialize.

  • Hunters benefit from 1–4x or 3–9x scopes, giving a balance of visibility and magnification.
  • Long-range shooters go for 4–16x, 5–25x, or even 6–24x scopes for target shooting beyond 600 yards.

👉 SEO Tip: For many readers, searching “best LPVO for civilians” or “best 1–8x tactical scope” — you can interlink to relevant gear reviews or buying guides.

3. Reticle Design: Simplicity vs Precision Data

Law Enforcement Reticles

Law enforcement reticles must be uncluttered and intuitive. Officers can’t waste time deciphering holdover lines in a high-stress situation.

Popular options include:

  • Illuminated center dot for quick target acquisition
  • Simple crosshair with hash marks for range estimation
  • BDC (Bullet Drop Compensator) reticles tailored to standard-duty ammo

Reticle illumination with NV-compatible brightness settings is also crucial for operations under night vision or low ambient light.

Civilian Reticles

Civilians have more freedom to experiment.

  • Hunters often prefer BDC reticles for common calibers like .308 or 6.5 Creedmoor.
  • Precision shooters choose MRAD or MOA reticles in a First Focal Plane (FFP) design, which maintains accuracy across magnification levels.
  • Plinkers or budget users may opt for standard duplex reticles simple, affordable, and effective.

4. Turrets & Adjustments: Locked vs Exposed

Law Enforcement Scopes

Duty-grade optics require precise, tactile turrets that are reliable even after rough use. Most teams prefer:

  • Locking or capped turrets to prevent accidental movement.
  • Mil or MOA markings for easy communication among trained officers.
  • Zero-stop features to instantly return to the baseline setting after adjustments.

This ensures that officers’ rifles maintain absolute consistency under field conditions a must for accountability and safety.

Civilian Scopes

Civilian shooters, especially long-range enthusiasts, love exposed turrets for quick windage and elevation adjustments.
Hunters may prefer capped turrets to avoid snagging in brush or while carrying rifles in the field.

Again, the civilian market emphasizes personal preference and scenario-specific design over standardized protocol.

5. Optical Quality: Clarity Counts for Both

Regardless of use, good glass makes or breaks an optic.

Law Enforcement:

  • Top-tier anti-reflective coatings to handle glare from headlights, flashlights, and streetlamps.
  • Reliable low-light transmission for night operations.
  • Edge-to-edge clarity to quickly identify threats.

Civilians:

  • Hunters demand bright glass during dawn and dusk when animals are most active.
  • Target shooters benefit from premium coatings to read mirage and wind indicators.

If your budget allows, investing in high-quality glass (Schott, ED, or HD lenses) will significantly improve accuracy, reduce eye strain, and last for years.

6. Durability & Environmental Sealing

Durability is where law enforcement scopes truly earn their price tags.
A duty optic must survive:

  • Drops
  • Recoil shock
  • Rain, snow, and extreme temperatures
  • Constant transport in patrol vehicles

Expect military-grade sealing (IPX7+), nitrogen or argon purging, and hard-anodized aircraft aluminum tubes.

For civilians, durability is still valuable but you can save by choosing mid-tier models if you’re not using your rifle daily in harsh conditions.

7. Legal & Accountability Considerations

Law Enforcement

Every piece of police equipment, including optics, is subject to chain-of-custody and policy documentation.

  • Officers must log zeroing procedures, adjustments, and maintenance.
  • Some agencies require optics with data-logging capability or body-cam integration for evidence.
  • Procurement often involves warranty, MIL-SPEC certification, and vendor reliability contracts.

Civilians

Civilians don’t face such strict oversight but must follow firearms regulations and ensure responsible storage and usage.
In some areas, accessories like night vision or thermal optics may be restricted — so always check local laws.

8. Training & Human Factors

No optic can replace training.

  • Law enforcement undergo standardized qualification courses that cover zeroing, range estimation, and low-light engagement.
  • Civilians should practice under realistic conditions not just at the bench.

Tips:

  • Practice transitions between magnification levels.
  • Train eye relief consistency and reticle holdovers.
  • Record your ballistic data (ammo, range, zero distance).

Consistent practice ensures the optic becomes a natural extension of your rifle.

9. Budgeting & Buying Advice

For Law Enforcement Agencies

  • Prioritize total lifecycle cost, not just initial price.
  • Ensure manufacturer support, spare parts, and service agreements.
  • Consider standardizing optics across departments for easier training and maintenance.

For Civilian Shooters

  • Define your primary shooting purpose before shopping.
  • Don’t overpay for features you won’t use (e.g., NV settings for daytime hunting).
  • Look for strong warranties — brands like Vortex, Trijicon, and Leupold offer lifetime coverage.

Pro Tip: Used optics from reputable sources can offer premium glass at a mid-tier price — just verify optical clarity and turret integrity.

10. Quick Comparison Table

FeatureLaw Enforcement ScopesCivilian Scopes
Magnification1–6x / 1–8x LPVO1–4x (hunting), 6–24x (long-range)
Reticle TypeSimple illuminated, NV-compatibleBDC, MRAD/MOA, duplex
TurretsLocking, zero-stop, MIL/MOAExposed or capped
DurabilityMIL-SPEC rugged, waterproofModerate to heavy-duty
Training RequirementStandardized qualificationSelf-directed
CostHigh (agency-grade)Wide range ($200–$2000+)
Legal OversightPolicy and evidence chainCivilian laws vary

11. Maintenance Tips

  1. Keep lenses clean using microfiber and optical solution.
  2. Record zero adjustments and environmental notes.
  3. Check mount torque and screws regularly.
  4. Store scopes in a cool, dry place with silica gel packs.
  5. For duty use, maintain inspection logs it’s not just about maintenance; it’s accountability.

Conclusion

When comparing tactical rifle scopes for law enforcement vs civilian use, it becomes clear that while the technology often overlaps, the purpose and application make all the difference.

For law enforcement, every optic must perform flawlessly under stress offering uncompromising durability, quick target acquisition, and absolute reliability in unpredictable environments. These scopes are engineered for professionals who need mission-ready precision and the assurance that every shot counts, no matter the conditions.

For civilian shooters, the focus shifts toward adaptability and personal preference. Whether it’s for hunting, home defense, or competitive long-range shooting, civilians can choose from a wider range of scopes that match their specific needs and budget. They enjoy more freedom in reticle design, magnification, and turret configuration often prioritizing versatility and value over military-grade ruggedness.

At the end of the day, both communities share the same ultimate goal: accuracy, confidence, and control behind the rifle. Whether you wear a badge or carry your rifle into the field, the right optic can make you a more efficient, responsible, and capable marksman.

So before making your next purchase, define your mission, understand your environment, and invest in an optic that’s not just powerful but purpose-built. Because in the world of tactical optics, clarity and reliability are what truly separate the good from the exceptional.

🛰️ Drone Use for Scouting Hunting Grounds (Legal Issues)

In today’s age of high-tech hunting, drones have transformed the way hunters scout terrain, locate game trails, and evaluate hunting zones. From aerial mapping to monitoring animal movement, drones offer a distinct advantage in planning a successful hunt.

However, before taking flight over your favorite hunting area, it’s crucial to understand the complex web of legal restrictions, ethical considerations, and hunting regulations surrounding drone use. Misusing a drone could lead to heavy fines, revoked hunting licenses, or even criminal charges.

This article dives deep into how hunters are using drones to scout hunting grounds and the legal issues every outdoorsman should be aware of.

1. The Rise of Drones in Hunting Scouting

Drones (or Unmanned Aerial Vehicles, UAVs) have become valuable tools for hunters and wildlife managers. Equipped with 4K cameras, GPS, and thermal imaging, modern drones can:

  • Capture aerial views of hunting grounds to analyze terrain and vegetation density.
  • Help identify animal trails, feeding areas, or bedding zones without physically disturbing the area.
  • Record data over multiple seasons to observe migration or population patterns.
  • Improve safety and navigation in remote locations.

For pre-season scouting, this technology can save countless hours of on-foot exploration. But while drones bring efficiency, regulators view them carefully due to potential misuse during actual hunts.

2. The Legal Framework: Federal and State Drone Regulations

🛑 Federal Laws

At the national level, drone usage is primarily regulated by the Federal Aviation Administration (FAA). Under FAA Part 107, recreational and commercial drone pilots must:

  • Fly below 400 feet above ground level.
  • Maintain visual line of sight at all times.
  • Avoid restricted airspace (such as national parks or military zones).
  • Register drones over 250 grams with the FAA.
  • Never operate drones in a way that endangers wildlife or other people.

Violating FAA regulations can lead to fines up to $27,500 (civil) or $250,000 (criminal) and imprisonment.

State and Local Hunting Laws

Where things get more complicated is at the state level. Every U.S. state (and Canadian province) has its own hunting-related drone laws.

In most regions, using drones to locate, track, or harass wildlife during an active hunting season is illegal. For example:

  • Colorado prohibits using drones to locate or drive game animals.
  • Alaska bans spotting game with drones on the same day of the hunt.
  • Montana and Idaho restrict the use of any aircraft for game-scouting within 48 hours of hunting.
  • Ontario (Canada) prohibits using drones to disturb or locate animals for hunting purposes.

In short: while drone scouting is legal for land survey and terrain mapping, using a drone to gain a real-time advantage during hunting season is usually a violation of fair chase principles.

3. “Fair Chase” and Ethical Hunting

The concept of Fair Chase, established by the Boone and Crockett Club, emphasizes equal opportunity between the hunter and the hunted.
Using drones to spot or track animals violates this principle because it:

  • Removes the natural challenge of locating game.
  • Increases success rates unfairly.
  • Disturbs wildlife behavior.

Even where not explicitly illegal, many hunting associations condemn drone use during active seasons. Ethical hunters often use drones only for off-season land scouting, property boundary checks, or habitat restoration surveys.

4. Acceptable Uses of Drones for Hunters

Despite restrictions, there are legally acceptable and highly beneficial applications for drones in the hunting ecosystem:

✅ Off-Season Scouting

Use drones to map trails, identify water sources, or measure field coverage before the season starts.
This gives hunters valuable insights while staying compliant with local laws.

✅ Land & Property Management

Landowners can use drones to:

  • Inspect fences, tree stands, and blinds.
  • Monitor erosion, flooding, or forest health.
  • Evaluate food plots and planting zones.

✅ Wildlife Conservation

Drones help biologists and conservation agencies track herds, identify disease spread, or monitor habitats — a practice often permitted with special authorization.

✅ Safety & Search Missions

Some jurisdictions allow drones for search and rescue or game recovery (after a legal harvest), provided they’re not used to pursue live animals.

5. Common Legal Pitfalls to Avoid

Before flying, ensure you’re not crossing any legal lines. Here are common mistakes that lead to penalties:

MistakeLegal Consequence
Flying drones over wildlife refuges or national parksFederal violation (hefty fines)
Using drones to flush, locate, or chase animalsIllegal in most states
Filming other hunters or private property without permissionPrivacy law violations
Failing to register drone or obtain FAA certificationCivil fines up to $27,500
Flying during restricted hours or zonesConfiscation or license suspension

Always consult your local wildlife agency or state hunting department before operating drones in the field.

6. How to Stay Compliant

Follow these best practices to stay within legal and ethical bounds:

  1. Check state regulations before each scouting trip.
  2. Fly only in off-season or non-hunting days.
  3. Avoid flying directly over wildlife or nesting areas.
  4. Obtain landowner permission when flying over private land.
  5. Label and register your drone per FAA or Transport Canada requirements.
  6. Keep video footage for personal land management use only, not for real-time game spotting.
  7. Join conservation organizations to stay updated on changing drone policies.

7. The Future of Drones in Hunting and Conservation

The future of drones in hunting looks promising yet tightly regulated. As technology advances, drones are being used not only for scouting but also for wildlife population surveys, reforestation, and fire management.

Some states are considering permit-based drone programs for ethical scouting or conservation monitoring. Others may introduce geo-fencing systems that automatically restrict flight zones near active hunting areas.

Ultimately, the responsible use of drones can make hunters more informed stewards of the land as long as the line between technology and fair chase remains respected.

Conclusion

Drones are powerful tools that can revolutionize pre-season scouting, land management, and conservation efforts. But their misuse can just as easily lead to legal trouble and ethical controversy.

For every hunter, understanding and respecting both FAA flight laws and state wildlife regulations is essential before taking off.
By flying responsibly, you ensure that drone technology enhances your hunting experience without compromising ethics, legality, or wildlife well-being.

Bipod vs Shooting Sticks for Hunters: How to Choose by Hunting Style

There is no single winner between a bipod and shooting sticks for hunting. The better support depends on your terrain, how far you carry your gear, how quickly you need to set up, and whether you normally shoot from prone, sitting, standing, a blind, or a stand. A bipod gives a low, rifle-mounted platform. Shooting sticks are a separate support that can work at sitting or standing height.

For many hunters, a bipod is the steadier choice when the ground is flat enough for prone or low bench-style shooting. Shooting sticks are usually more flexible in brush, tall grass, slopes, blinds, and elevated positions. Neither option makes a shot safe, legal, ethical, or guaranteed. Safe muzzle direction, target identification, a clear backstop, and current local rules still come first.

Table of Contents
  1. Quick Answer: Bipod vs Shooting Sticks
  2. What Is a Rifle Bipod?
  3. What Are Hunting Shooting Sticks?
  4. Bipod vs Shooting Sticks Comparison Table
  5. How They Affect Firearm Control
  6. Decision Matrix by Hunting Style
  7. Terrain and Carry Weight Notes
  8. Limitations to Keep in Mind
  9. Related Guides
  10. Frequently Asked Questions

Quick Answer: Bipod vs Shooting Sticks

Choose a bipod if you often shoot from prone, use flat ground or a bench, and want the support attached to the rifle. Choose shooting sticks if you hunt from seated or standing positions, move through brush, use blinds or stands, or need height adjustment. If your hunts change a lot, the best choice may be the one you will actually carry and practice with.

Bipods favor low stable positions; shooting sticks add height flexibility for seated and standing field setups.

What Is a Rifle Bipod?

A rifle bipod is a two-legged support that mounts to the rifle, usually near the front of the stock or rail. It folds against the rifle when not in use and deploys when you need a low rest. Many models have adjustable legs, and some allow cant or swivel so the rifle can be leveled on uneven ground.

Where a Bipod Works Best

A bipod works best when you can get low and build a stable position on firm ground, a bench, a mat, or a flat field edge. Because it is attached to the rifle, it is always available. The tradeoff is that it adds weight to the front of the rifle and may be awkward in tall grass, brush, tight blinds, or elevated windows.

What Are Hunting Shooting Sticks?

Shooting sticks are a separate support that you carry and set up in the field. Common styles include monopod, bipod stick, and tripod stick designs. Instead of attaching to the rifle, they give you a rest point where the fore-end can sit while your hands still control the firearm.

Where Shooting Sticks Work Best

Shooting sticks are useful when you need height. They can work from sitting, kneeling, or standing positions, which makes them practical in ground blinds, box blinds, elevated stands, brushy edges, and hilly terrain where prone is not realistic. Tripod sticks are usually the steadiest. Monopods are lighter and faster, but they give less side-to-side stability.

Bipod vs Shooting Sticks Comparison Table

FactorRifle bipodShooting sticks
Typical positionProne or low benchSitting, kneeling, or standing
StabilityVery steady when low and plantedVaries by style; tripod is usually steadiest
MobilityAlways attached to the rifleSeparate item to carry and deploy
Setup speedFast if you can get lowFast for monopod, slower for tripod
Terrain fitBest on flat, firm groundBetter in brush, grass, slopes, blinds, and stands
Weight feelAdds weight to the rifleAdds carried weight but keeps rifle lighter
Main limitationHard to use where prone is not possibleLess steady than a solid prone position

How They Affect Firearm Control

Both supports are meant to reduce wobble, not replace safe firearm handling. With a bipod, the rifle is attached to the legs, so the whole setup points where the muzzle points. With shooting sticks, the rifle rests on the support and can shift if you relax your hands. In both cases, stay deliberate when repositioning.

The basic safety rules still apply: keep the muzzle in a safe direction, keep your finger off the trigger until ready, know your target, and know what is beyond it. The NSSF firearm safety rules are a useful baseline, and hunter education resources such as Hunter-Ed firearm safety guidance reinforce the same point.

Decision Matrix by Hunting Style

Use this matrix as a starting point, not a rule. Your terrain, body position, comfort, and local regulations matter more than a generic label.

Hunting styleOften fitsWhyWatch out for
Ground blindTripod or bipod sticksSeated positions need adjustable heightLimited room inside small blinds
Box blindSticks or a stable rail/bag restWindow height usually sits above bipod heightHard surfaces can be noisy
Deer standBipod or tripod sticksElevated seated setups favor height controlManage support carefully at height
Predator callingTripod sticksSteady seated hold while scanningQuiet setup matters
Mountain or backcountryLightweight bipod or monopodCarry weight matters on long climbsThe lightest option may be less steady
Range practiceRifle bipodFlat benches and prone lanes suit low supportsConfirm range rules first

Terrain and Carry Weight Notes

Terrain often decides the choice before preference does. If you hunt flat fields, open cuts, or places where prone is possible, a bipod can be simple and stable. If the shot lane is blocked by grass, brush, snow, a blind wall, or uneven ground, shooting sticks may give you a usable position that a bipod cannot.

Weight on the Rifle vs Weight in the Pack

A bipod moves weight onto the rifle, usually toward the front. Some hunters like that because there is nothing separate to forget. Others dislike the nose-heavy feel during long carries. Shooting sticks keep the rifle lighter but add another item to pack, adjust, and manage quietly.

Limitations to Keep in Mind

Neither support fixes an unstable surface, poor target visibility, unsafe background, or lack of practice. A bipod is limited when you cannot get low. Shooting sticks are less steady than a solid prone rest and can shift if the legs are planted poorly. Test the position before relying on it, and pass on any shot where the setup does not feel controlled.

If you already own a bipod, our guide to the advantages of using a bipod explains where that setup shines. If you are working on rifle setup more broadly, the rifle scope sight-in guide is a useful next read. For bench support, compare the difference with our shooting bags guide.

Frequently Asked Questions

Is a bipod or shooting sticks better for hunting?

Neither is better for every hunt. A bipod is usually better for low, steady prone positions. Shooting sticks are usually better when you need a seated or standing rest in brush, blinds, stands, or uneven terrain.

Are shooting sticks steady enough for hunting?

Shooting sticks can be steady enough when properly planted and matched to the position. Tripod sticks are usually steadier than bipod or monopod sticks, but they also take more setup time.

Do bipods work in a ground blind or deer stand?

Sometimes, but many rifle bipods are too low for seated blind windows or stand positions. Adjustable-height shooting sticks, a stable rail, or a bag rest may fit those setups better.

Can I use both a bipod and shooting sticks?

Yes. Some hunters use a bipod for prone or range work and carry shooting sticks for seated or standing field positions. The downside is extra weight and more gear to manage.

Smart Rifle Scopes with Ballistic Calculator

Smart rifle scopes have shifted from niche gadgetry into practical tools for hunters, competition shooters, and tactical marksmen. In 2025 the term smart scope usually means a riflescope (or optic system) that integrates sensors, digital processing, connectivity, or mechanical systems that automatically assist with aiming most commonly by calculating ballistic drop and suggesting (or applying) corrections in real time. This post unpacks how they work, what to expect in 2025, the best tech approaches, practical pros/cons, and an actionable buying checklist.

1) What exactly is a “smart rifle scope”?

A smart scope combines optics with electronics and software to give shooters data-driven aiming assistance. Typical features you’ll see in 2025:

  • Integrated ballistic calculator — uses inputs (ammo, muzzle velocity, zero distance, atmospheric data) to compute bullet trajectory and display holdover or aim points.
  • Laser rangefinder (LRF) — measures target distance and feeds the ballistic solver instantly.
  • Environmental sensors — barometer/thermometer/hygrometer/tilt sensors to correct for altitude, temperature, and shooting angle.
  • Digital elevation turrets / PĒK or electronic dialing — automates dialing elevation or gives dynamic holdovers on an electronic reticle. Burris’ PĒK / Veracity examples show this hybrid mechanical-digital approach.
  • Thermal / night capabilities or image sensors — for low-light / obscured-vision operation (many thermal scopes now also include ballistic calculators).
  • Apps & connectivity — smartphone/tablet apps let you build/load profiles, sync ammo tables, or push environmental data.

In short: the smart scope’s ballistic calculator is the brain sensors and rangefinder are its inputs, and the reticle/dial/app is how the system communicates the solution to you.

2) How ballistic calculators in scopes actually work (brief technical primer)

  1. User / System inputs: bullet BC (ballistic coefficient), muzzle velocity (or measured velocity), zero distance, sight height, chosen units (MOA/MIL), and environmental data (altitude, temperature, pressure, humidity, wind estimate). Some systems let you pick a specific cartridge from a database.
  2. Range measurement: LRF provides the slant or line-of-sight range; inclinometer corrects for uphill/downhill angle. Modern systems auto-convert slant to horizontal range for drop compensation.
  3. Ballistic solution: the solver computes time-of-flight, drop, and wind drift (if wind input provided). Advanced solvers incorporate drag curves and sometimes machine-learning adjustments or probability outputs.
  4. Output / correction: either shown as holdover marks on an electronic reticle / heads-up display, displayed as a turret/dial adjustment to apply, or in some systems actually commands a motorized turret to move. Burris’ PĒK is an example of a digitally-assisted dialing workflow rather than fully motorized turrets.

3) Why integrate the ballistic calculator into the scope (vs. phone app)?

Pros:

  • Speed & ergonomics: instant on-scope corrections without putting your eye down, especially critical for single-shot opportunities in hunting.
  • Fewer human errors: automated data fusion (range + sensors) reduces manual math and misreading.
  • All-weather operation: purpose-built optics and thermal/IR options keep functionality where phones or standalone apps might fail.

Cons:

  • Cost & complexity: smart scopes add price, battery dependence, and potential failure modes.
  • Repair / service: advanced electronics can be harder to field-repair than mechanical scopes.

4) Top smart-scope approaches and representative models (2025 snapshot)

Note: the market mixes purpose-built “smart scopes” that include ballistic solvers + LRFs, thermal scopes with calculators, and hybrid mechanical scopes that pair with smartphone apps/digital knobs.

A. Laser-rangefinding scopes with built-in solvers (classic smart-scope)

  • Burris Eliminator & similar models long-known concept: integrated LRF + solver that displays holdover. Burris’ newer Veracity/PĒK systems combine digital turret control and app-driven ballistic inputs. These remain a strong, proven direction.

B. Premium optical smart-scopes with configurability

  • Swarovski dS PL and other high-end digital-configurable optics premium glass + digital reticle/config apps; pricey but top-tier image quality with smart features.

C. Thermal / multimode scopes with ballistic calculators

  • Pulsar, ATN, GTGUARD, DNT thermal/night-capable optics that now include integrated ballistic solvers and LRFs in many mid/high-end models, making them viable for low-light hunting and surveillance.

D. App-first, digital-knob hybrid systems

  • Systems that store ballistic profiles in an app and then either instruct a digital elevation knob (PĒK-like) or display an electronic reticle overlay. Useful for shooters who want mechanical reliability with digital convenience.

E. Experimental / research

  • TrackingPoint-style precision-guided systems historically pushed the envelope, but their commercial status has fluctuated; other R&D projects explore ML-based probability-of-hit overlays.

5) Real-world buying guide — pick the right smart scope for your use

Choose by use case:

  • Big-game hunting (daylight): choose fast LRF + clear glass, light battery footprint, simple UI. Burris Eliminator-style or Veracity with app integration is ideal.
  • Low-light / hog / predator hunting: get thermal or low-light scope with calculator (Pulsar, ATN, GTGUARD). Thermal + LRF + solver is a powerful combo.
  • Precision long-range: premium glass + verified BC/muzzle velocity inputs + ability to fine-tune environmental inputs. Consider premium digital-configurable optics (Swarovski dS, high-end Burris).
  • Budget-conscious / tech-curious: use high-quality optical scope + phone app (Strelok, Ballistics Calculator 2025) + handheld LRF; lower complexity and cost.

Checklist before you buy:

  • Does it have an accurate LRF (range, reflectivity performance)?
  • How does the ballistic database/input work? Can you add custom loads and measured muzzle velocity?
  • Reticle/output style: electronic reticle overlay vs. mechanical turret vs. recommended dial steps. Which do you prefer?
  • Battery life & field-replaceable power: critical for multi-day hunts.
  • App & ecosystem: is the app reliable, updated, and easy to use? Can profiles be exported?
  • Repair & warranty — electronics need different service than optical glass.

6) Setup & field tips (practical)

  1. Chronograph your ammo — measured muzzle velocity beats factory numbers every time. Enter that into the ballistic profile. (Apps and smart scopes permit custom velocity input.)
  2. Zero method: zero carefully at a chosen range, then create ballistic profile for that zero. Confirm at known distances.
  3. Verify LRF accuracy: measure a known target distance when possible. LRF errors directly translate to drop errors.
  4. Account for wind: most on-scope solvers can’t magically measure wind train to estimate or use wind apps/devices and apply manual corrections.
  5. Backup plan: always have simple holdover charts printed or in your phone if electronics fail, you can still make the shot.

7) Legal, ethical & range-safety considerations

  • Local laws: some jurisdictions restrict “fire-control” electronics or certain guided systems. Before buying, check local/state/provincial rules for smart optics and for hunting-specific legality. (Regulations differ widely.)
  • Range policies & competitions: many competitions and some ranges restrict or ban electronically-assisted aiming. Know the rules before using on match day.
  • Ethics: understand that smart scopes can increase hit probability but do not replace shot-calling judgment (distance, wind, target behavior). The shooter still bears responsibility for humane, ethical shots.

8) Quick comparisons (high-level)

  • Burris Veracity / Eliminator family: proven LRF + solver integration; some models offer digital turret assistance (PĒK) — great for hunters wanting mechanical feel with digital math.
  • Swarovski dS series: premium glass with configurable digital options — expensive but elite optical performance for long-range hunting.
  • ATN / Pulsar / GTGUARD / DNT: thermal / digital scopes with ballistic calculators — best for low-light predation and technical thermal hunts.
  • App + LRF + analog scope: cheapest, most flexible combo for technicians on a budget; more manual but highly reliable if you know your load.

Conclusion

In conclusion, smart rifle scopes with ballistic calculators have transformed precision shooting in 2025. What was once reserved for elite marksmen or experimental prototypes is now accessible, durable, and practical for hunters, competitors, and tactical shooters alike. The fusion of laser rangefinding, environmental sensors, and onboard ballistic solvers eliminates the need for manual dope charts or guesswork, allowing shooters to focus entirely on fundamentals like wind reading and trigger discipline. Brands such as Burris, Swarovski, Pulsar, and ATN are leading this evolution, each catering to different needs from daylight big-game hunting to night-time thermal operations. However, technology doesn’t replace skill; it enhances it. Shooters should still invest time in verifying ballistic profiles, practicing real-world shots, and understanding environmental impacts. As innovation continues, we can expect smarter integration with apps, longer battery life, and AI-driven hit probability analytics but success will still depend on the human behind the trigger. In essence, the smart scope revolution represents a perfect balance between traditional marksmanship and cutting-edge technology, helping shooters achieve precision, confidence, and ethical accuracy like never before.

How to Introduce Kids to Hunting Safely and Responsibly

The safest way to introduce kids to hunting is slowly: start with respect for wildlife, safe handling rules, age-appropriate learning, hunter education, and short outdoor experiences before any serious hunt. A child should understand the purpose of hunting, basic safety expectations, and their role in the field before they are placed near a firearm, bow, or live hunting situation.

This guide is for parents, guardians, mentors, and family members who want to build a responsible young hunter. Always check your state wildlife agency rules, minimum-age requirements, hunter education rules, youth-season rules, land-access rules, and supervision requirements before planning a hunt.

Table of Contents

Start With Readiness, Not Age

Look for Interest and Patience

A child who enjoys wildlife tracks, scouting, sitting quietly, learning calls, or helping with gear may be ready for early hunting lessons. A child who is bored, frightened, careless, or only interested in the shot may need more time outdoors before hunting is introduced.

Make Ethics Part of the First Conversation

Explain that hunting is not just about taking an animal. It includes conservation, legal seasons, clean decisions, respect for landowners, meat care, and knowing when not to shoot. Kids should hear early that passing on a shot can be the right decision.

Teach Safety Before Gear

Start With Universal Safety Rules

Before a child handles hunting equipment, teach simple safety rules in plain language. Keep the muzzle or arrow direction safe, keep fingers away from triggers until ready, know the target and what is beyond it, and treat every firearm or bow with respect. The NSSF firearm safety rules are a useful adult reference when teaching firearm basics.

Use Age-Appropriate Gear

Gear should fit the child, not the other way around. Oversized rifles, heavy bows, stiff triggers, poor eye relief, and adult-sized packs can create unsafe habits. If the equipment is too big, too loud, too heavy, or too hard to control, slow down and adjust the plan.

Separate Storage From Training

Children should understand that safe storage is not optional. Firearms, bows, ammunition, broadheads, and knives need adult-controlled storage. Project ChildSafe offers practical secure storage resources for families and firearm owners.

Fit, Comfort, and Communication

Fit the Gear to the Child

Kids should not be asked to “grow into” unsafe or uncomfortable gear in the field. Clothing should keep them warm and dry, boots should let them walk safely, and hearing/eye protection should fit well enough that they actually wear it when needed.

Agree on Stop Signals

Before leaving, agree on simple signals for cold, fear, fatigue, bathroom breaks, and wanting to stop. A child who knows they can speak up is less likely to hide discomfort or make rushed decisions.

Practice Quiet Skills First

Let kids practice whispering, walking quietly, watching wind, using binoculars, and identifying safe directions before the stakes feel high. Those small skills make the first real hunt calmer and safer.

Use Hunter Education and Mentors

Hunter education is one of the best ways to give kids a structured foundation. State rules vary, so check the official wildlife agency for your location. National resources such as Hunter-Ed and the International Hunter Education Association can help families understand what hunter education usually covers.

A good mentor should be calm, patient, safety-focused, and willing to end the hunt early if the child is tired or uncomfortable. The best mentor does not push a young hunter to perform for adults.

Plan a Calm First Hunt

Choose the Right Conditions

The first hunt should be short, legal, and realistic. Mild weather, easy access, safe terrain, and a clear exit plan matter more than trophy potential. A simple scouting walk, small-game outing, or observation sit may be better than a long all-day hunt.

Give the Child a Clear Role

Not every first trip needs the child to carry a firearm or bow. They can glass, track, listen, help with a checklist, observe wind, or learn field signs. Giving them a role keeps them involved without forcing responsibility too early.

Prioritize the Process

Celebrate safe decisions, patience, quiet movement, legal awareness, and respect for animals. A first hunt can be successful even without a harvest. That mindset builds better hunters than adult expectations or disappointment.

Youth hunting rules are not the same everywhere. Some states have apprentice licenses, youth seasons, hunter education exemptions, minimum ages, weapon restrictions, blaze-orange requirements, or direct-supervision rules. Check the current rulebook before buying tags or planning a trip.

Adult supervision should be active, not passive. The adult should know where the child is, where the muzzle or bow is directed, what is loaded or unloaded, and when the hunt should pause. A responsible adult also models calm decision-making when an animal appears.

For very young learners, the first step may be a scouting walk, wildlife observation sit, or range-safety lesson with no hunting tag involved. That still counts as progress because the child is learning field awareness without being rushed.

After the Hunt

After the hunt, talk through what went well and what felt difficult. Ask what the child noticed, what they enjoyed, and what they want to learn next. If an animal was harvested, explain field care, meat use, gratitude, and why ethical hunters avoid waste.

If the child felt scared, cold, bored, or overwhelmed, treat that honestly. A shorter next outing or more practice may be the right move. The goal is long-term confidence and responsibility, not rushing a milestone.

Common Mistakes To Avoid

  • Starting with a hunt that is too long, cold, or physically demanding.
  • Using gear that does not fit the child.
  • Skipping hunter education or state rule checks.
  • Letting excitement override safe muzzle or arrow direction.
  • Making harvest the only measure of success.
  • Ignoring the child’s fear, fatigue, or discomfort.
  • Talking about ethics after the shot instead of before the season.

Quick Parent Checklist

  • Check state youth hunting, hunter education, and supervision rules.
  • Teach safety rules before handling equipment.
  • Use properly fitted firearm, bow, clothing, and hearing/eye protection where appropriate.
  • Keep ammunition, firearms, bows, broadheads, and knives secured.
  • Plan short first outings in safe, comfortable conditions.
  • Give the child a clear role that matches readiness.
  • Debrief after every trip and adjust the next step.

FAQ

What age should kids start hunting?

There is no universal age. Laws vary by state, and readiness varies by child. Start with safety, outdoor skills, and hunter education before planning a live hunt.

Should a child carry a firearm on the first hunt?

Not necessarily. Many kids benefit from observing, scouting, or helping with simple tasks before carrying equipment. Follow state law and only move forward when the child is ready and supervised.

How do I keep the first hunt positive?

Keep it short, safe, warm, and calm. Bring snacks, explain what is happening, and let learning count as success.

What is the most important lesson for young hunters?

Safety and respect come first. A young hunter should learn that legal, ethical, safe decisions matter more than taking a shot.

Final Takeaway

Introducing kids to hunting works best when adults move slowly, model safe behavior, and keep ethics at the center. Start with readiness, education, secure storage, proper gear fit, and short low-pressure outings. A responsible young hunter is built through trust and repetition, not pressure.

Official Safety Resources

Rifle Scope Magnification Explained for Beginners

Rifle scope magnification tells you how much larger the target appears through the optic compared with your naked eye. A 3-9x scope can show the image about three times larger at the low end and nine times larger at the high end. For beginners, the best magnification is not always the highest number; it is the range that gives enough detail while still keeping a useful field of view, comfortable eye relief, and a steady sight picture.

This beginner guide explains fixed vs. variable magnification, what common scope numbers mean, why field of view changes, and how to choose practical magnification for hunting, range practice, and general rifle use. It is an educational support article, not a product roundup.

Table of Contents

What Rifle Scope Magnification Means

Magnification is the amount of visual enlargement a scope provides. If a target looks three times larger through a scope than it does with the unaided eye, the scope is being used at 3x. If it looks twelve times larger, it is at 12x.

A telescopic sight is built to help the shooter see and aim more precisely, but magnification is only one part of the system. Glass quality, reticle design, adjustment tracking, eye relief, mounting height, and shooter fundamentals all matter.

How To Read Scope Numbers

Example: 3-9×40

In a 3-9×40 scope, 3-9x is the magnification range. The image can be set from 3x to 9x. The 40 usually means a 40 mm objective lens. A larger objective can help with light transmission and exit pupil, but it can also add weight and require higher rings.

Example: 4-16×50

A 4-16×50 scope gives more top-end magnification and a larger objective lens. That can help for target work or longer distances, but it may be heavier and less handy for quick close-range use.

Example: 1-6×24

A 1-6×24 scope is a low-power variable optic. It favors speed, wide field of view, and short-to-medium distance use over high-magnification detail.

Fixed vs. Variable Magnification

Fixed-Power Scopes

A fixed-power scope has one magnification setting, such as 4x or 10x. Fixed scopes can be simple, rugged, and consistent. The tradeoff is that you cannot zoom out for a wider view or zoom in for more detail.

Variable-Power Scopes

A variable scope lets you adjust magnification within a range. This is the most common choice for beginners because one optic can cover different distances and situations. The key is choosing a useful range, not simply the highest top number.

Common Magnification Ranges

1-6x and 1-8x

These low-power variable scopes are useful when speed and field of view matter. They are common for short-to-medium distance range work and situations where the shooter may need to find the target quickly.

2-10x, 3-9x, and 3-12x

These are practical general-purpose ranges for many hunters and new rifle shooters. They provide enough magnification for many normal distances while staying lighter and easier to use than extreme high-power optics.

4-16x and 5-25x

These ranges can make sense for target shooting, longer-range practice, and precision-oriented rifles. They also demand more attention to position, parallax, glass quality, and stable support.

Why More Power Is Not Always Better

Higher magnification makes the target look larger, but it also narrows field of view and makes wobble easier to see. At high power, heat shimmer, mirage, low light, and small movements can become distracting. Beginners often shoot better with moderate magnification because the sight picture feels steadier.

More power can also slow target acquisition. If a deer steps out close, a scope set too high may show only a patch of hair instead of the whole animal and background. For hunting, a usable low end is often more important than an impressive high end.

How Beginners Should Choose

  • For woods hunting: prioritize low-end magnification and field of view.
  • For general deer hunting: 2-10x, 3-9x, or 3-12x is often practical.
  • For range practice: choose enough power to see the target clearly, but do not overlook glass and tracking quality.
  • For long-range learning: consider 4-16x or higher only if you also have stable support and training.
  • For lightweight rifles: watch size and weight; a huge scope can make the rifle awkward.

A good beginner scope should make practice easier. If the optic is too heavy, too complex, or too powerful for your actual use, it can slow learning instead of improving it.

Common Beginner Mistakes

The most common mistake is buying the biggest magnification range before understanding the rifle’s real use. A scope that looks impressive on paper can be slow in the woods, awkward on a light rifle, or frustrating if the eye box is tight.

  • Leaving the scope on high power: this can make close targets harder to find.
  • Ignoring eye relief: poor eye relief can make the sight picture uncomfortable and may be unsafe on heavier-recoiling rifles.
  • Forgetting parallax: some higher-power scopes need parallax adjustment for the clearest and most consistent view.
  • Choosing too much weight: a large optic can change how the rifle carries and balances.
  • Skipping zero confirmation: magnification does not matter if the rifle is not properly zeroed and verified.

A beginner-friendly scope is usually the one you can mount correctly, see through comfortably, adjust without confusion, and practice with consistently. That is more valuable than chasing a number you rarely use.

Safe Setup and Use

Magnification does not replace safe firearm handling. Review rules from sources like the NSSF, keep the muzzle in a safe direction, know your target and what is beyond it, and use a safe backstop.

Use the rifle and scope manuals for mounting, torque, eye relief, zeroing, and adjustment procedures. If you are unsure about ring height, eye relief, bore alignment, or zeroing, ask a qualified gunsmith, instructor, or experienced range officer.

FAQ

What does 3-9x mean on a rifle scope?

It means the scope can adjust from 3x magnification to 9x magnification. The image appears about three to nine times larger than it does with the naked eye.

Is 3-9x enough for deer hunting?

For many deer hunters, yes. A 3-9x scope is still practical because it offers a useful low end and enough top-end magnification for many common hunting distances.

Does higher magnification make a rifle more accurate?

No. Higher magnification can help you see the target, but rifle accuracy depends on the rifle, ammunition, optic setup, shooter fundamentals, and conditions.

What magnification should beginners start with?

Beginners usually do well with moderate magnification. For many hunting and range setups, a 2-10x, 3-9x, or 3-12x scope is easier to learn than an extreme high-power optic.

Why does my scope look shaky at high power?

High magnification makes normal movement easier to see. The rifle may not be moving more than before; you are simply seeing the movement enlarged. Use stable support and avoid overcorrecting.

Final Takeaway

Rifle scope magnification is useful only when it matches the job. Beginners should choose a practical range, learn what the scope numbers mean, and avoid chasing maximum power before mastering safety, zeroing, steady position, and trigger control.

Exit mobile version