Best Rangefinder for Bowhunting Under $200

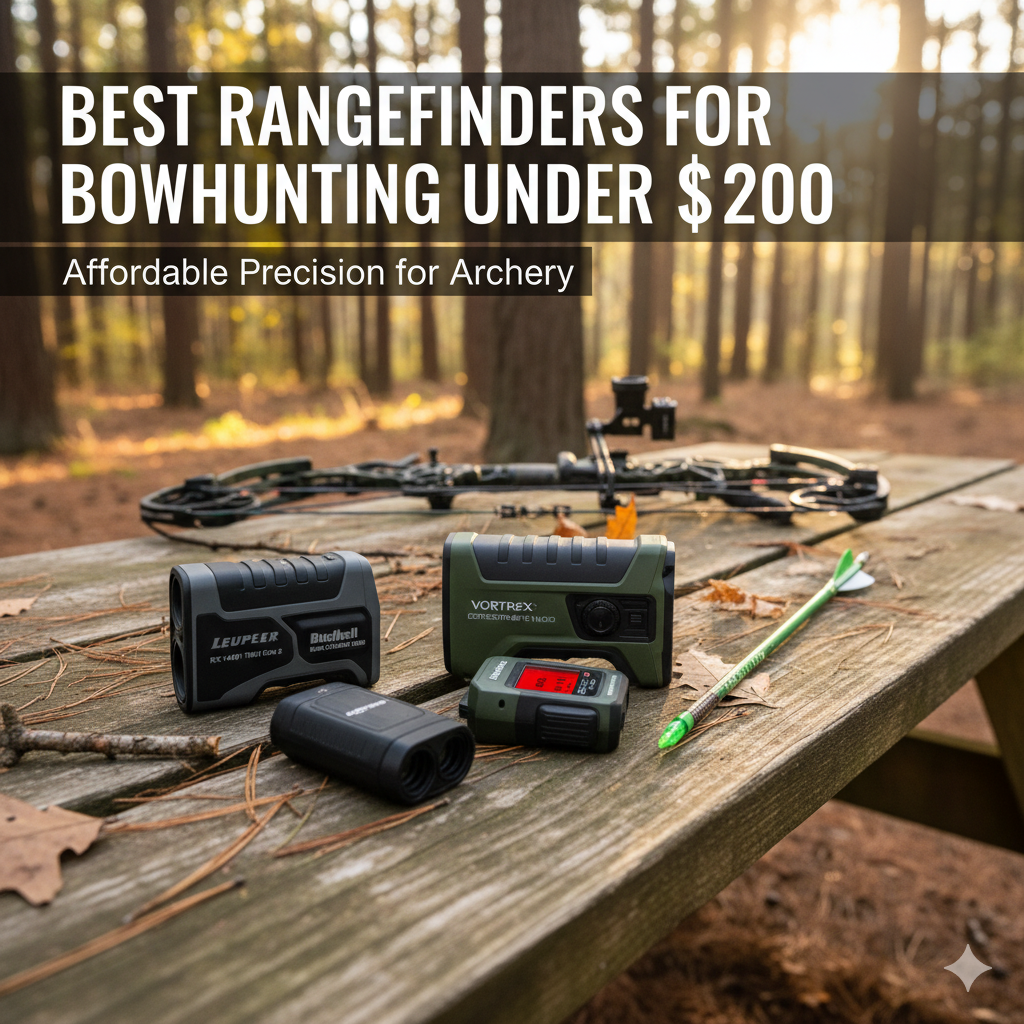
If you’re out bowhunting, you know that estimating yardage isn’t just helpful it’s essential. A few yards off and your arrow might fall short or sail over the back. That’s why investing in a solid laser rangefinder makes sense. But you don’t necessarily need to spend $300+, especially for bowhunting scenarios. In this post we’ll walk through what to look for, and then highlight some great options under $200.

What to look for in a bowhunting rangefinder

Before diving into picks, here are the features that matter most for a bowhunter:

  • Angle compensation: If you’re shooting from a tree-stand or on a slope, you need a true horizontal (or hold-over) distance rather than line-of-sight. As one guide puts it: “Most budget models … will not have angle compensation, which is a bowhunter’s best friend.”
  • Quick, reliable ranging: With a deer moving or heavy brush, you want near-instant feedback. One review warns to avoid units where you hit the button and get no response.
  • Durability / optics quality: In woods, pre-dawn, wet leaves and rough terrain—good glass, waterproofing or at least resistant housing matter.
  • Close-range accuracy: Most bow shots are <100 yards (even <50 in many cases). You need accuracy and confidence at these shorter ranges, not just “1000-yard max” specs.
  • Value for money: Since you’re under $200 budget, you’ll likely get fewer bells and whistles than the high-end units—but you can still hit the sweet spot.

From reviews:

  • One guide says: “For bowhunters … having a quality rangefinder is a must-have.” f
  • Another forum: “I’m getting started … My budget for accessories is tight and I’ve pinpointed three main options for a range finder below $200…”

Top Picks Under $200

Here are some models worth your attention. They might not offer everything the ultra-premium units do, but for bowhunting they hit the key criteria.

🦌 1. TIDEWE Hunting Rangefinder

Key Features:

  • 6× magnification, 700–1000 yd range
  • Rechargeable USB battery
  • Multiple modes: distance, angle, speed, scan
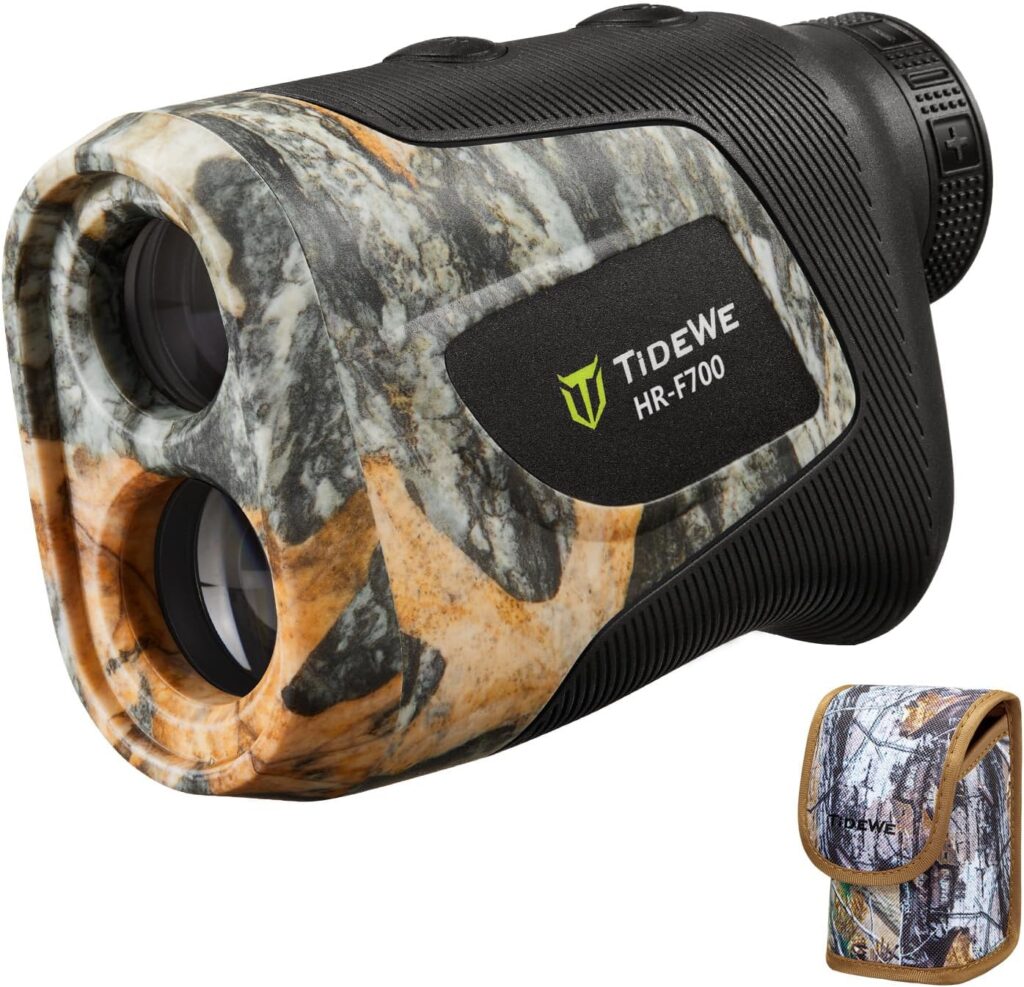
Pros:
✅ Budget-friendly & lightweight
✅ Angle and speed mode
✅ Rechargeable—no extra batteries

Cons:
❌ No illuminated display
❌ Basic weather resistance only

🎯 2. REVASRI 1000Y Rangefinder

Key Features:

  • Up to 1000 yd range, ±1 yd accuracy
  • Rechargeable lithium battery
  • Golf & hunting modes, slope compensation
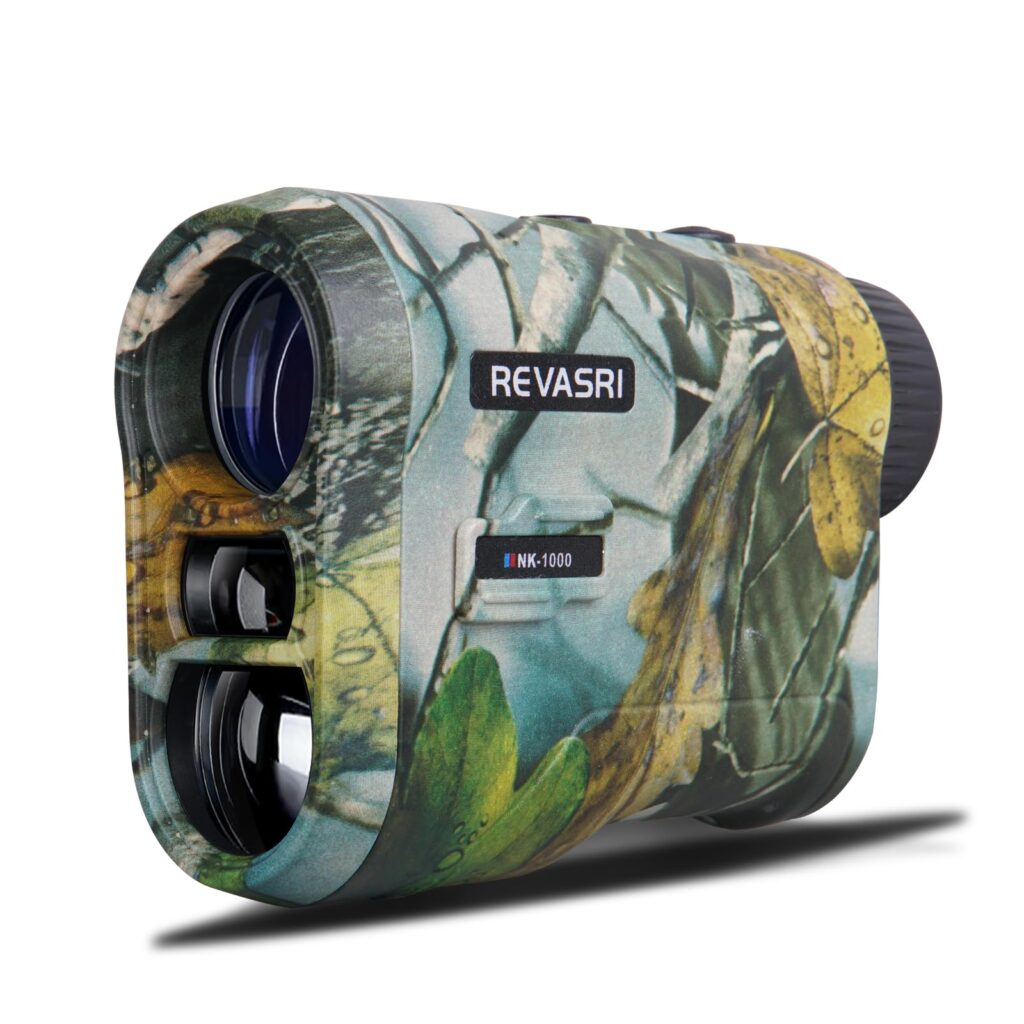
Pros:
✅ Dual use (golf + hunting)
✅ Compact & fast reading
✅ Vibration and slope modes

Cons:
❌ Build feels cheaper than premium brands
❌ Real range shorter than claimed

🌲 3. AILEMON AL51 Rangefinder

Key Features:

  • 900 yd range, 6× magnification
  • Waterproof camo body
  • Angle range compensation (ARC)
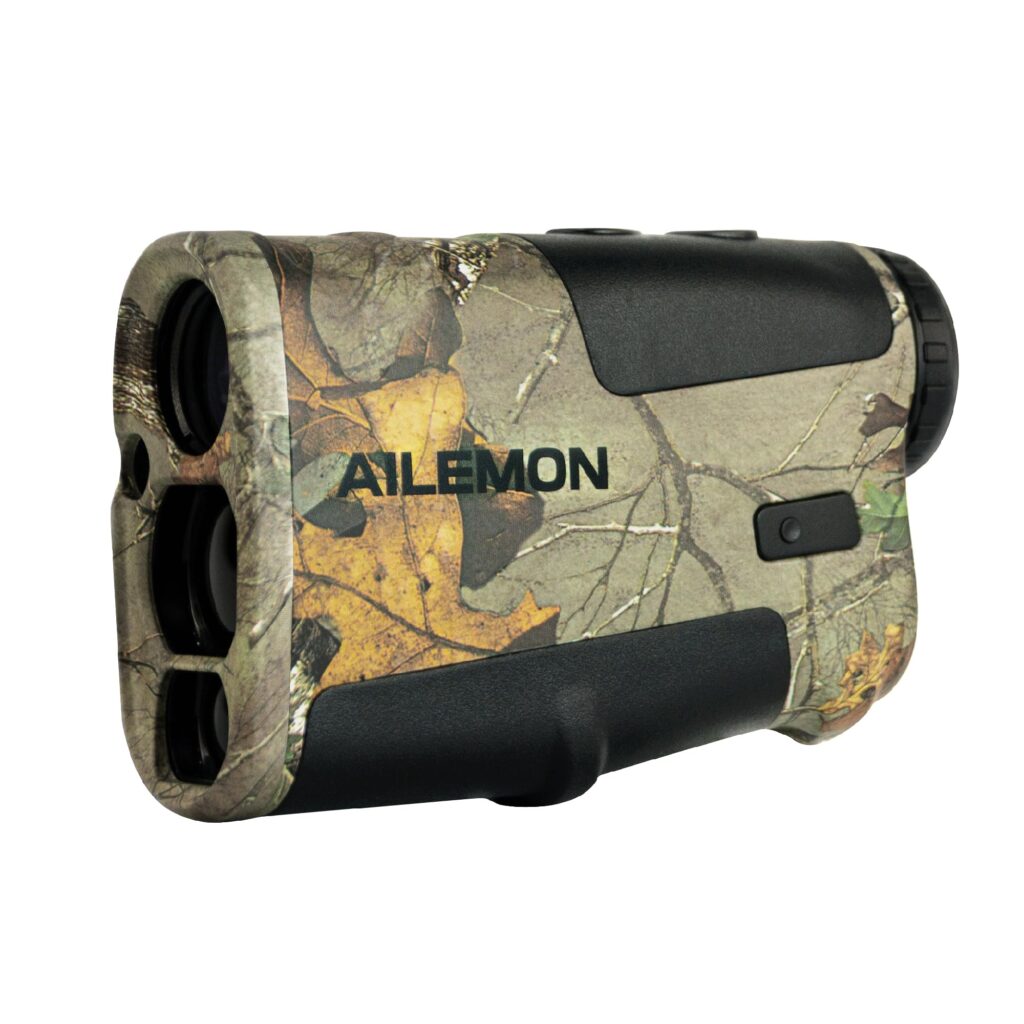
Pros:
✅ Durable waterproof design
✅ Accurate within 1 yd
✅ Great for archery & rifle hunting

Cons:
❌ Slightly slower readout time
❌ Focus ring needs manual adjustment

🏹 4. Vortex Crossfire HD 1400

Key Features:

  • 1400 yd max, 750 yd on deer
  • HD optics, 5× zoom
  • HCD/LOS modes, waterproof & shockproof
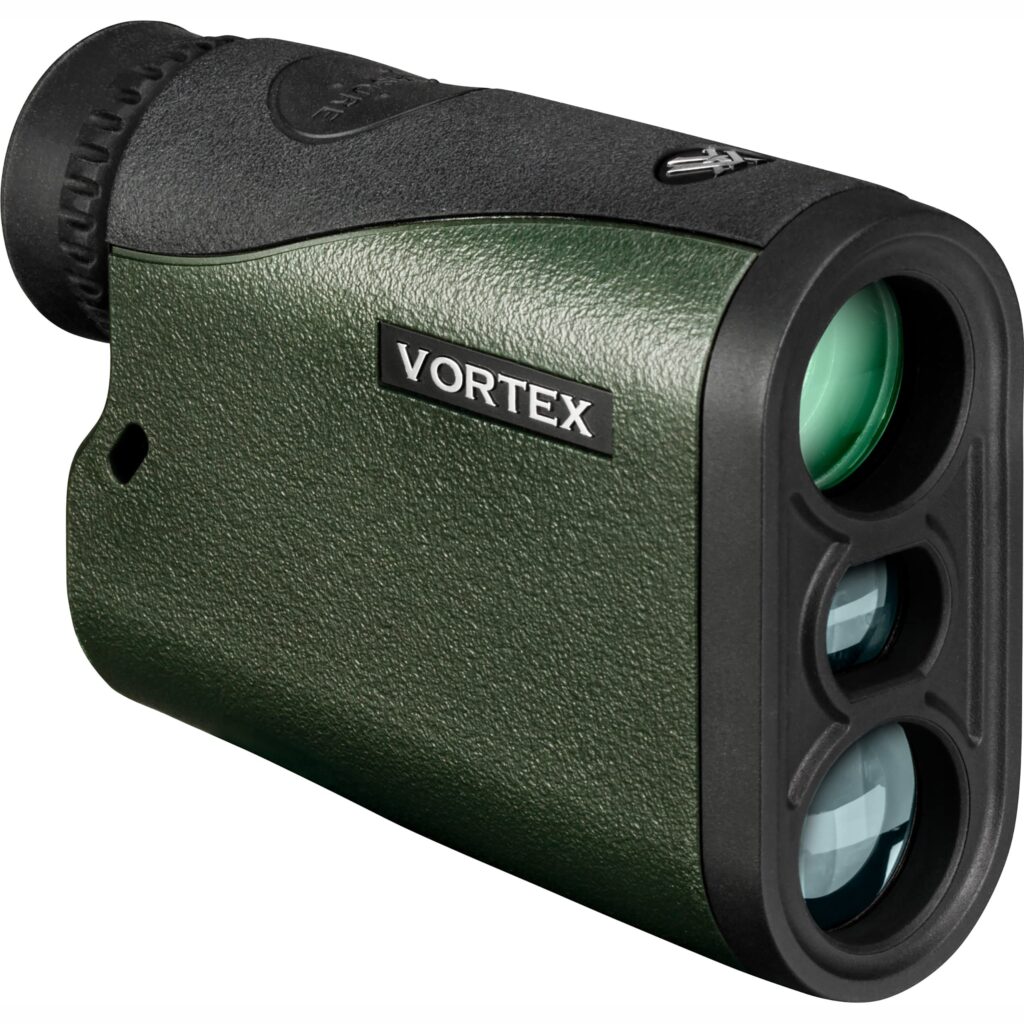
Pros:
✅ Premium glass & clarity
✅ Trusted brand & warranty
✅ Works great in harsh conditions

Cons:
❌ Higher price tag
❌ Limited display brightness in sunlight


🐾 5. AOFAR HX-700N

Key Features:

  • 700 yd range, 6× magnification
  • Two modes: range & speed
  • Lightweight & waterproof
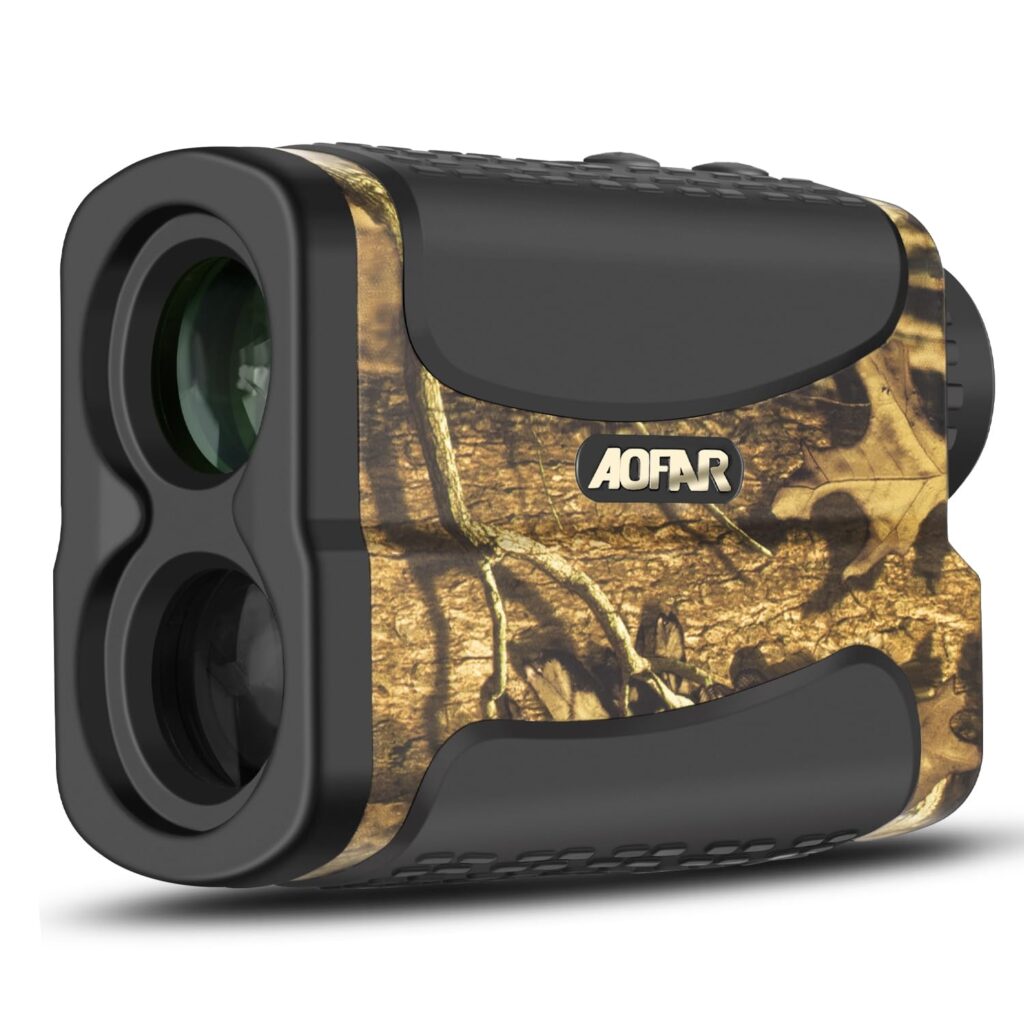
Pros:
✅ Very affordable
✅ Simple & beginner-friendly
✅ Includes pouch & battery

Cons:
❌ No angle compensation
❌ Not ideal for long-range use


Conclusion

each of these five rangefinders offers distinct strengths depending on your hunting or outdoor needs. The AOFAR HX-700N is ideal for beginners thanks to its simplicity and low price, while the TIDEWE and REVASRI models deliver great value with rechargeable batteries and multiple measuring modes suitable for both hunting and golfing. The AILEMON AL51 stands out as a reliable mid-range option, combining waterproof protection with accurate angle compensation perfect for archers and rifle users alike. For professionals seeking unmatched clarity, durability, and long-term reliability, the Vortex Crossfire HD 1400 is the premium choice.

Ultimately, your best pick depends on how often and where you use it. If you want affordability and simplicity, go with AOFAR or TIDEWE; if you want versatility, choose REVASRI; for rugged performance, AILEMON; and for top-tier optics and precision, Vortex Crossfire HD 1400 delivers every time.

Bow Maintenance Tips Before Hunting Season

Pre-season bow maintenance is mostly inspection, clean storage, and knowing when to stop. Before hunting season, read the owner manual for your exact bow, check the string, cables, serving, limbs, cams, arrows, nocks, points, rest, sight, and quiver mounts, then confirm the bow shoots normally at a safe range. Anything damaged, unusual, or beyond basic care belongs with a qualified bow technician.

This guide is not a repair manual or a safety clearance. Compound bows store serious energy, and different models have different service limits. Treat the manual and a qualified pro shop as the final authority for your setup.

Table of Contents
  1. Quick Answer: What To Check Before Hunting Season
  2. Start With The Owner Manual and Safety Inspection
  3. Inspect Arrows, Nocks, Points, and Broadhead Storage
  4. Basic Cleaning and Storage Habits
  5. What To Test At A Safe Range
  6. When To Stop Shooting and Visit a Pro Shop
  7. Pre-Season Bow Maintenance Checklist
  8. Common Bow Maintenance Mistakes
  9. Related Bow Setup Guides
  10. Frequently Asked Questions

Quick Answer: What To Check Before Hunting Season

Before hunting season, check the bow in this order: manual, string and cables, serving, limbs, cams, rest, sight, quiver mounts, arrows, nocks, points, broadhead storage, cleaning, dry storage, and safe range confirmation. Stop shooting if you see fraying, broken strands, serving separation, limb damage, cam damage, unusual noise, or any issue you do not understand.

Keep the work simple. Visual inspection, clean handling, safe storage, and range confirmation are reasonable owner tasks. Press work, string or cable replacement, timing, limb adjustment, module work, peep work, and D-loop service should be handled by a pro shop.

Start With The Owner Manual and Safety Inspection

Start with the owner manual for your exact bow model. The manual tells you what the manufacturer considers normal, what checks are allowed, and which warning signs mean the bow should not be used. If you do not have a current manual, manufacturer manual pages such as Hoyt’s manuals page are a good reminder to find the correct document before doing anything more than a visual check.

Strings, Cables, Serving, and Limbs

Look closely at the string and cables. Watch for broken strands, heavy fraying, flattened areas, unusual separation, or serving that has shifted or opened up. Then inspect the limbs for cracks, splinters, chips, or delamination. Manufacturer safety pages such as Hoyt’s compound bow safety and warnings explain why damaged parts are a stop-use issue, not something to test for “one more shot.”

Cams, Modules, Rest, Sight, and Quiver

Check that cams, modules, and tracks look normal, with no visible bending, chips, or loose hardware. Look over the rest, sight, stabilizer mount, and quiver connection so nothing is obviously loose or shifted from your last setup. If a cam, module, cable path, or limb bolt looks questionable, stop and get service help. Manufacturer support pages such as Mathews support point owners toward model-specific assistance rather than guesswork.

Use pre-season bow maintenance as a structured inspection, not a home repair session.

Inspect Arrows, Nocks, Points, and Broadhead Storage

Check every arrow before the season. Look for cracked shafts, damaged fletching, loose inserts, damaged nocks, and points that are not seated correctly. If your arrow manufacturer recommends a specific inspection method, follow that method. If an arrow looks or sounds suspicious during inspection, remove it from use rather than trying to “test” it at full draw.

Broadheads should be stored covered, organized, and away from loose gear. This article does not cover broadhead tuning or shot setup; it only covers safe storage and inspection habits. Replacement arrows, nocks, inserts, and broadheads should match your bow setup and manufacturer guidance.

Basic Cleaning and Storage Habits

Basic bow care is simple: wipe away dirt and moisture, keep the bow dry, and store it in a stable place where it will not be knocked over, crushed, or exposed to harsh chemicals. A soft cloth is usually enough for normal surface cleaning. Avoid solvents, oils, sprays, or abrasive cleaning unless your owner manual specifically allows them.

String wax is another manual-led item. If your manual gives waxing guidance, follow it exactly. If the string is damaged, serving is separating, or you are unsure whether wax is appropriate, do not use wax as a fix. Get the bow inspected.

What To Test At A Safe Range

After the visual inspection, confirm the bow at a safe range with a proper target, backstop, and normal shooting routine. Watch for unusual sound, vibration, feel, arrow flight changes, or shifted accessories. Never dry fire a bow. USA Archery’s safety resources are a useful high-level reference for safe practice habits.

The range check is not a license to ignore warning signs. If anything seems different from normal, stop shooting and investigate with a qualified technician. A bow that feels “mostly fine” can still have a serious problem.

When To Stop Shooting and Visit a Pro Shop

Visit a pro shop if you see fraying, broken strands, serving separation, limb damage, cam damage, unusual noise, derailment, dry-fire history, a hard drop, or anything that makes you uncertain. A qualified technician should handle string and cable service, press work, timing, limb adjustments, module changes, peep work, D-loop service, and any repair that changes the bow’s setup.

When in doubt, choose the slower and safer path. Manufacturers such as BowTech direct owners toward customer service or authorized support for issues that should not be solved by guesswork.

Pre-Season Bow Maintenance Checklist

CheckWhat To Look ForSafe Action
Owner manualExact model guidance and warningsFollow the manual before any maintenance decision
String and cablesFraying, broken strands, serving separationStop and use a pro shop if damaged
Limbs and camsCracks, chips, bent parts, loose hardwareDo not shoot if anything looks abnormal
Arrows and nocksCracks, loose inserts, damaged nocks or fletchingRemove questionable arrows from use
AccessoriesShifted rest, sight, quiver, or stabilizerConfirm secure mounting without forcing adjustments
Range confirmationUnusual sound, feel, vibration, or arrow flightStop if the bow does not feel normal

Common Bow Maintenance Mistakes

The biggest mistake is treating maintenance as repair. A quick inspection does not prove a bow is safe, and a small warning sign can matter. Other common mistakes include skipping the owner manual, dry firing during checks, shooting a questionable arrow, using wax to hide string damage, ignoring serving separation, or attempting press work at home.

Another mistake is waiting until the night before the hunt. Do the inspection early enough that you have time for a pro-shop visit, replacement arrows, or range confirmation without rushing.

Frequently Asked Questions

What bow maintenance should I do before hunting season?

Read the owner manual, inspect the string, cables, serving, limbs, cams, accessories, arrows, nocks, and points, then confirm normal shooting at a safe range. Send anything damaged, advanced, or uncertain to a pro shop.

How often should I replace my bowstring?

There is no universal replacement interval that fits every bow and archer. Use your manual, usage level, visible condition, and a technician’s inspection. Fraying, broken strands, or serving separation are reasons to stop and get professional help.

Can I wax or service my own bowstring?

You can follow your manual if it gives clear string-waxing instructions. Do not treat wax as a repair. String replacement, cable replacement, twisting, timing, and press work should be handled by a qualified technician.

When should I take my bow to a pro shop?

Take it to a pro shop if you see string, cable, serving, limb, or cam damage; if the bow has been dry fired, derailed, dropped, or struck; if it sounds or feels unusual; or if you are unsure whether it is safe to shoot.

Bow Sight Setup & Adjustment Guide (Step-by-Step)

In archery whether for target shooting, bowhunting, or 3D competition the difference between a “good” shot and a great shot often comes down to your bow sight setup and adjustment. A poorly aligned sight can lead to frustration, inconsistent groups, and missed opportunities in the field. On the other hand, a finely tuned sight setup becomes an extension of your aim and lets you shoot with confidence.

In this guide, we’ll walk through everything from choosing a sight, mounting it properly, leveling the axes, sighting in pins, and fine adjustments for varying angles and distances. Whether you are a newcomer or a seasoned hunter looking for a refresher, this article will help you dial in your sight system for maximum accuracy.

Why Proper Sight Setup Matters

Before jumping into steps, it’s worth understanding why sight setup matters so much:

  • Parallax & alignment: Misalignment of sight housing or bubble levels can cause your aiming point to shift as distance increases.
  • Consistent reference: A stable, repeatable sight setup gives you the same reference point each shot.
  • Angle compensation: In bowhunting terrain (uphill/downhill), mis-adjusted axes result in error when aiming.
  • Efficiency in the field: You don’t want to fiddle mid-hunt a properly set sight works under stress.

As GoHunt emphasizes, many accuracy problems at longer range stem from poorly leveled axes, especially second and third axes of the sight.

Types of Bow Sights & Their Differences

Understanding your sight type is key to correct setup. Here are common types:

  1. Fixed-pin (multi-pin) sights – multiple pins (e.g. 3, 5, 7) each representing a distance (20, 30, 40, etc.).
  2. Single-pin adjustable (slider) sights – one pin that you adjust up/down for target distance.
  3. Digital/optical or “advanced” sights – with built-in range finders or electronic adjustment.

Each type demands the same fundamentals of alignment and leveling, though the process of “sighting in” differs. Many of the principles below apply to all.

Tools & Preparations You’ll Need

Before you begin, gather:

  • Allen wrench set (usually supplied with sight)
  • Long carpenter’s level (12″ to 36″ or more)
  • String level or small “bubble on line” level
  • Plumb bob (string + weight)
  • Bow vise or stable bow rest
  • Target and plenty of arrows
  • Tape, paper target, or line target
  • Optional: sight graph or chart for pin spacing

Having a stable platform and accurate levels is critical.

Step 1: Proper Mounting of the Sight

Start by mounting the sight to the bow riser:

  1. Center Shot & Rest Setup
    Before adjusting the sight, make sure your bow’s center shot (arrow rest alignment) is correct. The arrow shaft should pass properly with minimal clearance on both sides (left/right). This ensures the arrow path is straight. (Many tuning guides discuss rest alignment, which precedes sight work).
  2. Fit the Mounting Holes
    Use the manufacturer’s screws, snug them lightly — don’t fully tighten yet. Leave some room for adjustments.
  3. Approximate Vertical and Horizontal Position
    – Move the sight slightly up/down to center your pins along the arrow line.
    – Center it left/right relative to your riser face.
    – Use washers or shims if you need micro-adjustments for centering.

Once it’s roughly in position, tighten screws just enough for minor movement we’ll fine tune later.

Step 2: Leveling the Bow and First Axis Adjustment

Leveling the Bow Itself

Your bow must be plumb (vertical) before you level the sight:

  • Place the bow in a bow vise or stable rest.
  • Lay a long level on a flat “face” of the riser (inside limb pocket, limb pocket wall, etc.) and adjust until it reads level.
  • If you don’t have a vise, use shims, clamps, or a level against a wall to keep the bow steady.

First Axis (Cant or Plumb) Adjustment

The first axis addresses the “twist” or cant of the sight mounting.

  • On sliding/adjustable sights, the mounting bracket sometimes can lean left or right (i.e. not perfectly vertical). That is a first axis issue.
  • Remove or loosen the sight head, and with a string level or small level, ensure the slide rail or mounting bar is vertical.
  • Some fixed-pin sights don’t include first axis adjustment, but you can shim behind the bracket screws if needed to correct minor lean.

If first axis is off, your sight’s vertical motion will cause left/right drift of pins as you move the slider up/down. Getting first axis plumb is the foundation for accurate longitudinal aiming.

Step 3: Second Axis – Vertical Leveling of Pins

Often considered the most important axis, the second axis ensures your sight bar or pins are truly vertical with regard to gravity.

  • Use the sight’s built-in bubble, or mount a bubble level on your sight frame.
  • With your bow held perfectly vertical (i.e. your bow is level), adjust the second axis screw(s) so the bubble reads level.
  • If the bubble is off, gently turn the adjustment screws until it aligns.
  • Re-check after each turn, and ensure your bow is still level when doing so.

If the second axis is off, your arrows will drift left or right as distance increases (i.e. error magnifies). As GoHunt explains, second axis error is a frequent culprit in groups that shift horizontally at longer range.

Step 4: Third Axis – Angle Compensation

The third axis is often the most underutilized but critical when shooting at angles (uphill, downhill, steep terrain). It compensates for the sight housing tilting forward/backwards relative to the bow.

  • Setup a plumb bob (string + weight) so it hangs free near your target area.
  • Draw your bow to full draw in level (horizontal) shot position, align your pins to the string, and see if the bubble remains centered.
  • Now shift your aim angle (e.g. 45° uphill or downhill) while keeping your bow properly held. Watch the bubble; if it shifts during angled shots, your third axis is off.
  • Adjust the third axis screw(s) (usually a tilt adjustment on the sight) until the bubble stays centered throughout angled aiming motions.

If your sight lacks built-in third axis adjustment, you may shim the mounting plate (front/back) to approximate the needed correction. But ultimately, a sight with a proper third axis makes angled shots significantly more accurate.

After adjusting, test multiple angles and fine-tweak so that the bubble remains stable.

Step 5: Sighting-in (Zeroing) Your Pins

With your sight axes correctly leveled, it’s time to sight in your pins for specific distances.

Strategy: Use a “Line Target” or Graph Method

Using a line target helps maintain consistency when zeroing multiple pins. You tape a straight line (horizontal) on your target so you can adjust arrow impact precisely.

Here’s a typical workflow:

  1. Start Close (10-20 Yards)
    Begin with your top pin (e.g. 20 yard pin). From a close distance like 10–20 yards, shoot 2–3 arrows aiming at center. Adjust until your shots consistently hit the line.
  2. Back Up to 30 Yards
    Once the 20 yard pin is hitting, move to 30 yards with the 30 yard pin. Adjust until arrows land on the same line.
  3. Horizontal Alignment / Left-Right Adjustment
    Rotate your line target to vertical and use the 30 yard pin (or middle pin) to adjust left/right. Most sight systems allow rack adjustment (all pins shift left/right together).
    Adjust so that your entire pattern is centered.
  4. Set Further Pins (40, 50, 60, etc.)
    Using a sight graph or chart, plot your pin spacing and adjust the remaining pins accordingly. A sight graph helps extrapolate distances based on arrow flight curve.
  5. Return and Revalidate
    After setting all pins, go back to your 20 and 30 yard pins and verify that they still hit. Small adjustments may be needed.

Tips During Sighting

  • Use the same anchor point, draw length, and form each shot.
  • Fire small groups (2–3 arrows) before adjusting; avoid over-adjusting after one shot.
  • Use micro adjustments (small screw turns) rather than big jumps.
  • Keep notes on how much adjustment per distance change (helps future tuning).
  • Once sighted, lock down screws carefully (but don’t overtighten; recheck levels).

Fine-Tuning & Advanced Adjustments

Even after basic sighting, further fine-tuning can enhance performance.

Addressing Vertical Spread (Distance Compensation)

If your arrows tend to fall above or below pins at certain distances:

  • Adjust individual pins slightly up/down within the sight head (if allowed).
  • Recheck by shooting multiple distances and fine-tune pin spacing.

Corrections for Left/Right Drift

If arrows drift left or right:

  • Re-check your second axis bubble leveling.
  • Adjust “rack left/right” on the sight (shift all pins).
  • Reassess your rest and center shot; sometimes drift comes from arrow alignment or torque.

Verifying at Distance / Field Test

  • Move out to maximum yardage (e.g. 60, 70, 80 yards) and test your pins under real conditions.
  • Factor environmental influences (wind, arrow drop).
  • Note any consistent offsets and adjust accordingly.

Maintenance and Checking for Loosening

Over time and after many shots:

  • Check all screws (mounting, axis adjustment) for loosening.
  • Re-check bubble alignment (second/third axis) occasionally.
  • If you carry your bow in a pack, vibrations can shift small screws — revalidate before each hunt or competition.

Common Troubleshooting & Mistakes

ProblemSymptomLikely Cause & Fix
Arrows drift left/right as distance increasesSecond axis off; bubble misalignedRe-level second axis; adjust left/right rack shift
Arrows move diagonally (not purely vertical)First axis skew or third axis tiltRe-check first axis plumb; adjust third axis for tilt
Pins don’t correlate well with distancesPoor pin spacing or sight graph offRe-graph, adjust spacing, re-zero
Bubble shifts on angled shotsThird axis not adjustedAdjust third axis while simulating angle shots
Sight shifts after travel or heavy useScrews loosenedUse thread locker (low strength), re-tighten, verify levels
Canting the bow when shootingInconsistent shooter formUse a bow level or teach yourself to keep bow vertical

A well setup sight greatly reduces these issues but vigilance pays off.

Shooting Angles & Field Use Considerations

In the real world, you’ll often shoot uphill, downhill, or from uneven terrain. Here are tips:

  • Trust your third axis adjustment: when it’s well tuned, your bubble should remain stable even on angled shots.
  • Use the “cosine rule” approach: your effective horizontal distance is less than your line-of-sight. The sighting system should account for that.
  • Practice from elevated stands or slopes to train your eye and your equipment setup.
  • Document your pin offsets and usage under different slope angles; some archers carry supplemental charts.

Conclusion

A well-tuned bow sight setup is the foundation of accuracy, consistency, and confidence in archery. By carefully mounting the sight, adjusting first/second/third axes, and methodically sighting in your pins, you transform your sight into a reliable aiming tool. The small time investment during setup pays huge dividends in performance, especially during hunts or competitions.

If you found this guide helpful, try it with your own bow this weekend. Document your adjustments, groupings, and results. I’d love to hear your experiences — leave a comment below sharing your bow model, sight type, and how much your accuracy improved after following this method.

Also, check out our related posts on arrow tuning, rest alignment, and shooting form to elevate your full setup. Happy shooting, and may your groups tighten at every yardage!

How To Choose Arrow Spine: Use Manufacturer Charts for Your Bow Setup

The reliable way to choose arrow spine is to use the current selector or chart from the arrow manufacturer whose arrows you are buying, matched to your specific bow setup. Spine describes how much an arrow shaft flexes, and the right value depends on draw weight, draw length, arrow length, point weight, bow type, bow setup, and release style.

This is not a universal spine chart. Any specific spine number should come from a named manufacturer chart for the exact arrow family, with your real inputs entered. If you are unsure, a qualified archery shop can measure your setup and confirm the fit.

Table of Contents
  1. Quick Answer: Use the Manufacturer Chart
  2. What Arrow Spine Means
  3. Inputs That Affect Arrow Spine
  4. Why Manufacturer Charts Matter
  5. Beginner Arrow Spine Workflow
  6. Common Arrow Spine Mistakes
  7. Related Bow Setup Guides
  8. Frequently Asked Questions

Quick Answer: Use the Manufacturer Chart

To choose arrow spine, gather your bow’s draw weight, draw length, planned arrow length, and point weight. Then enter those details into the current selector or chart for the exact arrow brand and product family you plan to buy. Use that manufacturer’s recommendation instead of mixing values between brands.

Arrow spine depends on your complete bow setup, so start with the right manufacturer chart and the right inputs.

What Arrow Spine Means

Arrow spine describes shaft stiffness. When a bow is shot, the arrow flexes as it leaves the string and then recovers in flight. The goal is not to find a random stiffness number; it is to match the shaft to the bow and arrow setup so the arrow behaves predictably.

Static Spine

Static spine is the measured stiffness rating for the shaft. It is the number printed on many arrows and used in manufacturer charts. Static spine is useful because it gives you a starting rating, but it is not the whole story.

Dynamic Spine

Dynamic spine is how the arrow behaves when actually shot. It changes with arrow length, point weight, draw weight, bow setup, and release style. Two arrows with the same printed spine can behave differently if one is longer, uses a heavier point, or is shot from a different bow.

Inputs That Affect Arrow Spine

Manufacturer charts ask for several inputs because spine selection is setup-dependent. Changing one input can shift the recommended spine, which is why simple shortcuts often fail.

InputWhy it matters
Draw weightMore weight generally needs a stiffer match, but not by itself
Draw lengthAffects the arrow length and energy in the setup
Arrow lengthLonger arrows generally behave weaker dynamically
Point weightHeavier points generally make the arrow behave weaker
Bow type and releaseCompound, recurve, finger release, and mechanical release paths may differ
Arrow modelCharts are brand and product-family specific

Draw Weight and Draw Length

Draw weight is the starting point, but draw length helps determine the arrow length you can safely and practically shoot. A change in draw weight can mean your old arrow setup should be checked again.

Arrow Length and Point Weight

Arrow length and point weight are common reasons two similar bows end up with different recommendations. A longer arrow or heavier point can make the arrow act dynamically weaker, so those details must be entered into the selector instead of guessed.

Why Manufacturer Charts Matter

Manufacturer charts matter because each brand uses its own product lines, spine systems, and selection workflow. A value from one brand’s chart does not automatically transfer to another brand’s arrows. Use the chart for the exact arrows you plan to buy.

For example, Easton provides an arrow selector, and Gold Tip provides a spine selector. Use the Easton workflow for Easton arrows and the Gold Tip workflow for Gold Tip arrows. Do not blend the results into a single homemade chart.

For broader archery participation and safety context, USA Archery is a useful reference. For the actual spine number, though, the arrow maker’s chart and your measured setup are the sources that matter.

Beginner Arrow Spine Workflow

  1. Choose the arrow brand and product family first.
  2. Measure or confirm your draw weight and draw length.
  3. Decide the planned arrow length and point weight.
  4. Open the current manufacturer selector or chart for that arrow family.
  5. Enter the inputs exactly as the selector asks for them.
  6. Use that chart’s recommended spine, then have a shop confirm if anything is unclear.

If your draw weight changes later, repeat the workflow. If you cut arrows shorter, change point weight, or move from field points to a different hunting or target setup, recheck the chart instead of assuming the old recommendation still fits.

Keep your measurements written down with the arrows you buy. A simple note with draw weight, draw length, arrow cut length, point weight, insert weight if known, and the chart used can save confusion later. If your groups suddenly open up after a setup change, those notes help you and a shop see whether the arrow match should be checked again before chasing rest or sight adjustments.

Also separate target and hunting setups when the components differ. A practice arrow with one point weight and a hunting arrow with a different front-end setup may not behave the same. That does not mean one is wrong; it means each setup should be checked through the correct manufacturer workflow.

Common Arrow Spine Mistakes

  • Using a generic “this draw weight equals this spine” shortcut.
  • Mixing chart values between manufacturers.
  • Ignoring arrow length or point weight.
  • Copying another archer’s setup without matching your measurements.
  • Trying to tune around a mismatched arrow instead of fixing the match first.

Arrow spine connects directly to bow setup and tuning. Read bow tuning for beginners, review common compound bow mistakes, check archery safety rules, and keep your gear maintained with our bow maintenance tips.

Frequently Asked Questions

How do I choose the right arrow spine for my bow?

Use the current selector or chart from the manufacturer of the arrows you are buying. Enter your draw weight, draw length, planned arrow length, and point weight, then use the recommendation for that exact arrow family.

Does draw weight alone determine arrow spine?

No. Draw weight is important, but arrow length, point weight, bow setup, bow type, and release style can also affect the recommendation.

Can I use one spine chart for any arrow brand?

No. Use the chart for the exact brand and product family you plan to buy. Manufacturer systems are not interchangeable.

What is the difference between static and dynamic spine?

Static spine is the measured shaft stiffness rating. Dynamic spine is how the arrow behaves when shot from your actual setup, which can change with length, point weight, draw weight, and release style.

Should I ask a pro shop before buying arrows?

Yes, if you are unsure about any input. A shop can measure draw weight, draw length, arrow length, point weight, and bow setup so the chart recommendation starts from accurate information.

Final Recommendation

Choose arrow spine by working through the current manufacturer chart for the exact arrows you plan to buy. Use your real setup inputs, keep each brand’s values separate, and ask a qualified shop when measurements are unclear. That workflow gives you a setup-based recommendation instead of a guess.

Recurve vs. Compound Bows: Which Is Better for Hunting?

Bowhunting has always carried a sense of tradition, skill, and closeness to nature that firearms simply cannot replicate. Yet within the world of archery, hunters often face one critical choice before stepping into the woods: Should I hunt with a recurve vs. compound bows?

This debate has existed since the modern compound bow revolutionized archery in the 1960s. On one side, you have traditionalists who swear by the simplicity and instinct-driven shooting of recurves. On the other, you have hunters who value the speed, precision, and mechanical efficiency of compound bows.

So, which is truly better for hunting? The short answer: it depends on your hunting goals, terrain, and skill level. But the long answer requires a deep dive into the features, pros and cons, and real hunting performance of each bow type. That’s exactly what this article will cover in detail.

What Is a Recurve Bow?

The recurve bow is one of the oldest bow designs, tracing its roots back thousands of years. Cultures from the Mongols to Native Americans relied on recurve-style bows for both hunting and warfare. Its defining characteristic is the way the limbs curve away from the archer at the tips, creating more energy storage compared to a straight-limbed longbow.

Characteristics of a Recurve Bow

  • Design Simplicity: No pulleys, cams, or cables. Just a riser and two curved limbs.
  • Lightweight: Easy to carry for miles in rough hunting terrain.
  • Instinctive Shooting: Relies heavily on the archer’s natural aim rather than sights.
  • Shorter Range: Effective hunting range typically 15–30 yards for most hunters.

Why Some Hunters Love Recurves

Hunters often choose recurves because of the raw hunting challenge. You have to get close—really close—to your prey, making every successful shot more rewarding. Many hunters describe it as “hunting the way our ancestors did,” providing a primal connection to the land and the game pursued.

What Is a Compound Bow?

The compound bow is a modern innovation created to solve two major hunting challenges: holding heavy draw weights for long periods and improving arrow speed. By using cams, pulleys, and cables, compound bows allow hunters to pull a heavy draw weight but hold only a fraction of that weight at full draw. This is called let-off.

Characteristics of a Compound Bow

  • High Power: Generates tremendous arrow speed and penetration.
  • Let-Off Advantage: A 70 lb draw weight might feel like only 15–20 lbs at full draw.
  • Accuracy Tools: Designed to work with sights, stabilizers, and arrow rests.
  • Long Range: Capable of ethical shots beyond 40 yards in the hands of skilled hunters.

Why Hunters Prefer Compounds

Compound bows are the go-to choice for modern bowhunters, especially for big game. They are more forgiving, accurate, and effective at longer ranges. For hunters in areas with wary game (like elk in open fields), a compound bow provides a clear edge.

Recurve vs. Compound Bows: Side-by-Side Comparison

Let’s break down how these bows perform in five major hunting categories.

1. Power and Arrow Speed

  • Recurve Bow: Energy transfer depends entirely on your draw length and draw weight. A 50 lb recurve can kill deer effectively, but arrow speeds are usually in the 160–190 fps range.
  • Compound Bow: Mechanical advantage boosts arrow speed into the 280–350 fps range. This results in flatter trajectories and better penetration on tough hides or bones.

Winner: Compound Bow

2. Accuracy

  • Recurve Bow: Accuracy relies 100% on consistent form and instinctive aiming. Even skilled hunters often keep shots within 25 yards.
  • Compound Bow: Equipped with sights, peep sights, and stabilizers, compound bows allow precision at 40+ yards with confidence.

Winner: Compound Bow

3. Portability and Simplicity

  • Recurve Bow: Weighs far less than compounds (2–3 lbs vs 4–6 lbs). Easy to pack on long treks. No mechanical parts to fail.
  • Compound Bow: Heavier, bulkier, and requires tuning. Dropping or damaging a cam can ruin a hunt.

Winner: Recurve Bow

4. Learning Curve

  • Recurve Bow: Requires months or years of consistent practice to master. Hunters must develop instinctive aiming skills.
  • Compound Bow: Beginners can shoot accurately much faster. Accessories and let-off reduce the difficulty curve.

Winner: Compound Bow

5. Hunting Versatility

  • Recurve Bow: Perfect for close-range hunting in dense forests or when still-hunting. Limited for open plains or long shots.
  • Compound Bow: Versatile for whitetails, elk, moose, antelope, and more. Works in almost any hunting environment.

Winner: Compound Bow

Hunting with a Recurve Bow

When hunting with a recurve, success comes down to stealth and shot placement. You’ll need to stalk closer than most compound hunters.

Pros of Hunting with a Recurve

  • Traditional Experience: Feels more connected to the hunt.
  • Quiet and Lightweight: Easier to maneuver in thick woods.
  • Durability: Fewer parts mean less risk of mechanical failure.

Cons of Hunting with a Recurve

  • Limited effective range (20–30 yards).
  • Requires constant practice to stay sharp.
  • Not as effective for large or tough game without perfect shot placement.

Best Use: Whitetail deer in wooded areas, turkey hunting, or hunters seeking the traditional challenge.

Hunting with a Compound Bow

A compound bow offers a technological edge that translates to more opportunities in the field.

Pros of Hunting with a Compound

  • Extended Range: Ethical shots out to 40–60 yards.
  • Penetration Power: Ideal for elk, moose, and bear.
  • Accuracy: Easier to master and more forgiving of mistakes.

Cons of Hunting with a Compound

  • Heavier and less portable.
  • Higher cost due to accessories.
  • Maintenance required (cables, cams, tuning).

Best Use: Versatile for almost any game, from deer to moose, across diverse terrains.

Cost Breakdown

  • Recurve Bows: $150–$500 (bow), minimal accessories. Total setup under $600.
  • Compound Bows: $400–$1,200 (bow), plus $300–$500 in accessories. Total setup often exceeds $1,000.

If budget matters, recurves win. But if performance is your top priority, compounds justify their price.

Ethical Considerations in Bowhunting

Hunting ethically means minimizing suffering and ensuring a quick, clean kill.

  • With recurves, you need to stalk closer and wait for perfect shot placement.
  • With compounds, greater speed and penetration reduce the chance of wounding game.

Real Hunting Scenarios

  1. Deer in Dense Woods
    • Recurve hunters thrive here with 15–25 yard shots.
    • Compound hunters still succeed but may find the heavier bow cumbersome in tight cover.
  2. Elk in the Rockies
    • Recurve hunters face challenges getting within 20 yards of wary elk.
    • Compound hunters benefit from 40-yard accuracy, making it the more practical choice.
  3. Backcountry Hunts
    • Recurve bows are lightweight for long hikes.
    • Compounds deliver long-range versatility but add weight to your pack.

Which Is Better for Beginners?

For new hunters, a compound bow provides faster success, higher confidence, and ethical shooting advantages.

However, if you want to truly develop archery skill, patience, and instinctive aiming, a recurve bow offers a rewarding journey.

Tips for Choosing Your Bow

  1. Match the Bow to Your Game
    • Small to medium game: Either works.
    • Large game: Compound recommended.
  2. Consider Your Hunting Style
    • Traditional challenge: Recurve.
    • Versatility and efficiency: Compound.
  3. Think About Terrain
    • Thick woods: Recurve excels.
    • Open plains/mountains: Compound shines.

Conclusion: Recurve vs. Compound Bows for Hunting

When comparing recurve vs. compound bows for hunting, the truth is that neither bow is universally better; the choice depends entirely on your goals and style as a hunter. Recurve bows offer a traditional, instinctive experience that connects you more deeply with the heritage of archery. They demand patience, practice, and the willingness to get close to your prey, rewarding hunters with a raw, primal satisfaction that modern equipment cannot replicate. Compound bows, on the other hand, provide power, speed, and precision that make them highly effective for larger game and longer shots. With their mechanical advantage and accuracy, they give hunters an edge in nearly any environment, especially when success is the top priority. In the end, both bows are capable of ethical and successful hunting when mastered. What matters most is choosing the bow that resonates with your personal hunting philosophy, dedicating yourself to practice, and embracing the experience of the hunt itself.

Best Bow Release Aids: The Complete Guide for Archers and Hunters

Archery is an ancient sport, but modern technology has refined it into a precise science. Among the many innovations that have transformed how archers shoot, best bow release aids stand out as one of the most impactful tools. If you have ever struggled with consistency, experienced finger pain from long shooting sessions, or wondered how professional archers achieve pinpoint accuracy, the answer often lies in their use of release aids.

This comprehensive guide will cover everything you need to know about bow release aids from their history, benefits, and types, to step-by-step usage, training drills, common mistakes, and recommendations for both hunters and target shooters. By the end, you’ll be equipped with the knowledge to choose the right release aid for your needs and master its use.

The History of Bow Release Aids

For centuries, archers relied solely on their fingers to draw and release the bowstring. Traditional archers still use finger tabs or gloves to protect their hands, but with the rise of compound bows in the 1960s, a new challenge emerged: heavier draw weights and greater string pressure.

Finger shooting was no longer practical for achieving the precision demanded by modern hunting and competition. This gave rise to mechanical release aids. Early designs were basic, but they evolved into today’s sophisticated devices that allow for extremely smooth, consistent, and accurate releases.

Today, release aids are considered standard equipment for compound bow archers, with a wide variety available to suit different shooting styles.

Why Use a Best Bow Release Aid?

You might wonder: if archers have shot bows with fingers for centuries, why switch to a mechanical aid? The reasons are compelling:

  • Consistency in Release
    Human fingers vary in pressure and timing every time you release the string. A release aid eliminates this inconsistency.
  • Improved Accuracy
    By minimizing torque and reducing sideways string movement, release aids ensure straighter arrow flight.
  • Reduced Fatigue
    Shooting with fingers can cause soreness and blisters, especially with high draw weights. Release aids transfer strain to your wrist or hand instead.
  • Better Control with Heavy Draw Weights
    For hunting compound bows that often exceed 60–70 pounds, release aids make it possible to hold at full draw without discomfort.
  • Lower Risk of Injury
    Continuous finger shooting can cause long-term tendon strain. Release aids protect your fingers and joints.

In short, release aids make archery more enjoyable, precise, and accessible for both beginners and professionals.

Types of Bow Release Aids

1. Wrist Strap Releases

  • How They Work: A strap wraps around your wrist, with a trigger mechanism controlled by your index finger.
  • Best For: Hunters who need to shoot quickly and handle heavy draw weights.
  • Advantages: Hands-free when not shooting, stable, and easy to learn.
  • Drawback: May feel bulky for target archers who prefer minimal gear.

2. Thumb Button Releases

  • How They Work: A handheld device activated by pressing a thumb button.
  • Best For: Target archers who want control and precision.
  • Advantages: Customizable sensitivity, ergonomic grip, consistent anchor point.
  • Drawback: Requires practice to avoid “punching” the trigger.

3. Hinge (Back Tension) Releases

  • How They Work: No trigger — fires by rotation of the release head during back tension.
  • Best For: Advanced archers wanting to overcome target panic.
  • Advantages: Promotes surprise release and perfect form.
  • Drawback: Steeper learning curve; not ideal for high-pressure hunting.

4. Resistance-Activated Releases

  • How They Work: Fires when pulling pressure reaches a set threshold.
  • Best For: Training proper execution and form.
  • Advantages: Great for learning steady back tension.
  • Drawback: Less common and requires adjustment time.

How to Choose the Right Bow Release Aid

Consider Your Purpose

  • Hunters should prioritize wrist strap releases for quick readiness.
  • Target Archers may prefer thumb or hinge releases for control.

Match to Skill Level

  • Beginners: Wrist strap releases (easy learning curve).
  • Intermediate: Thumb button releases.
  • Advanced: Hinge or resistance releases.

Comfort and Adjustability

Test how the release fits your hand, whether the trigger tension can be adjusted, and if it provides a natural anchor point.

Price and Quality

A good release aid is an investment. Budget models start around $40, while professional-grade releases exceed $200. Remember — quality directly affects accuracy.

How to Use a Bow Release Aid Properly

  1. Secure the Release – Ensure the strap or handheld release is fitted snugly but not overly tight.
  2. Attach to the D-Loop – Clip onto the bowstring’s D-loop (standard on compound bows).
  3. Draw Smoothly – Engage back muscles and avoid using only your arm strength.
  4. Anchor Consistently – Find a repeatable anchor point (chin, jawline, cheekbone).
  5. Execute the Release – Squeeze the trigger slowly (or rotate naturally for hinge releases). Avoid jerky movements.
  6. Follow Through – Keep your bow arm extended and eyes on target after release.

Common Mistakes to Avoid

  • Punching the Trigger – Jerking leads to inconsistent accuracy.
  • Changing Anchor Points – Always anchor in the same place.
  • Poor Grip – Holding the release incorrectly causes torque.
  • Not Practicing Enough – Switching from finger shooting to release aids requires training.

Bow Release Aids vs. Finger Shooting

FeatureBow Release AidFinger Shooting
ConsistencyHighLow–Moderate
AccuracySuperiorLimited
ComfortVery comfortableCan cause finger pain
Suitability for HuntingExcellentModerate
Suitability for Target ArcheryExcellentTraditional only
Learning CurveModerateEasy

Traditional archery has its charm, but if your goal is precision, release aids are the modern solution.

Training Drills for Release Aid Mastery

  1. Blank Bale Shooting
    Stand close to a target and focus only on your release execution. Ignore aim; focus on form.
  2. Surprise Release Drill
    Practice slow, steady trigger pulls until the shot surprises you. This reduces target panic.
  3. Anchor Consistency Drill
    Draw and anchor repeatedly without shooting to ingrain muscle memory.
  4. Pressure Simulation
    Train under time limits or with distractions to prepare for real hunting scenarios.

Top Bow Release Aid Brands and Models (2025)

  • Scott Archery – Known for durable hunting wrist releases.
  • Tru-Fire – Popular among hunters, wide range of affordable options.
  • Carter Enterprises – High-end thumb and hinge releases favored by professionals.
  • Stanislawski (Stan Releases) – Precision releases for competitive archers.
  • B3 Archery – Innovative designs for hunters and target shooters.

When choosing, consider both your budget and long-term goals.

Maintenance and Care

  • Wipe down after each use to prevent dirt buildup.
  • Apply light bow oil to moving parts every few weeks.
  • Check wrist straps for wear and tear.
  • Store in a dry case to prevent rust or corrosion.

Proper care ensures your release aid lasts for years and maintains performance.

Frequently Asked Questions

Do beginners need a release aid?
Not mandatory, but highly recommended for compound bows. It makes learning easier and less frustrating.

Can I use the same release for hunting and target archery?
Yes, but some archers prefer separate releases for each purpose.

Do release aids work with recurve bows?
Not typically. They are primarily designed for compound bows.

How long does it take to master a release aid?
With consistent practice, most archers adapt within 2–4 weeks.

External Resources

For more expert guidance, check these resources:

Conclusion

Bow release aids are more than just accessories — they are essential tools for anyone serious about archery. They bring consistency, accuracy, and comfort to your shooting, helping you enjoy the sport while performing at your best.

Whether you’re a hunter preparing for the next season, a competitive target shooter chasing perfection, or a beginner eager to improve quickly, choosing the right release aid and practicing proper techniques will elevate your archery skills dramatically.

From wrist straps to thumb buttons, hinge releases to resistance aids, there’s a perfect option for every archer. Start with what matches your style, train diligently, and watch your accuracy soar.

Youth Compound Bows: The Complete Guide for Young Archers

Archery is one of the oldest sports in the world, combining skill, patience, and focus. In recent years, it has become especially popular among younger generations thanks to movies, video games, and the rise of outdoor adventure sports. For young beginners stepping into archery, having the right equipment is crucial and nothing is more important than choosing the best youth compound bow.

A properly designed youth compound bow ensures safety, comfort, and accuracy, helping young archers build confidence while developing essential shooting skills. In this guide, we’ll cover everything parents and coaches need to know about youth compound bows: what they are, how to choose one, safety considerations, and the best models available in 2025.

What Are Youth Compound Bows?

A youth compound bow is a specially designed compound bow tailored for younger archers. Unlike adult bows, these models feature:

  • Lower draw weights (10–40 lbs) suitable for smaller muscles.
  • Shorter draw lengths (18–27 inches) to fit smaller body frames.
  • Lightweight designs for easier handling.
  • Adjustability so the bow can grow with the child.

Compound bows use cams and pulleys to reduce holding weight at full draw (known as “let-off”), making it easier for young archers to focus on accuracy rather than strength.

Why Choose a Youth Compound Bow Instead of a Recurve or Longbow?

  1. Easier Learning Curve – The let-off feature makes compound bows less tiring to shoot.
  2. Better Accuracy – Cams and stabilizers allow steadier shots.
  3. Adjustability – Many youth compound bows can be adjusted for years of use.
  4. Modern Appeal – Kids often find compound bows more exciting because they resemble professional archery gear.

Key Features to Look for in a Youth Compound Bow

1. Draw Weight

  • Youth bows typically range between 10–40 lbs.
  • Beginners should start on the lower end (10–20 lbs).
  • For hunting, most states require a minimum of 35 lbs for ethical shots.

2. Draw Length

  • Most youth archers fall between 18–27 inches.
  • Choose a bow with adjustable draw length to allow growth.

3. Weight of the Bow

  • A lightweight bow (2–3.5 lbs) is best for younger kids.
  • Heavy bows can cause fatigue and poor form.

4. Adjustability

  • Look for compound bows that allow easy adjustments without a bow press.
  • This ensures the bow “grows” with the child, saving money in the long run.

5. Safety Features

  • Rounded cam edges to prevent string slap injuries.
  • Comfortable grips sized for small hands.
  • Smooth draw cycles for beginner-friendly shooting.

6. Accessories

  • Many youth bows come in ready-to-shoot kits, including sights, rests, quivers, and arrows.
  • This makes setup easy for beginners.

Best Youth Compound Bows in 2025

1. Diamond Archery Infinite Edge Pro (Youth-Friendly)

  • Draw Length: 13–31 inches
  • Draw Weight: 5–70 lbs
  • Why It’s Great: Highly adjustable, grows with the archer.
  • Best For: Older youth and teens serious about archery.

2. Bear Archery Cruzer Lite

  • Draw Length: 12–27 inches
  • Draw Weight: 5–45 lbs
  • Why It’s Great: Lightweight and versatile.
  • Best For: Beginners and young hunters.

3. Genesis Original Bow

  • Draw Length: Universal (15–30 inches)
  • Draw Weight: 10–20 lbs
  • Why It’s Great: Official NASP (National Archery in Schools Program) bow.
  • Best For: School programs and first-time archers.

4. PSE Mini Burner

  • Draw Length: 16–26.5 inches
  • Draw Weight: 4–40 lbs
  • Why It’s Great: Compact size and complete package kit.
  • Best For: Youth archers 7–12 years old.

5. Bear Archery Royale Youth Compound Bow

  • Draw Length: 12–27 inches
  • Draw Weight: 5–50 lbs
  • Why It’s Great: Super adjustable and lightweight.
  • Best For: Kids who want a bow they won’t outgrow quickly.

Safety Considerations for Youth Archers

  1. Supervision: Children should never shoot unsupervised.
  2. Proper Draw Weight: Avoid setting draw weight too high, which can cause strain.
  3. Protective Gear: Arm guards and finger tabs prevent injuries.
  4. Safe Environment: Always practice in a controlled range or safe outdoor space.
  5. Proper Arrows: Arrows must be the correct length and spine rating for the bow.

Youth Compound Bows for Hunting

Many young archers eventually want to transition into hunting. Here are some tips for choosing a youth hunting bow:

  • Ensure the bow can reach 35 lbs minimum draw weight (state regulations vary).
  • Use arrows with appropriate broadheads.
  • Choose compact bows for maneuverability in blinds and treestands.
  • Practice extensively on 3D targets before going into the field.

Top Hunting Pick: Bear Cruzer Lite – meets most hunting requirements while remaining lightweight and easy to handle.

Tips for Parents Buying a Youth Compound Bow

  1. Try Before Buying: Visit a pro shop to test bows for comfort and fit.
  2. Start with Adjustability: Kids grow fast; choose a bow that can adjust in weight and length.
  3. Don’t Over-Spend Initially: A mid-range bow is perfect for beginners. Upgrade later if interest continues.
  4. Encourage Practice: Set up safe backyard ranges or join youth archery programs.
  5. Make It Fun: Let kids choose colors or accessories to personalize their bow.

Common Mistakes to Avoid

  • Too Heavy Draw Weight: Causes bad habits and frustration.
  • Buying Adult Bows for Kids: Unsafe and ineffective.
  • Skipping Safety Gear: Increases risk of injuries.
  • Using Wrong Arrows: Can cause tuning problems and dangerous misfires.
  • Ignoring Adjustability: Leads to buying new bows too soon.

Accessories That Help Youth Archers

  • Sights: Multi-pin sights make aiming easier.
  • Arrow Rests: Whisker Biscuits are beginner-friendly.
  • Quivers: Lightweight designs that attach to bows.
  • Releases: Simple wrist-strap releases improve consistency.
  • Stabilizers: Small stabilizers help with balance and reduce vibration.

Training Tips for Youth Archers

  1. Start Close: Begin at 5–10 yards and gradually increase distance.
  2. Focus on Form: Teach proper stance, anchor points, and release.
  3. Short Sessions: Keep practice fun, 20–30 minutes at a time.
  4. Games and Challenges: Make practice engaging with scoring games.
  5. Join a Program: Many schools and clubs have youth archery programs.

Maintenance Tips for Youth Compound Bows

  • Inspect Strings: Wax regularly to prevent fraying.
  • Check Screws: Ensure sights, rests, and cams are tight.
  • Store Properly: Keep bows in dry, safe places.
  • Pro Shop Tune-Up: Get annual checks for tuning and safety.
  • Replace Worn Parts: Change out arrow rests, strings, or cams as needed.

Benefits of Archery for Youth

  • Physical Fitness: Builds strength, coordination, and focus.
  • Confidence: Hitting targets builds self-esteem.
  • Patience & Discipline: Teaches focus and perseverance.
  • Stress Relief: Outdoor shooting reduces screen time and promotes relaxation.
  • Bonding: Great family activity for parents and kids.

Conclusion

Archery is an exciting and rewarding sport for young people, but having the right equipment is critical. A youth compound bow provides the perfect balance of safety, adjustability, and performance to help kids learn proper shooting technique while having fun.

From recreational backyard shooting to competitive school programs and even hunting, youth compound bows are versatile enough to grow with a child’s skill level. By focusing on adjustability, proper draw weight, and safe accessories, parents can ensure their child has the best start in archery.

In the end, archery is more than hitting targets it’s about building confidence, discipline, and lifelong skills. With the right youth compound bow, young archers are set up for success, both on the range and beyond.

Arrow Rest Guide: Rest Types, Fit, and Setup Basics for Archers

An arrow rest is the part of the bow that supports the arrow until release. The main rest types are drop-away rests, containment or full-capture rests, and prong or blade-style rests. The right choice depends on your bow, arrow setup, shooting style, and how much retention, clearance, and tuning complexity you want.

A better rest can support cleaner arrow flight, but it does not guarantee accuracy by itself. Fit, arrow spine, nocking point, form, and tuning all work together. Use this guide to understand the rest types, then confirm final setup with your bow and rest manufacturer instructions or a qualified pro shop.

What An Arrow Rest Does

An arrow rest holds the arrow in position on the bow and supports it through the shot. A well-matched rest helps the arrow launch consistently. A poorly matched or mistuned rest can create fletching contact, erratic flight, and frustrating groups.

The rest is only one part of the setup. Your arrow spine, point weight, nocking point, draw length, release, and form also matter. For broader shooting form work, see our guide on improving archery shooting.

Common Types Of Arrow Rests

Arrow rests fall into a few practical categories. The descriptions below are general, so confirm exact behavior and compatibility for your specific bow and rest.

Drop-away rests

A drop-away rest supports the arrow during the draw and drops out of the way during the shot. The goal is to reduce contact between the rest and the arrow or fletching. Drop-away rests are common on compound bows, but they need correct setup and timing.

Containment and full-capture rests

Containment rests surround or partly surround the arrow so it stays in place while you move, draw, or hold at an angle. That retention can be useful for hunting, field use, and new archers. The tradeoff is that some designs create more arrow or vane contact than a well-set drop-away rest.

Prong, blade, and shoot-through rests

Prong and blade-style rests support the arrow on small contact points and are often associated with target setups. They can be precise, but they also require careful matching to arrow diameter, spine, point weight, and shooting style.

Traditional shelf rests

Many traditional bows use the shelf or a simple stick-on rest rather than a compound-style rest. Do not assume compound rest advice applies to recurves or longbows. Follow the bow maker’s setup guidance.

How To Choose By Use Case

Choose by how you shoot, not by the most expensive or most complicated design.

  • Hunting and field use: arrow retention matters because you may move, change angles, or draw from uneven positions.
  • Target archery: repeatability, clearance, and fine adjustment usually matter more than maximum retention.
  • 3D archery: balance retention, clearance, and class rules. Our 3D archery setup guide explains the broader setup context.
  • Beginners: simplicity and reliability usually beat complicated tuning until form is more stable.

Compatibility And Fit

Before choosing a rest, confirm it fits your bow and your arrows. Check the riser’s mounting interface, arrow diameter, vane clearance, and whether the rest type matches your shooting discipline. If your rest has timing or activation parts, make sure the bow can support that setup correctly.

Manufacturer support pages and manuals are the safest place for model-specific information. For example, Bear Archery’s product manuals and Mathews customer support are better references for setup limits than a generic article.

Setup And Tuning Cautions

Arrow rest setup is connected to the rest of the bow. Centershot, nocking point, arrow spine, fletching clearance, and drop-away timing can all interact. That is why beginners should treat tuning instructions as equipment-specific, not universal.

Use the rest maker’s instructions, the bow manual, and a pro shop or coach when you are unsure. For safe learning context, USA Archery’s safety guidance is also worth reviewing before working with new equipment.

Maintenance Checks

  • Check mounting screws for looseness.
  • Inspect moving parts on drop-away rests.
  • Look for worn bristles, blades, pads, or launcher arms.
  • Check for fletching contact or unusual arrow marks.
  • Recheck tune after changing arrow spine, point weight, vanes, or draw settings.

If you are also working on overall bow balance, see our bow stabilization guide.

Frequently Asked Questions

What type of arrow rest is best for beginners?

Many beginners do well with a simple containment or full-capture rest because it helps keep the arrow in place. The best choice still depends on the bow, arrow setup, and shooting style.

What is the difference between a drop-away rest and a containment rest?

A drop-away rest moves out of the arrow’s path during the shot to reduce contact. A containment rest holds the arrow more securely during movement. Drop-away rests emphasize clearance; containment rests emphasize retention.

Do I need a pro shop to set up an arrow rest?

Not always, but a pro shop is smart if you are unsure about centershot, vane clearance, drop-away timing, or compound bow setup. Small rest changes can affect the whole tune.

Will a better arrow rest make me more accurate?

A well-matched and well-tuned rest can support more consistent arrow flight, but it does not guarantee accuracy. Form, arrows, bow fit, and practice still matter.

How do I know if a rest is compatible with my bow?

Check the rest and bow manufacturer information for mounting style, bow type, arrow compatibility, and setup instructions. If anything is unclear, ask the manufacturer or a local pro shop before buying.

Final Takeaway

The right arrow rest is the one that fits your bow, supports your arrows, and matches how you shoot. Drop-away rests prioritize clearance, containment rests prioritize arrow retention, and prong or blade-style rests can support precise target setups. Treat the rest as part of a complete bow system, not a standalone accuracy fix.

3D Archery Bows: A Practical Setup and Getting-Started Guide

3D archery is a target sport where archers shoot at life-size foam animal targets placed at varied distances along an outdoor course. A good 3D archery bow is not a magic model or a stale yearly pick list. It is a bow that fits you, launches matched arrows consistently, and stays inside the rules for the format or class you plan to shoot.

This guide explains how 3D archery works, what setup choices matter, and how to prepare for a course safely. It does not promise a score, rank products, or tell you that one bow type is best for everyone.

What Is 3D Archery?

3D archery uses three-dimensional foam targets, often shaped like game animals, on a walking course. Unlike a flat target lane, a 3D course may include uphill or downhill angles, changing light, natural terrain, and distances that are sometimes unmarked.

It is still target archery, not hunting. Many bowhunters use 3D as off-season practice, but the event itself is about safe target shooting, range judgment, and consistent form. For broad sport context and participation pathways, USA Archery is a useful starting point, while World Archery’s 3D archery discipline page explains the international discipline at a high level.

3D Archery Bow Setup Factors

A good 3D setup starts with fit and repeatability. Chasing speed, weight, or a model name before fit usually leads to frustration. The goal is a bow you can draw, hold, aim, and shoot repeatedly over a full course without fighting the equipment.

Draw length and draw weight

Correct draw length helps your anchor point, sight picture, and release stay repeatable. Draw weight should be controllable across many shots, not just impressive for one shot. Overbowing yourself can hurt form and consistency.

Balance and holding feel

3D archery often rewards a bow that holds steady on uneven terrain and varied target angles. Bow weight, stabilizer setup, grip feel, and overall balance all influence that hold. For a deeper support article on this piece, see our guide to bow stabilization for target shooting.

Course practicality

A course bow must also be practical to carry. A long, heavy target setup may aim beautifully, but it can be tiring on a walking course. A compact hunting bow may be easier to carry but less stable for some shooters. Fit the setup to the way you will actually shoot.

Bow Types Used In 3D Archery

Different bow types can be used in 3D archery, depending on the event, class, and local rules. Do not assume every club or organization allows the same equipment.

Compound bows

Compound bows are common in 3D because let-off, sights, releases, and stabilizers can support steady aiming. They also require correct setup and periodic service. If your compound needs press-dependent work, use a qualified pro shop.

Recurve bows

Recurve bows bring a simpler equipment path and a more form-focused challenge. They can be a rewarding choice for archers who prefer fewer mechanical parts, but they do not give compound-style let-off at full draw.

Traditional bows

Traditional bows can be used in some 3D contexts, depending on class rules. They reward consistent form, distance judgment, and a realistic understanding of your effective range.

Arrows And Tuning For 3D

Consistent arrow flight matters more than any single accessory. Arrow spine, length, point weight, and fletching should match your bow and draw setup. Use manufacturer spine charts and a pro shop when you are unsure.

3D archery uses field points, not broadheads. Broadheads can damage foam targets and are not part of normal 3D practice or competition. Keep field point weight consistent with the arrow setup you tune. For rest-related setup context, see our arrow rest guide.

Sights, Rests, And Stabilization

Sights, rests, stabilizers, and release aids can help consistency, but they do not guarantee a better score. They must also be legal for your chosen class.

Sights

Some classes allow adjustable sights, some limit sight styles, and some traditional classes may restrict sights heavily. Read the rulebook before buying around a class.

Rests

The rest should support clean, repeatable arrow launch. If arrows are showing contact problems or inconsistent flight, rest setup is one of the areas to inspect.

Stabilizers

Stabilizers can change how the bow balances at full draw and through the shot. A longer target-style stabilizer may hold steadier for one archer, while a shorter setup may be more practical on a walking course for another.

Course And Range Safety Basics

Safety comes before score. Only nock and draw when it is safe, follow the shooting stake and range directions, never shoot when someone is forward of the line, and keep arrows pointed safely downrange. Outdoor courses add terrain and visibility concerns, so follow the host club’s instructions.

For general range-safety thinking, our shooting range safety guide covers habits that transfer well to structured shooting environments. USA Archery’s archery safety page is also worth reviewing, especially for beginners and youth programs.

Formats, Classes, And Rules

3D archery rules vary by organization and event. Equipment class can affect sights, stabilizer length, release aids, rangefinders, arrow type, and scoring. Do not buy gear based on assumptions from a different event.

Before competing, read the current official rulebook for the organization or club hosting the event. If you shoot casually, still ask the range or club about allowed points, walking direction, scoring, and safety procedure before starting.

Getting Started Checklist

Use this checklist as a planning aid before your first course. It is not a replacement for your event’s rulebook or in-person instruction.

  • Confirm draw length and a comfortable draw weight.
  • Match arrows to your bow using spine and point-weight guidance.
  • Use field points only for 3D targets.
  • Check rest contact, sight setup, and broad equipment class rules.
  • Practice at varied known and unknown distances.
  • Read the current event or club rulebook.
  • Follow all course and range safety instructions.

For practice habits that support better consistency, see our guide on improving archery shooting form.

Frequently Asked Questions

What kind of bow is best for 3D archery?

The best bow for 3D archery is one that fits you, shoots matched arrows consistently, and is legal for your chosen class. Many archers use compound bows, but recurves and traditional bows can also fit depending on the format.

Can I use my hunting bow for 3D archery?

Yes, many archers use a hunting compound for 3D practice. Use field points, confirm the setup fits the class or club rules, and tune the bow for consistent arrow flight.

Do I shoot broadheads in 3D archery?

No. Use field points for 3D archery. Broadheads can damage foam targets and are not part of normal 3D target practice or competition.

Are distances marked in 3D archery?

It depends on the event and class. Some 3D formats use unknown distances, while others may allow rangefinders or known-distance formats. Check the event rules before you shoot.

Will a better setup guarantee better scores?

No. A better-fitting, well-tuned setup can support consistency, but scores come from form, practice, range judgment, and following the rules. No bow or accessory guarantees a result.

Final Setup Recommendation

Start with fit, matched arrows, field points, and safe course habits. Then refine the rest, sight, stabilizer, and release setup inside your chosen class rules. A 3D archery bow should help you shoot comfortably and consistently across a course; it should not be chosen from a stale model list or a single spec.

Best Bows for Women in 2025 | Hunting & Archery Buyer’s Guide

Archery has seen a massive rise in popularity among women in recent years. From recreational backyard shooting to competitive target archery and hunting, more women are discovering the thrill, skill, and satisfaction that bows provide. But here’s the challenge: not all bows are created equal, and women often need bows designed with specific considerations in mind such as draw weight, draw length, grip size, and overall comfort.

In this comprehensive guide, we’ll explore the best bows for women, factors to consider when choosing one, types of bows available, and expert tips for making the right purchase. Whether you’re a beginner looking for your first bow or an experienced archer upgrading your gear, this article will help you make an informed decision.

Why Women Need Bows Designed for Them

Anatomical Considerations

On average, women tend to have shorter draw lengths (typically between 24–27 inches) compared to men. Using a bow with an overly long draw length can result in poor accuracy and discomfort. Similarly, draw weights that are too heavy can lead to muscle strain and fatigue.

Comfort and Grip

Smaller hand sizes mean that ergonomic grips are essential for women’s bows. A bow designed for a woman’s hand ensures better control, reduced torque, and a more consistent shot.

Performance and Confidence

When the bow feels comfortable and fits properly, shooting becomes more enjoyable. A poorly fitted bow can discourage beginners, while the right bow builds confidence and improves accuracy.

Types of Bows for Women

1. Recurve Bows

Recurve bows are one of the most popular choices for women entering the world of archery. They’re lightweight, simple in design, and effective for both target practice and hunting.

Best for: Beginners, target archery, traditional archery enthusiasts.
Pros: Lightweight, easy to handle, elegant design.
Cons: Requires more practice for accuracy compared to compounds.

2. Compound Bows

Compound bows use a system of pulleys and cams that reduce holding weight at full draw, making them ideal for women who want power without excessive strain.

Best for: Hunting, competitive shooting, women needing more accuracy and speed.
Pros: High accuracy, adjustable draw weights and lengths, powerful performance.
Cons: Heavier and more complex than recurves.

3. Longbows

Longbows are traditional and elegant but can be more challenging for beginners due to the lack of mechanical aids.

Best for: Traditional archery enthusiasts.
Pros: Simple design, lightweight, historical appeal.
Cons: Requires significant practice, no let-off.

4. Crossbows

Crossbows have grown in popularity among women hunters because they allow powerful shots without requiring as much upper-body strength.

Best for: Hunting, women with limited draw strength.
Pros: High power, less upper-body strain, modern designs available in lightweight models.
Cons: Heavier overall, often regulated by hunting laws.

Key Factors to Consider When Choosing a Bow

1. Draw Length

  • Women typically fall between 24–27 inches.
  • Choosing a bow with an adjustable draw length ensures proper fit.

2. Draw Weight

  • Recommended starting range: 25–40 lbs.
  • For hunting, most states require at least 35–40 lbs for ethical kills.
  • Start lower for practice, then gradually increase.

3. Bow Weight

  • A lighter bow is easier to handle during long shooting sessions.
  • Average weight range for women: 2.5–4 lbs.

4. Adjustability

Look for compound bows with wide adjustability in both draw weight and length. This allows growth and flexibility without needing to replace the bow frequently.

5. Grip Design

Narrow grips with ergonomic shaping help women maintain steady shots.

Top Bows for Women in 2025

1. Diamond Archery Infinite Edge Pro

  • Type: Compound Bow
  • Why It’s Great for Women: Extremely adjustable (draw length 13–31”, draw weight 5–70 lbs).
  • Best For: Beginners to advanced archers.

2. Bear Archery Cruzer G2

  • Type: Compound Bow
  • Highlights: Lightweight, versatile, adjustable for small frames.
  • Best For: Women hunters and recreational shooters.

3. Samick Sage Recurve Bow

  • Type: Recurve Bow
  • Highlights: Affordable, reliable, available in multiple draw weights.
  • Best For: Beginner women archers.

4. Genesis Original Bow

  • Type: Universal Compound Bow
  • Highlights: Popular with schools and training programs, lightweight and simple.
  • Best For: Women and youth beginners.

5. PSE Stinger Max

  • Type: Compound Bow
  • Highlights: Compact, forgiving, smooth draw cycle.
  • Best For: Women who want hunting performance.

Benefits of Archery for Women

1. Physical Fitness

Shooting a bow builds upper body strength, balance, and coordination.

2. Stress Relief

Archery requires focus and calm, making it a form of active meditation.

3. Confidence & Empowerment

Women gain a sense of accomplishment from mastering a skill traditionally dominated by men.

4. Versatility

Archery can be enjoyed recreationally, competitively, or for hunting.

Women in Hunting: Why Bows Are Becoming More Popular

Over the last decade, the number of women hunters has increased significantly. Many prefer bows because:

  • They are quieter than firearms, allowing stealth in the field.
  • Archery offers a closer, more intimate hunting experience.
  • Lightweight compound bows are now specifically designed for women.

Tips for Women Buying Their First Bow

  1. Get measured for your draw length at a pro shop.
  2. Start with adjustable bows that can grow with your skill.
  3. Try before you buy—comfort is key.
  4. Invest in accessories like stabilizers, wrist slings, and release aids.
  5. Don’t go too heavy on draw weight—focus on accuracy first.

Safety Considerations for Women Archers

  • Always wear arm guards to prevent string slap.
  • Use finger tabs or release aids to reduce strain.
  • Ensure your bow is properly tuned for your draw length and weight.
  • Start with supervised range practice before hunting.

Common Mistakes Women Make When Choosing a Bow

  1. Picking a bow with too high a draw weight.
  2. Using a bow with the wrong draw length.
  3. Ignoring comfort in grip size.
  4. Choosing based only on looks instead of performance.
  5. Skipping professional setup and tuning.

Accessories That Improve Performance

  • Arrows: Choose spine ratings that match your draw weight.
  • Sights: Multi-pin sights improve accuracy for beginners.
  • Quivers: Lightweight designs keep arrows accessible.
  • Stabilizers: Reduce vibration and improve shot balance.
  • Releases: Mechanical releases increase consistency for compound shooters.

Maintenance Tips for Women’s Bows

  1. String care: Wax bowstrings regularly.
  2. Check limb integrity: Inspect for cracks or damage.
  3. Proper storage: Store in cool, dry places.
  4. Annual tune-ups: Take your bow to a pro shop at least once a year.
  5. Transport safely: Use padded bow cases.

Best Practices for Women Bow Hunters

  • Opt for lighter bows that won’t fatigue you during long hunts.
  • Practice shooting from elevated stands and ground blinds.
  • Use broadheads appropriate for your draw weight.
  • Always follow local hunting laws and ethical practices.

SEO-Friendly Key Takeaways

  • Bows for women should prioritize adjustability, comfort, and fit.
  • Compound bows offer accuracy and ease of use.
  • Recurve bows are great for beginners and traditionalists.
  • Women should focus on draw length, draw weight, and grip size when buying.
  • Top bows for women in 2025 include Diamond Infinite Edge Pro, Bear Cruzer G2, and Samick Sage.

Conclusion

Archery is no longer just a male-dominated sport. With the growing number of women entering the field, manufacturers have responded with bows tailored to women’s unique needs. Choosing the right bow comes down to fit, comfort, and intended use.

Whether you’re drawn to the elegance of a recurve, the power of a compound, or the versatility of a crossbow, there’s a perfect bow for every woman. By focusing on proper draw length, manageable draw weight, and quality accessories, women can enjoy a safe, empowering, and rewarding archery experience.

So, if you’re searching for the best bows for women, remember this: the right bow doesn’t just make shooting easier it makes it more enjoyable, accurate, and confidence-boosting.

Exit mobile version