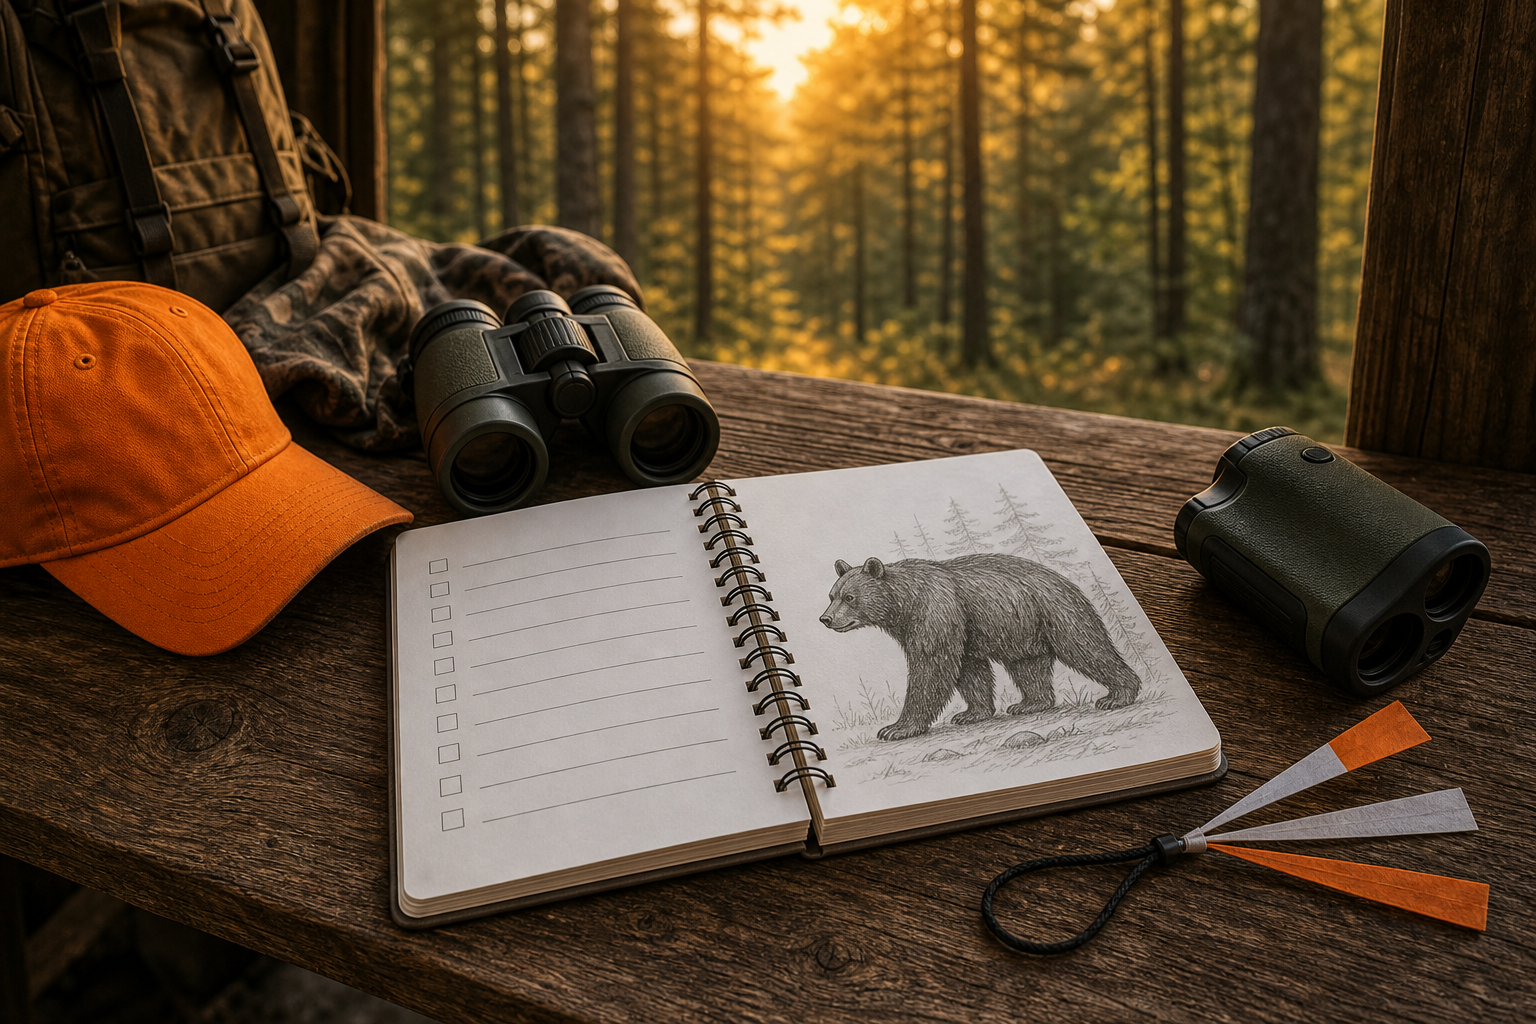
If you are wondering where to shoot a bear with a bow, the safest ethical answer is: wait for a calm broadside or slightly quartering-away bear, stay inside your proven bow range, and aim only when the path is clear and you are confident in the shot. If the angle, distance, light, brush, or the bear’s behavior is wrong, pass the shot.
Bear bowhunting is not a place for rushed guesses. A bear’s heavy hair, rounded body, and different posture can make the aiming point harder to read than on a deer. This guide focuses on shot selection, when to wait, and when to walk away so the decision is ethical, legal, and realistic.
For most bowhunters, the best bear shot is a broadside or slightly quartering-away shot at a calm animal. The aiming point should be selected from the bear’s body position, not from hair outline alone. Keep the shot inside the range you can repeat accurately under hunting pressure, and avoid any angle that forces the arrow through heavy shoulder structure, brush, or too much body before reaching the vital area.
That does not mean every broadside bear is automatically a shot opportunity. Wind, legal rules, distance, light, recovery access, and the bear’s behavior all matter. State wildlife agencies may also have season, bait, tagging, sex, cub, and recovery rules, so check your current state bear regulations before hunting. Florida’s official bear hunting information is one example of why state-specific rules matter.
Before You Think About Aiming
The first decision is not where to hold the pin. It is whether you should take the shot at all. A responsible bowhunter should already know the legal season, have a sharp broadhead that matches the bow setup, understand the recovery plan, and know the maximum distance they can shoot cleanly without stretching.
Use a rangefinder before the bear steps into the opening if possible. Pick clear landmarks, know your shooting lanes, and decide your pass-shot limits before adrenaline shows up. If you are hunting from a stand, account for the downward angle and practice from that type of position before the season. If you cannot explain your plan calmly before drawing, wait.
Why Bears Are Different From Deer
Bears can look bigger and lower than they really are because of hair, fat, and a rounded body shape. The leg position can also be harder to read, especially on a dark bear in shade. That is why experienced hunters often warn new bear hunters not to aim by the outline of the hair. Study the body angle, shoulder line, and leg position instead.
There is also a bigger judgment issue: bear behavior and identification matter. Do not take a shot if you are unsure whether cubs are nearby, if the bear is alert and about to move, or if the situation feels rushed. Resources like Bear Smart’s bear education material are useful background because ethical hunting starts with understanding the animal, not just the equipment.
Best Bowhunting Shot Angles
The right shot angle is the one that gives your arrow a clean path and gives you a realistic recovery. The best options are usually simple, patient shots. Complicated angles are where wounded animals, lost recovery trails, and unsafe follow-up decisions happen.
Broadside
A broadside bear is usually the clearest bow shot because the body angle is easiest to read. Wait until the near-side front leg is not blocking the path. Pick a clean lane, settle the pin, and avoid drifting too far forward into heavy shoulder structure or too low into hair and body outline.
The key is patience. If the bear is walking, turning, or stretching, let it settle. A calm standing bear gives you time to confirm the angle and distance. If the bear never gives you that calm position, passing is the right decision.
Slightly Quartering Away
A slight quartering-away shot can be ethical when the angle is mild and the arrow path is clear. Think about where the arrow needs to travel through the body, not just where it touches the near side. If the angle becomes steep, or the shot would need to drive through too much body before reaching the vital area, do not force it.
This is where many hunters make mistakes by treating every quartering-away animal the same. Slight is different from hard quartering. When the angle is hard, wait for a turn or pass the shot completely.
Elevated Stand Angles
From a treestand, the contact point and exit path matter more than the pin picture alone. A steep downward shot can make the arrow path narrower and less forgiving. Practice from elevated positions, use a rangefinder with angle awareness if you trust it, and avoid steep shots that look tempting but reduce recovery confidence.
Bowhunter education resources often stress patience, controlled shot execution, and understanding your limits. If you need a refresher on bowhunting fundamentals, start with a reputable hunter-education source such as Bowhunter Ed, then apply your own state’s current rules.
Shots to Pass
A strong bear hunter knows which shots not to take. Passing is not failure; it is part of ethical hunting. The shots below are the ones most likely to create poor penetration, unclear recovery, or unsafe follow-up.
Frontal Shots
Do not take frontal bow shots on a bear. The target window is small, the structure is heavy, and the margin for error is too narrow. Wait for the bear to turn broadside or quarter slightly away.
Hard Quartering-To
A hard quartering-to bear usually protects the clean path you need. Even if the range is close, this is a shot to pass. Let the animal move, or let the opportunity go.
Running or Alert
Never rush a shot at a running, nervous, or alert bear. The animal can move during your shot sequence, and a small aiming error becomes a major recovery problem. Draw only when the situation is calm enough to finish the shot cleanly.
Brush, Obstructed, or Too Far
Do not shoot through brush, branches, grass, or uncertain cover. Do not stretch the range because the bear is impressive or because the hunt has been slow. Your field range is not your best range on a perfect practice day; it is the distance you can repeat when your heart rate is high.
Bear Bowhunting Shot Checklist
Before drawing, run through a short checklist. Is the bear legal? Is the distance known? Is the bear calm? Is the angle broadside or slightly quartering away? Is the shooting lane clear? Is your recovery plan realistic? If one answer is no, wait.
Legal: Season, tag, area, bait rules, and bear identification are confirmed.
Distance: The bear is inside your proven bow range, not just your hopeful range.
Angle: Broadside or slight quartering-away only.
Lane: No brush, limbs, grass, or other animals in the path.
Behavior: The bear is calm enough that you can finish the shot cleanly.
Recovery: You have light, help, permissions, and a plan for follow-up.
After the Shot and Recovery
After the shot, watch and listen carefully. Mark the spot where the bear stood and the last place you saw it. Do not climb down or start moving immediately unless your state rules, safety, or specific situation require it. If you are unsure about the hit, slow down and get help instead of pushing too fast.
Recovery rules and best practices vary by state, property, terrain, weather, and available tracking help. Plan this before the hunt. Know who you can call, what lights or marking tape you carry, and what your local regulations allow. A good recovery plan is part of ethical shot selection, not an afterthought.
Common Mistakes
The most common mistake is rushing because the bear finally appeared. Another is aiming from the hair outline instead of reading the body. A third is using deer habits without adjusting for bear shape, hair, and behavior. Good bear bowhunting is slower than that. You wait, verify, breathe, and only shoot when the answer is clear.
Another mistake is letting gear confidence replace judgment. Sharp broadheads, a tuned bow, and solid arrows matter, but they do not make a bad angle ethical. Equipment supports the decision; it does not rescue the wrong one.
FAQ
What is the best shot angle for a bear with a bow?
A calm broadside bear is usually the clearest bow shot. A slight quartering-away angle can also work when the arrow path is clean and the angle is not steep.
Should you shoot a bear facing you?
No. A frontal bow shot on a bear has too little margin for error. Wait for the bear to turn or pass the shot.
How far should you shoot a bear with a bow?
Stay inside the distance you can repeat accurately under field pressure. That number is different for each hunter, and it should be based on honest practice, not hope.
Is bear shot placement the same as deer shot placement?
No. Bear hair, body shape, posture, and shoulder structure can make the aiming picture different. Do not aim from the hair outline alone.
What should you do if the shot does not feel right?
Do not shoot. Passing a questionable shot is the ethical choice, especially with a powerful animal and a difficult recovery situation.
Final Recommendation
The best place to shoot a bear with a bow is not a single magic dot. It is the right shot opportunity: legal bear, calm behavior, known distance, broadside or slight quartering-away angle, clear lane, and a recovery plan. If those pieces are not present, pass the shot and wait for a better one.
That mindset protects the animal, the hunter, and the quality of the hunt. A bear you pass today is better than a bear you cannot recover tomorrow.
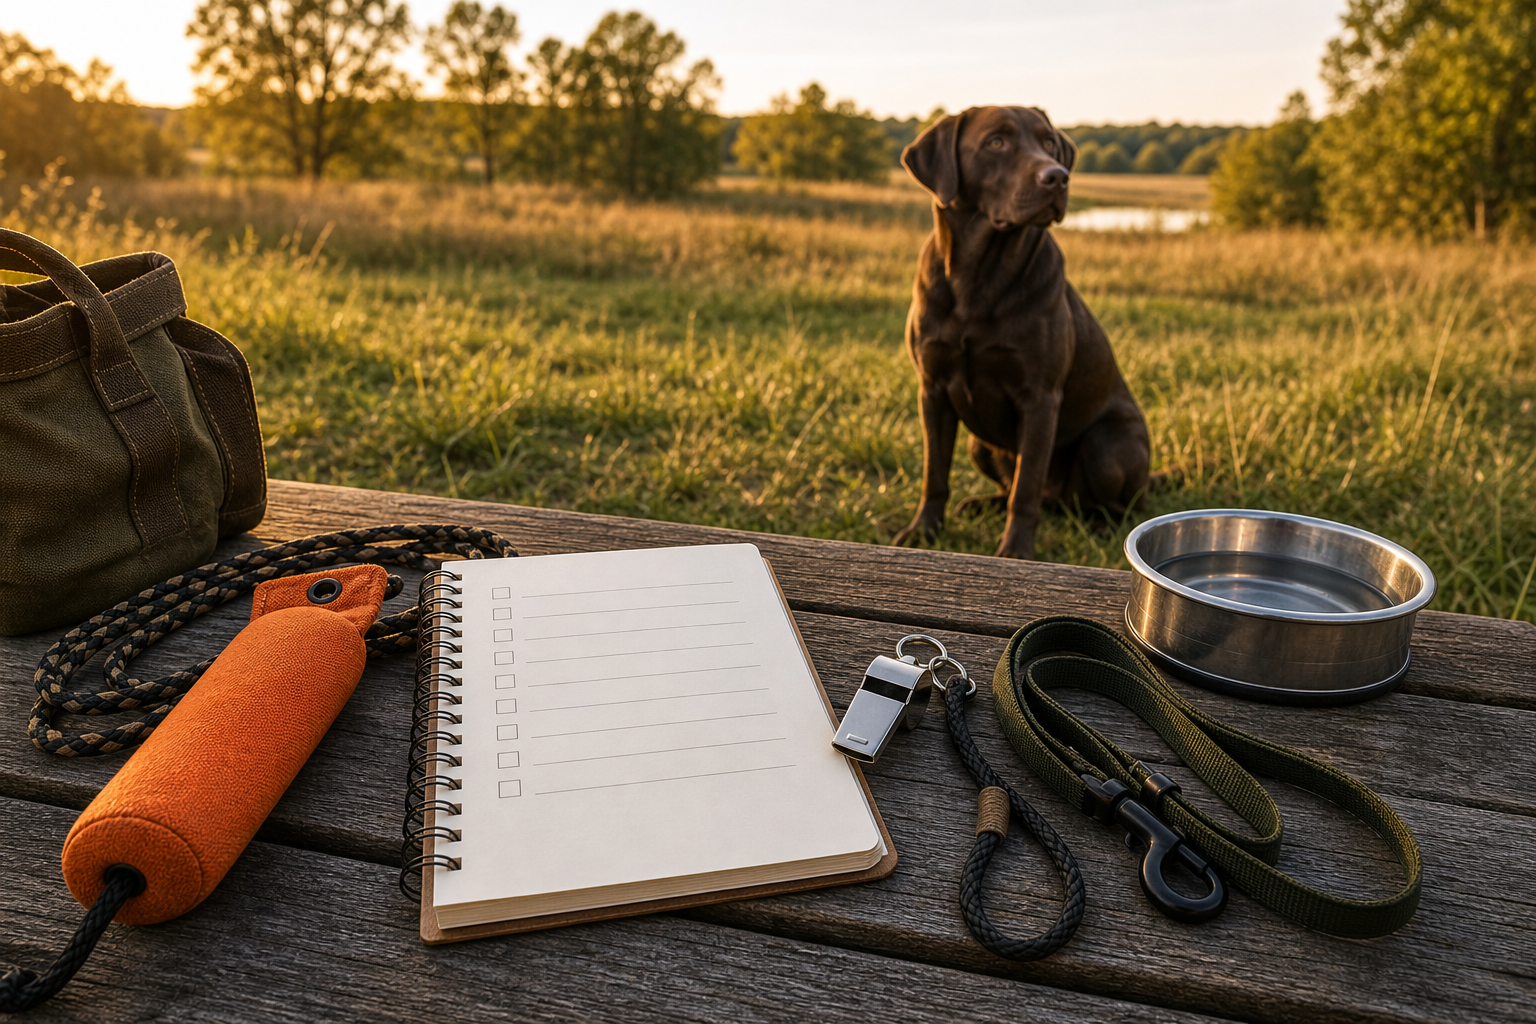
To train a hunting dog, build obedience first, then add field skills in small steps: recall, heel, sit or whoa, place, steadiness, retrieving, scent work, and calm exposure to hunting environments. A good hunting dog is not created by pressure alone; it is built through clear commands, consistency, safety, and trust.
This guide is for beginners who want a practical training roadmap. It does not replace a professional trainer, veterinarian, or experienced gun-dog mentor, especially if the dog shows fear, aggression, injury, or stress around field work.
The best way to train a hunting dog is to teach reliable obedience first, then introduce hunting tasks one layer at a time. Start with recall, leash manners, steadiness, and calm handling. After that, add retrieving, scent work, water or cover exposure, and field drills that match the type of hunting the dog will actually do.
Start With Foundation Obedience
A hunting dog that cannot listen at home will not become reliable in a noisy field. Foundation work should include name recognition, recall, sit, stay, heel, place, crate comfort, and calm handling. Keep sessions short and end before the dog becomes frustrated.
Positive reinforcement is useful because it teaches the dog what behavior earns reward. Humane World has a helpful overview of positive reinforcement training. Hunting dogs still need boundaries, but fair training starts with clarity, timing, and consistency.
Recall Is Non-Negotiable
Recall should be practiced in low-distraction places before moving to fields, woods, water, or birds. Use a long line or check cord until the dog is reliable. Do not gamble with an off-leash dog around roads, livestock, other hunters, or unsafe terrain.
Match Training to the Dog’s Purpose
Not every hunting dog is trained for the same job. Retrievers, pointers, flushers, hounds, and versatile breeds use different instincts. A duck retriever needs steadiness and water work. A pointing dog needs bird contact and steadiness. A tracking dog needs nose work and patience.
Groups such as the North American Versatile Hunting Dog Association are useful for understanding versatile hunting-dog testing and training culture. Use breed purpose as a guide, but train the individual dog in front of you.
A good hunting dog plan starts with obedience, safety, field exposure, and gradual skill building.
Core Hunting Dog Field Skills
Steadiness
Steadiness means the dog can wait instead of breaking early. It protects the dog, prevents ruined hunts, and helps the handler stay in control. Practice steadiness with low excitement before adding bumpers, birds, water, or gunfire.
Retrieving
Retrieving starts with short, fun sessions. Teach the dog to go out, pick up, return directly, and deliver calmly. Avoid turning every session into a marathon; quality repetitions matter more than exhausting the dog.
Scent Work
Introduce scent work gradually with simple trails, bird wings where legal and appropriate, or controlled training setups. Let the dog learn how scent moves with wind and cover instead of rushing into advanced drills too soon.
Field Exposure
Field exposure should feel like education, not chaos. Walk the dog through light cover, short grass, different footing, shallow water edges, and quiet training areas before expecting polished work in a real hunt. Let the dog learn new surfaces, smells, and sounds in manageable pieces.
Keep early field sessions simple. A few calm retrieves, a short scent trail, or a clean recall from cover is better than a long session that ends with confusion. When the dog succeeds, stop and build from that success next time.
Gunfire and Field Noise
Do not surprise a young or unprepared dog with loud gunfire. Noise exposure should be slow, positive, and paired with confidence-building work. If a dog shows fear, stop and get help from an experienced trainer.
Training Checklist
Short daily obedience sessions.
Reliable recall on a long line before off-leash work.
Calm leash and crate habits.
Gradual exposure to fields, water, cover, decoys, and other dogs.
Simple retrieving or scent drills matched to the dog’s job.
Slow, careful noise conditioning.
Rest days, hydration, paw checks, and injury monitoring.
Common Training Mistakes
Skipping obedience and rushing straight to birds or bumpers.
Training too long after the dog loses focus.
Using harsh pressure when the dog does not understand the task.
Introducing gunfire too quickly.
Expecting one dog to excel at every hunting style.
Ignoring fitness, heat, cold, paw injuries, and hydration.
Simple Training Timeline
A young dog should begin with socialization, confidence, handling, and short obedience. As the dog matures, add longer recalls, steadiness, retrieving, scent games, and controlled field exposure. Advanced work should come only after the foundation is reliable.
Do not compare your dog to a finished field-trial dog or a polished guide dog. The right pace is the one where your dog stays confident, healthy, and clear about what you are asking.
The Handler Matters Too
Many hunting dog problems begin with unclear handling. Use the same command words, reward timing, hand signals, and release cues every time. If one family member allows jumping, another corrects it, and a third repeats commands five times, the dog learns noise instead of rules.
Train yourself to be calm and predictable. A dog working around birds, water, other dogs, or field noise will make mistakes. Correct the setup first, simplify the drill, and help the dog understand the job before adding more pressure.
Frequently Asked Questions
When should hunting dog training start?
Basic manners and confidence-building can start early, but advanced field work should wait until the dog is physically and mentally ready. Keep puppy sessions short and positive.
Can any dog become a hunting dog?
Any dog can learn obedience and field manners, but breed traits and individual temperament matter. Some dogs are naturally better suited to retrieving, pointing, flushing, tracking, or scent work.
How long should training sessions be?
Short sessions are usually better than long ones. Stop while the dog is still engaged, and repeat consistently instead of trying to fix everything in one day.
Should I use an e-collar?
An e-collar should never be used to teach a command the dog does not understand. If you use one, learn from a qualified trainer and treat it as a communication tool, not a shortcut or punishment device.
Final Recommendation
The best hunting dog training plan is patient, fair, and specific. Build obedience first, match drills to the dog’s hunting role, introduce field pressure gradually, and protect the dog’s confidence and health. A steady, safe, responsive dog is more valuable than a rushed dog with unfinished basics.
Sickness on the Hunt: When hunting in isolated places, knowing how to provide first aid in the event of Illness can make the difference between watching your hunting companion die and saving his life. Here you will find a guide with the procedures to be applied, based on the guidelines of the European Resuscitation Council.
Introduction
The need to evolve every activity that man intends to do always undergoes a radical change with the continuity of his practice to improve its quality and performance. The hunting practices falling among the most archaic activities that have undergone radical changes in history compare the first hominid who hunted with spear points made of flint, the modern hunter.
I have deliberately used this Aristotelian syllogism as an introduction to support my thinking. I have long argued that the hunters of the new millennium still need to evolve by further improving their range of technical skills, obtaining greater specialization for themselves and the whole category to protect it. It has been the case for years in central European countries.
The hunter in Europe is a folkloristic figure linked to the rural world who indeed suffers less negative pressures than our ones. He is considered a resource for the environment that can be used by administrations rather than a problem.
This difference between the two figures is not attributable to the Italian hunters, who are neither better nor worse than the Austrian or German ones. It is a general cultural diversity that I think depends on the technical quality. And so our foreign colleagues can put on the plate after decades of progress aiming to improve their image through the good deeds performed during hunting activities, in full compliance with the rules first of all and to appear as resources to protect the environment and not destroy it.
Basic Life Support – What It Is and Why Knowing How to Apply It Can Make a Difference?
By technical skills, I do not mean only those related to the mere act of hunting, but all the ancillary ones that accompany its normal execution. To better understand the idea, I would like you to think about the regulations related to law 81, “safety in the workplace,” because precisely this culture applied to hunting differentiates us from the rest of hunting Europe.
In the workplace, you are all used to, and I am no exception, to comply with an infinite number of rules to prevent accidents, and that’s not enough! Your employers also must train you in safety, directly concerning the role and job you hold. One of the essential building blocks on which your training is based is learning first aid procedures in the professional field. It is often indicated by the English acronym BLS that is Basic Life Support (in Italian, Basic Life Support), set techniques and procedures that allow one person to provide help to another in need, often saving her life.
The BLS upgrade is called BLSD Basic Life Support & +Defibrillation, the same procedures as the basic level with the automatic external defibrillator. What does the BLS consist of? BLS is a first aid maneuver that includes cardio/pulmonary resuscitation plus a sequence of basic life support operations. In light of what has been said, I believe that the BLS should be taught extensively to the entire population, as has been the case in the Scandinavian countries, which are now fully aware of cardiovascular diseases and traumas.
More than a dream, I consider this hope a mere utopia in this country. Still, slowly it will inevitably be achieved, if only by adapting to the rules of the European Union. These notions should be considered gold in all fields of application because they can make a difference, especially in the local hunting world, where the average age of Italian hunters is closer to 70 than you are 60 years old.
Unfortunately, it is not new that some hunters fall ill during a hunting trip and need help. Given that the geographical position in which the extraordinary event is often disadvantageous and challenging to reach because it is located in inaccessible areas, quick intervening gives the patient an extra chance to get away with it.
Suppose the companions intervene, applying the right maneuvers. In that case, the ill person gets revived, and the epilogue of the lousy situation comes with the arrival of the helpers who will take charge of the patient and transport him to a structure capable of treating him. There is also the possibility that despite the lightning-fast rescue, the epilogue is more unpleasant. In any case, the possible second conscience has been made, and nothing has been left unturned. In this case, there is nothing to reproach or fear.
The law protects the lay rescuer, i.e., non-professional, relieving him of any criminal or civil liability if the patient does not survive the situation. The legislator thought this to favor the spontaneous intervention of any person who is on the spot when the fact happens, dispelling doubts and perplexities in those who find themselves having to decide whether or not to intervene, wasting time, and hesitating.
Because they are persecuted by the thought of the possible legal consequences deriving from their actions in this regard, if you do not know the correct maneuvers, you can carry out the rescue even with just a phone call. It will be the reluctant, the fake skeptics who will pretend nothing happens, if ever, who will be heavily and criminally accused of failure to help.
So, after explaining my point of view to you with the possible and discounted benefits that hunting can derive from it. I list the maneuvers of the BLS broadly, trying to explain them. It is understood that to be trained in these practices. I believe “D’obligation to Attend Courses at Training Centers Recognized and Accredited by the Ministry of Public Health.” Here you will find highly qualified personnel who will guide you in learning, providing you with medical training aids and aids to learn the practice and the theory.
When and Why Apply BLS Procedures?
First, when do these maneuvers apply? When faced with an unconscious person suffering from syncope, a person with a mechanical blockage of the airways due to drowning, suffocation, or cardiac arrest.
The purpose of this maneuver is to ensure oxygen to the heart muscle and brain, ensuring, through compressive thrusts on the chest, a minimum of blood circulation. The risk that the patient runs in the absence of an emergency intervention, about 1 minute after the event, to be clear, is that of causing anoxic brain damage.
The timeliness of the intervention at this juncture is fundamental. Because, from the beginning of the cardio / circulatory arrest, the chances of survival are reduced by 10% after every minute. It is rare to hope for brain damage recovery. Especially after the absence of cardiopulmonary resuscitation for 9-10 minutes. The first serious damage to the brain is found, in fact, already after the first 4 minutes of lack of oxygen.
How to Intervene: the Chain of Survival
The survival percentage of a human being to a physical event of this entity is not concentrated in a simple or single maneuver. Still, it is subordinated to a series of essential interventions, metaphorically considered a “chain” precisely to explain the importance of sequence in which you must perform these maneuvers and explain that skipping one of the planned phases reduces the chances of drastically getting out of it acceptably.
This chain, known as the “Survival Chain,” is made up of 4 links:
Emergency call
Application of Basic Life Support (BLS) procedures
Defibrillation (if in possession of an AED)
Start of intensive health treatment
Emergency Call, the First Thing to Do
It is the call to a single simplified telephone number if a person finds himself in danger of life or sees others in difficulty.
The single European emergency number (NUE) is 112, in the whole of the European Union in the face of a need for help, dial 112 on the mobile phone to get help, it will be the switchboard’s task to take action by alarming the most suitable services for the case.
In Emilia Romagna, Tuscany, Veneto, Marche, Calabria, Molise, Abruzzo, Campania, and some areas of Sicily and Sardinia, this issue is exclusively dedicated to the Carabinieri, except for recent changes of which I have no news. However, the NUE is active in Lombardy, Liguria, Piedmont, the Province of Rome, and other areas scattered throughout Lazio, Friuli Venezia Giulia, the Province of Trento, the Province of Bolzano, and south-eastern Sicily. In the more or less near future, it will be an extended service to the whole national territory.
This call is used to obtain immediate help but allows us to maintain contact with the medical operator alerted by 112. He can help us manage the situation by giving us orders on how to intervene. Therefore, if a person is forced to operate by applying the BLS maneuvers, he can place the telephone on the ground by activating the speakerphone and remain listening or ask someone else to get in touch with help and stay online with the operator. Doctor, making the latter hold the phone, always with the speakerphone inserted, thus finding himself in a position to have his hands free to intervene and in any case to take advantage of the skills of a professional.
The operator with whom you will interface will respect a precise procedure by quickly addressing some specific questions that you must answer clearly without hesitating. Those questions are a procedure designed to provide rescuers, traveling to reach you, essential information to prepare them in advance for what they will have to face when they arrive on the spot and to give them the opportunity, during the approach, to prepare the necessary equipment to face the ’emergency.
It is useless to get off the vehicle to reach the place where the event took place on foot along a mule track with a positive difference in the height of 300 meters in one kilometer with the resuscitation equipment if it is a bit fracture of the finger of the left foot. Forgive me if I have emphasized giving you an example. Still, I want the concept to pass that you risk slowing down help or even invalidating it if you are not precise.
How to Apply the Basic Life Support Procedures
These maneuvers require specific training carried out by suitable personnel as they are very invasive and must be practiced only and exclusively in real need. It is no coincidence that the training courses are carried out by practicing massage on special mannequins. It is common for a BLS maneuver to cause the fracture of one or more ribs. For this reason, a didactic tool is used that reproduces the human body and which in some cases, is equipped with special sensors connected to a PC that is used to help evaluate and possibly correct the maneuvers performed by the student.
That said, the procedures described below are based on the guidelines of the European Resuscitation Council, explicitly created to be used by anyone, even non-healthcare personnel. To this end, they do not require medical skills or the use of special aids. For this reason, it is defined as secular BLS. The procedure involves using medical devices such as Ambu bag, Pharyngeal or Nasopharyngeal canula, Combitube, pax needle, etc. On the other hand, it was created for medical nursing staff and certified and qualified rescuers.
Make Sure That the Scene of the Incident Is Free of Imminent Danger
The first step to take when witnessing the fortuitous event is to make sure that the scene is free of imminent dangers for those in need of help and those who will have to intervene. For example, suppose a hunting companion slips and falls into a gully while trying to drag a freshly picked boar. In that case, it is useless to intervene to retrieve it, simply because you are not trained to do so and expose yourself to such a risk only serves to multiply the number of emergencies, which rescuers will have to remedy.
So the only thing you can do is call the Alpine and Speleological Rescuewho has the necessary skills to resolve emergency response. On the other hand, if the hunting companion is crossing a road where cars can circulate and faints, the first thing the rescuer friend will have to do is drag the sick person to the side of the road, avoiding him being hit by a vehicle. And start with the emergency maneuvers.
If you cannot intervene because you are not trained in these procedures or at risk of safety, promptly notify the NUE and list the various difficulties encountered and the dangers that prevent you from intervening.
Evaluation of the Injured Person
When and if action is taken, the first step after alerting the emergency services is evaluating the injured person. It is known to those who have attended BLS training courses that the procedures to be applied are two slightly different. One treats Illness, including drowning, the second trauma. When you can’t understand the type of problem you are facing, by convention, you apply the treatment reserved for victims of “suspected trauma, “and you act as if the trauma happened.
We approach the patient’s extended body to complete the first summary assessment, and tests based on the 5-senses are carried out. The first test consists in shaking the body slightly by grabbing it by the shoulders, being careful not to move the neck abruptly, and calling it aloud. The double physical/vocal control (touch and hearing are used in this test) serves to overcome the problem of deafness in some people that increases with age. If there is no reaction, the person is called unconscious. It is useless to continue with other tests.
ABC Maneuvers
The patient is unconscious, help is on alert, and is arriving. The switchboard operator on the phone is waiting to receive further information on the patient’s status. All that remains is to proceed with the ABC, Airway, Breathing, Circulation maneuvers,i.e., airways, breath, blood circulation.
The patient is positioned on the bare ground to have the ground as a sufficiently rigid surface, the limbs and the head are aligned in the supine position, then belly up, and the thorax is uncovered. Always consider the patient suffering from cervical spine trauma.
Airway
The first danger faced by an unconscious person is the obstruction of the airways. There is a tangible possibility that the tongue will turn back due to the temporary loss of muscle tone and thus prevent the passage of air. The maneuver to open his mouth and check that the tongue is not out of place is called a “purse maneuver,” in a nutshell, thumb and index finger are used, making the same movement to open a purse. If the tongue is in its place at the visual check and no other objects obstruct the airways, you can move on to the next maneuver.
If the tongue or a foreign body is blocking the airways, try to remove them without ever putting your fingers in the mouth patient and being careful not to push the foreign body deeper. It does not change if obstructing the respiratory tract rather than an object is liquid, biological, or external. It is necessary to tilt the head sideways to make it come out. Since the suspicion of cervical trauma is still present, we will rotate the whole patient on his side instead of rotating the head, taking care to move the neck as little as possible.
The airways have been checked, and if necessary, freed, now you can perform the hyperextension maneuver of the head. This maneuver is carried out by placing one hand on the forehead, which will move the patient’s head back and two fingers under the chin to lift it. This operation must be delicate but done with the decision. It must be excluded if there is the only suspicion of cervical trauma, in which case only the purse maneuver is provided.
Breathing
Now that you are sure that the airways are clear, you need to understand breathing. The best method (covid-19 permitting) is to bring a cheek to the patient’s mouth at a distance of about 4 cm to perceive the movement of air. It is beneficial to observe if you discovered a chest movement in advance in the very first phase. Freeing the chest from clothing also serves for this. This maneuver is called GAS.
I look, listen, feel, because you look at the movement of the chest, listen to the breath, feel the air on the cheek. This observation must last for at least 10 seconds while counting aloud. However, we must not confuse panting and gurgling from respiratory arrest for good breathing.
Circulation
This control usually takes place, looking for the arterial carotid pulse because it is located near the heart and is perceptible even if the systolic (maximum) is about 50 mmHg. The search for tangible signs of blood circulation must not cause excessive waste of time, so if you cannot find the pulse, you must consider absent and act as such. In light of the objective difficulties in this operation, especially if you are not an expert, you can still deduce that the circulation is in operation from the presence of MO.TO.RE. (Movements, TOsse, REspiro).
Lateral Safety Position
Suppose breathing and blood circulation are present and the patient is unconscious, and no trauma to the cervical spine or spinal column is suspected. In that case, he should be placed in a lateral safety position. This position avoids the risk of suffocation due to obstruction of the respiratory tract, prevents the tongue from turning backward for muscle relaxation as described above, fills the oral cavity with biological fluids from the stomach, and facilitates rescuers in loading the unconscious patient on the spinal stretcher.
This position is obtained by following 4- steps in which the patient’s limbs move safely to pass from the initial standing position, prone with the belly up, to the lateral one on the side. The first phase consists in extending the rescuer’s arm outwards, leaving the elbow flexed. The arm and the chest must form a 90 ° angle on the ground. The second-hand arm is placed on the opposite shoulder crossing it on the chest in the second phase.
The correct position of the hand is between the shoulder and the face. The third phase involves bending the knee opposite the rescuer in a not too accentuated vertical angle. The last stage will see the rescuer simultaneously grasp the knee flexed upwards in phase 3 and the patient’s body by pulling towards himself until the patient is lying on one side with his head resting on the hand of phase 2, both resting on the arm of the patient.
Cardiopulmonary Resuscitation
This procedure, also known as “heart massage,” is, in fact, the primary maneuver of the BLS. It is the life-saving maneuver, the only weapon, the only practical thing that simple hunters can perform as early as possible in the field while waiting for the arrival of help. I take it for granted that when you go out to serve, alone or accompanied, no one owns an IFAK, Individual first aid kit, even the military is during their operations. “Hunters are not military,” “we have never needed it,” “we have never seen it done,” “it is not our culture,” “we are not educated in these practices.
Up to now, perhaps 95% of the category has never even thought it could be helpful to know the first aid procedures to practice hunting activities. Knowing this maneuver that you can perform with only the hands is the only real possibility to make a difference in a health emergency on the hunting ground.
It is necessary to make a synthesis of how oxygenation of the human body occurs. A few simple notions of anatomy make it possible to explain this maneuver’s effect if performed correctly. Breathing is signaled by the continuous and visible rise and fall of the rib cage. It is one of the most critical vital functions of the human body and is an automatic function that does not require the rational will to be exercised.
It depends on the expansion and emptying of the lungs. . Through the airways, oxygen is introduced into the lungs, which work the air by synthesizing oxygen to enter the blood through the alveoli, this is the first phase called inhalation, the second phase is called exhalation and serves to expel the anhydride carbonic.
You can immediately anticipate that CPR is a very invasive maneuver. It must be performed with full knowledge of the facts; for this reason, you should remember that a course with certified instructors who can train you effectively and profitably must be attended. It must be carried out mainly in case of the absence of signs of breathing or blood circulation, chronologically during the checks and the “ABC maneuvers.” CPR is performed in adults with chest compressions (thrusts on the chest in the solar plexus area with both hands crossed) between 5 and 6 cm deep with a 100-120 bpm frequency.
These compressions create an artificial heart motion and are assisted by insufflations through the oral cavity. For carrying out an insufflation, it is necessary to close the patient’s nose with the index finger and thumb (the pinch gesture). So that the blown air does not escape but enters the lungs, with the index and middle fingers of the other hand a light pressure on the chin to keep the jaw open by opening the mouth completely wide, in this condition, it is possible to blow air into the oral cavity.
If the oral cavity is occluded, air can be blown through the nose as an alternative. These maneuvers make it possible to reproduce breathing artificially. The ratio of chest compressions to respiratory insufflations is 30 to 2 in adults, 30 massages, and 2- insufflations.
Video Explaining the Basic Life Support process
In the following video, you can see an example of the Basic Life Support process, developed by the European Resuscitation Council.
Defibrillation – How to Use an Automated External Defibrillator
The Automatic External Defibrillator (AED), defined as automatic by convention, is, in fact, a semi-automatic defibrillator because it requires an initial pose and start-up by a rescuer. In practice, it is a Personal Computer, aesthetically similar to the boosters that car repairers use to start a vehicle that has broken down due to the exhausted electric battery. In addition to the shapes, paradoxically, the AED shares its purpose: both are used to restart stopped motors with an electrical impulse.
These semi-automatic defibrillators allow lay staff to perform early defibrillation. For a long time, those who live in the city have seen columns containing the AED. The relative signs scattered everywhere indicating its position appear in public places such as stations, schools, administrative buildings, stadiums, gyms, etc. With the great awareness campaigns on cardiovascular diseases, it has been concluded that it is essential to counter these disorders once they have occurred.
For doing this, the necessary equipment must be made easily available, the use of which must be as simple as possible and within reach of all. The AED statistically increases the chances of being saved by up to 75%. They are produced with a very simple graphical interface, and there are only 2-buttons. One of the power on/off the other is the button to launch the impulse, also called discharge or shock.
As I wrote earlier, the chances of saving a person in cardio-respiratory arrest, with consequent brain damage, drop by 10% every minute that passes. By acting on a patient in cardiac arrest, two minutes after the heart has stopped, the patient has an 80% chance of being saved. After three minutes, 70% and so on. The primary purpose of BLS is to maintain heart massage and, with mouth-to-mouth, mouth-to-nose ventilation (in case you encounter problems in blowing through the mouth), a constant and sufficiently good supply of oxygenated blood to the brain. After 4 minutes without oxygen, the brain undergoes severe brain damage.
In many cases, however reversible, from 6 minutes onwards, the damage becomes irreversible and can cause motor deficits, lexicons, or heavily affect the person’s state of consciousness. Victims in a vegetative state are an example. I doubt that the managers of a wild boar hunting team, the only true association of hunters in pursuit of their hunting activity permitted by law, can budget for an expense of 500 or 600 euros for an automatic external defibrillator. It is a matter of pure utopia. But I am not a natural skeptic nor a chronic pessimist.
So I want to hope, going against the tide, that soon, among the 1000 new useless and counterproductive regulations continuously promulgated at the European level on the subject of hunting. One will come up with one that will introduce the AED as an accessory tool to be carried on the hunting leader’s vehicle and guarantee its presence where the number of people is substantial, such as hunting wildlife reserves, where customers are often numerous.
Having it available would greatly facilitate the task of the poor hunter forced to intervene. So while waiting for the relative legislation, let’s assume that we have one with us in the car during a wild boar hunt. However, it must be known how to use it. The mere fact of having it makes no difference with not having it!
The first precaution to be taken is a quick check of the place: the purpose of the AED is to launch an electrical impulse, it should never, I never repeat, be used if the patient is near water basins, if he is above a puddle, or if the victim is wet because you fished him out of a river, a stream, a lake or if he is soaked in the rain.
A wet body causes an enormous dispersion of the electrical impulse, significantly attenuating the effect on the heart. Furthermore, the rescuer would risk taking a shock by conduction. In these cases, therefore, the first rule of the BLS applies: The victim must be “secured” in a dry place, and if necessary, we must undress the victim, trying to dry him as best as possible.
Once the feasibility of the intervention has been ascertained, the case is opened. There is the AED with 2-adhesive electrodes, a pair of scissors to cut the clothes that cover the chest, a disposable razor to remove hair if present from the areas where it will go positioned the electrodes (the equipment depends on the model).
Once the chest has been freed with scissors, switched on the AED with the button. In new models, it turns on automatically when the lid is opened. One of the two electrodes is applied to the right breastplate. The remaining is just below the side on the left side. (see video below)
Once this operation has been carried out, you will wait for the instrument’s orders. While you are waiting for the response from the machine, you must “make sure” by removing any onlookers present from the range of action of the machine. If the machine decides that it must give the impulse, there must be no one around him. The correct mantra to be recited aloud, possibly shouting, is: “GO ME! ALL AWAY! ”
Once everyone present is safe, and you press the shock button. From the moment the AED is activated, it performs an ECG, an electrocardiogram, to detect the presence of abnormal heart currents. If the data collected by the victim’s analysis requires it, he will order you to launch the pulse. Suppose he believes that the victim does not need a charge because he detects sufficient and regular cardiac activity or does not detect any at all.
In that case, he will not intervene but will alert the rescuer of the need to intervene with the cardiopulmonary massage. A 30-2 is performed (30 thrusts and 2-insufflations)for two consecutive minutes until the machine repeats the procedure from the beginning, “GO ME! ALL AWAY!” and wait for the ECG result again for the machine order, and proceed accordingly. It continues until the rescuers arrive.
I also stress that each phase of its operational cycle is accompanied by a recorded vocal explanation, which will continuously update you on the current situation and on the measures it intends to take from time to time. I can guarantee that this recording helps considerably to manage psycho-physical stress for all phases of the rescue.
Early Start of Intensive Health Treatment
The last link in the “chain of survival” is the patient’s care by an equipped health facility. At these facilities, chosen based on the symptoms found during the intervention by professional rescuers, the patient will receive intensive treatment to stabilize his physical condition until he is considered out of danger of life.
Conclusions
I thought about writing this article after the loss of my mother on April 18, 2020, in a full covid-19 emergency. I thought of his last 30 years of life, made more difficult by his various forms of heart disease. Over the years, we have learned about cardiovascular disorders, everything that could have been useful in case of his default.
Perhaps, for this reason, 25 years ago, I unconsciously embarked on a professional path that favored me in training, making me a good professional in the private security sector. My mother, during our chats, always said that when you can help people, you should never back down. The best chance to sensitize as many people as possible about accidents and sudden illnesses is to attract interest in the correct procedures to counter them, contributing in a small way to save human lives indirectly.
Lives of people who are at the center of their tiny universe made up of affections, friendships, relationships, family, and passions, including hunting, a much-discussed world in which I believe every improvement in the image is essential to silence the voices of those who would like to turn it off with a click. The same click that a defibrillator button makes when it is turned on to save a life, and if after publishing this little vademecum on a page like this, one hunter out of all those who will read will do a BLSD course for me, it will already be a great one victory. One day, if this hunter will save another person’s life, it will be a bit as if he had saved my mother’s.
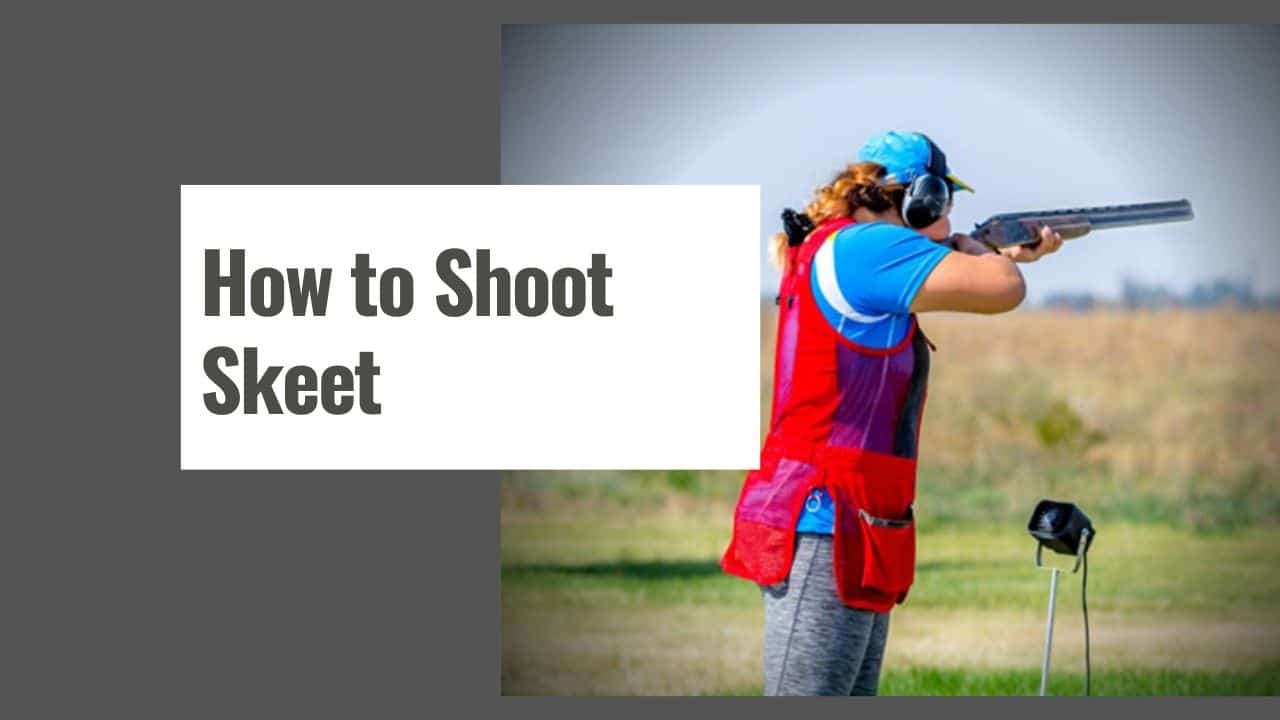
How to Shoot Skeet: Shooting skeet is fun for all ages, whether you’re a seasoned competitor or just looking to have some fun. Also, it is a great way to spend time outdoors and start your shooting practice. Hence, it requires focusing on a tiny target and hitting it with speed and accuracy.
Hence, learning how to shoot skeet like a pro is necessary if you are a beginner shooter. Therefore, to learn how to shoot skeet, read the following steps below attentively.
Learning the Rules
Know What to Shoot
The first step in shooting skeet is knowing what to shoot. To hit a target in skeet shooting, usually, a shotgun is used to aim at small clay targets, released into the air to mimic bird hunting. They’re usually orange and have a diameter of 4 to 5 inches (10.2 to 12.7 cm).
These targets are shot separately and continuously from two sides of an arc that includes ground stations on both sides. However, you can rotate between stations and fire two to four rounds at each target when shooting skeet. A skeet round includes 25 shots.
When it comes to shooting skeet, almost any type of shotgun will do. But experienced shooters, choose to use a shotgun, known as a skeet gun, that is accurate and long-range.
Usually, skeet guns are shotguns with over-under barrels. However, by adding relatively open chokes, you can increase your accuracy and make consistent hits on the target. Many skeet shooters prefer to add this.
Know the Difference Between Stations
Skeet shooting is a sport of shotguns. At skeet shooting, you’ll need to move between 7 stations that are arranged 21 yards far away from your target in an arc and a point, which is comparatively closer than other stations. You will constantly aim in the same specific direction (downrange) from your initial station to your final station.
However, the angle that you view the targets from will change depending on your position. Again, two traps discharge clay targets on either side of the range: low and high. These two clay targets will appear and cross your field of view together, and you’ll have to hit both of them.
Learn the Target Pattern
Usually, target release order varies from station to station. In general, each trap will allow you to hit only one target, though, at certain times, that may vary. However, learning the pattern is a core part of the skeet shooting strategy.
At Stations 1 & 2
At stations 1 and 2, the upper trap releases a single target, followed by the bottom trap releasing another single target. The respective traps are called “high house” and “low house.”
The next target will be released from the low trap, and then multiple targets will be released continuously. During the simultaneous release, your goal should be to shoot the higher target first. At each station, the shooter will take 4-shorts.
At Stations 3 to 5
At each of the stations 3–5, the shooter will take a total of 2-shots. One target will be released from the upper trap and another from the lower trap.
At stations 6 & 7
The pattern of 1st and 2nd stations is exactly the same here: a high, a low, and then the continuous targets. One exception is that this time shooter will fire the lower target first. Each of these stations will have 4-shots to shoot.
At station 8
You’ll shoot a high and a low target at this closer-up station. If you do not miss the target, you will get another chance to hit a lower house target.
A half-circle comprises seven evenly spaced stations on one side of the skeet field. Choose one of the seven stations and take your position located between the lower and upper houses.
Before taking the final shot, it may be helpful to practice shooting at some other targets so that you can get an idea about flight patterns, timing, and accuracy.
Assume the Right Shooting Stance
When approaching a clay target, keep your back straight, spread your feet apart, and be flexible in your position. Also, keep your knees slightly bent and stand on your forward foot. Bring the gun up to your shoulder and hold it tightly.
Practice
Put the gun unloaded and point the gun at a fixed target. Then swing the gun in an arc to get a feel for the motion of the swing. As the targets move quickly, people who want to shoot well must develop muscle memory to get good at it.
It’s not only about aiming precisely but also about the mechanics of how you aim. Once you’ve practiced your swing, it’s time to take some shots.
Take a Shot Ahead of the Targets
If you’re new to skeet shooting, it will take some time to get an idea about the flight pattern and feel for how much lead you may need to give each target.
But once you’ve got it, you’ll start hitting more and more targets. If you consistently miss the target, change your lead time and retry.
Learn to swing naturally and quickly so that you can follow each target and take the most efficient shots.
Follow-through
Target shooting requires a high level of patience. When you pull the trigger, your swing will stay connected to your mind (your brain) for a brief moment. It is important to start thinking about the target as soon as you start moving.
After you fire a shot, continue to move your gun through your swing. But as soon as you’re done firing, put your finger away from the trigger.
If you want to shoot skeet regularly, consider joining a skeet club. In skeet clubs, you can learn tips from other shooters. You can even join leagues at clubs.
Join NSSA (National Skeet Shooting Association)
Being a member of the NSSA allows you to practice and enter tournaments to improve your accuracy and rank. There are classes for different skill levels of shooters.
For instance, if you’re just starting, you’ll be in a class of other beginners/novices. As you improve, you’ll progress with your level and find people to compete against. Don’t worry about how you rank. Just focus on becoming better by practicing, and you’ll eventually rank up.
Take Skeet Lessons
If you want to improve your shooting skills, take lessons from an experienced shooter. You can learn a lot by being around experienced skeet shooters and listening to their tips and advice, even if you’re not yet at the same level.
The more advanced skeet shooters can show you where your weaknesses lie and help you avoid the same mistakes they made. Overall, you can learn a lot from an experienced shooter.
Keep Practicing
Shooting is just like any other sport – you improve by actually doing it. If you want to get better at shooting, go practice. Regularly shooting will build the muscle memory needed to shoot accurately. Besides, when you go shooting, you’ll learn a lot more than you will be reading about it. Plus, shooting is fun!
Final Verdict
Skeet shooting is a great way to learn how to shoot a shotgun and improve your bird hunting skills. Also, it’s a fun and challenging sport for people of all skill levels.
But, knowing the fundamentals of skeet shooting can make you a much better skeet shooter. In this article, we have covered all the necessary steps of skeet shooting.
We hope this article will prove helpful to you to learn how to shoot skeet.
How Does a Compound Bow Work: The modern compound bow is mechanical assistance to reduce the draw weight. They are now regarded as the smoothest, fastest, most accurate, efficient, and powerful bows ever created. For both amateur and professional archers, it’s essential to know how to handle and operate a compound bow.
Therefore, in this article, first, we’ll go over the various components of a compound bow in better detail. Next, we’ll explain how they work. Then, we will discuss some common compound bow terminologies as well.
At the end of this article, we will cover the advantages of using a compound bow and answer relevant queries regarding compound bows. Hopefully, after reading this article, you’ll have a correct understanding of compound bows and their working principle.
Compound Bow Accessories
Before understanding how compound bow works, it’s essential to have the necessary knowledge of various parts of a compound bow.
Especially if you’ve never touched any compound bow before, you must learn these fundamentals first. Therefore, here we will discuss some essential compound bow accessories in the following.
After reading this section, we hope that anyone will easily pick up the right compound bow and be an expert archer with enough practice.
However, if you’re already an experienced compound bow user, you can skip this part and go ahead.
Limbs
The limbs are the compound bow’s most flexible part that stores and releases energy. The majority of these limbs are constructed from carbon fiber or other types of composite material.
When you pull back on the string, the limbs become compressed. And therefore, all of the energy for your shot comes from the limbs. In another word, most of the draw weight flows from the limbs.
Usually, the pulley system in a compound bow creates a lot of force, and the bow limbs can withstand that pressure.
String
In a compound bow, you will find a string and 2-cables. The string is the outermost wire of the compound bow. The string passes over the cams and also wraps around both cams on the inside.
The archer usually pulls the string backward to create tension for drawing the bow. Then when the archer releases the string, it sends the compound bow arrow flying.
Cables
The role of cables in a compound bow is significant. Their function is not limited to guiding the limbs and keeping them in place but also has a direct impact on arrow speed and helps to achieve accuracy.
Generally, the cables are hooked to the cam on one side and the limb on the other. Unlike string, cables do not run over a bow’s cam but run over the mod. Both cables are attached to the bows having the same distance and also connected in a similar way.
Cams
Both the lower and upper limbs of a compound bow are usually equipped with large wheels. These wheels are known as cams.
All of the parts that contribute to the let-off effect are connected to the cams. However, the cams have groves in them that keep the string on track.
Furthermore, compound bows come in various designs. Some designs result in faster shots, while others provide better handling.
So, you should select the design that best suits your shooting style. Again, there are many different cam configurations available to choose from.
Mod
The mod usually takes place at the cam’s side. Each cam contains a mod, and each cable is connected to a mod. As the name refers, you can easily modify its placement to change the draw length.
The riser is the fundamental portion of the compound bow. It preserves the bow’s main components together (the sight, limbs, rest, stabilizers, etc.).
Since there are numerous parts connected to the riser, so it must be firm but light. Contemporary risers are used to withstand tension while remaining light and easy to handle.
How Does a Compound Bow Work?
The compound bow is a new advancement in archery that takes the benefit of mechanical advantage. The mechanism of a compound bow is quite the same as the pulley system.
A compound bow works similarly to a pulley system because they are both based on the block and tackle system. This bow drives the arrow using multiple energy. Again, it also lacks the straight force found in most conventional bows. When the string reaches a certain level during pulling the string, it peaks, sending the arrow flying.
Moreover, the most challenging part of ancient archery is pulling a maximum weight while maintaining your aim steady.
Therefore, the compound bow employs mechanical devices such as cams, cables, or pulleys to apply power. These components are designed to reduce the bow weight at full draw and make aiming much more effortless.
The pulley system on a compound bow removes around 80% of the draw weight when you’re at full draw, saving your effort of holding back some of that weight. This removed weight is referred to as “let-off.”
We’ve already mentioned it, but here we will shed some more light on this factor. You may be able to achieve different let-off rates depending on your bow.
Therefore, it ups to you which let-off rate you will found more convenient for you. In archery, comfort is just as important as accuracy.
Also, make sure to choose one with a let-off value that gives you the right kind of shooting zone. However, keep in mind that a compound bow with a high let-off will be easier to handle than one with a low let-off.
Valley
Most archers define the “valley” as the point when a cam transitions from making adjustments to a full let-off. To achieve aggressive shots, you’ll have to be shooting with the bow positioned in a way that creates a short valley.
Benefits of Using a Compound Bow
While we’re on the subject of compound bows, let’s have a look at the reasons why this is the ideal sort of bow:
For those interested in archery, compound bows give the necessary force and accuracy without requiring excessive effort.
A compound bow has a longer let-off potential and is easier to hold, so it will allow you to take a more accurate shot at your target.
This bow shoots arrows faster. If you want to shoot arrows with more energy, this is a fast and accurate bow for you.
Generally, there is a low draw weight requirement for compound bows. It makes them easy to handle and safe to use.
Compound bows come with a wide range of archery accessories that can improve your performance.
Compound bows are generally lighter and easier to carry, so you won’t have to worry about your equipment weighing you down.
In addition to the construction and design of the compound bow, there are various cam configurations to choose from.
Take your time experimenting with different bow configurations to determine which bow you are most comfortable with.
How to Configure Draw Length?
We can modify the draw length by adjusting the mod location because you can adjust the mod only when the let-off occurs.
Also, concentrating on the upper limb, we may raise the draw weight by turning it clockwise and lowering it by turning it counter-clockwise. We can reach the cam’s flat area at any point in the draw as long as we adjust the mod’s position on the cam.
Why Compound Bows Shoot Faster?
A compound bow operates in the same way as a simple block and tackle. It uses a pulley system to multiply the energy you apply over distance. In short, compound bows store more potential energy in the limbs, which allows them to shoot faster.
Yes, shooting a compound bow requires less energy than shooting an old-fashioned bow and arrow, but it still takes a lot of practice to master.
A powerful compound bow is more manageable to aim than a traditional bow due to let-off, which lowers string forces at full draw.
In addition, the compound bow is safer and smaller than recurve bow, it requires less practice, and it is also easy to handle.
Final Word
It’s very reasonable to be curious about how your compound bow works when you first get it. The preceding section will quickly introduce you as a beginner to some compound bow fundamentals.
However, if you’re already an archer who shoots with a compound bow, you’ll also likely find this article helpful to read.
Making arrows for a bow is less about carving random sticks and more about building a safe, straight, properly matched arrow. A usable arrow needs the right spine, length, shaft condition, nock fit, insert, point weight, and fletching alignment for the bow and archer.
This guide explains the process at a high level so beginners understand what matters before buying parts or working on arrows. If you are new to archery, have your finished arrows checked by a qualified archery shop or coach before shooting them.
To make arrows for a bow, choose shafts with the correct spine for your draw weight and arrow length, cut them squarely to a safe length, install inserts and nocks correctly, fletch the shaft evenly, add the correct point weight, and inspect every arrow before shooting. Do not shoot damaged, cracked, underspined, or poorly fitted arrows.
Safety Comes First
An unsafe arrow can fail at release or fly unpredictably. Carbon shafts can splinter, wood shafts can warp, and incorrect spine can make tuning difficult or dangerous. Before shooting a handmade or assembled arrow, flex-test and visually inspect the shaft, check the nock, and confirm the arrow is matched to the bow.
For a deeper inspection habit, read a trusted archery safety guide such as Archery360’s arrow inspection guide. If that page redirects, use the site search for “inspect your arrows” and follow the current version.
Arrow Parts You Need to Understand
A modern arrow is a system, not just a shaft. The main parts are the shaft, nock, insert or outsert, point or broadhead, and fletching. Each part affects fit, weight, balance, and flight.
Shaft
The shaft is the body of the arrow. Common materials include carbon, aluminum, wood, and hybrids. Beginners should avoid improvising shafts for real shooting and should use manufacturer-rated shafts that match their bow setup.
Nock
The nock clips onto the bowstring. It should fit securely without being too tight. A poor nock fit can create release problems, inconsistent flight, or unsafe string separation.
Insert and Point
The insert holds the field point or broadhead. Point weight changes the total arrow weight and dynamic spine, so do not swap point weights casually after building the arrow.
Fletching
Fletching stabilizes the arrow in flight. Vanes or feathers must be placed evenly and bonded cleanly. Uneven fletching can create wobble, poor grouping, or clearance problems.
Match Spine, Length, and Point Weight
Arrow spine is the shaft’s stiffness. It must match the bow’s draw weight, arrow length, point weight, and intended use. A shaft that is too weak or too stiff can be hard to tune and may behave unpredictably.
Use a current manufacturer spine chart for the exact shaft model you buy. Easton maintains an arrow sizing and spine chart, and other arrow makers publish their own charts. Do not assume one chart applies to every shaft brand or model.
A safe arrow build starts with fit: spine, length, point weight, nock fit, straightness, and final inspection.
Basic Arrow-Making Process
1. Choose the Right Shaft
Start with a rated shaft that matches your draw weight, draw length, and point weight. Avoid mystery shafts, cracked shafts, or old arrows with unknown history.
2. Measure Safe Arrow Length
Arrow length should be measured safely with the bow setup and archer in mind. Do not cut arrows too short. A too-short arrow can fall off the rest or create a dangerous draw condition.
3. Cut and Square the Shaft
Use the correct arrow-cutting equipment for the shaft material. After cutting, square the end so inserts seat cleanly. Poor cuts can cause weak insert bonding and inconsistent point alignment.
4. Install Inserts and Nocks
Use the adhesive recommended for the shaft and insert. Keep glue away from areas where it can interfere with fit. Let the adhesive cure fully before shooting.
5. Fletch the Arrow
Use a fletching jig so vanes or feathers are spaced consistently. Match the fletching style to your rest, broadhead choice, and shooting purpose.
6. Inspect Before Shooting
Spin-check the finished arrow, inspect the shaft, verify nock fit, and confirm the point or broadhead is seated correctly. The general arrow reference is useful for terminology, but safety checks should come from the shaft manufacturer or an archery professional.
What to Check If the Arrow Flies Poorly
If a new arrow fishtails, porpoises, groups badly, or makes unusual contact with the rest, do not keep shooting and hope it settles in. First inspect the shaft and nock for damage. Then check whether the arrow length, point weight, fletching clearance, and spine match the bow setup.
Many arrow problems are really setup problems. A nocking point, rest position, cam timing, peep alignment, or release habit can make a good arrow look bad. That is why it helps to test new arrows from a known safe setup and keep notes about shaft model, length, point weight, and fletching.
Do not try to fix poor arrow flight by randomly adding heavier points, cutting shafts shorter, or switching broadheads without checking the full system. Those changes can alter dynamic spine and may make the arrow less safe or less consistent.
Arrow Making Checklist
Use shafts with known brand, model, spine, and length specs.
Confirm draw weight, arrow length, and point weight before cutting.
Use proper cutting and squaring tools for the shaft material.
Install inserts with the adhesive recommended for that shaft.
Check nock fit on the actual bowstring.
Fletch with a jig for consistent spacing and orientation.
Inspect every finished arrow before the first shot and after impacts.
Keep one finished arrow as your reference sample. When you build the rest of the set, compare length, nock alignment, point seating, vane placement, and spin before putting the arrows into regular practice.
Common Mistakes
Cutting arrows too short.
Using the wrong spine for the bow.
Changing point weight without checking spine again.
Shooting cracked, splintered, or unknown shafts.
Skipping insert curing time.
Assuming homemade wood shafts are safe for modern high-energy bows.
Frequently Asked Questions
Can beginners make arrows at home?
Beginners can assemble arrows at home if they use rated parts, correct tools, and manufacturer charts. A shop or coach should check the first finished arrows before shooting.
Can I make arrows from sticks?
Primitive arrow making exists, but random sticks are not a safe shortcut for modern bows. For real shooting, use shafts designed and rated for archery.
What is the most important arrow spec?
Spine is one of the most important specs, but it works together with length, point weight, total arrow weight, and bow setup. Treat the arrow as a complete system.
Should I inspect arrows every time?
Yes. Inspect arrows before shooting and after hard impacts. Any cracked, splintered, loose, or questionable arrow should be removed from use.
Final Recommendation
Making arrows is rewarding, but safety and fit come first. Choose rated shafts, match spine correctly, cut and assemble with proper tools, and inspect every arrow before shooting. If you are unsure, let an archery shop build or check your first set.
Birdwatching is simple to start: choose a quiet place, move slowly, listen first, then use binoculars or your eyes to notice shape, color, behavior, song, and habitat. You do not need expensive gear to begin, but a little structure makes the experience much better.
This beginner guide covers where to go, what to bring, how to identify birds, and how to watch respectfully without disturbing wildlife or other people.
To birdwatch, go to a park, yard, trail, wetland, or field edge, stay quiet, scan slowly, and identify birds by size, shape, colors, sound, movement, and habitat. Keep notes, use a field guide or birding app, and avoid getting too close to nests or stressed birds.
Where to Birdwatch
Start close to home. Backyards, neighborhood parks, ponds, river edges, open fields, city green spaces, and wooded trails can all be good birding spots. Early morning is often productive because birds are active and human noise is lower.
For beginner-friendly guidance, Audubon has a useful overview on how to start birding. You can also use eBird to learn where people report birds and to keep your own checklists.
Good Beginner Locations
Local parks with trees, open grass, and water.
Quiet backyard or balcony feeding areas where allowed.
Pond edges, marsh boardwalks, and river trails.
Field edges where birds move between cover and food.
Nature preserves with marked trails and observation areas.
Beginner Birdwatching Gear
You can birdwatch without gear, but binoculars and a notebook help. Start with comfortable binoculars, weather-appropriate clothing, water, and a field guide or app. Avoid carrying so much that you stop paying attention to the birds.
A simple birdwatching kit: binoculars, field notes, water, patience, and a quiet place to observe.
Binoculars
Choose binoculars that are comfortable to hold and easy to focus. Beginners usually benefit more from a steady, bright image than from chasing maximum magnification. If binoculars feel shaky or heavy, you will use them less.
Notebook or App
Write down where you were, the date, habitat, bird size, colors, behavior, and sound. Notes teach you to notice details that a quick photo may miss.
How to Identify Birds
Identification is easier when you look for patterns instead of one color. Ask: How big is the bird? What is the beak shape? Is the tail long or short? Does it hop, walk, cling, swim, soar, or dive? What habitat is it using?
Use the Four-Part Method
Size and shape.
Color pattern.
Behavior.
Habitat and location.
Bird songs and calls also help, but do not worry if sound identification feels hard at first. Start with common local birds and build slowly.
How to Observe Without Missing Birds
Many beginners walk too fast. Pick a spot, stand still for a few minutes, and let the area settle. Watch the edges of trees, brush, water, and open ground. Birds often appear after the first noisy moment passes.
Use your ears before your binoculars. A chirp, wingbeat, splash, or rustle can point you toward movement. Once you locate the bird with your eyes, then raise the binoculars slowly and focus carefully.
Think About Season and Habitat
Birdwatching changes through the year. Migration, nesting, winter feeding, rain, drought, and food sources all affect what you see. A park that feels quiet one month may be excellent in another season.
Habitat is the shortcut. Water attracts ducks, herons, swallows, and shorebirds. Dense shrubs may hold sparrows and wrens. Open skies are better for watching hawks, vultures, and swifts. Learn the habitat and identification becomes easier.
Birdwatching Etiquette
Good birdwatching should not disturb the birds. Stay on trails where required, keep distance from nests, avoid flushing birds repeatedly, and never trespass for a better view. If a bird changes behavior because of you, back away.
Be considerate around other people too. Keep noise low, share viewing areas, follow park rules, and be careful with location sharing for sensitive species.
Keep Simple Birding Records
Good notes make birdwatching more rewarding. Record the date, place, weather, habitat, bird behavior, and any field marks you noticed. Over time, your notes show migration patterns, seasonal changes, and which locations are worth revisiting.
Do not worry about perfect identification every time. If you are unsure, write down what you know and look it up later. Honest uncertainty is better than forcing a wrong ID.
Beginner Checklist
Pick one nearby birding location.
Go during a quieter time of day.
Bring binoculars, water, and a notebook or app.
Move slowly and listen before scanning.
Identify birds by size, shape, behavior, sound, and habitat.
Record what you saw and where you saw it.
Respect wildlife, private property, and other visitors.
Common Mistakes
Buying too much gear before learning basic observation.
Moving too quickly through good habitat.
Looking only for bright colors and ignoring shape or behavior.
Getting too close to nests or stressed birds.
Forgetting to write down location and habitat notes.
Frequently Asked Questions
Do I need binoculars to start birdwatching?
No. Binoculars help, but you can begin by watching common birds in your yard, park, or neighborhood and learning their shapes, sounds, and behavior.
What is the best time to birdwatch?
Early morning is often best because many birds are active and human disturbance is lower. Evening can also be good, especially near water or feeding areas.
How do beginners identify birds?
Start with size, shape, color pattern, behavior, habitat, and location. Do not rely on one color alone, because light, age, season, and sex can change how a bird appears.
Is birdwatching good for hunters?
Yes. Birdwatching can improve patience, observation, habitat reading, and ethical wildlife awareness. It is also a quiet way to learn more about the places you hunt or hike.
Final Recommendation
Start birdwatching close to home, keep your gear simple, and focus on patient observation. The more you notice shape, sound, behavior, and habitat, the faster your bird identification skills will grow.
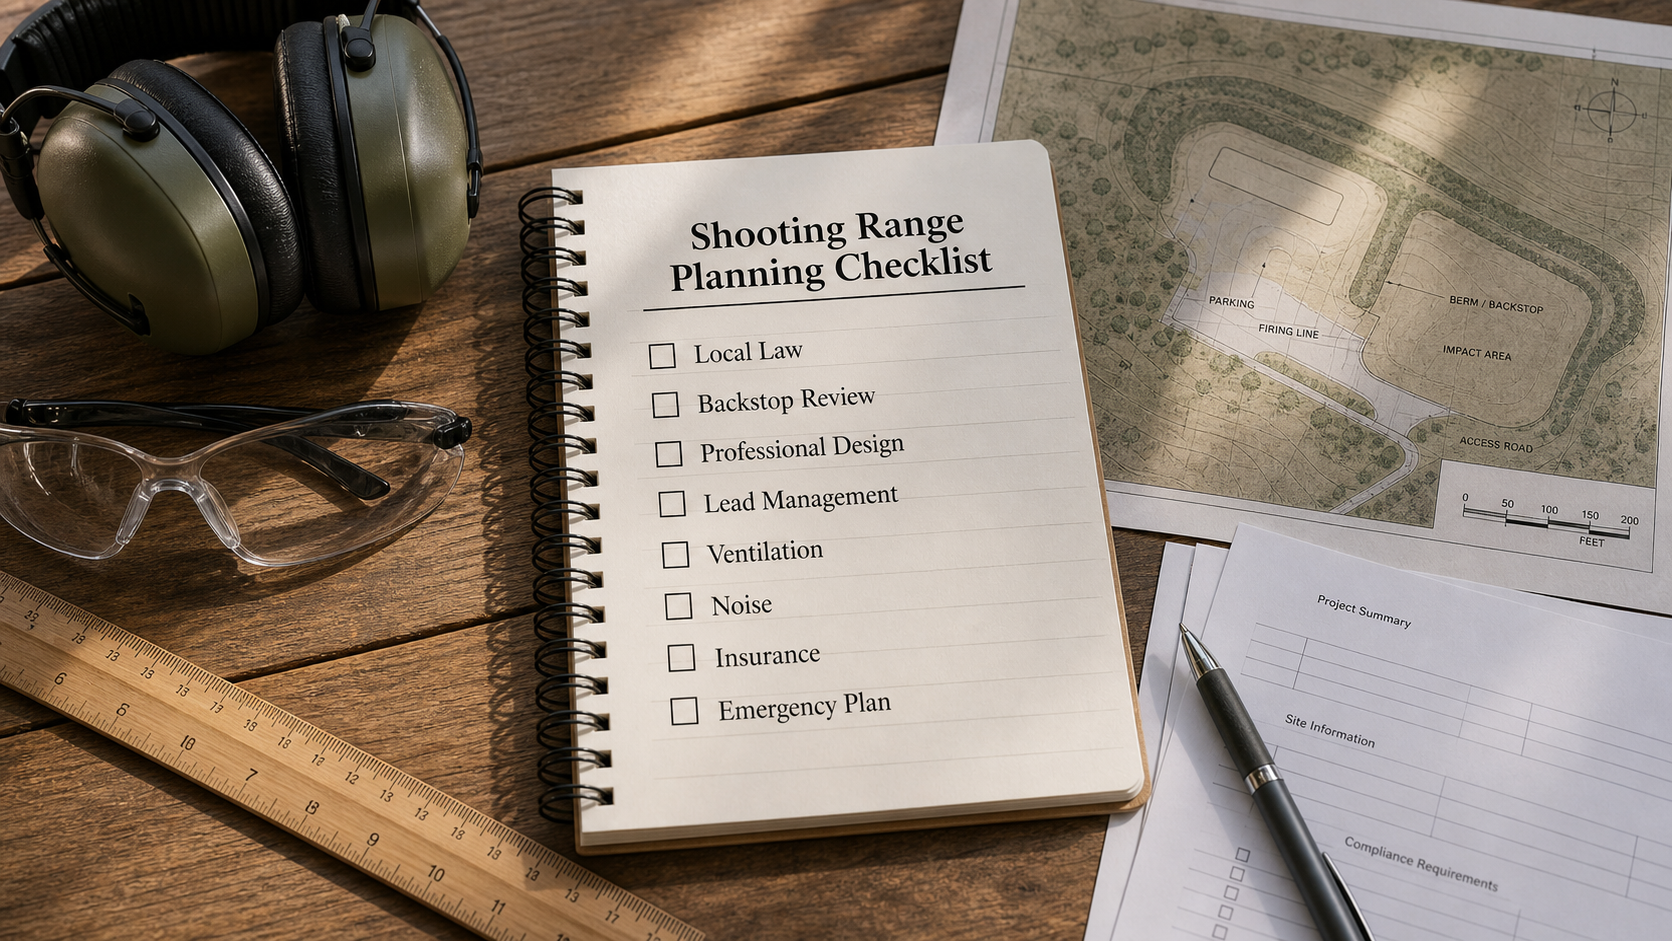
How do you build a shooting range safely? Start with the legal, safety, environmental, and professional-design questions before you think about targets or lanes. A real firearm range is not a casual backyard project. It needs local approval, a safe backstop plan, lead management, noise control, insurance, emergency procedures, and qualified range-design review.
This guide is a planning checklist, not a construction blueprint. It does not provide engineering instructions for bullet traps, berms, ventilation systems, or range structures. For any live-fire range, work with qualified professionals and your local authorities.
To build or set up a shooting range, first confirm that shooting is legal at the location, then get professional review for backstop, bullet containment, ventilation, lead management, noise, emergency access, and insurance. For most readers, the safest and simplest choice is to use an established public, private, or club range instead of trying to build a live-fire range at home.
If you are only setting up an airgun, archery, dry-fire, or laser-training area, the risk is different, but you still need safe direction, a reliable backstop, local rule compliance, eye protection, and control over who can enter the area.
Home Range vs. Professional Range
A home practice area and a true shooting range are not the same thing. A dry-fire corner, laser trainer, airgun pellet trap, archery lane, or rimfire-rated club range each has different risks. The more energy, distance, projectile type, and public access involved, the more serious the design and legal requirements become.
For live firearms, do not rely on improvised materials or internet drawings. Range safety depends on site-specific factors: direction of fire, terrain, projectile type, ricochet risk, soil, drainage, nearby roads and houses, overhead hazards, and how the range will be supervised.
Legal Permission and Neighbors
Before planning any range, check city, county, state, and property rules. Local firearm-discharge ordinances, zoning, building permits, nuisance rules, noise limits, HOA restrictions, public-land rules, and lease terms may all matter. Rural land does not automatically mean live-fire practice is legal.
Also think about neighbors. Even if shooting is technically legal, a range that creates noise, dust, lead concerns, or unsafe perceptions can turn into complaints or legal trouble. A responsible plan includes communication, written permission, controlled hours, safe access, and documented procedures.
Backstop and Downrange Safety
The backstop is the heart of range safety, but it is also where DIY advice becomes dangerous. A safe backstop is not just a pile of material. It must be designed for the firearm, ammunition, distance, impact angle, maintenance schedule, drainage, and ricochet control. It must also account for what is behind and around the target area.
Use professional range-design guidance for live fire. At a minimum, confirm the direction of fire, side containment, overhead concerns, target placement, shooter position, access control, and emergency stop procedures. The basic firearm-safety principle still applies: know your target and what is beyond it. The NRA’s gun safety rules are a useful baseline for every range discussion.
Lead, Ventilation, and Environmental Risk
Lead is one of the biggest issues range owners overlook. Outdoor ranges need a lead-management plan for soil, runoff, reclamation, and maintenance. The EPA’s Best Management Practices for Lead at Outdoor Shooting Ranges explains why range owners and operators should treat lead management as an environmental responsibility, not an afterthought.
Indoor ranges add another layer: ventilation and airborne lead. NIOSH guidance on indoor firing ranges and OSHA’s lead safety information show why casual indoor live-fire setups are a bad idea without professional ventilation, cleaning, exposure control, and maintenance procedures.
Noise, Insurance, and Emergency Plan
Noise matters for safety, comfort, and community acceptance. A range plan should include hearing protection rules, shooting hours, sound direction, distance from neighbors, and local noise ordinances. Indoor or covered firing points can change sound behavior, so do not assume a structure automatically makes things quieter.
Insurance matters too. If guests, students, club members, or customers use the range, liability exposure increases. A written emergency plan should cover cease-fire commands, first aid, emergency vehicle access, communication, fire risk, weather, and who has authority to stop shooting.
Range Rules and Supervision
A safe range also needs written rules that every shooter can understand before any firearm is uncased. Post the firing line rules, cease-fire command, eye and ear protection requirement, allowed targets, allowed firearms, guest policy, and emergency contact steps. If more than one person is shooting, assign one person to control the line instead of assuming everyone will coordinate naturally.
Supervision matters most when new shooters, visitors, youth shooters, or mixed experience levels are present. A quiet, clear command system prevents confusion and gives everyone permission to stop shooting immediately if something feels wrong.
Safe Range Planning Checklist
Local law: Confirm zoning, discharge rules, permits, and land-use restrictions.
Professional design: Use qualified review for live-fire backstops, bullet containment, and range layout.
Safe direction: Control where every projectile could go, including misses and ricochets.
Access control: Prevent people, animals, vehicles, or neighbors from entering the danger area.
Lead plan: Plan for lead recovery, soil/runoff protection, and safe cleanup.
Ventilation: Do not build an indoor live-fire range without professional air-handling design.
Noise: Check local limits and protect shooters and neighbors.
Insurance: Confirm liability coverage before anyone else uses the range.
Emergency plan: Post commands, first-aid steps, communication, and access routes.
FAQ
Can you build a shooting range at home?
Sometimes, but only if local law, land layout, safety design, backstop, noise, lead management, and insurance all support it. Many homes are not suitable for live-fire ranges.
Is an indoor home shooting range safe?
A live-fire indoor home range is not something to improvise. It requires professional bullet containment, ventilation, fire safety, lead control, noise control, and legal approval.
What is the biggest risk in a DIY shooting range?
The biggest risks are unsafe projectile containment, ricochet, people entering the downrange area, lead exposure, and legal problems from local rules or neighbor complaints.
Can you set up an airgun range more easily?
Usually yes, but it still needs a safe backstop, local-rule compliance, eye protection, controlled access, and a clear shooting direction. Treat it as a controlled practice area, not a toy setup.
Who should review a shooting range plan?
For live-fire firearms, consult local authorities, a qualified range designer or engineer, an insurance provider, and environmental or lead-management professionals where needed.
Final Recommendation
If your goal is practice, an established range is usually the better choice. If your goal is to build or operate a real shooting range, treat it as a legal, engineering, environmental, and safety project from day one.
Do not build a live-fire range from casual online advice. Start with local law, professional design, safe backstop review, lead and ventilation planning, noise control, insurance, and emergency procedures. That is the responsible path.
Making a bowstring is a precision job, not just a craft project. The safe answer is this: you can learn what materials, tools, and checks are involved, but a bowstring should only go on a bow when its length, material, strand count, serving size, loop fit, nock fit, and bow setup match the bow manufacturer’s specifications.
If you are new to archery, the smartest path is to use this guide as a buying and inspection checklist, then have a qualified archery shop or experienced bow technician verify the finished string before you shoot it. A poorly matched string can damage the bow, change arrow flight, or create a safety problem.
Quick Answer: What Do You Need To Make a Bowstring?
At a high level, bowstring making involves string material, serving material, a bowstring jig or measured setup, serving tools, wax, nock-fit checks, and final bow setup checks. The exact material and dimensions depend on the bow type. Recurve, longbow, compound, and crossbow strings are not interchangeable, and compound bows are especially sensitive to cable/string specs and cam timing.
Before any string is used, confirm the bow’s manual or manufacturer specs, inspect the limbs and cams, check serving and loops, set brace height or axle-to-axle measurements where applicable, and confirm that arrows/nocks fit correctly. Organizations such as the Archery Trade Association, World Archery, and USA Archery are useful starting points for archery education, safety culture, and participation standards.
Bowstring-Making Checklist
Check
What to verify
Why it matters
Bow type
Recurve, longbow, compound, or crossbow
Each bow type uses different string rules and safety tolerances.
Manufacturer specs
Approved string length, material, strand count, and serving diameter
Guessing can change performance or damage the bow.
String material
Dacron/B-50 style, modern low-stretch material, or manufacturer-approved equivalent
Older bows may need more forgiving materials; modern compounds often need exact specs.
End loops
Loop size and serving quality match limb tips or cam posts
Poor loop fit can slip, wear, or load the bow incorrectly.
Center serving
Nock fit is snug without pinching or falling off
Bad nock fit can cause inconsistent release or unsafe arrow behavior.
Bow setup
Brace height, tiller, axle-to-axle, and cam timing where applicable
The string affects the whole bow tune, not just the part your fingers touch.
Inspection
No fraying, separation, serving gaps, or damaged loops
Visible defects are warning signs before shooting.
Final verification
Qualified shop or experienced technician check if you are unsure
A second check is cheap compared with bow damage or injury.
What This Guide Covers and What It Does Not
This guide explains the parts of a bowstring, common materials, tools, and safety checks so you can make better decisions. It is not a replacement for your bow manual, a pro-shop setup, or hands-on coaching. That matters because a string that looks neat can still be wrong for the bow.
For a simple traditional bow, the process is easier to understand. For a modern compound bow or crossbow, the margin for error is much smaller because the string and cables affect cam timing, draw length, let-off, arrow speed, and safety. If your bow uses cams, cables, or high draw weight, treat string work as technical maintenance.
Materials To Understand Before Making a Bowstring
String material
Bowstrings can be made from different synthetic materials, but the best choice depends on the bow. Dacron-style materials are often more forgiving for traditional and older bows. Modern low-stretch materials can improve efficiency, but they may be too harsh for some older limb designs. Do not choose material only because it is strong; choose the material your bow is designed to handle.
Serving material
Serving protects high-wear sections of the string, especially the center serving where the arrow nock attaches and the end-loop areas that contact limb tips or cams. Serving diameter matters because it controls nock fit. A nock that clicks on too tightly or falls off too easily can create inconsistent and unsafe shooting behavior.
End loops and nocking point
The end loops must fit the bow correctly without twisting, slipping, or creating sharp stress points. The nocking point also needs to be placed and checked with the bow setup, not guessed by eye. Small fit problems can become major accuracy and wear problems after repeated shots.
Tools Commonly Used for Bowstring Work
Common bowstring tools include a string jig, serving jig, bow square, string wax, measuring tape, nock-fit tools or test nocks, and a safe bow press when working on many compound bows. A homemade board-and-post setup may help someone understand how string loops are formed, but it should not be treated as a substitute for accurate bow specs and final tuning.
If the bow requires a press, do not improvise. A compound bow stores serious energy, and the wrong press method can damage limbs, cams, strings, or cables. That is one of the main reasons pro-shop help is worth the cost for many archers.
Why Exact Bow Specs Matter
A bowstring is part of the bow’s tuning system. Changing length, material, strand count, or serving thickness can change brace height, draw length, nock travel, arrow launch, and cam timing. On a compound bow, a string that is close but not correct can make the bow feel wrong even if it technically fits on the cams.
Before replacing or making a string, record the bow model, draw weight, draw length, factory string length, cable length if applicable, and any manufacturer notes. If those details are missing, contact the manufacturer or a qualified archery shop instead of relying on a generic online measurement.
Safety Checks Before Using Any Bowstring
Inspect the full string before every shooting session. Look for broken strands, fuzzy wear, separated serving, loose loops, damaged nock fit, and changes in brace height or timing. Stop shooting if the bow sounds different, feels different, or shows unexpected wear.
Never dry fire a bow, and do not test a questionable string by pulling the bow repeatedly without a proper arrow and safe range setup. If a string has visible damage or unknown history, replacement is safer than trying to stretch its life.
When To Use a Pro Shop
Use a pro shop when the bow is a compound, crossbow, high draw-weight setup, expensive hunting bow, or any bow with unclear specs. Also use a shop if you need cam timing, peep alignment, draw-length confirmation, or a press. The cost of professional setup is small compared with damaged equipment or unsafe shooting.
DIY string knowledge is still useful. It helps you ask better questions, inspect your equipment, understand why a shop recommends certain materials, and catch obvious fit problems before they become failures.
Beginners can learn the terms and process, but they should not trust a first homemade string on a bow without experienced inspection. A bowstring has to match the bow, not just look finished.
What is the safest bowstring material?
The safest material is the one approved for your bow. Dacron-style material may be appropriate for many traditional or older bows, while modern compounds often require specific low-stretch materials and exact dimensions.
Why does nock fit matter?
Nock fit affects safety and consistency. If the nock is too tight, it can interfere with release. If it is too loose, it may fall off the string before or during the shot cycle.
Should I make a compound bow string at home?
Most shooters should use a qualified shop for compound bow strings and cables. Compound bows depend on exact string and cable specs, cam timing, press safety, and final tuning.
Final Recommendation
Learning how a bowstring is made is valuable, but safety comes first. Use the correct material, match the bow’s exact specifications, inspect every wear point, and get professional verification when you are unsure. For most hunters and casual archers, a properly built replacement string from a trusted source or pro shop is the better decision than risking a poorly matched DIY string.
How to Choose Binoculars for Hunting: Binoculars are an irreplaceable companion of any hunter; it is with the help of this optical device that you can find in time an animal lurking in the bushes or a bird hiding in the branches of trees.
Very often, it is optics that plays a decisive role and makes the hunt effective. Hunting lovers can be safely identified into a special category of people who are ready to do their favorite thing in any weather.
Accordingly, equipment and auxiliary equipment must be ready for the harsh tests that the American climate can present.
How to Choose Binoculars for Hunting
Within this article, we will try to understand all the subtleties and technical nuances of optical devices and answer one of the main questions of novice hunters – how to choose binoculars for hunting.
The Main Criteria for Choosing Hunting Binoculars
Ease and comfort of use;
Optical characteristics and capabilities of optics;
Advanced capabilities of modern binoculars;
Protection of the device from moisture and fogging;
Reliability of the optical assistant;
Optical system based on Roof-prism or Porro-prism;
Professional advice when choosing binoculars for hunting.
Let’s take a closer appearance at each point and take a closer look at the main subtleties that you may encounter in the process of using optics.
Ease and Usability
When tracking down an animal, binoculars begin to play one of the key roles because this optical device will allow you to detect cautious representatives of the fauna in time.
Accordingly, to use, namely to carry out long-term observations, should be as comfortable as possible. The optical device should lie easily in hand and not strain it too much. In addition, binoculars should allow you to refocus as quickly as possible on targets that are at different distances from the shooter.
Most modern binoculars are equipped with a center focusing mechanism with diopter adjustment of the right eyepiece.
When choosing binoculars for hunting, pay attention to the convenience of using the focusing mechanism. Sometimes you will have to manipulate the fine settings of the optics in winter gloves, and the success of the whole event will often depend on how quickly you can do this.
Optical Characteristics and Capabilities of Optics
Optical performance directly affects the functionality of your device. In other words, magnification is not a decisive factor determining the ability of optics to solve the assigned tasks. No less important qualities for observations are luminosity and resolution.
The ability of binoculars to see at low light levels is affected by the diameter of the lens, the quality of the optical glasses, and the presence of antireflection coatings. The larger the lens diameter, the more light it can pass through.
Binoculars with optical magnification up to 10x, these are models 8×30, 10×40, and so on, will be optimal for hunting in tight forest conditions, where the requirements for magnification are not so great.
As a rule, these are wide-angle optical devices with which the hunter can see a large space area. For hunting in open areas, in the steppe or mountains, you will need a more powerful tool with good resolution and a magnification of more than 10 times. These can be 12×45, 20×50, and so on.
Advanced Capabilities of Modern Binoculars
You won’t surprise anyone with a rangefinder reticle in binoculars. Old grandfather’s methods with complex calculations on the knee, confusion with the translation of meridians into meters and vice versa are gradually becoming a thing of the past.
Now modern optics with sophisticated electronic stuffing appear on the arena, which makes it possible to accurately calculate the distance to a distant object and give the hunter ready-made results of ballistic calculations for a specific group of ammunition. All you have to do before making an effective shot is to make adjustments to the range and wind strength.
For example, using the Fusion 1 MILE ARC 12X50 rangefinder binoculars, you can accurately determine the distance to a target that is at a distance of up to 1 kilometer. Fully coated optics with prisms made of high-quality Bak-4 glass will provide a high-contrast and high-quality image even of a very distant object. And the aperture diameter of 50 mm makes it possible for comfortable observation at dusk.
Importance of Moisture Resistance and Nitrogen-Filled Optical Channels in Hunting Optics
Hunting often takes place in harsh weather conditions such as rain, snow, and fog. Therefore, it is crucial to choose optics that can withstand these extreme environments.
One of the essential factors to consider when selecting hunting optics is moisture resistance. Ideally, the optics should have a completely sealed enclosure that can tolerate short-term immersion in water to depths of 1 or more meters. This feature is necessary in case of accidental exposure to water, such as falling into a puddle, sleet, or stream.
Moreover, it is recommended that the optical channels are filled with nitrogen, which is effective in preventing condensation in the lens system during sharp temperature fluctuations. Optics without nitrogen filling can fog up when moving from a warm, heated room or car to the outdoors, where the temperature is below zero, and hinder quick surveillance of the area.
In summary, moisture-resistant and nitrogen-filled hunting optics are essential for hunting in all weather conditions, allowing hunters to rely on their optical devices without worrying about equipment malfunction.
Reliability of Binoculars
Hunting is a very active activity associated with a long stay in the open air, intensive movement in the forest, and open areas. In this case, the reliability of the optical assistant comes to the fore.
The case is one of the essential components, which is the first to experience all the delights of exploitation. Its main task is to protect and ensure the operability of optics in any abnormal situations, for example, when falling, hitting a tree branch, immersed in water, and so on.
Nowadays, a large number of cases are made of polymeric materials such as engineering plastics. It is a very durable and reliable material capable of withstanding high mechanical and shock loads; it perfectly tolerates both overheating and cooling. Housings made of modern aluminum alloys are also capable of reliably protecting optics in harsh operating conditions.
In addition, they are significantly less weight and, if this parameter is critical for you, we recommend choosing the device from this material.
The covering of the case of hunting binoculars should be, first of all, non-slip and capable of absorbing impact energy, for example, in the event of a fall. Modern rubberized models are easy to grip in completely wet hands and do an excellent job in case of falls and bumps.
Factors to Consider When Choosing Hunting Binoculars
When selecting binoculars for hunting, it is important to consider various factors to ensure that you make the right choice. One of these factors is the optical scheme used in the device.
Rooftop prism binoculars are more compact, while Porro prism devices provide a more voluminous and clear image due to the expanded stereo base. Also, constant magnification binoculars are generally more reliable than those with variable magnification levels.
In addition, the degree of moisture resistance is a crucial factor to consider when selecting hunting binoculars. It is best to choose a sealed enclosure that can withstand immersion in water to a depth of 1 meter or more, and optics channels filled with nitrogen to prevent condensation in the lens system during sharp temperature fluctuations.
Finally, it is important to consider the body material of the binoculars. A lightweight and durable material with a rubberized coating and a convenient center focus mechanism is ideal for most hunting situations. However, for those who prioritize high-quality images and are willing to deal with additional weight, Porro-prism binoculars may be a good option.
Professional Advice: Choosing the Right Binoculars for Hunting
To maximize your hunting experience, it is important to choose the right binoculars that meet your specific needs. Professional hunters emphasize that there is no one-size-fits-all binocular for every situation. The optimal characteristics of binoculars for mountain hunting differ from those for wooded areas.
While high magnification and good resolution are essential for mountain hunting, they may not be necessary for observing game at a distance of up to 100 meters. Professionals recommend selecting binoculars based on the operating conditions and the intended tasks you plan to accomplish with the device.