GPS Devices for Tracking Hunting Locations: Safe Navigation Guide

GPS devices can help hunters mark stands, return to camp, track routes, save blood-trail notes, and avoid getting turned around in unfamiliar terrain. They are useful tools, but they should not be your only navigation plan. Batteries fail, screens break, maps can be outdated, and signal conditions vary.

The best approach is redundancy: use a GPS or hunting app, carry a paper map and compass, preload offline maps, keep backup power, and tell someone your plan before you leave. This guide explains how to choose and use GPS tools without depending on them blindly.

Table of Contents

Quick Answer

A hunting GPS is worth using if it helps you mark locations, navigate safely, and plan routes without replacing basic woods skills. The most useful features are offline maps, waypoint marking, track-back routing, battery life, weather resistance, map layers, and emergency communication options where available.
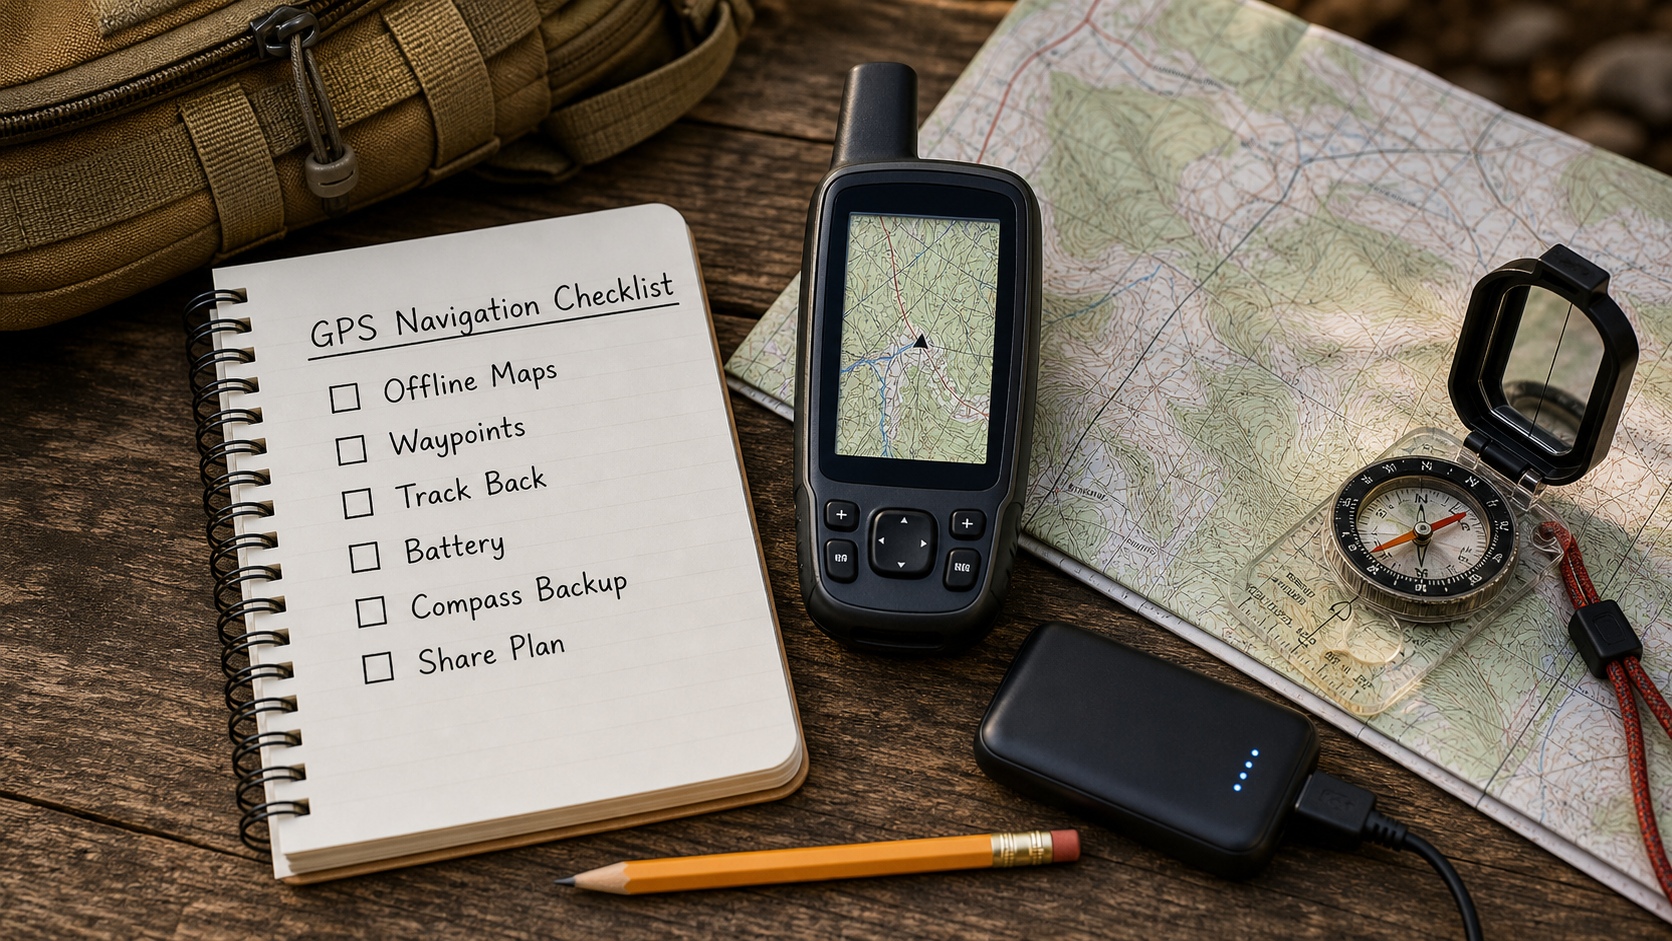
Before a hunt, confirm offline maps, waypoints, track-back, battery power, compass backup, and a shared trip plan.

Before relying on any device in the field, run through this checklist. It is simple, but it prevents the most common navigation failures.

  • Offline maps: Download the full area before leaving service.
  • Waypoints: Mark truck, camp, stand, blind, water crossing, and hazard locations.
  • Track back: Test route recording and return navigation before the hunt.
  • Battery: Start with full charge and carry backup power or spare batteries.
  • Compass backup: Carry a real compass and know the general direction to safety.
  • Trip plan: Tell someone where you are going and when you expect to return.

Why Hunters Use GPS

Hunters use GPS tools to reduce uncertainty. A device can help you return to the truck in the dark, find a stand without wandering, mark sign, measure access routes, avoid property boundaries, and record how you entered an area. It also helps when fog, snow, timber, or flat terrain makes landmarks harder to read.

GPS stands for Global Positioning System, a satellite-based positioning system. A basic GPS overview is useful background, but hunters should care less about the technical details and more about whether the device works reliably in their terrain.

Features That Matter

Do not choose a hunting GPS only because it has a long feature list. Choose the features that support your actual hunt.

Offline Maps and Boundaries

Offline maps are critical because cell service can disappear quickly in hills, timber, and remote access roads. Boundary layers can help with public/private land awareness, but you should still verify legal access from official sources because map layers can lag behind current rules.

Waypoints and Tracks

Waypoints mark specific spots. Tracks record your path. Together, they help you understand how you moved through an area and how to return. Use clear names such as Truck North Gate, Creek Crossing, Buck Sign, or Stand 2 instead of vague labels you will forget later.

Battery and Weather Resistance

Battery life matters more than novelty features. Cold weather, screen brightness, route recording, and satellite messaging can drain power. Weather resistance also matters because hunting gear gets wet, dirty, and bumped around in packs.

Types of GPS Tools

Hunters commonly use handheld GPS units, smartphones with hunting apps, satellite communicators, GPS watches, and vehicle-mounted navigation. Each has trade-offs.

Handheld GPS vs. Phone Apps

A handheld GPS may be more rugged and battery-friendly. A phone app may have better map layers and easier planning. Many hunters use both: the phone for detailed maps and the handheld or compass as backup. The best setup is the one you practice with before you need it.

Satellite Communicators

Satellite communicators can add messaging or SOS features in remote areas, depending on device and subscription. Do not treat them as permission to take careless risks. They are backup tools, not a replacement for route planning, weather checks, and telling someone your plan.

Field Workflow

Use a consistent workflow. Before leaving the vehicle, mark the truck, confirm the map is loaded, start a track if needed, and check battery level. During the hunt, mark sign, hazards, trail junctions, and recovery points. After the hunt, clean up duplicate waypoints and save useful notes while the memory is fresh.

Keep your system simple. Too many waypoints can become clutter. Use names and icons that make sense at a glance, especially in the dark or bad weather.

Safety and Backup Navigation

A GPS is only one part of outdoor safety. The National Park Service lists navigation, illumination, first aid, fire, shelter, extra food, extra water, and extra clothes among the Ten Essentials. Hunters should also carry season-appropriate survival gear and know how to navigate without a screen.

For hunting-specific preparation and safe decision-making, resources such as Hunter Ed can help reinforce trip planning, legal access, and responsible behavior. Tell someone your route, expected return time, vehicle location, and what to do if you do not check in.

Common Mistakes

The biggest mistake is assuming the device will solve every problem. Other common mistakes include forgetting offline maps, letting the battery run low, failing to mark the truck, trusting outdated property layers, ignoring weather, and never practicing track-back until lost.

Another mistake is staring at the screen instead of reading the land. Use the GPS to confirm your plan, but still watch wind, terrain, light, trails, and landmarks. A hunter who combines map sense with device discipline is much safer than one who only follows a glowing line.

FAQ

Do I need a GPS for hunting?

You do not always need one, but it is very useful in unfamiliar terrain, public land, big woods, mountains, swamps, or low-light exits. Carry backup navigation either way.

Is a phone enough for hunting navigation?

A phone can work if maps are downloaded and the battery is protected, but it should not be your only plan. Carry a compass, backup power, and basic route knowledge.

What waypoints should hunters mark?

Mark the truck, camp, stand, blind, trail junctions, hazards, water crossings, sign, and recovery points. Use clear names so the map still makes sense later.

Should I still carry a compass?

Yes. A compass and paper map are lightweight backups when batteries die, phones break, or screens become hard to use in weather.

Final Takeaway

GPS devices are excellent hunting tools when you use them as part of a complete navigation plan. Preload maps, mark important points, carry backup power, keep a compass, and share your trip plan. The best navigation system is not the most complicated one; it is the one you understand before the woods get dark.

How to Zero a Scope at 100 Yards

To zero a rifle scope at 100 yards, start with a safe range setup, confirm the rifle and ammunition match, bore-sight if possible, fire careful groups from a stable rest, adjust the scope based on group center, and confirm the final zero with the same ammunition you plan to use. The goal is not a single random hit. The goal is a repeatable point of impact from a safe, controlled position.

Table of Contents
  1. Quick Answer
  2. Safety First
  3. What You Need
  4. Start Close Before 100 Yards
  5. Shoot Groups, Not Single Shots
  6. Adjust the Scope
  7. Confirm the Zero
  8. Common Mistakes
  9. Troubleshooting a Wandering Zero
  10. Field Notes After Zeroing
  11. FAQ

Quick Answer

A simple 100-yard zero process is: set up safely, shoot a three-shot group, measure the group center, adjust elevation and windage, shoot another group, and repeat until the group center matches your desired point of impact. Let the barrel cool as needed and avoid chasing one bad shot.

Why 100 Yards Is Popular

A 100-yard zero is easy to confirm, easy to explain, and useful for many hunting and range rifles. It gives you a reliable baseline before learning longer-distance holds or turret adjustments.

What It Does Not Prove

A 100-yard zero does not prove your rifle is ready for every distance, animal, or weather condition. It only confirms where that rifle, optic, and ammunition hit at 100 yards under the conditions you tested.

Safety First

Before zeroing, review safe firearm handling. The NSSF firearm safety rules are a good baseline: keep the muzzle pointed in a safe direction, keep your finger off the trigger until ready to shoot, know your target and what is beyond it, and treat every firearm with care.

Range Setup

Use an approved range or safe shooting area with a safe backstop. Follow all range commands. Keep ammunition organized, keep the muzzle downrange, and do not handle firearms while people are downrange.

Ammunition Check

Use ammunition that matches the firearm markings and manual. If you are unsure about ammunition compatibility, stop and verify. SAAMI publishes safety information on unsafe firearm and ammunition combinations.

What You Need

  • Rifle with securely mounted scope.
  • Correct ammunition from the same load or lot when possible.
  • Stable front and rear support, bags, bipod, or rest.
  • Paper target with visible grid or aiming point.
  • Eye and ear protection.
  • Tools for turret caps or mount checks.
  • Notebook or phone note for recording adjustments.

Check Mounts Before Shooting

A loose base, ring, or action screw can make zeroing feel impossible. Check the scope mount according to the manufacturer’s instructions and torque specs. If you are unsure, ask a qualified gunsmith or experienced range officer.

Start Close Before 100 Yards

If the rifle is newly mounted or far from zero, start closer than 100 yards. Many shooters begin at 25 yards to make sure shots are on paper. This saves time, ammunition, and frustration.

Bore-Sighting

Bore-sighting can help get close, but it is not a final zero. It only helps align the bore and optic enough to start live-fire confirmation.

Move to 100 Yards

Once the rifle is on paper and reasonably centered at a closer distance, move the target to 100 yards and begin shooting careful groups.

Shoot Groups, Not Single Shots

One shot can lie. A three-shot or five-shot group tells you more about the rifle, ammunition, and shooter. Use the center of the group for adjustments instead of chasing each hole.

Group Size Matters

If groups are very large, do not keep adjusting the scope. Check fundamentals first: rest stability, trigger control, mount tightness, ammunition, barrel heat, and shooter fatigue.

Let the Barrel Cool

Some rifles shift point of impact as the barrel heats. If groups start walking, slow down and let the barrel cool before making major adjustments.

Adjust the Scope

Most scopes adjust in MOA or MIL clicks. Read your scope manual. A common hunting scope may adjust 1/4 MOA per click, which is roughly 1/4 inch at 100 yards. Do not assume; check the turret markings.

Adjust From Group Center

Measure how far the group center is from the desired point of impact. Adjust windage and elevation in the direction indicated by the turret. Then shoot another group to confirm.

Do Not Overcorrect

Make a calculated adjustment and test it. If the next group moves unexpectedly, check your math and shooting setup before spinning the turrets again.

Confirm the Zero

When the group center matches your chosen point of impact, shoot a final confirmation group. If this is a hunting rifle, confirm with the exact hunting load you plan to carry.

Record the Setup

Write down the rifle, ammunition, bullet weight, zero distance, temperature, scope setting, and date. This helps you notice changes later.

Check Again After Travel

Reconfirm zero after hard travel, a drop, scope work, mount work, or a major ammunition change. A rifle that was zeroed last season should still be checked before an important hunt.

Common Mistakes

  • Chasing single shots instead of group center.
  • Zeroing with one ammunition load and hunting with another.
  • Ignoring loose mounts or poor rest stability.
  • Shooting too fast and heating the barrel.
  • Forgetting to tighten turret caps or reset the turret reference.
  • Assuming a 100-yard zero proves long-range readiness.

Troubleshooting a Wandering Zero

If the point of impact keeps moving, pause before blaming the scope. Check the simple things first: loose rings, loose bases, inconsistent shoulder pressure, unstable rear support, a hot barrel, mixed ammunition, or changing wind. A zeroing session can go sideways quickly when two or three small problems stack together.

When To Stop Adjusting

If groups are not consistent, stop adjusting turrets and diagnose the setup. A scope adjustment only helps when the rifle is grouping predictably. When the group itself is scattered, the better fix is stability, ammunition consistency, mount inspection, or shooter rest.

When To Ask for Help

If the rifle will not hold zero after careful checks, ask a qualified gunsmith, range officer, or experienced instructor to inspect the mount and optic. Continuing to fire without understanding the problem wastes ammunition and can build bad confidence.

Field Notes After Zeroing

After zeroing, learn your holdover or turret data at other distances only on a safe range. Wind, angle, animal movement, and shooting position all matter. For outdoor wind awareness, the National Weather Service wind safety resources are a useful reminder that conditions can change quickly.

Set a Practical Limit

Your ethical range is the distance where you can repeat clean hits from realistic field positions. A benchrest zero is a baseline, not a reason to stretch past what you have proven.

FAQ

How many shots does it take to zero a scope?

It depends on how close the rifle starts and how well it groups. Careful shooters often need several groups. Do not rush; clean confirmation matters more than saving a few rounds.

Should I zero at 25 yards first?

Starting at 25 yards can help get on paper, especially with a newly mounted scope. It is not a substitute for confirming at 100 yards.

Can I zero with different ammo?

You can test different ammunition, but your final zero should match the ammunition you plan to use. Different bullet weights and loads can hit in different places.

Why does my zero keep moving?

Common causes include loose mounts, inconsistent shooting support, barrel heat, ammunition changes, poor scope tracking, or shooter fatigue. Diagnose before making endless turret adjustments.

Final Takeaway

A good 100-yard zero is built from safe range setup, careful groups, measured adjustments, and final confirmation with the right ammunition. Take your time, record your data, and treat zeroing as the start of responsible shooting, not the end of practice.

How to Reduce Recoil for Better Accuracy

Reducing recoil for better accuracy starts with fit, stance, grip, trigger control, and realistic practice. Gear can help, but it cannot replace safe fundamentals. The goal is to manage recoil consistently so the sights lift predictably, return naturally, and your shots stay repeatable.

Table of Contents
  1. Quick Answer
  2. Safety First
  3. Fit and Setup
  4. Stance, Grip, and Body Position
  5. Trigger Control and Follow-Through
  6. Ammunition and Load Choice
  7. Recoil-Reducing Gear
  8. Diagnose Recoil Anticipation
  9. Practice Plan
  10. Common Mistakes
  11. FAQ

Quick Answer

To reduce recoil for better accuracy, use a firearm that fits, keep a stable stance, hold consistent grip pressure, press the trigger smoothly, and practice with ammunition you can control. If recoil causes flinching, step down to a lower-recoil setup for training before returning to heavier loads.

Most Important Fix

The biggest improvement usually comes from consistency. A repeatable grip, shoulder position, cheek weld, and trigger press will do more for accuracy than chasing every accessory.

When Gear Helps

Recoil pads, proper stock fit, muzzle devices where legal, heavier firearms, and appropriate ammunition can help. They work best after the shooter already has safe fundamentals.

Safety First

Before working on recoil control, review the NSSF firearm safety rules. Keep the muzzle pointed in a safe direction, keep your finger off the trigger until ready to shoot, know your target and what is beyond it, and follow range commands.

Use the Right Ammunition

Only use ammunition that matches the firearm markings and manual. For safety context, SAAMI explains why unsafe firearm and ammunition combinations must be avoided.

Stop When Fatigue Shows Up

Recoil fatigue can create bad habits. If you start flinching, pushing the muzzle, blinking hard, or losing safe control, pause the session. More rounds are not always better practice.

Fit and Setup

Fit is one of the most overlooked recoil factors. A rifle or shotgun that is too long, too short, too light, or poorly shaped can make recoil feel sharper and make accurate shooting harder.

Rifle and Shotgun Fit

Length of pull, comb height, recoil pad shape, and cheek weld all matter. The firearm should mount naturally without stretching your neck, lifting your head, or placing the butt awkwardly on the shoulder.

Handgun Fit

For handguns, grip size and trigger reach affect recoil control. If the grip is too large or too small, the shooter may steer the gun during the trigger press or lose control during recoil.

Stance, Grip, and Body Position

Good recoil control uses the whole body. The firearm should recoil into a stable structure, not into loose joints or a collapsing position.

Rifle Position

Keep the butt seated firmly in the shoulder pocket, maintain a consistent cheek weld, and support the rifle so it tracks straight back. Avoid leaning away from recoil.

Handgun Position

Use a balanced stance, firm support-hand pressure, and locked-in wrist alignment. The goal is not to freeze the gun in place, but to let it recoil and return consistently.

Trigger Control and Follow-Through

Recoil anticipation often hurts accuracy before recoil actually happens. A clean trigger press and good follow-through help you avoid pushing, jerking, or dipping the muzzle before the shot breaks.

Watch the Sights

Watch what the sights do during and after the shot. If they dip before recoil, the issue is anticipation. If they lift and return predictably, your recoil management is improving.

Do Not Rush the Next Shot

Accuracy comes from seeing the sights return and confirming the next shot. Speed should come after control, not before it.

Ammunition and Load Choice

Ammunition changes recoil. Bullet weight, velocity, powder charge, firearm weight, and stock design all affect how recoil feels. For practice, a manageable load can help you build skill without developing a flinch.

Training Loads

Lower-recoil training ammunition, rimfire practice, or reduced-power options can help when used safely and legally. Confirm point of impact again before switching back to hunting or defensive loads.

Hunting Loads

For hunting, choose ammunition that is legal, accurate, and appropriate for the animal. Do not choose the hardest-kicking load if it makes you flinch or shoot poorly.

Recoil-Reducing Gear

Gear can reduce felt recoil, but every option has tradeoffs. A recoil pad may help comfort. A heavier firearm may move less but carry worse. A muzzle brake may reduce recoil but increase blast and noise. Use proper eye and ear protection, and follow range rules.

Recoil Pads and Stock Fit

A good recoil pad can spread force and improve comfort. Stock fit can be even more important because poor fit sends recoil into the shooter awkwardly.

Muzzle Brakes and Suppressors

Muzzle devices may be regulated and can change noise, blast, length, and handling. Verify local rules and range policies before using them.

Diagnose Recoil Anticipation

Recoil problems often start before the shot. If the shooter expects pain, noise, or blast, the body may tighten, blink, dip the muzzle, or pull the shot off target. The fix is to make practice observable. Watch the sights, slow the pace, and use a setup that lets you see what happens instead of simply enduring more recoil. Treat each session as skill-building, not punishment.

Use Short Strings

Short practice strings help you stay honest. Fire a few careful shots, pause, and check whether the sights are lifting and returning predictably. If accuracy gets worse as the session continues, fatigue or anticipation may be taking over. Record what changed between good and bad groups so the next session has a clear focus.

Separate Noise From Push

Some shooters react more to blast than recoil. Better hearing protection, outdoor practice where appropriate, or lower-blast setups can help the shooter focus on sight movement and trigger control. Keep proper hearing protection on every time you shoot.

Practice Plan

  • Start with safe handling and a firearm you can control.
  • Use short practice strings instead of long fatigue-heavy sessions.
  • Mix dry practice with live fire where appropriate and safe.
  • Use manageable ammunition while building fundamentals.
  • Watch the sights during recoil and recovery.
  • Stop when flinching or fatigue begins to take over.

Common Mistakes

  • Buying recoil gear before fixing fit and fundamentals.
  • Practicing with ammunition that causes flinch.
  • Leaning away from the firearm.
  • Changing grip pressure at the moment of firing.
  • Shooting too many rounds after fatigue starts.
  • Ignoring noise and blast as part of recoil sensitivity.

FAQ

Does heavier firearm weight reduce recoil?

Usually, yes. A heavier firearm often has less felt recoil, but it may be harder to carry or hold steady for some shooters.

Can a muzzle brake improve accuracy?

It can help some shooters by reducing recoil, but it also increases blast and may not be allowed everywhere. Accuracy still depends on fundamentals, ammunition, and firearm setup.

Why do I flinch before recoil?

Flinching usually comes from anticipating noise, blast, or recoil. It can happen before the firearm moves. Lower-recoil practice, dry practice, and instructor feedback can help.

Should beginners start with smaller calibers?

Often, yes. A manageable caliber helps beginners learn sight picture, trigger control, and follow-through without building recoil anxiety.

Final Takeaway

Recoil control is a system: fit, stance, grip, trigger control, ammunition, gear, and practice all work together. Start with safety and consistency, then use gear and load choices to support the fundamentals you can already repeat.

How to Choose Binoculars for Deer Hunting: A Comprehensive Guide

The best binoculars for deer hunting are the ones that match your terrain, your light conditions, and how long you carry them, not the ones with the highest magnification number on the box. For most whitetail hunters, an 8×42 or 10×42 pair balances brightness, steadiness, and weight well enough to glass from before dawn until last light. No single magnification is correct for every hunter, and no binocular removes your legal and ethical duty to positively identify your target before you ever consider a shot.

This guide walks through the specifications that actually change what you see in the field: magnification, objective lens size, glass and coatings, exit pupil and low light performance, field of view, weight, and durability. It also covers the ethics of using optics responsibly.

Table of contents

Magnification: what 8x and 10x really mean

Magnification is the first number in a binocular spec such as 8×42, and it tells you how many times closer an object appears compared to your naked eye. An 8×42 makes a deer at 200 yards look about as large as it would at 25 yards. Higher magnification shows more detail, but it also narrows your view, amplifies hand shake, and can make a dim image look dimmer.

8x for timber and close cover

An 8x binocular gives a wider field of view and a steadier image when you glass freehand. In thick timber, river bottoms, and tree stands where most shots are under 150 yards, 8x usually lets you find and follow moving deer faster than a higher power. The steadier picture also reduces eye fatigue during long sits.

10x for open country and long glassing

A 10x binocular resolves more detail at distance, which helps when you are picking apart far hillsides, agricultural fields, or open western terrain to judge antlers or confirm what you are looking at. The tradeoff is a tighter field of view and more visible shake. If you spend long sessions on 10x, a tripod adapter steadies the image and reduces fatigue.

There is no single best magnification. Match the power to where you hunt most. If you split time between thick cover and open ground, 8x is the more forgiving all-around choice for handheld use.

Objective lens size and brightness

The second number in a spec such as 8×42 is the objective lens diameter in millimeters. The objective lens gathers light, so a larger objective can deliver a brighter image, which matters at the low light edges of the day when deer move most. The cost is added size and weight.

  • 42mm: The common all-around choice for deer hunting. Good low light performance with manageable weight.
  • 50mm or 56mm: Brighter at dusk and dawn, but noticeably heavier and bulkier, often paired with a tripod.
  • 32mm or smaller: Light and compact for active hunters who cover ground, with less low light reach.

Objective size alone does not decide brightness. Glass quality and lens coatings matter just as much, which is why a well coated 42mm can outperform a cheap 50mm at the same price point.

Exit pupil and low light performance

Exit pupil is the width of the beam of light that reaches your eye, and it predicts how bright a binocular looks in dim conditions. You find it by dividing the objective size by the magnification. An 8×42 has a 5.25mm exit pupil, while a 10×42 has 4.2mm.

In bright daylight your eye pupil is small, so a small exit pupil is fine. As light fades, your pupil dilates, and a larger exit pupil keeps the view bright and easy to hold on target. For the first and last legal shooting minutes when deer are active, an exit pupil around 5mm or larger is a practical target. This is one reason 8×42 is so popular for low light hunting.

Glass quality, coatings, and prism type

Glass quality is where binoculars at different price points separate the most. Two pairs with identical 8×42 specs can look very different because of the glass, the coatings, and the prism design inside.

Lens coatings

Coatings reduce reflection and increase light transmission. Look for the term fully multi coated, which means every air to glass surface has multiple coating layers. Lesser binoculars may only be coated or multi coated on some surfaces, which lowers brightness and contrast.

ED or HD glass

Extra low dispersion glass, often labeled ED or HD, reduces color fringing around high contrast edges, such as a dark antler against a bright sky. The result is sharper, more accurate detail, which helps when you are trying to confirm exactly what an animal is.

Roof versus porro prism

Most modern hunting binoculars use roof prisms, which allow a slim, straight barrel design that packs and carries well. Porro prisms can give strong depth perception and value but are bulkier. For deer hunting, a quality roof prism pair is the typical choice. You can read a neutral overview of prism designs on Wikipedia’s binoculars article.

Field of view and eye relief

Field of view is how wide an area you can see, usually stated in feet at 1,000 yards. A wider field helps you pick up movement and follow walking deer, which favors lower magnification. As you increase power, field of view typically shrinks.

Eye relief is the distance you can hold the binocular from your eye and still see the full image. If you wear glasses, look for longer eye relief, often listed around 15mm or more, and twist down eyecups so you can use the full field of view with your glasses on.

Weight, size, and how you carry them

Weight is easy to ignore in a store and impossible to ignore on a long hunt. A heavy pair pulls on your neck, bounces while you walk, and gets left in the pack when you need it most. Think about how you hunt before you choose size.

  • Treestand or blind hunting: You can carry a heavier, brighter pair because you are not covering ground.
  • Spot and stalk or long hikes: A lighter pair, or a 32mm, may serve you better even with slightly less low light reach.
  • Carry method: A binocular harness distributes weight across your shoulders, keeps the optics secure, and protects them better than a neck strap.

Durability and weather sealing

Hunting binoculars take rain, frost, drops, and temperature swings. Look for waterproof and fog proof construction. Waterproofing comes from sealed housings with O rings, and fog proofing comes from purging the interior with a dry gas such as nitrogen or argon so the inside lenses do not fog when you move between cold and warm air. A rubber armored body adds grip and shock resistance.

A strong, transferable warranty is a sign the maker stands behind the build. Many quality optics brands repair or replace damaged binoculars regardless of how the damage happened, which can matter more over years of hard use than a small spec difference.

Optics and ethical target identification

Binoculars help you hunt ethically, but they do not replace your responsibility to follow safe firearm and hunting practices. The most basic rule of hunter safety is to positively identify your target and what is beyond it before you ever raise a firearm. Good optics make that identification easier in poor light, but the duty is yours, not the equipment’s.

Use binoculars, not your rifle scope, to scan and study animals. Glassing with a scope means pointing a firearm at things you have not identified, which violates basic muzzle discipline. The National Shooting Sports Foundation firearm safety rules and the hunter education materials at Hunter-Ed both stress target identification and safe muzzle handling. For legal shooting hours, identification requirements, and what counts as a legal animal in your area, follow your state wildlife agency. This article is general information, not legal advice.

Quick buying checklist

  • Pick magnification by terrain: 8x for cover and handheld use, 10x for open country and tripod glassing.
  • Choose 42mm objectives for the best all-around balance of brightness and weight.
  • Aim for an exit pupil near 5mm or larger for low light hunting.
  • Prioritize fully multi coated lenses and ED or HD glass within your budget.
  • Confirm waterproof and fog proof construction.
  • Check eye relief if you wear glasses.
  • Match weight and size to how far you walk and where you sit.
  • Plan to carry them in a harness for comfort and protection.

Frequently asked questions

Is 8x or 10x better for deer hunting?

Neither is universally better. 8x gives a wider, steadier view that suits timber and handheld use, while 10x resolves more distant detail for open country. If you hunt mixed terrain by hand, 8x is the more forgiving choice.

What objective lens size is best for low light?

A 42mm objective offers a strong balance of brightness and weight for most hunters. Larger 50mm or 56mm lenses gather more light at dusk and dawn but add bulk, and they often pair best with a tripod.

Do expensive binoculars actually help in the field?

Higher quality glass and coatings usually produce brighter, sharper images in the low light minutes when deer move and identification is hardest. Whether that gain is worth the price depends on your budget and how often you hunt those conditions.

Can I just glass with my rifle scope instead?

No. Scanning with a rifle scope points a firearm at things you have not identified, which breaks basic muzzle safety. Use binoculars to find and study animals, and only bring up the firearm once you have positively identified a legal target.

Final takeaway

Choose deer hunting binoculars by working from your terrain and light conditions back to the specs. For most hunters, an 8×42 with fully multi coated, quality glass and waterproof, fog proof construction covers nearly every situation while staying light enough to carry all day. Step up to 10x or larger objectives only when open country or long glassing sessions justify the tradeoffs. Whatever you choose, the optics are a tool to help you identify your target safely and legally, never a substitute for that responsibility.

How to Mount a Rifle Scope Step by Step


Mounting a rifle scope means securing the optic to the rifle in a way that is level, holds zero, and gives you proper eye relief, and the first step every single time is to confirm the firearm is unloaded. The basic process is to clear and secure the rifle, attach a base and rings, set the scope for eye relief and level, then tighten the rings to the manufacturer’s published torque value. This article is a safe overview and checklist, not a model-specific manual. When you are unsure, a qualified gunsmith is the right call.

Mounting a scope correctly affects how comfortable the rifle is to shoot and how reliably it returns to point of aim, but no mounting procedure guarantees accuracy on its own. Ammunition, the rifle, and the shooter all matter.

Table of contents

Step 1: Clear and secure the firearm first

Before you touch a tool, confirm the firearm is unloaded. Point the muzzle in a safe direction, remove the magazine if there is one, open the action, and visually and physically check the chamber to confirm it is empty. Keep your finger off the trigger throughout. These are core firearm safety rules, and you can review them through the National Shooting Sports Foundation.

Once the firearm is confirmed clear, secure it in a stable rifle vise or cradle so it cannot shift while you work. A wobbling rifle makes leveling impossible and invites tools to slip.

Step 2: Gather tools and read the manuals

Gather the right tools before you start so you are not improvising mid job. A typical setup includes the correct screwdriver or hex bits, a torque wrench or torque driver, two small bubble levels, and the cleaning supplies to degrease screws and threads.

  • Scope rings and a base or rail matched to your rifle and scope tube diameter
  • A torque wrench that covers the small in pound values used for optics screws
  • Two bubble levels, or a level and a reference flat
  • Thread locker only if the ring or base maker specifies it
  • The printed or downloaded instructions for your scope, rings, and base

Read the instructions for each component. Ring makers, base makers, and scope makers each publish their own guidance, and those documents are the authority for screw torque, thread locker use, and ring lapping. Do not rely on a single universal number you read somewhere.

Step 3: Install the base and lower rings

Clean the receiver’s mounting holes and the base screws so threads are free of oil unless the maker says otherwise. Attach the base or one piece rail to the receiver and tighten the base screws to the value listed by the base manufacturer. Then set the lower halves of the rings in place.

If your ring instructions call for lapping or a specific seating procedure, follow them. Some ring systems require it for proper contact, and others are designed not to be lapped. The maker’s document decides.

Step 4: Level the rifle and the base

A level rifle is the reference for everything that follows. Place a bubble level on a flat reference surface on the rifle, such as the scope base rail or the action, and adjust the rifle in the vise until that surface reads level. Lock the rifle in place once it is true.

Getting the rifle level first means that when you later level the scope reticle, the reticle will be square to the rifle and to gravity. A canted reticle introduces aiming errors at distance, so this step is worth doing carefully.

Step 5: Set eye relief and level the reticle

Set the scope into the rings without final tightening so it can still slide and rotate. Get into your normal shooting position with the rifle in the vise and slide the scope forward or back until you see a full, clear image with no dark edge ring. This is your eye relief. Proper eye relief is also a safety point, since it keeps the scope from striking your brow under recoil.

With eye relief set, level the reticle. Use a second small level on a flat part of the scope’s turret cap or compare the vertical crosshair to a plumb line, and rotate the scope until the reticle is square to the already level rifle. Recheck eye relief after leveling, since adjustments can shift it slightly.

Step 6: Tighten ring caps to the manufacturer torque spec

Tighten the ring cap screws gradually in a cross pattern, alternating between screws so the cap seats evenly and the gaps on each side stay equal. Bring the screws up in stages rather than fully tightening one at a time.

Use the torque value published by your ring manufacturer for the cap screws, and the value published by your base manufacturer for the base screws. These numbers vary by product, and there is no single correct universal torque for all rings and bases. Over tightening can dent or distort a scope tube, and under tightening lets the scope shift under recoil. A calibrated torque wrench set to the maker’s specification is the way to get this right.

Step 7: Verify and bore sight before live fire

After everything is torqued, confirm the reticle is still level and eye relief is still correct. Check that the scope does not rotate or slide by hand. Many shooters then bore sight the rifle to get the reticle roughly aligned with the bore, which saves ammunition when you sight in at the range.

Final sighting in must happen at the range with the firearm loaded only when you are ready to shoot safely. Follow all range safety rules, use eye and ear protection, confirm a safe backstop, and use only ammunition that matches the firearm. For ammunition compatibility context before any live-fire session, review SAAMI’s guidance on unsafe firearm and ammunition combinations. Bore sighting only gets you on paper. It does not replace live fire to establish a true zero, and a clean mount does not by itself guarantee a tight group.

When to use a gunsmith

Use a qualified gunsmith whenever you are unsure. Mounting looks simple, but stripped receiver threads, the wrong base, a canted reticle, or over torqued rings can damage equipment or cost you accuracy. Specific cases where professional help makes sense include rifles that need drilling and tapping, receivers with damaged threads, unfamiliar or expensive optics, and any situation where you do not have the correct torque tools.

There is no shame in paying a professional. A correct mount done once is cheaper than a damaged scope or a season of unexplained misses.

Scope mounting checklist

  • Confirm the firearm is unloaded and the chamber is empty.
  • Secure the rifle in a stable vise or cradle.
  • Gather correct bits, a torque wrench, and two levels.
  • Read the scope, ring, and base instructions.
  • Install and torque the base to the base maker’s spec.
  • Level the rifle using a flat reference surface.
  • Set eye relief in your shooting position.
  • Level the reticle square to the level rifle.
  • Tighten ring caps in a cross pattern to the ring maker’s spec.
  • Verify level, eye relief, and security, then bore sight.
  • Establish a true zero at the range under full safety rules.

Frequently asked questions

How tight should rifle scope rings be?

Tighten ring and base screws to the torque value published by that component’s manufacturer, using a calibrated torque wrench. There is no single universal number that applies to all rings and bases, so always follow the maker’s specification rather than a remembered figure.

Do I need thread locker on scope screws?

Only if the ring or base manufacturer calls for it. Some systems specify a thread locker and others do not, so follow the component instructions rather than applying it by default.

Why is leveling the reticle important?

A canted reticle causes your point of impact to drift left or right as distance increases, even when your hold looks correct. Leveling the reticle square to a level rifle keeps your adjustments true at longer ranges.

Can I mount a scope without a torque wrench?

It is not recommended. Guessing at torque risks denting the scope tube if you go too tight or losing zero if you go too loose. A torque wrench that covers small in pound values is the reliable way to match the manufacturer spec.

Final takeaway

Mounting a rifle scope is a methodical job that rewards patience. Clear the firearm first, level the rifle, set eye relief, level the reticle, and torque every screw to the value the manufacturer publishes for that exact component. Use the right tools, read every instruction sheet, and hand the job to a qualified gunsmith whenever you are uncertain. A careful mount sets you up for a comfortable, repeatable rifle, but remember that final accuracy still comes down to live fire sighting in at the range.

How To Choose Arrow Spine: Use Manufacturer Charts for Your Bow Setup

The reliable way to choose arrow spine is to use the current selector or chart from the arrow manufacturer whose arrows you are buying, matched to your specific bow setup. Spine describes how much an arrow shaft flexes, and the right value depends on draw weight, draw length, arrow length, point weight, bow type, bow setup, and release style.

This is not a universal spine chart. Any specific spine number should come from a named manufacturer chart for the exact arrow family, with your real inputs entered. If you are unsure, a qualified archery shop can measure your setup and confirm the fit.

Table of Contents
  1. Quick Answer: Use the Manufacturer Chart
  2. What Arrow Spine Means
  3. Inputs That Affect Arrow Spine
  4. Why Manufacturer Charts Matter
  5. Beginner Arrow Spine Workflow
  6. Common Arrow Spine Mistakes
  7. Related Bow Setup Guides
  8. Frequently Asked Questions

Quick Answer: Use the Manufacturer Chart

To choose arrow spine, gather your bow’s draw weight, draw length, planned arrow length, and point weight. Then enter those details into the current selector or chart for the exact arrow brand and product family you plan to buy. Use that manufacturer’s recommendation instead of mixing values between brands.

Arrow spine depends on your complete bow setup, so start with the right manufacturer chart and the right inputs.

What Arrow Spine Means

Arrow spine describes shaft stiffness. When a bow is shot, the arrow flexes as it leaves the string and then recovers in flight. The goal is not to find a random stiffness number; it is to match the shaft to the bow and arrow setup so the arrow behaves predictably.

Static Spine

Static spine is the measured stiffness rating for the shaft. It is the number printed on many arrows and used in manufacturer charts. Static spine is useful because it gives you a starting rating, but it is not the whole story.

Dynamic Spine

Dynamic spine is how the arrow behaves when actually shot. It changes with arrow length, point weight, draw weight, bow setup, and release style. Two arrows with the same printed spine can behave differently if one is longer, uses a heavier point, or is shot from a different bow.

Inputs That Affect Arrow Spine

Manufacturer charts ask for several inputs because spine selection is setup-dependent. Changing one input can shift the recommended spine, which is why simple shortcuts often fail.

InputWhy it matters
Draw weightMore weight generally needs a stiffer match, but not by itself
Draw lengthAffects the arrow length and energy in the setup
Arrow lengthLonger arrows generally behave weaker dynamically
Point weightHeavier points generally make the arrow behave weaker
Bow type and releaseCompound, recurve, finger release, and mechanical release paths may differ
Arrow modelCharts are brand and product-family specific

Draw Weight and Draw Length

Draw weight is the starting point, but draw length helps determine the arrow length you can safely and practically shoot. A change in draw weight can mean your old arrow setup should be checked again.

Arrow Length and Point Weight

Arrow length and point weight are common reasons two similar bows end up with different recommendations. A longer arrow or heavier point can make the arrow act dynamically weaker, so those details must be entered into the selector instead of guessed.

Why Manufacturer Charts Matter

Manufacturer charts matter because each brand uses its own product lines, spine systems, and selection workflow. A value from one brand’s chart does not automatically transfer to another brand’s arrows. Use the chart for the exact arrows you plan to buy.

For example, Easton provides an arrow selector, and Gold Tip provides a spine selector. Use the Easton workflow for Easton arrows and the Gold Tip workflow for Gold Tip arrows. Do not blend the results into a single homemade chart.

For broader archery participation and safety context, USA Archery is a useful reference. For the actual spine number, though, the arrow maker’s chart and your measured setup are the sources that matter.

Beginner Arrow Spine Workflow

  1. Choose the arrow brand and product family first.
  2. Measure or confirm your draw weight and draw length.
  3. Decide the planned arrow length and point weight.
  4. Open the current manufacturer selector or chart for that arrow family.
  5. Enter the inputs exactly as the selector asks for them.
  6. Use that chart’s recommended spine, then have a shop confirm if anything is unclear.

If your draw weight changes later, repeat the workflow. If you cut arrows shorter, change point weight, or move from field points to a different hunting or target setup, recheck the chart instead of assuming the old recommendation still fits.

Keep your measurements written down with the arrows you buy. A simple note with draw weight, draw length, arrow cut length, point weight, insert weight if known, and the chart used can save confusion later. If your groups suddenly open up after a setup change, those notes help you and a shop see whether the arrow match should be checked again before chasing rest or sight adjustments.

Also separate target and hunting setups when the components differ. A practice arrow with one point weight and a hunting arrow with a different front-end setup may not behave the same. That does not mean one is wrong; it means each setup should be checked through the correct manufacturer workflow.

Common Arrow Spine Mistakes

  • Using a generic “this draw weight equals this spine” shortcut.
  • Mixing chart values between manufacturers.
  • Ignoring arrow length or point weight.
  • Copying another archer’s setup without matching your measurements.
  • Trying to tune around a mismatched arrow instead of fixing the match first.

Arrow spine connects directly to bow setup and tuning. Read bow tuning for beginners, review common compound bow mistakes, check archery safety rules, and keep your gear maintained with our bow maintenance tips.

Frequently Asked Questions

How do I choose the right arrow spine for my bow?

Use the current selector or chart from the manufacturer of the arrows you are buying. Enter your draw weight, draw length, planned arrow length, and point weight, then use the recommendation for that exact arrow family.

Does draw weight alone determine arrow spine?

No. Draw weight is important, but arrow length, point weight, bow setup, bow type, and release style can also affect the recommendation.

Can I use one spine chart for any arrow brand?

No. Use the chart for the exact brand and product family you plan to buy. Manufacturer systems are not interchangeable.

What is the difference between static and dynamic spine?

Static spine is the measured shaft stiffness rating. Dynamic spine is how the arrow behaves when shot from your actual setup, which can change with length, point weight, draw weight, and release style.

Should I ask a pro shop before buying arrows?

Yes, if you are unsure about any input. A shop can measure draw weight, draw length, arrow length, point weight, and bow setup so the chart recommendation starts from accurate information.

Final Recommendation

Choose arrow spine by working through the current manufacturer chart for the exact arrows you plan to buy. Use your real setup inputs, keep each brand’s values separate, and ask a qualified shop when measurements are unclear. That workflow gives you a setup-based recommendation instead of a guess.

Tracking Animals: How to Read Tracks, Scat, Rubs, and Trails


Tracking animals means reading the marks they leave behind, including tracks, scat, rubs, scrapes, beds, feeding sign, and worn trails, to understand which animals use an area, where they travel, and when. Good tracking is woodsmanship, not a guarantee. Reading sign well puts you in better places at better times and helps you recover an animal after a shot, but no skill removes the uncertainty of hunting wild animals. Before you act on any of it, confirm seasons, legal species, and methods with your state wildlife agency.

This guide explains how to read the most common sign, how to judge how fresh it is, how to connect the clues into a picture of animal movement, and how to track ethically after a shot. The fieldcraft applies broadly, but the rules that decide what you may legally do are set by your wildlife agency. Hunter education programs like Hunter-Ed and IHEA-USA are good places to build the foundation.

Table of contents

Why reading sign matters

Reading sign turns a stretch of woods from a blank into a map of animal activity. Tracks and trails show travel routes, feeding sign shows where animals eat, and bedding sign shows where they rest. Put together, these clues tell you where to set up and when an area is likely to be active.

It is honest to say what tracking is not. It is not a guarantee of a harvest, and it does not let you predict exactly where an animal will be. Wild animals shift with weather, food, pressure, and the breeding season. Tracking improves your odds and your understanding, and it is essential for recovering an animal after a shot, but it rewards patience and observation over certainty.

Reading tracks

A track is the clearest sign of which animal passed and which way it went. Start with the basic shape, then look at size, spacing, and direction.

What to look for in a track

  • Shape: Cloven, two-part hoof prints point to deer and similar animals, while paw prints with or without claw marks point to predators or other mammals.
  • Size: Larger tracks generally mean larger or older animals, though ground softness affects how big a print looks.
  • Direction and stride: The pointed end and the spacing between prints show direction and whether the animal was walking or moving fast.
  • Depth: Deeper prints suggest a heavier animal or softer ground, and toes splayed wide can suggest speed or a steep slope.

Soft surfaces such as mud, wet sand, and snow hold the best detail. Field guides and resources from state wildlife agencies and references like National Park Service wildlife pages can help you learn the track shapes of local species. The more tracks you study in person, the faster you read them.

Reading scat and feeding sign

Scat, or droppings, tells you what animals are present and roughly how recently. Shape, size, and content vary by species and by what the animal has been eating, so scat helps confirm both the animal and the food source nearby.

Feeding sign is just as useful. Browsed plant tips, stripped bark, dug-up ground, cracked nuts, and trampled crop edges all show where and what animals eat. When feeding sign, fresh scat, and tracks all cluster in one spot, you have found an active food source, which is one of the most reliable places to focus. Fresh, moist scat indicates recent use, while old, dry, or weathered scat means the activity may have shifted.

Rubs, scrapes, and territorial sign

Some sign is made deliberately by animals marking territory or communicating, and it is especially useful during the breeding season. For deer, rubs and scrapes are the classic examples.

A rub is a spot where a buck has rubbed bark off a tree or sapling with its antlers, leaving a scarred, exposed patch. A scrape is a cleared area of ground, often under an overhanging branch, that a buck paws and scent-marks. A line of fresh rubs can show a travel route and direction, and active scrapes can indicate a buck working an area during the rut. Treat this sign as evidence of recent activity and travel, not as a promise that the animal will return on schedule.

Trails, beds, and bedding areas

Animals that use an area repeatedly wear trails between food, water, and bedding. A well-worn trail with packed dirt, matted vegetation, and overlapping tracks is a travel corridor worth understanding.

Beds are flattened, oval areas in grass, leaves, or snow where an animal has rested, often in thick cover, on benches, or in spots with a view and an escape route. Knowing where animals bed and how they travel to feed helps you set up along the route rather than crowding the bedding area, which tends to push animals out. The general principle is to position yourself on travel between bedding and feeding, with the wind in your favor.

Judging how fresh sign is

Sign only helps if you can estimate how old it is, because fresh sign means recent activity. A few cues help you judge age, though weather changes them.

  • Edges of tracks: Sharp, crisp edges suggest fresh prints, while crumbled, rounded, or rain-pocked edges suggest older ones.
  • Moisture and color: Fresh scat is often moist and dark, while old scat dries, fades, and hardens.
  • Rubs and cuts: A bright, light-colored rub or a green, freshly browsed plant tip is recent, while gray, weathered wood and browned tips are older.
  • Weather context: A track on top of fresh snow, after recent rain, or over your own earlier prints tells you it was made very recently.

Use the weather as a clock. If you know when it last rained or snowed, sign made after that event is fresh. Comparing sign to your own tracks or to known recent disturbances is one of the most reliable freshness checks.

Putting the clues together

No single sign tells the whole story. The skill is connecting tracks, scat, feeding sign, rubs and scrapes, trails, and beds into a picture of how animals use the area through the day.

A useful mental model is a daily loop: animals bed in cover, travel established trails to feed, and return. When you find a fresh trail linking a bedding area to an active food source, with the freshest sign concentrated along it, you have found a high-percentage area. Set up downwind of the travel route, keep your intrusion low so you do not pressure the animals, and let observation over several trips sharpen the picture. Trail observation over time usually beats a single walk-through.

Ethical tracking and recovery after a shot

Tracking is most important after a shot. Recovering an animal you have hit is an ethical responsibility, and patient, careful tracking is how you meet it.

  • Mark where the animal stood and where it was last seen before you move.
  • Wait an appropriate time before following so a hit animal can settle, rather than pushing it farther.
  • Follow the trail slowly and carefully, marking your progress so you can return to the last confirmed point if the trail thins.
  • Read the ground and vegetation patiently and work in good light when possible.
  • If the trail gives out, grid-search the likely direction and ask for help rather than giving up early.

The ethical standard is simple: make a clean, well-placed shot within your proven range, then make every reasonable effort to recover the animal. Knowing your local recovery and trespass rules matters too, since following an animal onto neighboring land may require permission. Confirm those rules with your wildlife agency and landowners.

Reading sign is a skill, but when and how you may hunt is set by law. Seasons, legal species, allowed methods, tagging, and land access rules vary by state and change from year to year.

Confirm the current rules with your state wildlife agency before you hunt, including season dates, licenses and tags, legal methods, and any recovery or trespass rules. Federal resources such as the U.S. Fish and Wildlife Service can point you to the right agency, and Hunter-Ed covers regulation basics. This article is general information, not legal advice.

Frequently asked questions

How can I tell how old a track is?

Look at the edges and the weather. Sharp, crisp track edges suggest fresh prints, while crumbled or rain-pocked edges suggest older ones. Comparing sign to the last rain or snowfall, or to your own tracks, is the most reliable way to judge freshness.

What is the difference between a rub and a scrape?

A rub is bark scarred off a tree by a buck’s antlers, leaving an exposed patch. A scrape is a pawed, scent-marked spot of cleared ground, often under an overhanging branch. Both are deer sign that signals recent activity, especially during the rut.

Does good tracking guarantee a successful hunt?

No. Tracking improves your odds by putting you in active areas at better times, but wild animals respond to weather, food, pressure, and the breeding season. It is a skill that raises your chances and is essential for recovery, not a guarantee.

How long should I wait before tracking an animal I shot?

It depends on the shot and the animal, so there is no single number. The general principle is to mark the spot, wait an appropriate time so a hit animal can settle rather than be pushed, then follow slowly and carefully. Learn recovery practices through hunter education and experienced mentors.

Final takeaway

Tracking animals is reading the story the ground tells: tracks and trails for travel, scat and feeding sign for food, rubs and scrapes for territory, and beds for rest, all weighed against how fresh the sign is. Connect those clues into a picture of daily movement, set up along travel routes with the wind in your favor, and treat recovery after a shot as a duty, not an option. Tracking sharpens your woodsmanship and your odds, but it is not a guarantee. Confirm seasons, methods, and land rules with your state wildlife agency before every season.

Broadhead Comparison: Fixed vs. Mechanical for Big Game


Fixed broadheads use blades that stay rigid in flight, prizing reliability and deep penetration, while mechanical broadheads deploy blades on impact for a larger cutting diameter and easier tuning. For big game, the right choice depends on your draw weight and arrow energy, the size of the animal, how well your bow is tuned, and the broadhead rules in your hunting area. Neither type guarantees a clean recovery. Your shot placement and your tuning matter more than the marketing on the package.

This comparison walks through reliability, cutting diameter, tuning demands, how each type fits different animals, and the regulations and ethics that should anchor the decision. Always confirm broadhead legality with your state wildlife agency before you hunt.

Table of contents

How fixed and mechanical broadheads work

A broadhead is the cutting tip you screw onto a hunting arrow. The two main designs differ in how their blades are arranged in flight.

Fixed blade broadheads

Fixed blade broadheads have rigid blades that are part of, or locked into, the head and do not move. Because nothing has to open on impact, there are fewer parts to fail. The blades are exposed in flight, which means they can catch air and affect arrow flight if the bow is not well tuned.

Mechanical broadheads

Mechanical, or expandable, broadheads keep their blades folded against the body in flight and deploy them when the head strikes the animal. The folded profile flies much like a field point, which makes them more forgiving in flight. The deploying mechanism is one more thing that must function correctly, and opening the blades uses some of the arrow’s energy.

Reliability and penetration

Fixed blade broadheads are generally considered the more mechanically reliable option because they have no moving parts to fail. They also tend to penetrate deeper for a given amount of arrow energy, since none of that energy is spent opening blades and the narrower fixed profiles can drive through tissue and bone efficiently.

Mechanical broadheads sacrifice some penetration to power blade deployment. With modern designs and adequate arrow energy this is often a manageable tradeoff on thin skinned game, but as animals get larger and bones get heavier, the penetration margin matters more. Hunters using lower draw weights or lighter arrows often lean toward fixed heads for that reason. You can review broadhead and bowhunting fundamentals through Bowhunter-Ed.

Cutting diameter and wound channel

Cutting diameter is where mechanical heads usually lead. Because the blades swing out beyond the arrow shaft, expandables commonly open to a wider cutting diameter than most fixed heads, which can create a larger wound channel and a better blood trail when everything works as designed.

Fixed heads generally have a smaller cutting diameter set by their physical blade width, though wide fixed and hybrid designs exist. The practical point is a tradeoff: mechanicals can offer more cutting width, while fixed heads trade some width for reliability and penetration. More cutting width only helps if the head still penetrates into the vitals, which is why energy and shot placement decide the outcome more than diameter alone.

Tuning and accuracy demands

Tuning is often the deciding factor for many hunters. Because mechanical heads fly with their blades folded, they tend to behave like the field points you practice with, so they are more forgiving of small tuning imperfections and hold a tight group at longer distances more easily.

Fixed heads demand a well tuned bow. The exposed blades act like small wings and will exaggerate any imperfection in arrow flight, so fixed heads usually require careful paper tuning or broadhead tuning to fly true. Many hunters who shoot fixed heads consider that tuning a benefit, because a bow tuned to shoot fixed heads accurately is tuned well overall. Whichever type you choose, practice with the exact broadheads you will hunt with, not just field points.

Matching the broadhead to the animal

The size and toughness of the animal should steer the choice along with your setup’s energy.

  • Whitetail and similar thin skinned deer: Both types work well when the bow is tuned and arrow energy is adequate. Many hunters value the larger cutting diameter of mechanicals here.
  • Elk and larger, heavier boned big game: Penetration is at a premium, so many experienced hunters favor a strong fixed blade head, especially with higher draw weights and heavier arrows.
  • Lower draw weight or youth setups: A reliable fixed head, or a mechanical specifically rated for lower energy, helps preserve penetration.

Match the broadhead to your real arrow setup. Total arrow weight, draw weight, and arrow speed determine how much energy is available, and that energy budget should guide whether you can afford the deployment cost of a mechanical head on the animal you are hunting.

Regulations and legality

Broadhead legality varies by location and is not something to assume. Some states and provinces set a minimum cutting diameter or width, some restrict or specifically allow mechanical broadheads, some require a minimum number of cutting edges, and some set minimum draw weight or arrow requirements for big game. These rules also change between seasons and species.

Before you buy or hunt, confirm the current broadhead rules with your state or provincial wildlife agency. Federal wildlife resources and hunter education sites can point you to the right authority, including the U.S. Fish and Wildlife Service and Bowhunter-Ed, but the legally binding rules are the ones your wildlife agency publishes for your hunt. This article is general information, not legal advice.

Ethical shot selection

The most ethical broadhead is the one you can place accurately into the vital area on a calm, broadside or quartering away animal, within a range you have proven you can shoot. No broadhead design compensates for a marginal shot or a distance beyond your practiced ability.

Practice with your hunting broadheads until your groups are consistent, set a personal maximum range and stay inside it, and pass on shots that are too far, obstructed, or poorly angled. A sharp, reliable head matched to your setup, combined with disciplined shot selection, is what leads to clean, ethical results. Treat recovery as part of the responsibility, not an afterthought.

How to choose: a quick framework

  • Confirm what is legal for your species and season with your wildlife agency.
  • Know your real arrow energy from draw weight, arrow weight, and speed.
  • For larger or heavy boned game, or lower energy setups, favor reliable fixed heads for penetration.
  • For thin skinned deer with a tuned bow and adequate energy, either type can work; mechanicals add cutting width.
  • If your bow is hard to tune for fixed heads, a quality mechanical may fly more consistently.
  • Always practice with the exact broadheads you will hunt with.
  • Choose your maximum range based on proven accuracy, not the head’s marketing.

Frequently asked questions

Are fixed or mechanical broadheads better for elk?

Many experienced hunters favor a strong fixed blade head for elk because penetration through heavier bone and muscle is at a premium. A mechanical can work with enough arrow energy and good placement, but penetration margin is the main concern on larger big game.

Do mechanical broadheads fly more accurately?

Mechanicals fly with their blades folded, so they behave more like the field points you practice with and are more forgiving of small tuning issues. Fixed heads can fly just as accurately, but they require a well tuned bow to do it.

Are mechanical broadheads legal everywhere?

No. Broadhead rules vary by state and province and can restrict mechanicals, set minimum cutting diameters, or require a minimum number of blades. Always confirm the current rules with your wildlife agency before hunting.

Do I really need to practice with broadheads?

Yes. Broadheads can fly differently than field points, especially fixed blade designs. Practicing with the exact heads you will hunt with confirms your point of impact and your true effective range.

Final takeaway

Fixed broadheads lead on reliability and penetration, while mechanical broadheads lead on cutting diameter and forgiving flight. The better choice for big game comes from your own setup: your arrow energy, the animal you are after, how easily your bow tunes, and what your wildlife agency allows. Confirm the regulations, build enough energy for the game, practice with your actual hunting heads, and choose shots you have proven you can make. The head matters, but disciplined shot placement and honest range limits matter more.

How to Field Dress a Deer Step by Step: Complete Hunter’s Guide


Field dressing a deer means removing the internal organs soon after harvest so the carcass cools quickly and the meat stays safe to eat. The priorities are simple: work cleanly with a sharp knife and protective gloves, avoid contaminating the meat, cool the carcass as fast as you can, and follow your state’s tagging and transport rules. This guide gives a safe, high level overview of the process. It is not a graphic walkthrough, and it focuses on the parts that protect your safety and your meat.

Take a hunter education course or learn hands on from an experienced hunter before doing this on your own. Reading is a starting point, not a substitute for supervised practice. For food safety specifics, defer to the CDC and your state agency, and for tagging and transport, defer to your state wildlife agency.

Table of contents

Why speed and cooling matter

A deer’s body holds a lot of heat after harvest, and warmth combined with the bacteria in the digestive tract is what spoils meat. Removing the organs promptly lets the carcass shed heat, and getting the meat cool is the single most important factor in keeping it safe and good to eat. The longer the carcass stays warm, the higher the risk of spoilage.

This is why hunters field dress in the field rather than waiting until they get home. The goal is to start cooling as soon as it is safe and legal to do so.

Gear and hygiene before you start

Good hygiene protects both you and the meat. Wild game can carry bacteria and parasites, so wear protective gloves and avoid contact with the animal’s blood and fluids on cuts or your face. Bring the gear that keeps the job clean and controlled.

  • A sharp fixed blade knife, plus a backup blade or a small sharpener
  • Disposable nitrile gloves, and arm length gloves if you have them
  • Paper towels or clean rags and zip ties or cord
  • Game bags to keep the meat clean and let it breathe
  • Clean water or wipes and a small first aid kit

Put gloves on before you begin and keep your hands away from your eyes, nose, and mouth. The CDC publishes guidance on handling wild game safely, and following basic hygiene reduces the risk of illness from contact and from the meat itself.

Tagging and legal steps first

Before you field dress, handle the legal steps your state requires. Many states require you to validate and attach a tag to the animal before moving it or before field dressing, and some require specific evidence of sex or species to remain attached during transport. These rules vary widely.

Confirm the exact requirements with your state wildlife agency for the species, season, and area you are hunting. Hunter education resources such as Hunter-Ed can help you understand general concepts, but the binding rules on tagging, evidence of sex, and transport are the ones your wildlife agency publishes. This article is general information, not legal advice.

Knife safety

Most field dressing injuries come from the knife, not the animal. A sharp knife is safer than a dull one because it cuts predictably and needs less force, which reduces slips. Keep your free hand and your legs out of the blade’s path and always cut away from your body.

Work slowly and deliberately, especially on uneven ground or in cold weather when your hands are stiff. If you use a gut hook or a caping blade, understand how it cuts before you rely on it. Take your time. There is no rush that is worth a deep cut miles from help.

The field dressing process, step by step

The general process is to open the body cavity carefully, separate and remove the internal organs without puncturing the digestive tract or bladder, and keep the edible meat clean throughout. The key principle at every step is to avoid spilling the contents of the stomach, intestines, and bladder onto the meat, because that is the main source of contamination.

Open the cavity carefully

Position the deer so the cavity can drain, often on its back or angled downhill. Make a shallow, controlled opening through the abdominal wall, lifting the skin and muscle away from the organs as you go so the blade does not nick the stomach or intestines underneath. Keeping the cut shallow and lifting as you cut is what protects the digestive tract.

Remove the organs cleanly

Free the organs from their connections and roll or lift the organ mass out of the cavity in one controlled motion, working to keep the digestive tract and bladder intact. Many hunters tie off the lower digestive tract to prevent spillage. If anything ruptures, do not panic; rinse the affected meat with clean water as soon as you can and trim away contaminated portions later.

Clean and prepare for cooling

Once the cavity is empty, drain excess blood and wipe the cavity with paper towels or rinse with clean water if available. Prop the cavity open so air can circulate. Keep dirt, hair, and debris out of the cavity, and get the carcass into game bags or ready for transport as soon as the legal steps are complete.

Cooling, handling, and transport

After dressing, cooling becomes the priority. Get the carcass out of the sun and allow air to move through the open cavity. In warm weather, the urgency is higher, and you may need to skin the animal and pack the meat with ice to bring the temperature down quickly. The aim is to reduce the meat temperature steadily and keep it cold until processing.

  • Keep the meat shaded, ventilated, and off hot ground or hot vehicle surfaces.
  • In warm conditions, plan to skin and ice the meat sooner rather than later.
  • Use breathable game bags to keep insects and debris off the meat.
  • During transport, keep the meat as cold as you can, with ice or cold packs in warm weather.
  • Deliver to a processor or your home refrigeration promptly.

Food safety and when to discard meat

Treat game meat with the same care as any raw meat, and a little more caution because of how it is harvested. Keep it cold, keep it clean, and cook venison thoroughly to a safe internal temperature before eating. Refer to the CDC and to FoodSafety.gov for safe handling and cooking temperatures.

Discard meat that is the wrong choice to keep. Trim away and discard meat heavily soaked with digestive contents that cannot be cleaned, badly bloodshot tissue around the wound, and any meat that develops an off smell, a slimy surface, or a sour odor before processing. When you are unsure whether meat is safe, the safe answer is to discard it. Some areas also test for or restrict consumption due to wildlife disease, so check your state wildlife agency’s current guidance for the area you hunt.

Field dressing checklist

  • Complete required tagging before moving or dressing the animal.
  • Put on nitrile gloves and protect cuts and your face.
  • Use a sharp knife and cut away from your body.
  • Open the cavity shallow, lifting skin and muscle away from the organs.
  • Remove organs without puncturing the digestive tract or bladder.
  • Rinse and trim any contaminated meat as soon as possible.
  • Prop the cavity open and start cooling immediately.
  • Use game bags and keep the meat shaded and ventilated.
  • Ice the meat in warm weather and keep it cold during transport.
  • Cook venison to a safe internal temperature and discard questionable meat.

Frequently asked questions

How soon should you field dress a deer?

Field dress as soon as you have completed any required tagging and it is safe to do so. Prompt dressing lets the carcass start cooling, and faster cooling is the main factor in keeping the meat safe, especially in warm weather.

Do I need gloves to field dress a deer?

Gloves are strongly recommended. Wild game can carry bacteria and parasites, and disposable nitrile gloves reduce your contact with blood and fluids. Keep your hands away from your face and wash up afterward.

What if I cut the stomach or intestines?

Stay calm and limit the spread of contents. Rinse the affected meat with clean water as soon as you can and trim away contaminated portions during processing. Meat that cannot be cleaned should be discarded.

Do I have to tag the deer before field dressing?

In many states, yes, but the rules vary. Some states require validating and attaching a tag before moving or dressing the animal. Confirm the exact requirement with your state wildlife agency before you hunt.

Final takeaway

Field dressing a deer comes down to a few priorities done well: handle the legal tagging first, protect yourself with gloves and a sharp, carefully used knife, remove the organs without contaminating the meat, and start cooling immediately. Keep the meat clean and cold all the way to processing, cook venison thoroughly, and discard anything you are not confident is safe. Learn the hands on technique from an experienced hunter or a hunter education course, and let the CDC and your state wildlife agency guide you on food safety and the legal steps.

Bushcraft Skills Every Hunter Should Know: Navigation, Shelter, Fire, and Water


Bushcraft skills every hunter should know are the field basics that keep you safe and self-reliant away from the truck: navigation, simple shelter, safe fire use, finding and treating water, basic first-aid awareness, and low-impact travel under Leave No Trace. None of these replace proper training, and the single most protective habit is preparation, telling someone your plan and expected return time before you go. These skills lower your risk and help you stay calm if a hunt runs long or the weather turns, but they are not a substitute for professional medical care or formal wilderness training.

This guide covers the core skills, how they fit a hunting trip, and where to get real training. The principles here are general preparation, not survival-medical certainty. For first aid and wilderness medicine, learn from qualified instructors, and follow established outdoor guidance such as the National Park Service Ten Essentials and the Leave No Trace seven principles.

Table of contents

Preparation comes first

The most valuable bushcraft skill happens before you leave home. Tell someone reliable exactly where you are going, your planned route, and when you expect to be back, then check in when you return. If you do not come back on time, that person can get help to the right place quickly.

Round out that habit by checking the weather forecast, knowing the terrain and access, carrying the right gear for the conditions, and keeping your phone charged with a backup power source. Cell coverage is unreliable in the backcountry, so consider a map and compass and, for remote areas, a satellite communicator or personal locator beacon. Preparation prevents far more emergencies than any improvised survival trick resolves.

The Ten Essentials for hunters

The Ten Essentials is a widely used outdoor packing framework that covers the categories of gear you may need if a trip goes wrong. It is a sound base for any hunter heading into the backcountry.

  • Navigation: map, compass, and a charged GPS or phone.
  • Headlamp or flashlight, with spare batteries.
  • Sun protection: hat, sunglasses, and sunscreen.
  • First-aid supplies suited to your trip and training.
  • A knife and a basic repair kit.
  • Fire: a reliable lighter or matches and a fire starter.
  • Emergency shelter, such as a bivy or space blanket.
  • Extra food beyond what you plan to eat.
  • Extra water and a way to treat more.
  • Extra insulating clothing for the worst likely conditions.

See the full, current list and explanations on the National Park Service Ten Essentials page. Adapt it to your hunt, your season, and your distance from help.

Navigation is the skill that keeps you found. Before the hunt, study a map of the area and identify clear landmarks, the road or trailhead you started from, and natural boundaries like ridgelines, creeks, and field edges that can guide you back.

Carry a physical map and compass and know how to orient the map and take a bearing, because batteries die and signal fails. A GPS or phone app is a strong primary tool, but treat the map and compass as the backup that always works. If you become unsure of your location, the standard guidance is to stop, stay calm, and avoid wandering deeper. Many lost-person situations get worse from continuing to move without a plan. Learn basic map and compass skills from a qualified course or experienced mentor before you rely on them.

Shelter basics

Shelter protects you from wind, rain, cold, and heat, which is why an emergency shelter belongs in your pack even on a day hunt. A lightweight bivy sack, an emergency space blanket, or a compact tarp can preserve body heat and keep you dry if you are stuck out longer than planned.

If you ever need to improvise, the priorities are getting out of the wind and off the cold or wet ground, and creating a barrier that traps warmth. A simple lean-to or a debris shelter using natural material and a tarp can work, but practicing the basics at home in good conditions is far better than learning under stress. The reliable move is to carry an emergency shelter so you rarely have to improvise at all.

Fire safety

Fire provides warmth, the ability to dry gear, a signal, and a morale boost in a hard situation, but it carries real responsibility. Carry at least two reliable ignition sources, such as a lighter and waterproof matches, plus a dedicated fire starter, and keep them dry in your pack.

  • Check current fire restrictions and burn bans before your trip, since dry conditions often close fires entirely.
  • Build fires only where allowed, clear the area down to bare ground, and keep the fire small and controlled.
  • Never leave a fire unattended, and keep water or dirt on hand to extinguish it.
  • Put the fire out completely, until it is cold to the touch, before you leave.

Wildfire risk is serious, and an escaped fire can cause harm and legal liability. Follow the fire rules from the land manager for your area, and follow the campfire guidance in the Leave No Trace principles.

Water awareness

Staying hydrated keeps you thinking clearly and moving safely, so carry enough water for your planned trip plus a margin, and carry a way to treat more if you may run out. Dehydration impairs judgment and stamina well before it becomes an emergency.

Backcountry water can carry pathogens that cause illness, so treat any water you collect rather than drinking it untreated. Common methods include filtering, chemical treatment, and boiling. The right choice depends on your gear and the water source, so learn proper treatment before you depend on it. The Centers for Disease Control and Prevention publishes general guidance on safe water practices that is a useful reference for understanding the risks.

First-aid awareness

First-aid awareness means knowing the basics, carrying a kit you can actually use, and recognizing when a situation needs professional help. This article does not teach medical treatment. The right step is hands-on training from a qualified provider.

Carry a first-aid kit matched to your trip and your training, and consider a wilderness first aid or first-aid and CPR course, especially if you hunt far from a road. Knowing how to manage a minor wound, stay warm, and stabilize a situation while you get help is realistic and valuable. Treating a serious injury yourself in the backcountry is not, so plan to reach professional care, and in a true emergency, call for help and follow the instructions of emergency services. Look for recognized training such as American Red Cross courses or a wilderness first aid program.

Weather, clothing, and warmth

Cold and wet are common and dangerous in the field, and managing them is a core skill. Dress in layers you can add or shed, favor materials that stay warm when damp over cotton, which loses insulation when wet, and pack a layer for worse conditions than you expect.

Watch for early signs of getting too cold, such as persistent shivering and clumsiness, and act before it worsens by adding layers, getting out of the wind, drying off, and warming up. Hot weather brings its own risks, so manage heat, sun, and hydration as deliberately as you manage cold. Knowing the forecast and matching your clothing to it prevents most weather problems before they start.

Leave No Trace for hunters

Low-impact travel protects the places you hunt and the access you depend on. Leave No Trace is a set of principles for minimizing your impact outdoors, and it fits hunting well.

  • Plan ahead and prepare so you do not improvise at the land’s expense.
  • Travel and camp on durable surfaces, and pack out all trash.
  • Dispose of waste properly, and follow local rules for any game remains.
  • Minimize campfire impact, and follow current fire restrictions.
  • Respect wildlife and other people sharing the area.

Read the full guidance on the Leave No Trace seven principles page. Following these habits keeps hunting areas healthy and helps protect access for everyone.

Frequently asked questions

What is the single most important thing to do before a backcountry hunt?

Tell someone reliable your exact plan, route, and expected return time, then check in when you get back. If you do not return on time, that person can direct help to the right area. This one habit prevents and shortens more emergencies than any field trick.

Do I really need a map and compass if I have a GPS?

Yes. A GPS or phone is a great primary tool, but batteries die and signal fails in the backcountry. A physical map and compass always work, so carry both and learn to use the map and compass as your reliable backup.

Is it safe to drink water from a stream while hunting?

Not without treating it. Backcountry water can carry pathogens that cause illness even when it looks clean. Filter, chemically treat, or boil water before drinking, and learn proper treatment for your gear before you rely on it.

How much first aid should a hunter know?

Enough to handle minor issues, stay warm, stabilize a situation, and recognize when to get professional help. Carry a kit you can use and consider a first-aid, CPR, or wilderness first aid course. Serious injuries need professional care, so plan how to reach it.

Final takeaway

The bushcraft skills that matter most for hunters are practical and preventive: prepare and tell someone your plan, navigate with a map and compass backup, carry emergency shelter, use fire safely, treat your water, build real first-aid awareness, manage cold and heat, and travel under Leave No Trace. These skills lower your risk and raise your self-reliance, but they do not replace professional medical care or formal training. Build them through qualified courses and steady practice, prepare for the conditions you will face, and always leave a plan behind before you head into the field.

Exit mobile version