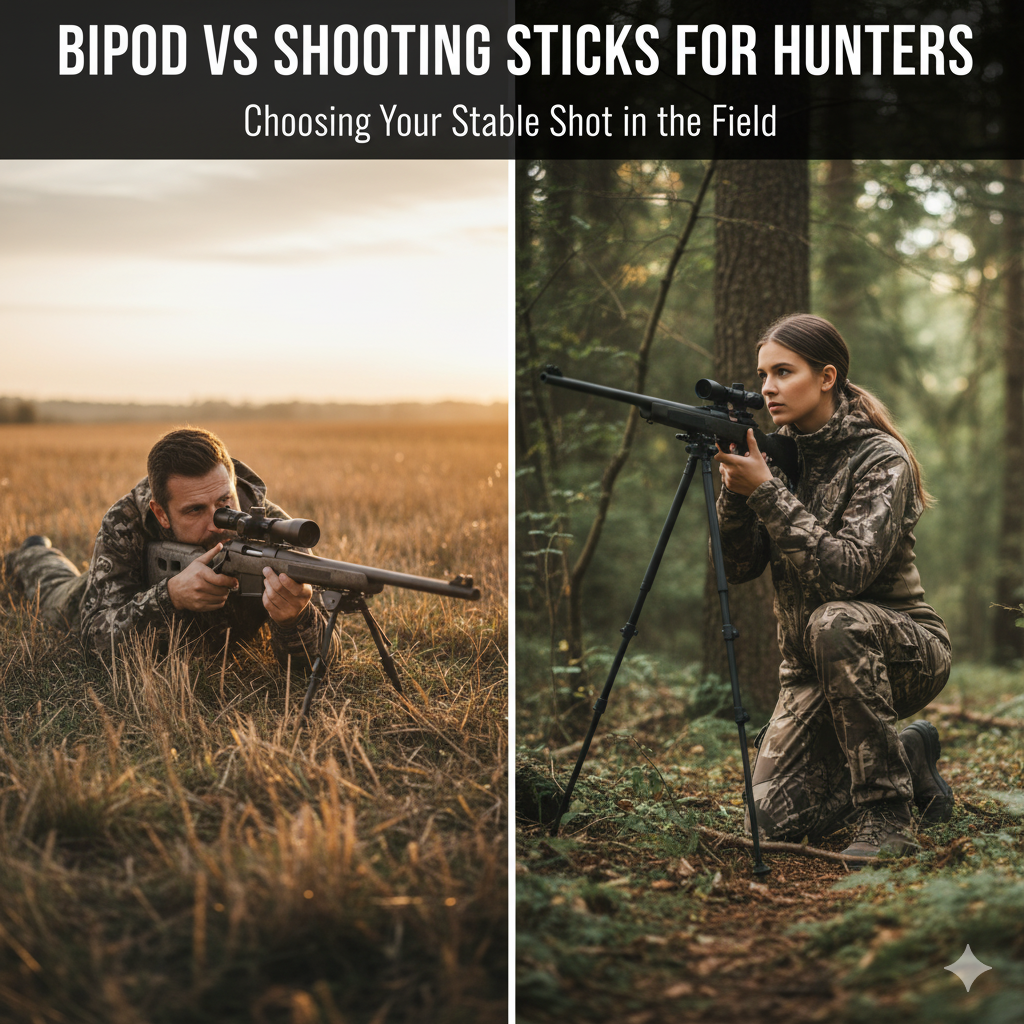
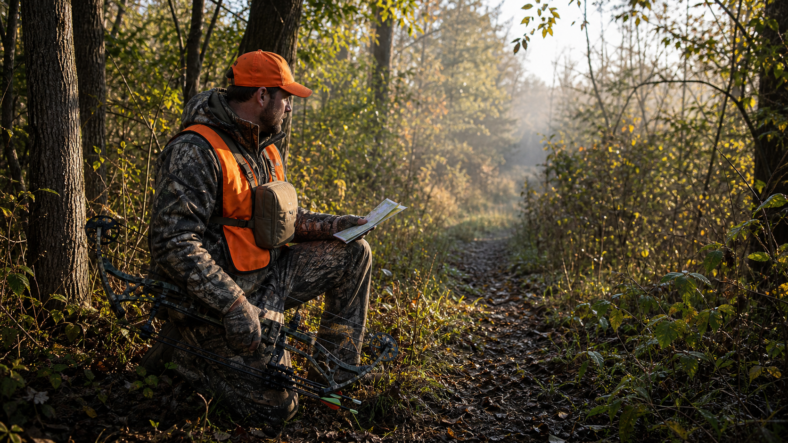
There is no single winner between a bipod and shooting sticks for hunting. The better support depends on your terrain, how far you carry your gear, how quickly you need to set up, and whether you normally shoot from prone, sitting, standing, a blind, or a stand. A bipod gives a low, rifle-mounted platform. Shooting sticks are a separate support that can work at sitting or standing height.
For many hunters, a bipod is the steadier choice when the ground is flat enough for prone or low bench-style shooting. Shooting sticks are usually more flexible in brush, tall grass, slopes, blinds, and elevated positions. Neither option makes a shot safe, legal, ethical, or guaranteed. Safe muzzle direction, target identification, a clear backstop, and current local rules still come first.
Choose a bipod if you often shoot from prone, use flat ground or a bench, and want the support attached to the rifle. Choose shooting sticks if you hunt from seated or standing positions, move through brush, use blinds or stands, or need height adjustment. If your hunts change a lot, the best choice may be the one you will actually carry and practice with.
Bipods favor low stable positions; shooting sticks add height flexibility for seated and standing field setups.
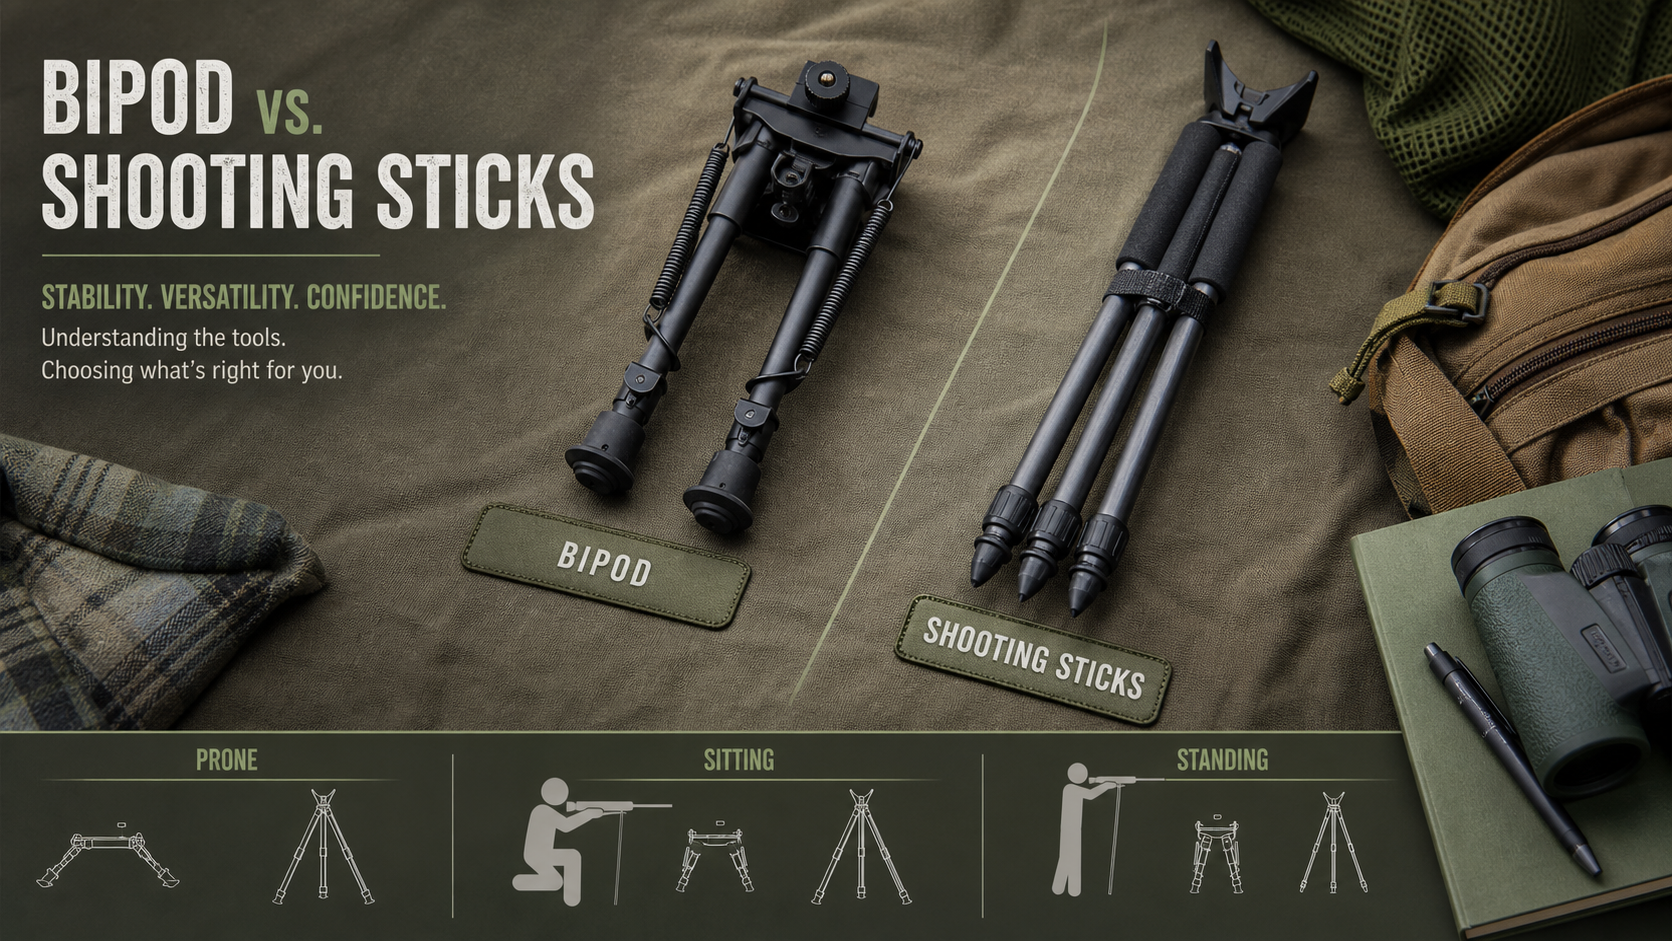
What Is a Rifle Bipod?
A rifle bipod is a two-legged support that mounts to the rifle, usually near the front of the stock or rail. It folds against the rifle when not in use and deploys when you need a low rest. Many models have adjustable legs, and some allow cant or swivel so the rifle can be leveled on uneven ground.
Where a Bipod Works Best
A bipod works best when you can get low and build a stable position on firm ground, a bench, a mat, or a flat field edge. Because it is attached to the rifle, it is always available. The tradeoff is that it adds weight to the front of the rifle and may be awkward in tall grass, brush, tight blinds, or elevated windows.
What Are Hunting Shooting Sticks?
Shooting sticks are a separate support that you carry and set up in the field. Common styles include monopod, bipod stick, and tripod stick designs. Instead of attaching to the rifle, they give you a rest point where the fore-end can sit while your hands still control the firearm.
Where Shooting Sticks Work Best
Shooting sticks are useful when you need height. They can work from sitting, kneeling, or standing positions, which makes them practical in ground blinds, box blinds, elevated stands, brushy edges, and hilly terrain where prone is not realistic. Tripod sticks are usually the steadiest. Monopods are lighter and faster, but they give less side-to-side stability.
Bipod vs Shooting Sticks Comparison Table
Factor
Rifle bipod
Shooting sticks
Typical position
Prone or low bench
Sitting, kneeling, or standing
Stability
Very steady when low and planted
Varies by style; tripod is usually steadiest
Mobility
Always attached to the rifle
Separate item to carry and deploy
Setup speed
Fast if you can get low
Fast for monopod, slower for tripod
Terrain fit
Best on flat, firm ground
Better in brush, grass, slopes, blinds, and stands
Weight feel
Adds weight to the rifle
Adds carried weight but keeps rifle lighter
Main limitation
Hard to use where prone is not possible
Less steady than a solid prone position
How They Affect Firearm Control
Both supports are meant to reduce wobble, not replace safe firearm handling. With a bipod, the rifle is attached to the legs, so the whole setup points where the muzzle points. With shooting sticks, the rifle rests on the support and can shift if you relax your hands. In both cases, stay deliberate when repositioning.
The basic safety rules still apply: keep the muzzle in a safe direction, keep your finger off the trigger until ready, know your target, and know what is beyond it. The NSSF firearm safety rules are a useful baseline, and hunter education resources such as Hunter-Ed firearm safety guidance reinforce the same point.
Decision Matrix by Hunting Style
Use this matrix as a starting point, not a rule. Your terrain, body position, comfort, and local regulations matter more than a generic label.
Hunting style
Often fits
Why
Watch out for
Ground blind
Tripod or bipod sticks
Seated positions need adjustable height
Limited room inside small blinds
Box blind
Sticks or a stable rail/bag rest
Window height usually sits above bipod height
Hard surfaces can be noisy
Deer stand
Bipod or tripod sticks
Elevated seated setups favor height control
Manage support carefully at height
Predator calling
Tripod sticks
Steady seated hold while scanning
Quiet setup matters
Mountain or backcountry
Lightweight bipod or monopod
Carry weight matters on long climbs
The lightest option may be less steady
Range practice
Rifle bipod
Flat benches and prone lanes suit low supports
Confirm range rules first
Terrain and Carry Weight Notes
Terrain often decides the choice before preference does. If you hunt flat fields, open cuts, or places where prone is possible, a bipod can be simple and stable. If the shot lane is blocked by grass, brush, snow, a blind wall, or uneven ground, shooting sticks may give you a usable position that a bipod cannot.
Weight on the Rifle vs Weight in the Pack
A bipod moves weight onto the rifle, usually toward the front. Some hunters like that because there is nothing separate to forget. Others dislike the nose-heavy feel during long carries. Shooting sticks keep the rifle lighter but add another item to pack, adjust, and manage quietly.
Limitations to Keep in Mind
Neither support fixes an unstable surface, poor target visibility, unsafe background, or lack of practice. A bipod is limited when you cannot get low. Shooting sticks are less steady than a solid prone rest and can shift if the legs are planted poorly. Test the position before relying on it, and pass on any shot where the setup does not feel controlled.
Neither is better for every hunt. A bipod is usually better for low, steady prone positions. Shooting sticks are usually better when you need a seated or standing rest in brush, blinds, stands, or uneven terrain.
Are shooting sticks steady enough for hunting?
Shooting sticks can be steady enough when properly planted and matched to the position. Tripod sticks are usually steadier than bipod or monopod sticks, but they also take more setup time.
Do bipods work in a ground blind or deer stand?
Sometimes, but many rifle bipods are too low for seated blind windows or stand positions. Adjustable-height shooting sticks, a stable rail, or a bag rest may fit those setups better.
Can I use both a bipod and shooting sticks?
Yes. Some hunters use a bipod for prone or range work and carry shooting sticks for seated or standing field positions. The downside is extra weight and more gear to manage.
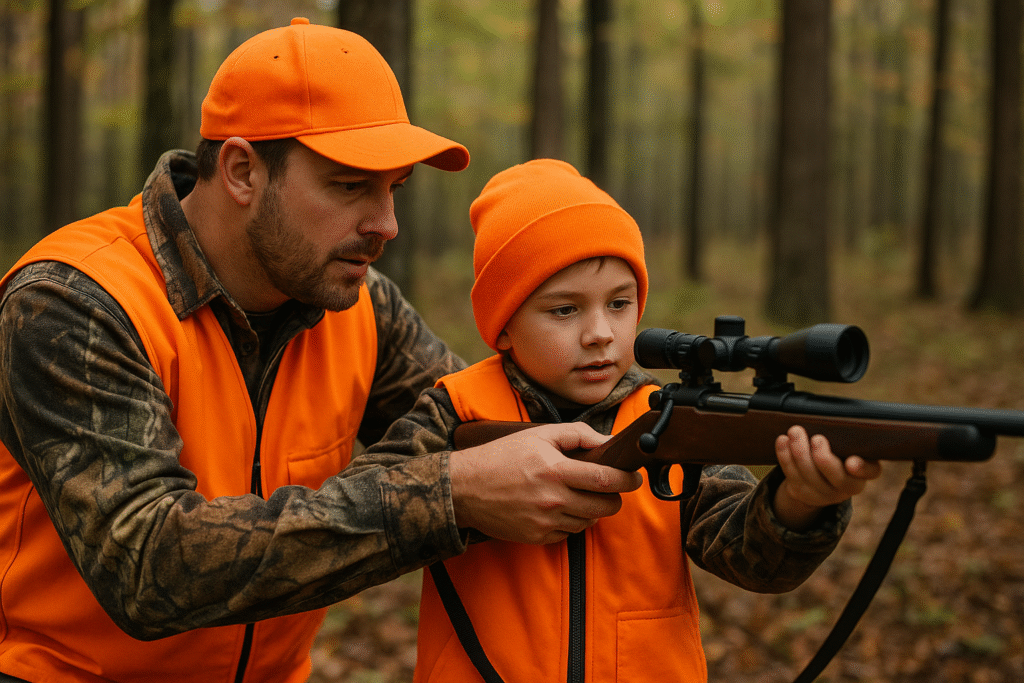
The safest way to introduce kids to hunting is slowly: start with respect for wildlife, safe handling rules, age-appropriate learning, hunter education, and short outdoor experiences before any serious hunt. A child should understand the purpose of hunting, basic safety expectations, and their role in the field before they are placed near a firearm, bow, or live hunting situation.
This guide is for parents, guardians, mentors, and family members who want to build a responsible young hunter. Always check your state wildlife agency rules, minimum-age requirements, hunter education rules, youth-season rules, land-access rules, and supervision requirements before planning a hunt.
A child who enjoys wildlife tracks, scouting, sitting quietly, learning calls, or helping with gear may be ready for early hunting lessons. A child who is bored, frightened, careless, or only interested in the shot may need more time outdoors before hunting is introduced.
Make Ethics Part of the First Conversation
Explain that hunting is not just about taking an animal. It includes conservation, legal seasons, clean decisions, respect for landowners, meat care, and knowing when not to shoot. Kids should hear early that passing on a shot can be the right decision.
Teach Safety Before Gear
Start With Universal Safety Rules
Before a child handles hunting equipment, teach simple safety rules in plain language. Keep the muzzle or arrow direction safe, keep fingers away from triggers until ready, know the target and what is beyond it, and treat every firearm or bow with respect. The NSSF firearm safety rules are a useful adult reference when teaching firearm basics.
Use Age-Appropriate Gear
Gear should fit the child, not the other way around. Oversized rifles, heavy bows, stiff triggers, poor eye relief, and adult-sized packs can create unsafe habits. If the equipment is too big, too loud, too heavy, or too hard to control, slow down and adjust the plan.
Separate Storage From Training
Children should understand that safe storage is not optional. Firearms, bows, ammunition, broadheads, and knives need adult-controlled storage. Project ChildSafe offers practical secure storage resources for families and firearm owners.
Fit, Comfort, and Communication
Fit the Gear to the Child
Kids should not be asked to “grow into†unsafe or uncomfortable gear in the field. Clothing should keep them warm and dry, boots should let them walk safely, and hearing/eye protection should fit well enough that they actually wear it when needed.
Agree on Stop Signals
Before leaving, agree on simple signals for cold, fear, fatigue, bathroom breaks, and wanting to stop. A child who knows they can speak up is less likely to hide discomfort or make rushed decisions.
Practice Quiet Skills First
Let kids practice whispering, walking quietly, watching wind, using binoculars, and identifying safe directions before the stakes feel high. Those small skills make the first real hunt calmer and safer.
Use Hunter Education and Mentors
Hunter education is one of the best ways to give kids a structured foundation. State rules vary, so check the official wildlife agency for your location. National resources such as Hunter-Ed and the International Hunter Education Association can help families understand what hunter education usually covers.
A good mentor should be calm, patient, safety-focused, and willing to end the hunt early if the child is tired or uncomfortable. The best mentor does not push a young hunter to perform for adults.
Plan a Calm First Hunt
Choose the Right Conditions
The first hunt should be short, legal, and realistic. Mild weather, easy access, safe terrain, and a clear exit plan matter more than trophy potential. A simple scouting walk, small-game outing, or observation sit may be better than a long all-day hunt.
Give the Child a Clear Role
Not every first trip needs the child to carry a firearm or bow. They can glass, track, listen, help with a checklist, observe wind, or learn field signs. Giving them a role keeps them involved without forcing responsibility too early.
Prioritize the Process
Celebrate safe decisions, patience, quiet movement, legal awareness, and respect for animals. A first hunt can be successful even without a harvest. That mindset builds better hunters than adult expectations or disappointment.
Adult Supervision and Legal Checks
Youth hunting rules are not the same everywhere. Some states have apprentice licenses, youth seasons, hunter education exemptions, minimum ages, weapon restrictions, blaze-orange requirements, or direct-supervision rules. Check the current rulebook before buying tags or planning a trip.
Adult supervision should be active, not passive. The adult should know where the child is, where the muzzle or bow is directed, what is loaded or unloaded, and when the hunt should pause. A responsible adult also models calm decision-making when an animal appears.
For very young learners, the first step may be a scouting walk, wildlife observation sit, or range-safety lesson with no hunting tag involved. That still counts as progress because the child is learning field awareness without being rushed.
After the Hunt
After the hunt, talk through what went well and what felt difficult. Ask what the child noticed, what they enjoyed, and what they want to learn next. If an animal was harvested, explain field care, meat use, gratitude, and why ethical hunters avoid waste.
If the child felt scared, cold, bored, or overwhelmed, treat that honestly. A shorter next outing or more practice may be the right move. The goal is long-term confidence and responsibility, not rushing a milestone.
Common Mistakes To Avoid
Starting with a hunt that is too long, cold, or physically demanding.
Using gear that does not fit the child.
Skipping hunter education or state rule checks.
Letting excitement override safe muzzle or arrow direction.
Making harvest the only measure of success.
Ignoring the child’s fear, fatigue, or discomfort.
Talking about ethics after the shot instead of before the season.
Quick Parent Checklist
Check state youth hunting, hunter education, and supervision rules.
Teach safety rules before handling equipment.
Use properly fitted firearm, bow, clothing, and hearing/eye protection where appropriate.
Keep ammunition, firearms, bows, broadheads, and knives secured.
Plan short first outings in safe, comfortable conditions.
Give the child a clear role that matches readiness.
Debrief after every trip and adjust the next step.
FAQ
What age should kids start hunting?
There is no universal age. Laws vary by state, and readiness varies by child. Start with safety, outdoor skills, and hunter education before planning a live hunt.
Should a child carry a firearm on the first hunt?
Not necessarily. Many kids benefit from observing, scouting, or helping with simple tasks before carrying equipment. Follow state law and only move forward when the child is ready and supervised.
How do I keep the first hunt positive?
Keep it short, safe, warm, and calm. Bring snacks, explain what is happening, and let learning count as success.
What is the most important lesson for young hunters?
Safety and respect come first. A young hunter should learn that legal, ethical, safe decisions matter more than taking a shot.
Final Takeaway
Introducing kids to hunting works best when adults move slowly, model safe behavior, and keep ethics at the center. Start with readiness, education, secure storage, proper gear fit, and short low-pressure outings. A responsible young hunter is built through trust and repetition, not pressure.
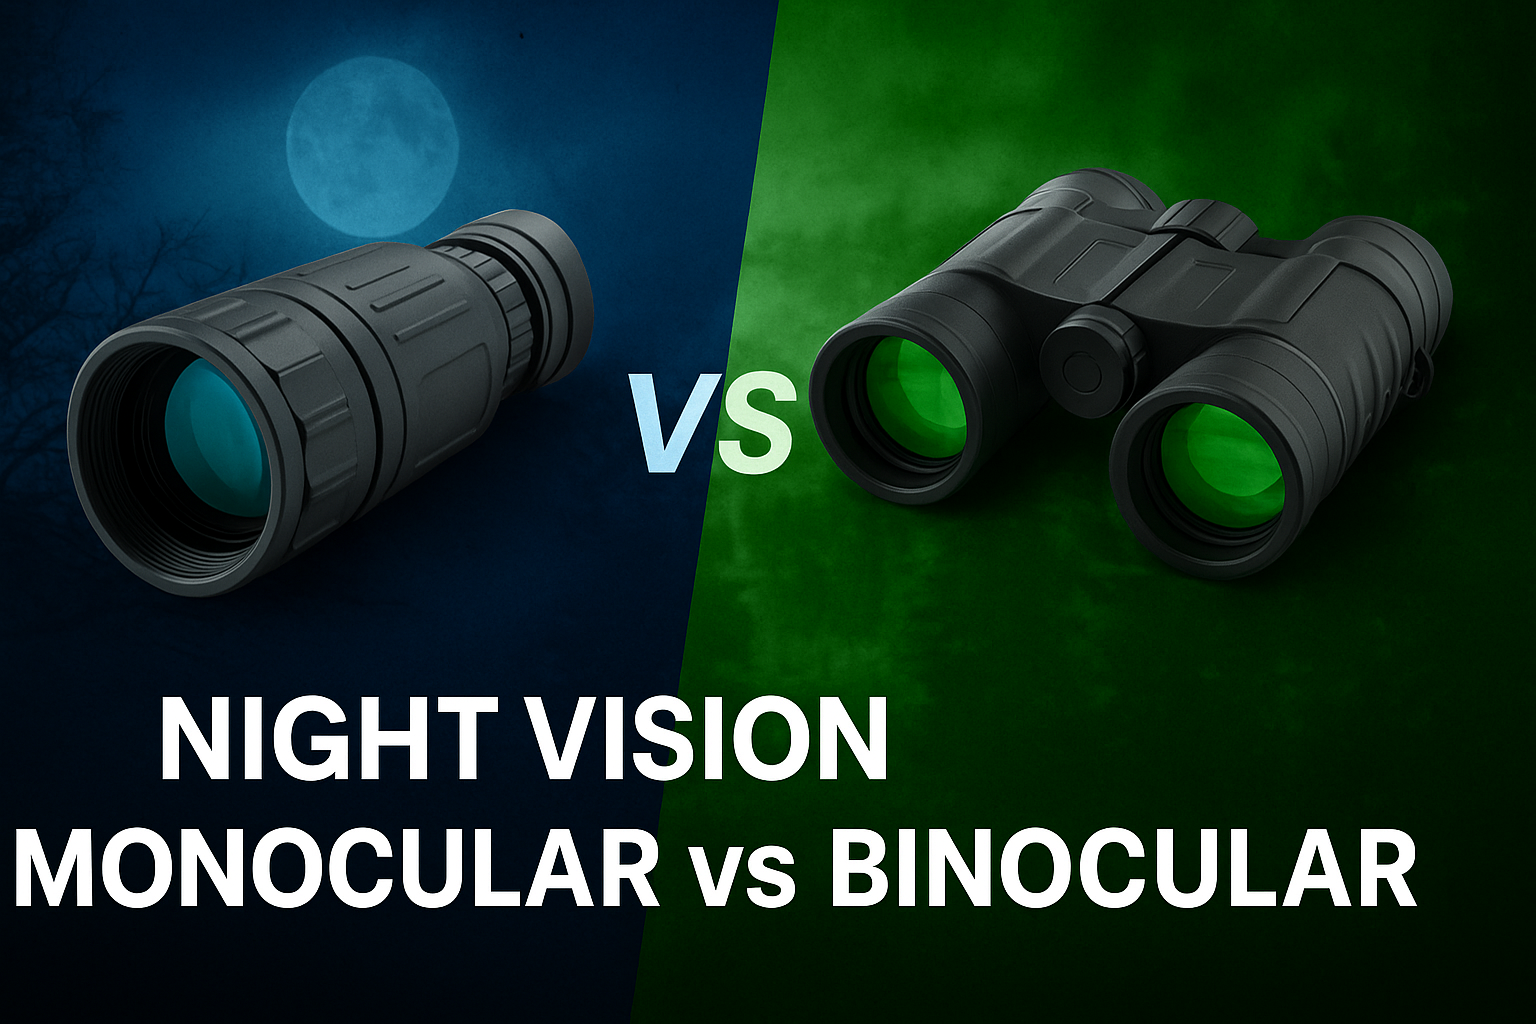
Night vision gear is a critical tool for shooters, hunters, wildlife observers, and tactical operators. When light levels drop, having the right night vision device can be the difference between success and failure. Among the most common debates in the field is the choice between a night vision monocular and a night vision binocular (or dual-tube) system.
In this comparison article, we’ll break down the strengths, weaknesses, technical factors, use cases, and decision criteria you should understand before choosing. By the end, you’ll be better equipped to decide which suits your night-time needs — whether for shooting, hunting, surveillance, or general outdoor use.
What Are Night Vision Monoculars and Binoculars?
Before comparing, let’s define terms:
A night vision monocular is a single-tube (single optical path) device that you use with one eye. It may be handheld, helmet mounted (on a goggle mount), or weapon-mounted (using adapters). It’s essentially half a pair of binoculars.
A night vision binocular (or dual-tube binocular / dual-channel NVG) uses two image intensifier tubes and two optical paths, one for each eye. This allows you to view with both eyes simultaneously.
Some hybrid devices exist (bioculars) in which a single image tube is fed to both eyes, but for this article we’ll mostly compare true monoculars vs true binocular (dual tube) systems.
Key Factors to Compare
When comparing night vision monoculars vs binoculars, several technical and ergonomic factors come into play. Below are the critical parameters you should evaluate.
Factor
Monocular
Binocular (Dual Tube)
Comments / Trade-offs
Weight & Size
Lighter, more compact
Heavier, bulkier
Dual tubes double up weight and bulk; head fatigue is a concern with long use.
Monoculars often support adapters and can double as spotting tools.
Cost
Generally lower
Much higher (dual tubes are costly)
For equivalent tube quality, binoculars often cost more than double.
Reliability & Alignment
Fewer moving parts, simpler optical alignment
More prone to misalignment (collimation)
Maintaining perfect alignment between two tubes is critical.
Operational Speed / Transitioning
Faster transitions (one eye free)
Slight delays switching / aligning dual eyepieces
Some users prefer monocular for faster engagement.
Let’s dig deeper into each of these points.
Weight, Fatigue & Ergonomics
One of the biggest practical differences is weight. When mounting on a helmet or head gear, every ounce matters. In tests between dual tube setups (e.g. FLIR BNVD-51) and single tube monoculars (e.g. FLIR MNVD-51), the weight difference can exceed 10 ounces. That becomes significant over prolonged use, especially when the device is mounted on the head.
Wearing heavier binoculars can cause neck fatigue, especially in dynamic operations or long hunts, making lighter monoculars an appealing option if weight is a limiting factor.
Field of View & Situational Awareness
Binocular systems offer a wider field of view (FOV), which enables better peripheral awareness. You’ll see motions or threats off to the side more easily, which is especially valuable in hunting, surveillance, or tactical scenarios.
Monoculars, in contrast, have narrower FOVs because you’re only using one optical path. This can limit your situational awareness and may require panning more with your head to catch glances.
Depth Perception & 3D Visualization
One of the strongest arguments for binoculars is depth perception. With two optical channels, your brain can interpret parallax differences and deliver stereoscopic depth cues, which help in estimating distance more accurately.
However, it’s important to know that monocular systems don’t completely lose depth perception. Humans can use monocular cues (like motion parallax, size scaling, focus, and perspective) to judge depth. Still, for tasks where precise depth judgment is critical (e.g. moving through terrain, judging shot distances), binoculars offer a distinct advantage.
Eye Strain and Long Session Use
Using a single eye for extended periods may cause ocular fatigue or visual discomfort, especially if your eyes alternate experience (one eye “sees” through the tube while the other is in darkness). Binoculars balance usage across both eyes, making the viewing experience more natural and less tiring over time.
Focusing and Adjustment Complexity
With a monocular, you adjust one tube — just one focus wheel or dial. Binoculars require synchronization or individual focusing for each eyepiece, which can be fiddlier and slower in practice.In dynamic settings where quick focus is needed, monoculars often offer an edge.
Versatility, Mounting & Multi-Role Use
Monoculars shine in their adaptability: they can be handheld, helmet-mounted, weapon-mounted, or adapted to cameras or spotting scopes. Some monoculars support quick detach adapters, red dot overlays, or coupling with day optics.
Binoculars, due to their bulk and dual-lens geometry, are less flexible in mounting options. You may lose some flexibility in how and where you deploy them.
Cost and Value
A major factor is cost. Dual-tube binocular systems require two high-quality image intensifier tubes and matched optics. This typically drives the price up much more than a monocular device of equivalent tube quality.
If you’re budget-limited, you may get better performance per dollar with a monocular.
Reliability & Optical Alignment
Binoculars demand correct optical alignment (collimation). If misaligned, images can be double or strain the eyes. Maintenance, shocks, or drops can knock alignment out of spec. Monoculars avoid this issue because there’s only one optical path.
Transitions & Operational Speed
Some users argue that monoculars allow faster transitions — e.g. switching between your naked eye and tube eye — because your off-eye remains free (and can remain dark-adapted). Binoculars require moving both eyepieces or aligning to both eyes, which can slow operations slightly.
The ideal choice depends heavily on the intended application. Below are common scenarios and guidance on which device tends to dominate in that context.
1. Night Hunting & Spotting Game
Sparse, open fields: Binoculars may help you scan large areas and detect movement across periphery more easily.
Dense terrain or brush: A monocular may be more practical, lighter, easier to maneuver.
Weapon integration: If you plan to mount night vision on your rifle or use a red dot overlay, monoculars often have more mounting flexibility.
2. Tactical / Law Enforcement Operations
When precision, depth judgment, and threat awareness matter, binoculars offer advantages.
But in scenarios needing mobility, quick transitions, or use of multiple devices (laser, scope, IR illuminator), monoculars may offer tactical flexibility.
Also, for covert ops or fast transitions between NVG and unaided eyes, monoculars allow one eye to remain dark adapted.
3. Surveillance / Observation
For stationary observation, binocular systems provide a more immersive viewing experience.
But if the operator wants to shift to handheld or mobile roles, the lighter, more compact monocular is often preferred.
4. Dual-function with Day Optics or Cameras
Because monoculars can often be adapted, mounted, or coupled with daytime optics, they are ideal for users who want multi-purpose use.
Binoculars are comparatively more specialized and less adaptable for cross-function use.
5. Long Duration Use & Comfort
For long surveillance, stakeouts, or multi-hour field sessions, binoculars may reduce fatigue due to balanced eye use.
However, for head-mounted use over long durations, the extra weight of binoculars might induce neck strain, tilting the balance in favor of monoculars.
Real-World Insights & User Feedback
To enrich theoretical comparison, here are a few real-world observations from users and experts:
A user on a night vision forum wrote: “I’d rather have a higher quality monocular … the only real advantage to duals is better depth perception and looking cooler, while monos are cheaper, lighter (usually), and give you the ability to see ambient conditions with your non-tubed eye.”
In dual vs single tube tests, some observers found depth perception was better with dual tubes, but monoculars could closely match performance after training.
On Sniper’s Hide, a spec-ops veteran recommended the monocular (PVS-14) approach because it allows one eye to remain dark-adapted and better transitions to non-NVG vision.
Manufacturers often discuss the trade-off: monoculars are more versatile and budget-friendly, while binoculars offer immersive depth and comfort at higher cost.
These accounts align well with the technical pros/cons discussed above — a practical user base often values flexibility and weight savings, while high-end users accept the cost/weight penalty for the benefits of binoculars.
Choosing the Right Night Vision Device: A Buyer’s Checklist
Here’s a decision flow you can use when selecting between a monocular and binocular NVG:
Define your primary use
If you anticipate a lot of movement, weapon use, or mounting, lean monocular.
If your main goal is observation, depth judgment, or immersive viewing, binocular may be better.
Set a weight or ergonomics threshold
If head-mounted weight must stay below a certain level, a monocular may be your only viable combination.
Decide on mounting flexibility / multi-function use
If you want dual use (spotting, camera, rifle mount), monoculars often support them more readily.
Budget constraints
If cost is a concern, a high-quality monocular may outperform a cheap binocular.
Trial or testing if possible
If you can rent or test both systems, the personal comfort, feel, and eye strain differences become obvious.
Plan for future upgrades / parts
Consider availability of tubes, optics, and accessories; dual-tube systems may need matched replacements, which are more expensive.
Training and adaptation
Be prepared: monocular use may require more adaptation. Using both eyes open (one with NV, one not) is a learning curve.
Tips for Maximizing Performance Regardless of Your Choice
Whatever you choose, here are some best practices:
Maintain alignment and calibration: Even binoculars need periodic checks to ensure collimation.
Use low-profile mounts to optimize the center of gravity and reduce neck strain.
Train your eye adaptation: Practice switching between naked vision and NVG vision to smooth transitions.
Use IR illuminators where allowed (if permitted by local regulations) to boost performance in low ambient light.
Keep tubes clean and dry: moisture, dirt, or shock can degrade performance or misalign optics.
Allow for spare parts: tubes, batteries, lens covers, and accessories are key to keeping gear mission-ready.
Summary & Final Recommendation
Both night vision monoculars and binoculars have unique advantages. Monoculars are lighter, more versatile, and budget-friendly perfect for hunters or shooters who need mobility. Binoculars offer better depth perception and comfort for long use but are heavier and more expensive. Choose a monocular for flexibility and value, or a binocular for immersive, high-performance viewing in the dark.
Bowhunting whitetails in thick cover is mostly a discipline problem: confirm the rules, scout for safe visibility, plan entry and exit, and pass any shot that is obstructed or uncertain. Dense cover can hold deer, but it also shortens sight lines and makes poor decisions easier to justify in the moment.
This is a safety-first and ethics-first guide, not a guarantee of hunting success. Seasons, legal methods, hunter-orange rules, access rules, baiting, cameras, stands, and reporting requirements vary by state and property, so verify current official regulations before every hunt.
Bowhunting thick cover safely means checking current rules first, scouting for visibility and safe access, reading the wind honestly, and committing to pass on any obstructed, low-light, or low-confidence shot. The limited sight lines reward patience and clear identification, not aggressive tactics.
Think of thick cover as a place where small mistakes compound. A poor entry route bumps deer. A bad wind exposes your position. A narrow lane tempts a rushed shot. The solution is preparation before the hunt and restraint during the hunt.
Check Rules Before Planning A Thick-Cover Hunt
Rules come before tactics. Do not assume last year’s deer season dates, legal methods, access rules, hunter-orange requirements, or reporting rules still apply. Start with your state wildlife agency’s current regulations for the exact place and season you plan to hunt.
Seasons, Legal Methods, Hunter Orange, And Access
Season timing, legal equipment, blaze-orange requirements, public-land access, and tagging/reporting rules are location-specific. This article intentionally avoids state-specific claims because those details change. Use official current sources for your state and property, and use hunter education as your safety foundation. IHEA-USA is a helpful starting point for hunter-education context.
Baiting, Stands, Cameras, And Property Rules
Rules around baiting, attractants, trail cameras, treestands, ground blinds, trimming lanes, and vehicle access vary widely. Private land also requires clear permission and known boundaries. If you are unsure whether a practice is allowed, treat it as unapproved until an official source or landowner confirms it.
Scout For Visibility, Wind, And Safe Access
Good thick-cover scouting is less about finding a dramatic spot and more about finding a spot you can enter safely, hunt ethically, and leave without creating avoidable pressure. Look for a few workable lanes, a clear route, and wind conditions that do not force a bad setup.
Also think about recovery before you ever hunt the spot. Thick cover can make visibility and follow-up decisions harder, so your setup should leave you with clear landmarks, safe walking paths, and a conservative plan for when you will back out and seek help. A responsible hunt is planned around the shot you might pass as much as the shot you hope to take.
Entry And Exit Routes
Plan entry and exit before dark. Thick cover can become confusing in low light, so carry a light, navigation, and a plan someone else knows. A careful route reduces both safety risk and the chance of bumping bedded deer before you ever settle in.
Shooting Lanes Without Over-Clearing
A few clear lanes inside your practiced range are more useful than a large cleared opening. Over-clearing can change deer movement, violate property rules, or damage habitat. Your goal is to see and identify the deer clearly, not to turn thick cover into open ground.
Plan thick-cover hunts around rules, access, wind, visibility, and shot discipline before the sit begins.
Wind And Thermal Checks
Wind can swirl in cover, draws, creek bottoms, and terrain breaks. Check wind often and be honest about what it means. If the only good lane requires a bad wind, it is usually better to wait, shift, or choose a different sit than to force the hunt.
Use Shot Discipline In Dense Cover
Shot discipline is the most important thick-cover skill. Before drawing, identify the deer, the lane, the angle, and what is beyond. Never shoot at sound, movement, or a partial silhouette in brush. Hunter education resources such as Hunter-Ed’s hunter education overview reinforce the same safety-first mindset.
Pass on brushy, low-light, hurried, or low-confidence shots. Passing is not failure. In thick cover, passing is often the decision that protects the animal, the hunter, and the integrity of the hunt.
Hunt Ethically Around Pressure And Habitat
Thick cover often exists because deer use it for security. Hunt it with respect for the habitat and the other hunters who may share the area. Avoid crowding, leave minimal impact, follow property rules, and do not let pressure push you into unsafe shortcuts.
Ethical hunting is not just about whether something is legal. It is also about restraint, preparation, and respect for the resource. That matters even more when cover limits visibility and decision time.
Thick-Cover Bowhunting Checklist
Before The Hunt
What To Confirm
Why It Matters
Rules
Season, legal method, orange, reporting, access
Prevents outdated or location-wrong assumptions
Property
Permission, boundaries, trimming, cameras, stands
Keeps the hunt legal and respectful
Access
Safe entry, exit, light, navigation, contact plan
Reduces risk in dense terrain and low light
Visibility
Clear identification and limited lanes in practiced range
Prevents obstructed or uncertain shots
Wind
Wind and thermals fit the setup
Avoids forcing a marginal sit
Discipline
Plan to pass low-confidence shots
Protects safety and hunting ethics
Common Mistakes In Thick Cover
The biggest mistakes are assuming rules, over-clearing lanes, ignoring wind, entering carelessly, and taking obstructed shots. Another common mistake is treating thick cover like open woods. It is not. You usually have less time, less visibility, and fewer clean options.
Do the boring work first: verify the rules, know the access, mark the safe lanes, and decide ahead of time what shots you will pass. That is the part that makes the hunt more responsible.
Start by checking current rules and access, then scout for safe entry, visibility, wind, and a few clear lanes inside your practiced range. During the hunt, pass on any obstructed, low-light, or uncertain shot.
Is thick cover good for deer hunting?
Thick cover can hold deer because it provides security and bedding, but it also limits visibility and safe shot options. That tradeoff makes planning and restraint especially important.
What is the most important rule for shooting in thick cover?
Clearly identify the deer and what is beyond before you draw. Never shoot at sound, movement, or a partial silhouette in brush. If you are not sure, do not shoot.
Do I need to clear shooting lanes in thick cover?
A few clear lanes can help, but do not over-clear. Confirm what trimming is allowed on the property, and keep lanes limited to places where you can clearly identify the deer and the background.
Are thick-cover hunting rules the same everywhere?
No. Seasons, legal methods, hunter-orange rules, baiting, cameras, stands, access, and reporting requirements vary by state and property. Always check current official regulations for the exact place you hunt.
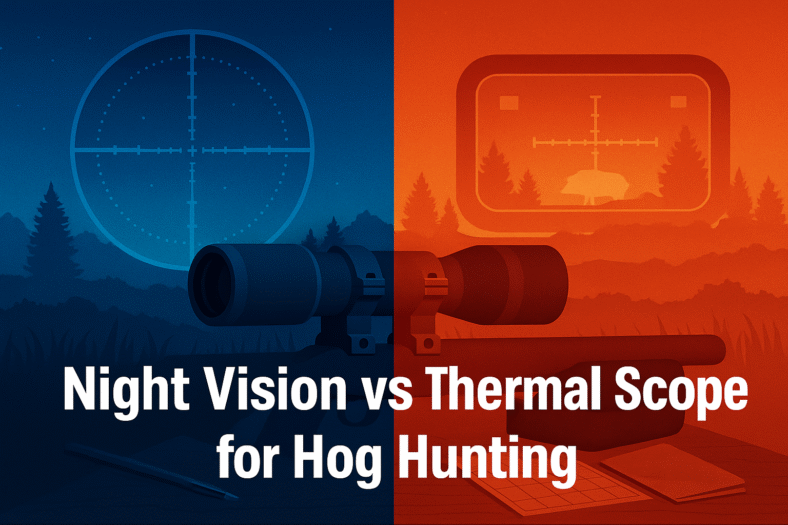
Hog hunting after dark is one of the most adrenaline-fueled pursuits a shooter can take on. The cover of night gives you stealth advantages, but it also presents a big challenge: seeing your target. In this article, we’re going to break down night vision vs thermal scopes in the context of hog hunting. Which one gives you the upper hand? What shortcomings should you watch out for? And ultimately, which is the better investment for your style and terrain?
Table of Contents
Introduction: Why optics matter at night
What is Night Vision (NV)?
How NV works
Generations and types
Strengths and weaknesses
What is Thermal Imaging?
How thermal scopes work
Color palettes, sensitivity, resolution
Strengths and weaknesses
Key Differences: Night Vision vs Thermal
Hog Hunting Scenarios: Side-by-Side Comparison
Open fields & long-range
Dense cover, brush, foliage
Fog, smoke, rain, and adverse conditions
Close-quarters vs mid-range
Legal, ethical, and regulatory considerations
Choosing the Right Scope for Your Hog Hunt
Budget vs performance
Accessories & support gear
Durability, battery life, weight
Hybrid or dual use systems
Practical Tips for Using NV or Thermal in the Field
Conclusion: What works best for hog hunting
Call to Action & Links to gear
1. Introduction: Why optics matter at night
The success of a night hog hunt often hinges on one thing: can you see your target clearly, confidently, and quickly enough to take the shot? Hog populations are often nocturnal or active in low light, and they use thick cover, mud, brush, and terrain to hide. A standard daytime rifle scope or iron sights won’t cut it in pitch darkness.
That’s where specialized optics night vision and thermal imaging enter. They give you “eyes in the dark,” helping you detect, identify, and engage hogs that might otherwise remain invisible. But they aren’t the same tool; they have fundamentally different operating principles, strengths, limitations, and costs.
Over the past decade, thermal imaging has rapidly improved and become more accessible to hunters. Still, many experienced hog hunters swear by high-end night vision rigs. The correct choice depends heavily on your environment, budget, and tactics.
Let’s dig in.
2. What is Night Vision (NV)?
How NV works
Night vision devices use image intensification to take very low ambient light (moonlight, starlight, distant glow) and amplify it to create a visible image. They often operate in the near-infrared (NIR) spectrum, converting that into a visible picture for your eye.
Some NV scopes also include an IR illuminator (an invisible infrared light source) to “light up” completely dark areas. The user doesn’t see that light, but the night vision device can pick it up.
Generations and types
Night vision comes in different “generations” (Gen 1, Gen 2, Gen 3) in the analog/tube world. Higher generations offer better clarity, more amplification, lower noise, and longer service life.
There’s also digital night vision, which uses a CMOS sensor to collect infrared or very low light and display the image on an LCD screen. This allows daytime and nighttime use, but often with lower resolution or clarity than premium tube-based NV.
Strengths of night vision
Under ambient light (moonlit or starlit), NV can produce a crisp, detailed image with good resolution and contrast.
Color isn’t preserved (it’s usually green or grayscale), but shape, movement, and finer anatomical detail can be easier to interpret.
For hunters wanting to positively identify a hog (sex, fullness, size) or differentiate hog from other animals, NV’s clarity can help.
The cost for entry-level NV tends to be lower (for moderate performance) than high-end thermal units.
Weaknesses and limitations of NV
NV requires some ambient light (or an IR illuminator). In absolute darkness, without an IR illuminator, it may fail.
IR illuminators can reveal your position if detected, or spook animals if misused.
NV struggles to see through obstacles: dense foliage, leaves, brush, tall grass — anything that blocks light will block the view.
Conditions like fog, smoke, heavy rain, and mist interfere strongly with light-based systems, reducing range dramatically.
Premium tube-based NV gear tends to be expensive, especially for higher-generation devices.
3. What is Thermal Imaging?
How thermal scopes work
Thermal imaging operates on a different principle: heat detection. Every object emits some infrared radiation (heat). Thermal sensors detect the temperature differences between objects and convert that into an image, often in grayscale or false color (white-hot, black-hot, rainbow, etc.). Animals (being warm-blooded) usually stand out as bright shapes against cooler backgrounds.
This means thermal scopes do not depend on any ambient light — they work in total darkness, twilight, daylight regardless.
Resolution, sensitivity, and color palettes
Thermal scope capability is largely determined by resolution (like 320×256, 640×512, etc.), pixel pitch / sensitivity (how small a temperature difference it can detect), and the refresh rate (frames per second). The more sensitive and higher resolution, the better your range and image fidelity.
Many thermal scopes offer color palettes (white-hot, black-hot, red-hot, rainbow) to help view targets under different backgrounds and conditions.
Strengths of thermal imaging
Works in total darkness, no need for ambient light or IR illuminators.
Penetrates partial obscurants: thermal imaging can detect animals behind light foliage or thin brush by their heat, even when visual light fails.
Performs better than NV in fog, smoke, mist, or darkness — to a degree.
Great for scanning: you can sweep an area and pick up heat signatures of hogs almost instantly.
Thermal devices are less likely to be “blinded” by sudden light changes (unlike NV which can overload if exposed to strong light).
For hog hunting, being able to spot a hog in thick cover or behind visual camouflage is a significant advantage.
Weaknesses and limitations of thermal
Thermal imaging often lacks fine detail — you may see a shape but not necessarily identify sex/features unless you’re relatively close.
Heat signatures from vegetation, rocks warmed by sun, or residual sun-warmed ground can create “noise” and distract from actual targets.
High-end thermal units are expensive, especially those with large sensors, high resolution, and fast frame rates.
Battery life, weight, and ergonomics can be limiting on more capable units.
In high ambient temperature environments, a hog may “blend” more with its surroundings, reducing thermal contrast.
4. Key Differences: Night Vision vs Thermal
Let’s compare side-by-side critical factors to help you decide:
Feature
Night Vision (NV)
Thermal Scope
Dependency on light
Needs ambient light or IR illuminator
No reliance on light — works in total darkness
Detail / image clarity
Often better for anatomical detail and shape recognition under favorable conditions
Strong for silhouette, shape, heat; less detail on texture
Penetration through cover
Blocked by foliage, brush, leaves
Can detect heat through light cover or brush (but not through thick solid objects)
Adverse weather handling
Very sensitive to fog, smoke, low light
Better performance in fog, smoke, low light
Price
Moderate to high (depending on generation)
Generally higher, particularly at top-end models
Battery / power
Good battery life on many NV scopes
Power-demanding sensors & electronics can reduce battery life
Use in daytime / dual use
Digital NV can sometimes be used in daytime
Thermal works both day and night
Ease of detection (you being seen)
IR light or ambient light can betray position
Passive system; less likely to alert game
Target identification
Better recognition at closer distance
May need to move closer for detail
One expert summary: “Thermals offer a clearer sight picture than night vision at most ranges … it’s possible to see heat signatures of animals that are obscured by shadows or camouflage that NV would miss.”
Another practical comparison: night vision may be limited in total darkness (or require IR illumination), while thermal has no such limitation.
5. Hog Hunting Scenarios: Side-by-Side Comparison
Now let’s evaluate how each technology performs in real hog-hunting situations.
a) Open fields & long-range
In wide open terrain — pastures, agriculture fields, open ground — your success depends heavily on detection range. Thermal scopes shine here: they can pick up the heat signature of a hog (or group) against a cooler field many hundreds of meters away, giving you time to move, plan, and engage. The contrast helps.
Night vision can work well in such settings if there is ambient light (moonlight, sky glow) or useable IR illumination. But its range will be inferior compared to a good thermal in many real-world conditions, especially if the hog is partially shaded or concealed.
b) Dense cover, brush, foliage
This is where hogs often hide, and where the debate gets real. Thermal scopes have a major edge in detecting warm bodies through light vegetation, behind leaves, or partially obscured. If a hog is walking behind brush or leaves, you might still catch their heat signature.
Night vision, reliant on light, often fails when even thin cover is between you and the hog. Unless you can “peep” through small openings, your view will be blocked. In many field reports, hunters using NV fail to detect hogs in brush while thermal users spot them easily.
c) Fog, smoke, rain, adverse conditions
Weather plays a big role. NV is handicapped by fog, smoke, rain, and mist light scattering becomes your enemy. Thermal optics, although not perfect, can still detect heat differences in many of those conditions, giving you an advantage. Many hog hunters prefer thermal in marginal weather conditions.
d) Close-quarters vs mid-range
In close-quarters (say inside 100 yards), both NV and thermal are capable of delivering results. NV may provide better clarity and easier aiming at close detail, especially if ambient light helps. But thermal still excels in quickly identifying movement or body heat.
In mid-range or transitioning scenarios (100–300 yards), thermal often maintains its advantage because of its detection power, particularly through marginal light or partial obstructions.
6. Legal, Ethical & Regulatory Considerations
Before purchasing or using night vision or thermal scopes for hog hunting, you must check local laws and regulations:
In many regions, using devices that enhance vision (NV, thermal, IR) for hunting is regulated or restricted. Some states or countries ban them, others allow them for specific species (like hogs) under certain permits.
Infrared or visible illuminators may be prohibited in some jurisdictions.
Ethical considerations: you must always positively identify your target before shooting. The clarity of NV helps here, but thermal may require closer confirmation to avoid misidentification.
Be aware of laws regarding use on “non-game” or “nuisance” species; hogs may be treated differently in laws.
Always ensure your setup remains within legal constraints — sensor type, magnification, illuminator usage, etc.
It’s your responsibility as a hunter to know the rules where you hunt. Ignorance is no defense.
7. Choosing the Right Scope for Your Hog Hunt
Now you’ve seen the trade-offs. Here’s a practical approach to choosing what’s best for you.
Budget vs Performance
If you are on a tight budget, a mid-tier NV device might be your entry into night hog hunting, but with acknowledgment of its limitations.
If your budget allows, a decent thermal will outperform NV in many real-world hog hunting contexts.
High-end NV (Gen 3 or better) can close the gap somewhat, but costs escalate quickly.
Accessories & Support Gear
NV systems with IR illuminators need good, quality IR lights (ideally adjustable).
Thermal scopes benefit from different color palettes, image parameters (contrast, gain), and sometimes video-out, WiFi, or recording features.
Consider mounting systems, shock resistance, water/dust sealing, and ease of use under stress.
Durability, battery life, and weight
Field use is rough: your scope must survive recoil, vibration, humidity, and rough handling.
Thermal devices often consume more power, so battery life is critical. Bring spare batteries or power packs.
Weight and bulk matter. A heavy scope can throw off your balance, especially in a ground blind or treestand.
Hybrid or dual-use systems
Some solutions combine NV and thermal or use clip-on thermal modules behind your daytime scope. This offers flexibility but at added complexity and cost. Some hybrid optics allow toggling between modes. It’s useful, but only if done well.
8. Practical Tips for Using NV or Thermal in the Field
Here are field-tested tips for maximizing your effectiveness.
Pre-scan with thermal: Use a handheld thermal or mounted unit to scan the area, locate hogs, then move to engage.
Always move slowly: In thermal mode, sudden heat changes (your body, gun barrel) can spook hogs.
Use proper reticles and zeroing: Thermal scopes often include ballistic drop reticles or customizable hash marks — get familiar before hunting.
Adjust gain/contrast: In changing scenes, adjust gain or contrast to avoid “blow-out” of bright heat or suppression of faint signals.
Blend movement & pauses: Animals show motion first. Pause at intervals to allow heat signatures to “pop.”
Keep optics clean: Dirt, fog, moisture on lens windows degrade performance—carry lens wipes, silica packs.
Limit self-heating: Don’t leave your scope in direct sun or close to heat sources before use; it can reduce contrast.
Practice identifying hog signature shapes: Know hog body shape, heat signature vs deer, raccoon, etc., so you don’t mis-shoot.
Zero often, confirm shot placement: Night conditions add uncertainties — practice under dark conditions.
Plan exit & retrieval: Use your scope to locate downed hogs; thermal helps in recovery in darkness.
9. Conclusion: What Works Best for Hog Hunting?
In summary: thermal scopes offer a significant advantage in many real-world hog-hunting conditions — total darkness, in cover, adverse weather, scanning large areas. Their ability to detect heat signatures that would be invisible to NV is a game-changer.
However, night vision still has a place, particularly if you’re operating in moonlit terrain, wanting fine target detail, or working on a moderate budget. High-end NV can perform admirably under some conditions. For some hunters, combining both (or using hybrid systems) may deliver the best balance.
Given the practical demands of hog hunting — the need to pick up movement, detect concealed animals, and act in varied terrain and light — thermal is often the better all-around tool, if it fits your budget and legal environment.
If I were to pick one for hog hunting (all else equal), I’d lean toward a good mid-to-high level thermal scope as my primary tool, and perhaps keep a compact NV as a backup or for close-range identification.
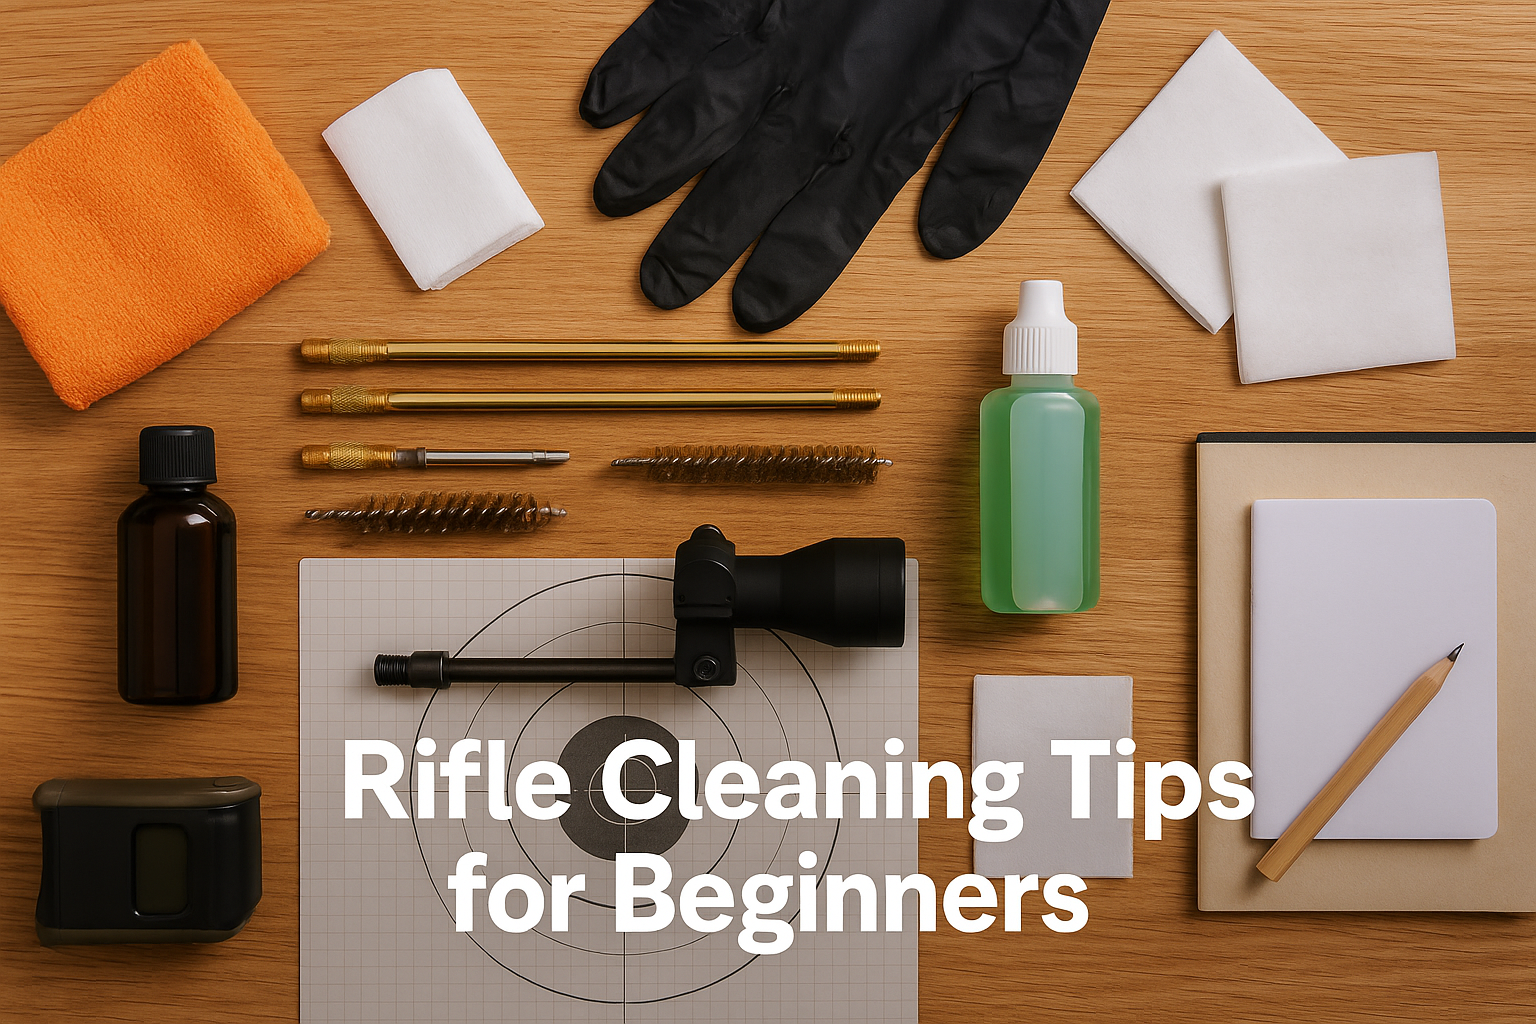
Beginner rifle cleaning starts with safety, the rifle manual, the right tools, and a calm routine. Unload and clear the rifle first, move ammunition away from the bench, work in a ventilated area, and use cleaning products according to their labels. This guide explains beginner-safe rifle cleaning habits without replacing your firearm manual, a qualified instructor, or a gunsmith.
To clean a rifle safely as a beginner, unload and clear it, remove ammunition from the cleaning area, follow the manual for any disassembly, use correctly sized rods, brushes, patches, solvent, and oil, clean from the recommended direction, wipe away residue, apply only the amount of oil the manual calls for, and store the rifle securely after inspection.
A beginner rifle-cleaning setup should include correct-size tools, patches, solvent, oil, gloves, eye protection, and the firearm manual.
Beginner Rifle Cleaning Checklist
Unload and clear: Confirm the rifle is unloaded before any cleaning work.
Remove ammunition: Keep ammunition off the cleaning bench and away from solvents.
Read the manual: Use the firearm maker’s cleaning and disassembly instructions.
Use correct-size tools: Match rods, brushes, jags, and patches to the bore.
Ventilate the area: Use solvent and oil in a space with airflow.
Protect yourself: Wear eye protection and gloves when using chemicals.
Store securely: Return the rifle and cleaning chemicals to safe storage when finished.
Start every cleaning session with firearm safety. The NSSF firearm safety rules are a useful reminder that maintenance begins with safe handling. If you clean after range sessions, residue hygiene matters too; CDC/NIOSH range guidance explains why lead and residue exposure should be taken seriously around shooting environments.
Before You Start Cleaning
Choose a stable bench, good lighting, and a surface you do not mind getting dirty. Put ammunition in another location before opening solvent or oil. Confirm the chamber and magazine are clear, then check again. If your rifle requires disassembly, follow the manual rather than memory or a random shortcut.
When to Stop and Ask for Help
Stop if a part does not move as expected, a screw feels stuck, the bore looks obstructed, the action does not function normally, or you are unsure how to reassemble the rifle. A gunsmith, qualified instructor, or manufacturer support is a better choice than forcing parts.
Tools and Supplies
A beginner kit should include a correctly sized cleaning rod or pull-through cable, bore brush, jag or patch loop, cotton patches, nylon utility brush, microfiber cloth, firearm-safe solvent, firearm oil, gloves, and eye protection. A bore guide can help on compatible rifles, but it must match the firearm and cleaning method.
Do not buy only by piece count. A large kit is not useful if the brushes are the wrong size, the rods are rough, or the case makes parts hard to identify. Correct fit and safe handling matter more than having the biggest kit on the shelf.
Solvent and Oil
Use solvent and oil according to their labels and the firearm manual. Avoid mixing chemicals, avoid over-oiling, and keep products capped when not in use. Eye protection and gloves are simple habits that keep residue and splashes under control.
Safe Cleaning Routine
A safe routine is slow and repeatable. After the rifle is clear and the bench is ready, follow the manual for access to the bore and action. Use properly fitted tools, work from the recommended direction, let solvent do its job, and use clean patches until heavy residue is removed. Do not scrape aggressively or force a brush through a bore that feels wrong.
Clean the chamber, bolt face, and accessible action areas only as your manual allows. Many beginners create problems by taking apart more than necessary. If the rifle has heavy rust, pitting, a bore obstruction, unusual wear, or a malfunction, cleaning is not a substitute for inspection by a qualified professional.
Keep Notes
A small maintenance note helps you remember when the rifle was cleaned, what products were used, and whether anything looked unusual. This is especially useful if you rotate several firearms or store a rifle for a season.
Oil, Wipe-Down, and Storage
Oil should protect parts without leaving the rifle wet or sticky. Too much oil can attract debris and may create problems in cold weather or dusty environments. Wipe exterior metal surfaces as appropriate, keep oil away from optics glass unless the product is made for that use, and check that the rifle functions normally after reassembly.
After cleaning, store the rifle securely and keep chemicals away from children, guests, and heat sources. General safety programs such as Project ChildSafe are useful reminders that safe maintenance and safe storage belong together.
Before putting everything away, do a simple bench reset: cap the chemicals, throw away dirty patches, wipe the mat, check that no small parts or tools are left in the action area, and return the manual and notes to the same place each time. Beginners build confidence faster when the cleaning area is organized and repeatable.
Common Beginner Mistakes
Cleaning before fully unloading and clearing the rifle.
Keeping ammunition on the bench during cleaning.
Using the wrong brush, jag, or patch size.
Forcing rods or brushes instead of stopping to diagnose resistance.
Over-oiling parts until they feel wet or gummy.
Mixing chemicals or ignoring solvent labels.
Taking apart more of the rifle than the manual recommends.
FAQ
How often should a beginner clean a rifle?
Follow the firearm manual first. Many rifles benefit from cleaning after range use, exposure to moisture, dusty conditions, or long storage, but the exact routine depends on the firearm and ammunition.
Can too much cleaning hurt a rifle?
Careless cleaning can cause wear or damage if tools are wrong, chemicals are misused, or parts are forced. Careful manual-based maintenance is different from aggressive scrubbing.
Should I clean from the muzzle or chamber end?
Use the direction recommended by your firearm manual and the tools designed for that method. When unsure, ask the manufacturer, a gunsmith, or a qualified instructor.
Do I need expensive cleaning tools?
You need correct, safe, well-finished tools more than expensive tools. A small quality kit that fits your rifle is better than a large kit full of parts you cannot use.
Final Takeaway
Good rifle cleaning habits are simple: unload and clear first, follow the manual, use correct-size tools, respect solvents and residue, avoid forcing parts, apply oil carefully, and store the rifle securely. Beginners do not need a complicated routine; they need a safe, repeatable one.
You improve long range shooting by tightening the fundamentals first: a stable position, consistent breathing, a clean trigger press, a steady natural point of aim, and honest reading of wind and distance. Equipment matters less than repeatable technique. The shooters who connect at distance are the ones who do the same simple things the same way on every shot, and who only take a shot when they are confident in it.
This guide stays on the safe, learnable parts of long range shooting. It does not give specific elevation or windage prescriptions, because every rifle, load, and condition is different, and following someone else’s numbers is how people miss or worse. Build your own confirmed data on a controlled range, follow the firearm safety rules from the National Shooting Sports Foundation, and treat every session as practice in discipline as much as accuracy.
Long range shooting generally means engaging targets far enough that bullet drop, wind drift, and your own stability become the limiting factors rather than the rifle’s mechanical accuracy. For many centerfire rifles that begins somewhere past 300 yards, though the exact point depends on the cartridge, the rifle, and the shooter. The label matters less than the principle: at distance, small errors at the trigger turn into large misses downrange.
That is why improvement at distance starts close in. A shooter who cannot hold a tight group at 100 yards will not suddenly tighten up at 500. Earn each step of distance by proving your consistency at the step before it.
Range Safety Comes First
No accuracy tip outranks safety. Long range shooting often happens on larger ranges where targets and impact areas are farther away and harder to see, which makes the basic rules even more important. Always treat every firearm as loaded, keep the muzzle pointed in a safe direction, keep your finger off the trigger until your sights are on target and you have decided to fire, and be certain of your target and what lies beyond it. The full set is laid out by the NSSF firearm safety rules.
Confirm a safe, known backstop or berm behind every target. Distance increases the area you are responsible for.
Follow the specific range’s rules, cease-fire commands, and downrange procedures without exception.
Wear eye protection and hearing protection on every shot, including spotting from beside the firing line.
Verify the firearm is clear before transporting, cleaning, or handing it to anyone.
Build a Stable Shooting Position
A stable position is the single largest physical contributor to long range accuracy. The goal is to support the rifle so it returns to the same point of aim with minimal muscular effort from you. The more your bones and gear hold the rifle, and the less your muscles strain to do it, the more repeatable each shot becomes.
Use a Solid Front Rest and Rear Support
A bipod, bench rest, sandbag, or stable improvised rest supports the front of the rifle. A rear bag or your supporting hand stabilizes the buttstock so you can make fine elevation adjustments without straining. The aim is a rifle that sits where you put it.
Find Your Natural Point of Aim
Natural point of aim is where your sights settle when your body is relaxed. Get into position, close your eyes, breathe, then open them. If the reticle has drifted off target, shift your whole body rather than muscling the rifle back. Forcing the rifle onto target with muscle introduces movement that shows up at distance.
Master the Fundamentals Before Distance
The fundamentals of marksmanship are sight alignment, breathing, trigger control, and follow-through. They are simple to describe and take real practice to make automatic. They matter more, not less, as distance grows.
Breathing
Your body moves slightly as you breathe, and that movement is visible through a scope at distance. Most shooters fire during the natural pause at the bottom of an exhale, when the body is briefly still. Do not hold your breath so long that you start to shake or strain.
Trigger Control
Press the trigger straight back with steady, increasing pressure so the shot almost surprises you. Jerking or slapping the trigger pushes the muzzle off target in the instant the bullet leaves. Dry practice with a verified unloaded firearm, following safe handling rules, is one of the best ways to refine a clean press.
Follow-Through
Stay on the rifle and keep your eye on the sight picture through the shot and for a moment after. Reacting before the bullet has cleared the barrel introduces movement. Good follow-through also lets you call your shot, meaning you know where the reticle was at the break.
Read Wind and Conditions
Wind is usually the hardest variable to manage at distance because it pushes the bullet sideways the entire way to the target and can differ between you and the target. Reading it is a skill built over many sessions, not a formula you apply once. The National Weather Service publishes useful background on how wind behaves and is measured.
Watch indicators downrange: grass, flags, mirage, dust, and moving vegetation tell you direction and rough strength.
Note that wind can vary along the bullet’s path, so the condition at your position is not always the whole story.
Build your own feel by observing conditions, making a call, firing, and comparing the result. Honest record keeping teaches faster than guessing.
This guide does not give wind hold values, because they depend on your specific cartridge, velocity, range, and conditions. Learn to read wind and develop your own confirmed corrections on a safe range.
Know Your Rifle and Build Your Own Data
Accuracy at distance depends on knowing how your specific rifle and ammunition behave, which is something only you can confirm. Borrowed numbers from another shooter, a forum, or a different rifle and load are not your data. Use only ammunition that is correct and safe for your firearm, and verify safe cartridge and chamber combinations through the firearm manual and resources such as SAAMI.
Confirm your zero at a known distance with the exact ammunition you intend to use, then verify it again on a later day.
Keep a simple log of your confirmed results in different conditions so your data reflects reality, not theory.
Maintain the rifle and check that the scope and mounts are secure, following the manufacturer’s torque and setup guidance.
Shoot Within Your Ability
Improving at long range is not the same as taking longer shots than you can make. The ethical and safe approach is to extend your maximum distance only as your confirmed, repeatable accuracy supports it. A shot you can make on a calm day at the range is not the same as a shot in wind, in a hurry, or on a live animal.
For hunters, this discipline is part of an ethical, humane approach to the field, and hunter education programs such as Hunter-Ed stress knowing and respecting your effective range. If you are not confident in a shot, the right answer is to pass on it. Confidence should come from proven practice, not optimism.
Common Mistakes That Cost Accuracy
Chasing equipment instead of practicing fundamentals. Gear cannot fix an inconsistent position or a poor trigger press.
Stretching distance faster than skill, which builds bad habits and unsafe shots.
Using another shooter’s drop or wind numbers instead of confirming your own.
Ignoring follow-through and reacting to recoil before the shot has cleared.
Skipping the wind read and treating a calm-range zero as if it applies everywhere.
Frequently Asked Questions
What is the most important factor in long range accuracy?
Consistent fundamentals applied from a stable position. A repeatable position, steady breathing, and a clean trigger press matter more than any single piece of gear. Master those first, then refine wind reading and your own confirmed data.
How far is considered long range?
It varies by rifle and cartridge, but for many centerfire rifles long range begins past about 300 yards, where drop and wind become the dominant factors. The exact distance depends on your equipment and skill, so judge it by your own confirmed accuracy.
Can I use someone else’s scope settings or drop chart?
No. Settings depend on your specific rifle, ammunition, velocity, and conditions. Using another shooter’s numbers leads to misses and unsafe shots. Build and verify your own confirmed data on a controlled range.
How do I practice wind reading safely?
Observe downrange indicators like flags, grass, and mirage, make a call, fire on a safe range with a proper backstop, then compare the result and keep notes. Reading wind is a skill built over many sessions, not a formula.
Final Takeaway
Improving long range shooting comes down to doing simple things consistently: build a stable position, master the fundamentals, learn to read wind, and confirm your own data on a safe range. Extend your distance only as your proven accuracy allows, follow every range safety rule, and pass on any shot you are not confident in. Discipline is what separates a shooter who hits at distance from one who hopes to.
GPS devices can help hunters mark stands, return to camp, track routes, save blood-trail notes, and avoid getting turned around in unfamiliar terrain. They are useful tools, but they should not be your only navigation plan. Batteries fail, screens break, maps can be outdated, and signal conditions vary.
The best approach is redundancy: use a GPS or hunting app, carry a paper map and compass, preload offline maps, keep backup power, and tell someone your plan before you leave. This guide explains how to choose and use GPS tools without depending on them blindly.
A hunting GPS is worth using if it helps you mark locations, navigate safely, and plan routes without replacing basic woods skills. The most useful features are offline maps, waypoint marking, track-back routing, battery life, weather resistance, map layers, and emergency communication options where available.
Before a hunt, confirm offline maps, waypoints, track-back, battery power, compass backup, and a shared trip plan.
GPS Navigation Checklist
Before relying on any device in the field, run through this checklist. It is simple, but it prevents the most common navigation failures.
Offline maps: Download the full area before leaving service.
Waypoints: Mark truck, camp, stand, blind, water crossing, and hazard locations.
Track back: Test route recording and return navigation before the hunt.
Battery: Start with full charge and carry backup power or spare batteries.
Compass backup: Carry a real compass and know the general direction to safety.
Trip plan: Tell someone where you are going and when you expect to return.
Why Hunters Use GPS
Hunters use GPS tools to reduce uncertainty. A device can help you return to the truck in the dark, find a stand without wandering, mark sign, measure access routes, avoid property boundaries, and record how you entered an area. It also helps when fog, snow, timber, or flat terrain makes landmarks harder to read.
GPS stands for Global Positioning System, a satellite-based positioning system. A basic GPS overview is useful background, but hunters should care less about the technical details and more about whether the device works reliably in their terrain.
Features That Matter
Do not choose a hunting GPS only because it has a long feature list. Choose the features that support your actual hunt.
Offline Maps and Boundaries
Offline maps are critical because cell service can disappear quickly in hills, timber, and remote access roads. Boundary layers can help with public/private land awareness, but you should still verify legal access from official sources because map layers can lag behind current rules.
Waypoints and Tracks
Waypoints mark specific spots. Tracks record your path. Together, they help you understand how you moved through an area and how to return. Use clear names such as Truck North Gate, Creek Crossing, Buck Sign, or Stand 2 instead of vague labels you will forget later.
Battery and Weather Resistance
Battery life matters more than novelty features. Cold weather, screen brightness, route recording, and satellite messaging can drain power. Weather resistance also matters because hunting gear gets wet, dirty, and bumped around in packs.
Types of GPS Tools
Hunters commonly use handheld GPS units, smartphones with hunting apps, satellite communicators, GPS watches, and vehicle-mounted navigation. Each has trade-offs.
Handheld GPS vs. Phone Apps
A handheld GPS may be more rugged and battery-friendly. A phone app may have better map layers and easier planning. Many hunters use both: the phone for detailed maps and the handheld or compass as backup. The best setup is the one you practice with before you need it.
Satellite Communicators
Satellite communicators can add messaging or SOS features in remote areas, depending on device and subscription. Do not treat them as permission to take careless risks. They are backup tools, not a replacement for route planning, weather checks, and telling someone your plan.
Field Workflow
Use a consistent workflow. Before leaving the vehicle, mark the truck, confirm the map is loaded, start a track if needed, and check battery level. During the hunt, mark sign, hazards, trail junctions, and recovery points. After the hunt, clean up duplicate waypoints and save useful notes while the memory is fresh.
Keep your system simple. Too many waypoints can become clutter. Use names and icons that make sense at a glance, especially in the dark or bad weather.
Safety and Backup Navigation
A GPS is only one part of outdoor safety. The National Park Service lists navigation, illumination, first aid, fire, shelter, extra food, extra water, and extra clothes among the Ten Essentials. Hunters should also carry season-appropriate survival gear and know how to navigate without a screen.
For hunting-specific preparation and safe decision-making, resources such as Hunter Ed can help reinforce trip planning, legal access, and responsible behavior. Tell someone your route, expected return time, vehicle location, and what to do if you do not check in.
Common Mistakes
The biggest mistake is assuming the device will solve every problem. Other common mistakes include forgetting offline maps, letting the battery run low, failing to mark the truck, trusting outdated property layers, ignoring weather, and never practicing track-back until lost.
Another mistake is staring at the screen instead of reading the land. Use the GPS to confirm your plan, but still watch wind, terrain, light, trails, and landmarks. A hunter who combines map sense with device discipline is much safer than one who only follows a glowing line.
FAQ
Do I need a GPS for hunting?
You do not always need one, but it is very useful in unfamiliar terrain, public land, big woods, mountains, swamps, or low-light exits. Carry backup navigation either way.
Is a phone enough for hunting navigation?
A phone can work if maps are downloaded and the battery is protected, but it should not be your only plan. Carry a compass, backup power, and basic route knowledge.
What waypoints should hunters mark?
Mark the truck, camp, stand, blind, trail junctions, hazards, water crossings, sign, and recovery points. Use clear names so the map still makes sense later.
Should I still carry a compass?
Yes. A compass and paper map are lightweight backups when batteries die, phones break, or screens become hard to use in weather.
Final Takeaway
GPS devices are excellent hunting tools when you use them as part of a complete navigation plan. Preload maps, mark important points, carry backup power, keep a compass, and share your trip plan. The best navigation system is not the most complicated one; it is the one you understand before the woods get dark.
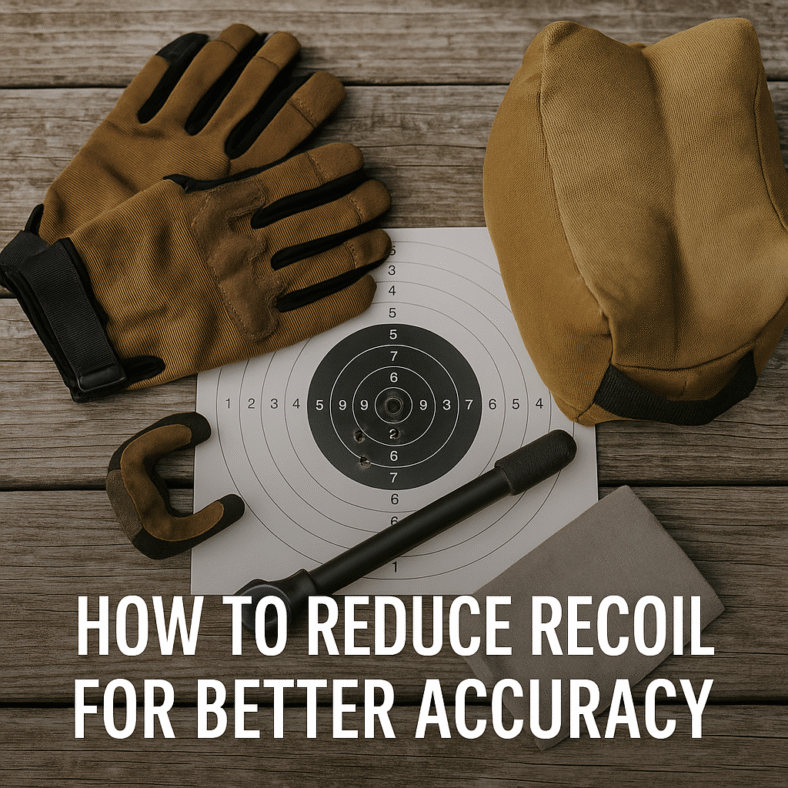
Reducing recoil for better accuracy starts with fit, stance, grip, trigger control, and realistic practice. Gear can help, but it cannot replace safe fundamentals. The goal is to manage recoil consistently so the sights lift predictably, return naturally, and your shots stay repeatable.
To reduce recoil for better accuracy, use a firearm that fits, keep a stable stance, hold consistent grip pressure, press the trigger smoothly, and practice with ammunition you can control. If recoil causes flinching, step down to a lower-recoil setup for training before returning to heavier loads.
Most Important Fix
The biggest improvement usually comes from consistency. A repeatable grip, shoulder position, cheek weld, and trigger press will do more for accuracy than chasing every accessory.
When Gear Helps
Recoil pads, proper stock fit, muzzle devices where legal, heavier firearms, and appropriate ammunition can help. They work best after the shooter already has safe fundamentals.
Safety First
Before working on recoil control, review the NSSF firearm safety rules. Keep the muzzle pointed in a safe direction, keep your finger off the trigger until ready to shoot, know your target and what is beyond it, and follow range commands.
Recoil fatigue can create bad habits. If you start flinching, pushing the muzzle, blinking hard, or losing safe control, pause the session. More rounds are not always better practice.
Fit and Setup
Fit is one of the most overlooked recoil factors. A rifle or shotgun that is too long, too short, too light, or poorly shaped can make recoil feel sharper and make accurate shooting harder.
Rifle and Shotgun Fit
Length of pull, comb height, recoil pad shape, and cheek weld all matter. The firearm should mount naturally without stretching your neck, lifting your head, or placing the butt awkwardly on the shoulder.
Handgun Fit
For handguns, grip size and trigger reach affect recoil control. If the grip is too large or too small, the shooter may steer the gun during the trigger press or lose control during recoil.
Stance, Grip, and Body Position
Good recoil control uses the whole body. The firearm should recoil into a stable structure, not into loose joints or a collapsing position.
Rifle Position
Keep the butt seated firmly in the shoulder pocket, maintain a consistent cheek weld, and support the rifle so it tracks straight back. Avoid leaning away from recoil.
Handgun Position
Use a balanced stance, firm support-hand pressure, and locked-in wrist alignment. The goal is not to freeze the gun in place, but to let it recoil and return consistently.
Trigger Control and Follow-Through
Recoil anticipation often hurts accuracy before recoil actually happens. A clean trigger press and good follow-through help you avoid pushing, jerking, or dipping the muzzle before the shot breaks.
Watch the Sights
Watch what the sights do during and after the shot. If they dip before recoil, the issue is anticipation. If they lift and return predictably, your recoil management is improving.
Do Not Rush the Next Shot
Accuracy comes from seeing the sights return and confirming the next shot. Speed should come after control, not before it.
Ammunition and Load Choice
Ammunition changes recoil. Bullet weight, velocity, powder charge, firearm weight, and stock design all affect how recoil feels. For practice, a manageable load can help you build skill without developing a flinch.
Training Loads
Lower-recoil training ammunition, rimfire practice, or reduced-power options can help when used safely and legally. Confirm point of impact again before switching back to hunting or defensive loads.
Hunting Loads
For hunting, choose ammunition that is legal, accurate, and appropriate for the animal. Do not choose the hardest-kicking load if it makes you flinch or shoot poorly.
Recoil-Reducing Gear
Gear can reduce felt recoil, but every option has tradeoffs. A recoil pad may help comfort. A heavier firearm may move less but carry worse. A muzzle brake may reduce recoil but increase blast and noise. Use proper eye and ear protection, and follow range rules.
Recoil Pads and Stock Fit
A good recoil pad can spread force and improve comfort. Stock fit can be even more important because poor fit sends recoil into the shooter awkwardly.
Muzzle Brakes and Suppressors
Muzzle devices may be regulated and can change noise, blast, length, and handling. Verify local rules and range policies before using them.
Diagnose Recoil Anticipation
Recoil problems often start before the shot. If the shooter expects pain, noise, or blast, the body may tighten, blink, dip the muzzle, or pull the shot off target. The fix is to make practice observable. Watch the sights, slow the pace, and use a setup that lets you see what happens instead of simply enduring more recoil. Treat each session as skill-building, not punishment.
Use Short Strings
Short practice strings help you stay honest. Fire a few careful shots, pause, and check whether the sights are lifting and returning predictably. If accuracy gets worse as the session continues, fatigue or anticipation may be taking over. Record what changed between good and bad groups so the next session has a clear focus.
Separate Noise From Push
Some shooters react more to blast than recoil. Better hearing protection, outdoor practice where appropriate, or lower-blast setups can help the shooter focus on sight movement and trigger control. Keep proper hearing protection on every time you shoot.
Practice Plan
Start with safe handling and a firearm you can control.
Use short practice strings instead of long fatigue-heavy sessions.
Mix dry practice with live fire where appropriate and safe.
Use manageable ammunition while building fundamentals.
Watch the sights during recoil and recovery.
Stop when flinching or fatigue begins to take over.
Common Mistakes
Buying recoil gear before fixing fit and fundamentals.
Practicing with ammunition that causes flinch.
Leaning away from the firearm.
Changing grip pressure at the moment of firing.
Shooting too many rounds after fatigue starts.
Ignoring noise and blast as part of recoil sensitivity.
FAQ
Does heavier firearm weight reduce recoil?
Usually, yes. A heavier firearm often has less felt recoil, but it may be harder to carry or hold steady for some shooters.
Can a muzzle brake improve accuracy?
It can help some shooters by reducing recoil, but it also increases blast and may not be allowed everywhere. Accuracy still depends on fundamentals, ammunition, and firearm setup.
Why do I flinch before recoil?
Flinching usually comes from anticipating noise, blast, or recoil. It can happen before the firearm moves. Lower-recoil practice, dry practice, and instructor feedback can help.
Should beginners start with smaller calibers?
Often, yes. A manageable caliber helps beginners learn sight picture, trigger control, and follow-through without building recoil anxiety.
Final Takeaway
Recoil control is a system: fit, stance, grip, trigger control, ammunition, gear, and practice all work together. Start with safety and consistency, then use gear and load choices to support the fundamentals you can already repeat.
The best binoculars for deer hunting are the ones that match your terrain, your light conditions, and how long you carry them, not the ones with the highest magnification number on the box. For most whitetail hunters, an 8×42 or 10×42 pair balances brightness, steadiness, and weight well enough to glass from before dawn until last light. No single magnification is correct for every hunter, and no binocular removes your legal and ethical duty to positively identify your target before you ever consider a shot.
This guide walks through the specifications that actually change what you see in the field: magnification, objective lens size, glass and coatings, exit pupil and low light performance, field of view, weight, and durability. It also covers the ethics of using optics responsibly.
Magnification is the first number in a binocular spec such as 8×42, and it tells you how many times closer an object appears compared to your naked eye. An 8×42 makes a deer at 200 yards look about as large as it would at 25 yards. Higher magnification shows more detail, but it also narrows your view, amplifies hand shake, and can make a dim image look dimmer.
8x for timber and close cover
An 8x binocular gives a wider field of view and a steadier image when you glass freehand. In thick timber, river bottoms, and tree stands where most shots are under 150 yards, 8x usually lets you find and follow moving deer faster than a higher power. The steadier picture also reduces eye fatigue during long sits.
10x for open country and long glassing
A 10x binocular resolves more detail at distance, which helps when you are picking apart far hillsides, agricultural fields, or open western terrain to judge antlers or confirm what you are looking at. The tradeoff is a tighter field of view and more visible shake. If you spend long sessions on 10x, a tripod adapter steadies the image and reduces fatigue.
There is no single best magnification. Match the power to where you hunt most. If you split time between thick cover and open ground, 8x is the more forgiving all-around choice for handheld use.
Objective lens size and brightness
The second number in a spec such as 8×42 is the objective lens diameter in millimeters. The objective lens gathers light, so a larger objective can deliver a brighter image, which matters at the low light edges of the day when deer move most. The cost is added size and weight.
42mm: The common all-around choice for deer hunting. Good low light performance with manageable weight.
50mm or 56mm: Brighter at dusk and dawn, but noticeably heavier and bulkier, often paired with a tripod.
32mm or smaller: Light and compact for active hunters who cover ground, with less low light reach.
Objective size alone does not decide brightness. Glass quality and lens coatings matter just as much, which is why a well coated 42mm can outperform a cheap 50mm at the same price point.
Exit pupil and low light performance
Exit pupil is the width of the beam of light that reaches your eye, and it predicts how bright a binocular looks in dim conditions. You find it by dividing the objective size by the magnification. An 8×42 has a 5.25mm exit pupil, while a 10×42 has 4.2mm.
In bright daylight your eye pupil is small, so a small exit pupil is fine. As light fades, your pupil dilates, and a larger exit pupil keeps the view bright and easy to hold on target. For the first and last legal shooting minutes when deer are active, an exit pupil around 5mm or larger is a practical target. This is one reason 8×42 is so popular for low light hunting.
Glass quality, coatings, and prism type
Glass quality is where binoculars at different price points separate the most. Two pairs with identical 8×42 specs can look very different because of the glass, the coatings, and the prism design inside.
Lens coatings
Coatings reduce reflection and increase light transmission. Look for the term fully multi coated, which means every air to glass surface has multiple coating layers. Lesser binoculars may only be coated or multi coated on some surfaces, which lowers brightness and contrast.
ED or HD glass
Extra low dispersion glass, often labeled ED or HD, reduces color fringing around high contrast edges, such as a dark antler against a bright sky. The result is sharper, more accurate detail, which helps when you are trying to confirm exactly what an animal is.
Roof versus porro prism
Most modern hunting binoculars use roof prisms, which allow a slim, straight barrel design that packs and carries well. Porro prisms can give strong depth perception and value but are bulkier. For deer hunting, a quality roof prism pair is the typical choice. You can read a neutral overview of prism designs on Wikipedia’s binoculars article.
Field of view and eye relief
Field of view is how wide an area you can see, usually stated in feet at 1,000 yards. A wider field helps you pick up movement and follow walking deer, which favors lower magnification. As you increase power, field of view typically shrinks.
Eye relief is the distance you can hold the binocular from your eye and still see the full image. If you wear glasses, look for longer eye relief, often listed around 15mm or more, and twist down eyecups so you can use the full field of view with your glasses on.
Weight, size, and how you carry them
Weight is easy to ignore in a store and impossible to ignore on a long hunt. A heavy pair pulls on your neck, bounces while you walk, and gets left in the pack when you need it most. Think about how you hunt before you choose size.
Treestand or blind hunting: You can carry a heavier, brighter pair because you are not covering ground.
Spot and stalk or long hikes: A lighter pair, or a 32mm, may serve you better even with slightly less low light reach.
Carry method: A binocular harness distributes weight across your shoulders, keeps the optics secure, and protects them better than a neck strap.
Durability and weather sealing
Hunting binoculars take rain, frost, drops, and temperature swings. Look for waterproof and fog proof construction. Waterproofing comes from sealed housings with O rings, and fog proofing comes from purging the interior with a dry gas such as nitrogen or argon so the inside lenses do not fog when you move between cold and warm air. A rubber armored body adds grip and shock resistance.
A strong, transferable warranty is a sign the maker stands behind the build. Many quality optics brands repair or replace damaged binoculars regardless of how the damage happened, which can matter more over years of hard use than a small spec difference.
Optics and ethical target identification
Binoculars help you hunt ethically, but they do not replace your responsibility to follow safe firearm and hunting practices. The most basic rule of hunter safety is to positively identify your target and what is beyond it before you ever raise a firearm. Good optics make that identification easier in poor light, but the duty is yours, not the equipment’s.
Use binoculars, not your rifle scope, to scan and study animals. Glassing with a scope means pointing a firearm at things you have not identified, which violates basic muzzle discipline. The National Shooting Sports Foundation firearm safety rules and the hunter education materials at Hunter-Ed both stress target identification and safe muzzle handling. For legal shooting hours, identification requirements, and what counts as a legal animal in your area, follow your state wildlife agency. This article is general information, not legal advice.
Quick buying checklist
Pick magnification by terrain: 8x for cover and handheld use, 10x for open country and tripod glassing.
Choose 42mm objectives for the best all-around balance of brightness and weight.
Aim for an exit pupil near 5mm or larger for low light hunting.
Prioritize fully multi coated lenses and ED or HD glass within your budget.
Confirm waterproof and fog proof construction.
Check eye relief if you wear glasses.
Match weight and size to how far you walk and where you sit.
Plan to carry them in a harness for comfort and protection.
Frequently asked questions
Is 8x or 10x better for deer hunting?
Neither is universally better. 8x gives a wider, steadier view that suits timber and handheld use, while 10x resolves more distant detail for open country. If you hunt mixed terrain by hand, 8x is the more forgiving choice.
What objective lens size is best for low light?
A 42mm objective offers a strong balance of brightness and weight for most hunters. Larger 50mm or 56mm lenses gather more light at dusk and dawn but add bulk, and they often pair best with a tripod.
Do expensive binoculars actually help in the field?
Higher quality glass and coatings usually produce brighter, sharper images in the low light minutes when deer move and identification is hardest. Whether that gain is worth the price depends on your budget and how often you hunt those conditions.
Can I just glass with my rifle scope instead?
No. Scanning with a rifle scope points a firearm at things you have not identified, which breaks basic muzzle safety. Use binoculars to find and study animals, and only bring up the firearm once you have positively identified a legal target.
Final takeaway
Choose deer hunting binoculars by working from your terrain and light conditions back to the specs. For most hunters, an 8×42 with fully multi coated, quality glass and waterproof, fog proof construction covers nearly every situation while staying light enough to carry all day. Step up to 10x or larger objectives only when open country or long glassing sessions justify the tradeoffs. Whatever you choose, the optics are a tool to help you identify your target safely and legally, never a substitute for that responsibility.