What to Do After a Liver Shot on a Deer: A Hunter’s Guide to Ethical Tracking and Harvesting


Introduction

Hello fellow hunters! Today, we’re diving into a scenario that’s both challenging and critical in the hunting world: dealing with a liver shot on a deer. While a liver shot isn’t the most ideal scenario, understanding how to handle it ethically and effectively is crucial for every responsible hunter. Let’s unravel the complexities together and ensure you’re equipped for this situation.


Understanding the Liver Shot

What is a Liver Shot?

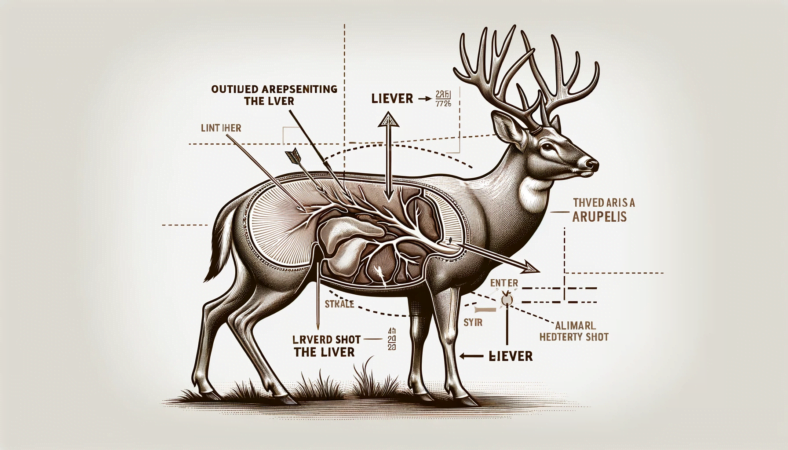
Before we get into the nitty-gritty, let’s clarify what a liver shot is. When hunting, a liver shot occurs when your arrow or bullet strikes the deer’s liver. Unlike a heart or lung shot, which are immediately incapacitating, a liver shot is not instantly fatal, but it is lethal.

Recognizing a Liver Shot

Visual cues: The first step in identifying a liver shot is through observation. Look for specific signs in the deer’s reaction and the arrow or bullet entry point.

Blood trail: The color and consistency of the blood can offer clues. Liver shot blood trails are typically dark red and may be thicker than blood from a lung or heart shot.


Immediate Actions Post-Shot

Patience is Key

After suspecting a liver shot, patience is paramount. Unlike heart or lung shots, where quick tracking is often beneficial, liver shots require a different approach.

Wait Time

How long to wait: It’s recommended to wait at least 6-12 hours before tracking a liver-shot deer. This waiting period is crucial to avoid pushing the deer further, making recovery more challenging.

Utilizing Time Wisely

Preparation for tracking: Use this waiting period to prepare for a potentially lengthy and challenging tracking job. Gather necessary supplies and inform any companions about the situation.


Tracking Strategies

Blood Trail Analysis

Understanding and interpreting the blood trail is a vital skill. The blood’s appearance can tell you much about the wound and how the deer is faring.

Navigating Terrain

Discuss how terrain can affect the blood trail and tracking strategies. Offer tips for different types of landscapes.

Using Technology

Highlight the role of technology in tracking, such as using GPS devices or specialized hunting apps.


Ethical Considerations

Respecting the Animal

It’s crucial to approach this situation with respect for the animal. A liver shot, while not ideal, demands a responsible and ethical approach to ensure a humane end for the deer.

Discuss the importance of complying with local hunting laws and regulations during the tracking and harvesting process.


Post-Recovery Actions

Processing the Deer

Once the deer is recovered, proper processing is essential. Discuss how to handle the deer to ensure meat quality and respect for the animal.

Learning from the Experience

Reflect on the experience and what it teaches about shot placement, patience, and respect for wildlife.


Conclusion

Dealing with a liver shot on a deer is a challenging but important part of hunting. By understanding the signs, exercising patience, and following ethical tracking practices, you can ensure a humane and responsible harvest. Remember, every hunting experience is a learning opportunity. Stay safe, ethical, and respectful out there!

Frequently Asked Questions (FAQs) About Liver Shots on Deer

1. How long should I wait before tracking a deer after a liver shot?

Answer: It’s recommended to wait at least 6-12 hours before beginning to track a deer that has been hit with a liver shot. This waiting period is crucial to prevent pushing the deer, which can make recovery more difficult.

2. How can I identify a liver shot from the blood trail?

Answer: A liver shot can often be identified by the blood trail’s characteristics. The blood tends to be darker red and thicker compared to a heart or lung shot. You might also notice it being more sporadic as the deer moves.

3. Is a liver shot lethal to a deer?

Answer: Yes, a liver shot is lethal to a deer. However, it is not immediately incapacitating like a heart or lung shot. The deer can live for several hours after a liver shot, which is why a longer tracking delay is recommended.

4. What should I do if I lose the blood trail while tracking a liver-shot deer?

Answer: If you lose the blood trail, it’s important to remain patient and methodical. Circle back to the last known point of the trail and search in widening circles. Utilize any available technology, like GPS tracking, and consider environmental factors like wind direction and terrain.

The Hunter’s Guide: Avoiding Top Ground Blind Mistakes for Successful Hunts

Introduction

Hello fellow hunters! Today, we’re diving into an essential topic: common ground blind mistakes and how to avoid them. Whether you’re a seasoned hunter or new to the game, mastering the art of using a ground blind is crucial for a successful hunt. In this comprehensive guide, we’ll explore these mistakes, why they can cost you the big game, and practical tips to sidestep them. So, let’s gear up and get ready to enhance your hunting skills!

Choosing the Wrong Blind Location

Understanding Terrain and Animal Patterns

Why Location Matters: Selecting the right spot for your ground blind is the cornerstone of a successful hunt. It’s all about blending in with the environment and being in the right place at the right time.

Tips for Perfect Location:

  • Scout Ahead: Spend time understanding the terrain and animal movement patterns. Look for trails, feeding areas, and water sources.
  • Elevation Advantage: Sometimes, a slightly elevated position can provide a better view without compromising your concealment.

Avoiding Common Location Errors

  • Too Close or Too Far: Being too close can spook the game, while too far reduces your chances of an accurate shot.
  • Ignoring Wind Direction: Always consider the wind direction. Your scent should not be carried towards the game.

Inadequate Blind Setup and Camouflage

Blending with the Environment

Importance of Camouflage: A ground blind that sticks out is a surefire way to alert animals. Your blind should be a natural part of the surroundings.

Tips for Effective Camouflage:

  • Use Natural Materials: Incorporate branches, leaves, and other natural materials from the area around your blind.
  • Consider Seasonal Changes: Adjust the camouflage as the environment changes with seasons.

Avoiding Setup Blunders

  • Noise Discipline: Be mindful of noise when setting up. Avoid metal-on-metal sounds and talking loudly.
  • Light Discipline: Be cautious of light reflecting off your blind or gear. This can catch an animal’s eye and spook them.

Neglecting Comfort and Patience

The Long Wait

Why Comfort Matters: Hunting often involves long periods of waiting. Discomfort can lead to restlessness, which can affect your alertness and stealth.

Tips for Comfort:

  • Bring the Right Gear: Invest in a good chair, weather-appropriate clothing, and quiet snacks.
  • Stretch and Stay Alert: Periodically stretch your muscles quietly to avoid cramps and stay alert.

Patience is Key

  • Avoid Frequent Movement: Limit your movements inside the blind. Excessive movement can give away your position.
  • Stay the Course: Animals have keen senses. Be patient and maintain your cover even when it seems like no game is around.

Overlooking Safety and Ethical Practices

Hunting Safely

Safety First: Your safety and that of others should always be a priority. Make sure you’re visible to other hunters while being concealed from the game.

Safety Tips:

  • Inform Someone: Always let someone know where you will be hunting and when you expect to return.
  • Carry a First Aid Kit: Accidents happen. Be prepared with a basic first aid kit.

Ethical Hunting Practices

  • Respect Wildlife: Follow ethical hunting practices. This includes taking humane shots and respecting wildlife habitats.
  • Leave No Trace: Maintain the natural beauty of the area. Pack out everything you brought in, including any trash.

Conclusion

Avoiding these common ground blind mistakes can significantly increase your chances of a successful hunt. Remember, hunting is not just about the harvest; it’s about connecting with nature, practicing patience, and honing your skills. So next time you set out, keep these tips in mind, and happy hunting!

Frequently Asked Questions

1. What’s the Best Time of Day to Use a Ground Blind?

Answer: The best times are typically during early morning and late afternoon. This is when game animals are most active. However, it can vary depending on the species you’re hunting and the specific behavior patterns of wildlife in your hunting area.

2. How Long Should I Wait in a Ground Blind?

Answer: Patience is key in hunting. It’s common to wait several hours, but there’s no strict rule. The duration often depends on the activity level of the game and your personal endurance. Some hunters spend an entire day, while others prefer shorter periods.

3. Can I Use the Same Ground Blind Location Multiple Times?

Answer: Yes, you can, but it’s essential to ensure that you’re not leaving any scent behind that might alert the animals. It’s also beneficial to change locations periodically to avoid creating patterns that wildlife might recognize.

4. How Do I Deal with Bugs and Insects in My Ground Blind?

Answer: Use insect repellent, but choose scent-free options to avoid alerting game. Additionally, consider netting or blinds with mesh windows to keep insects out.

5. Is it Necessary to Practice Shooting from a Ground Blind Before the Hunt?

Answer: Absolutely. Practicing helps you get used to the limited space and shooting angles. It’s crucial for ensuring accuracy and comfort when the moment of truth arrives during your hunt.

Bow Tuning for Beginners: A Safe, Simple Guide

Bow tuning is the process of getting your bow, arrows, rest, string, and shooting form to work together so arrows leave the bow consistently. For beginners, the goal is not to perform every advanced adjustment at home. The goal is to understand the basics, do safe visual checks, match your arrows correctly, and know when the bow belongs in a qualified pro shop.

This guide keeps the process in a safe lane. It explains what tuning means, what a beginner can check, what should be left to a technician, and how to avoid chasing equipment changes when the real issue is fit, form, or arrow match.

Table of Contents
  1. Quick Beginner Tuning Checklist
  2. What Bow Tuning Means
  3. Start With Fit and Safety
  4. Check Arrow Spine and Rest Alignment
  5. Understand Paper Tuning Without Overdoing It
  6. When to Visit a Bow Shop
  7. Common Bow Tuning Mistakes
  8. Related Archery Setup Guides
  9. Frequently Asked Questions

Quick Beginner Tuning Checklist

Use this as a starting point, not as a full setup procedure. Anything beyond these basic checks should go to a qualified bow technician or the manufacturer instructions for your exact bow model.

Start with fit, arrow spine, rest alignment, safety inspection, and a pro-shop check when you are unsure.
CheckBeginner-safe actionWhen to ask a pro
FitConfirm draw weight and draw length feel controlledIf you are guessing or changing modules
ArrowsCheck arrow spine with a manufacturer selector or shopIf arrow flight stays inconsistent
RestConfirm the arrow sits the same way each shotIf hardware needs moving or retuning
String and cablesLook for fraying, wear, or unusual changesAny replacement, twisting, timing, or press work
Noise or damageStop shooting and inspect visuallyAny crack, dry fire, hard knock, or abnormal sound

What Bow Tuning Means

Bow tuning means adjusting and matching the shooting system so the arrow leaves cleanly and repeats. That system includes the bow, arrow spine, point weight, nock fit, rest, string, cables, release, draw length, draw weight, and the archer. Easton’s arrow tuning guide is useful because it frames tuning as a complete setup issue, not one magic adjustment.

For a beginner, tuning is a sequence. Fit and safety come first. Arrow match comes second. Rest and nocking consistency come next. Fine tuning comes last, often with help. If you skip the early steps, advanced tuning methods can send you in circles.

Start With Fit and Safety

A bow that does not fit you cannot be tuned into good shooting. Draw weight should be something you can pull smoothly and hold under control through a full session, not the heaviest number you can force once. Draw length should match your body and anchor point. If you are unsure, a coach or pro shop can measure it properly.

Safety comes before every adjustment. Inspect limbs, riser, string, cables, cams, rest, nocks, and arrows before shooting. If the bow has visible damage, frayed strands, loose hardware, new noise, or anything that feels different, stop shooting. Organizations such as USA Archery and World Archery are useful starting points for safe archery context, but your exact bow manual is still the authority for your equipment.

Check Arrow Spine and Rest Alignment

Arrow spine is one of the first equipment checks to get right. Spine describes how stiff the arrow is, and the correct choice depends on draw weight, draw length, arrow length, point weight, and bow setup. Do not guess from a generic chart without matching it to your own measurements. If you want the deeper explanation, read our arrow spine guide.

Rest Alignment Is a Consistency Check

For a beginner, rest alignment starts with observation. The arrow should sit on the rest the same way every shot, the nock should engage consistently, and nothing should look loose or shifted. Actually moving the rest, setting centershot, or changing nocking-point relationships is best learned with a technician the first time. Our arrow rest guide explains the component without turning it into risky at-home press work.

Understand Paper Tuning Without Overdoing It

Paper tuning is a diagnostic method where an arrow is shot through paper and the tear is read for clues about arrow flight. A clean tear suggests cleaner flight. A left, right, high, or low tear suggests something to investigate. That does not mean every beginner should immediately start moving hardware.

For new archers, inconsistent tears often come from form: grip pressure, anchor changes, release execution, or inconsistent posture. If the same problem appears with good form and matched arrows, a pro shop can help interpret the tear and make safe adjustments.

Write down any changes you test so you can return to the last known good setup.

When to Visit a Bow Shop

Visit a qualified bow shop or authorized retailer any time the work touches stored energy, cams, limbs, strings, cables, or draw-length modules. These parts are under force, and the wrong adjustment can damage the bow or injure someone.

  • Anything that needs a bow press
  • Cam timing or synchronization
  • String or cable twisting, replacement, or adjustment
  • Draw-length module changes
  • Peep sight or D-loop installation
  • Any repair after a dry fire, hard knock, crack, or unusual noise

Common Bow Tuning Mistakes

  • Tuning before the bow fits the archer.
  • Blaming the bow when inconsistent form is the real issue.
  • Using arrow spine, rest, or nock settings copied from someone else.
  • Doing press-level work without proper tools and training.
  • Ignoring warning signs like new sounds, frayed strands, or visible damage.
  • Skipping the manual for the exact model and year.

Bow tuning connects to several other setup basics. Start with archery safety rules, then review how to choose arrow spine, the arrow rest guide, and how to increase draw weight safely.

Frequently Asked Questions

What does bow tuning mean for a beginner?

For a beginner, bow tuning means confirming safe fit, matched arrows, consistent rest and nock behavior, and stable form. Advanced adjustments can wait until the basic setup is safe and consistent.

Can I tune my bow at home?

You can do basic visual checks at home, such as inspecting for damage and confirming the arrow sits consistently. Work involving strings, cables, cams, limbs, modules, or a bow press should go to a qualified technician.

Do I need a spine chart to start?

You need spine information matched to your own bow setup. Use a manufacturer selector, your exact measurements, or a pro shop rather than guessing from a generic chart.

What is paper tuning?

Paper tuning is a diagnostic test that uses the tear in paper to judge arrow flight. It can be helpful, but beginners should be careful about making hardware changes without experienced help.

When should I stop shooting and get help?

Stop shooting if you see cracks, frayed strands, loose hardware, a damaged arrow, a new sound, or anything that feels wrong. Get help after any dry fire, hard impact, or suspected equipment damage.

Final Recommendation

Treat bow tuning as a safe sequence: fit first, safety inspection second, arrow match third, rest consistency fourth, and advanced tuning only when the foundation is stable. When the job touches the bow’s stored energy or press-level components, let a qualified technician handle it. That protects both the archer and the equipment.

Unveiling the Secrets of Post-Rut Antler Rattling

Introduction to Antler Rattling

Welcome to an in-depth exploration of post-rut antler rattling! If you’re an avid deer hunter, understanding this technique is key to enhancing your hunting strategy. But what exactly is antler rattling, and why is it crucial in the post-rut season? Let’s dive in and unravel the mysteries of this effective hunting method.

Understanding the Rut Season

Before we delve into the nuances of post-rut rattling, it’s essential to understand the rut season. The rut is the breeding season for deer, characterized by increased activity and behavioral changes in bucks. Recognizing the phases of the rut – pre-rut, peak rut, and post-rut – is vital for implementing effective hunting strategies.

What is Antler Rattling?

Antler rattling involves simulating the sound of two bucks fighting, usually by clashing antlers or similar objects together. This technique is used to attract other deer, particularly bucks, who are drawn to the sound of the battle, either out of curiosity or a challenge.

The Post-Rut Phase: A Unique Opportunity

The post-rut phase, following the peak breeding season, presents a unique set of behaviors in deer. Bucks are still in search of does that haven’t been bred, making them more susceptible to certain lures and sounds, like antler rattling.

Behavioral Changes in Bucks Post-Rut

  • Lower Energy Levels: After the exhausting rut, bucks are typically less energetic and more cautious.
  • Continued Search for Mates: Some does come into estrus late, so bucks are still on the lookout for mating opportunities.
  • Increased Wariness: Having faced hunting pressure during the peak season, bucks are more alert and cautious.

Mastering Post-Rut Antler Rattling

To maximize the effectiveness of post-rut rattling, understanding the subtleties of this technique is crucial.

Equipment and Setup

  • Rattling Tools: While actual antlers can be used, various synthetic rattling devices offer convenience and effectiveness.
  • Ideal Location: Choose a spot with good visibility and deer traffic, considering wind direction and cover.

Rattling Technique for Post-Rut

  • Subtlety is Key: Given the bucks’ weariness, a gentler rattling approach can be more effective.
  • Varying Intensity and Duration: Experiment with different intensities and lengths of rattling sequences to mimic realistic fights.

Timing and Frequency

  • Best Times to Rattle: Early morning and late afternoon are typically the most effective times.
  • Frequency: Don’t overdo it. Spacing out rattling sessions can prevent spooking the deer.

Combining Rattling with Other Techniques

Enhance your post-rut strategy by combining rattling with other methods.

Using Scents and Calls

  • Doe Estrus Scents: Can be effective if some does are still in estrus.
  • Grunt Calls: Mimicking buck vocalizations can add realism to your setup.

Stealth and Patience

  • Movement and Noise: Minimize your movements and noise levels to avoid detection.
  • Patience is Crucial: Post-rut rattling might require longer waiting periods for results.

Understanding Deer Response to Rattling

Recognize the signs of a successful rattling session.

Signs of Attraction

  • Direct Approach: A buck coming straight towards the rattling sound.
  • Cautious Investigation: Bucks might circle downwind to scent-check the area.

Adapting to Deer Behavior

  • Reading Body Language: Adjust your technique based on the deer’s response.
  • Being Ready for Quick Shots: Be prepared for sudden opportunities as bucks can approach quickly.

Conclusion: The Art of Adaptation

Post-rut antler rattling is an art that requires adaptation, understanding of deer behavior, and patience. By mastering these techniques, you can enhance your hunting experience and increase your chances of success.

Embracing the Challenge

Post-rut hunting presents unique challenges, but with the right knowledge and skills, it can be incredibly rewarding.

Frequently Asked Questions about Post-Rut Antler Rattling

1. What is the best time of day for post-rut antler rattling?

Answer: The most effective times for post-rut antler rattling are typically early morning and late afternoon. During these periods, bucks are more active and likely to respond to the rattling. It’s important to consider the specific behavior and patterns of deer in your hunting area, as these can vary.

2. How often should I rattle antlers in a post-rut hunting session?

Answer: In a post-rut setting, it’s advisable to rattle sparingly and not overdo it. A good strategy is to start with a rattling session lasting around 20-30 seconds, followed by a waiting period of about 20 minutes to an hour. This mimics natural deer behavior and prevents spooking the deer.

3. Can I combine antler rattling with other deer hunting techniques?

Answer: Absolutely! Combining antler rattling with other techniques like using grunt calls or doe estrus scents can enhance its effectiveness. Grunt calls add realism by mimicking buck vocalizations, while scents can attract bucks still searching for a mate.

4. Is antler rattling effective throughout the entire post-rut season?

Answer: Antler rattling can be effective throughout the post-rut season, but its success largely depends on the behavior of the deer in your area. As the post-rut progresses, bucks may become less responsive due to exhaustion and increased wariness. Monitoring local deer activity and adapting your strategy accordingly is key.

5. What type of rattling tools are recommended for post-rut antler rattling?

Answer: Both natural antlers and synthetic rattling devices can be effective for post-rut rattling. Synthetic tools offer convenience and consistent sound quality, while natural antlers can provide a more authentic sound. The choice depends on personal preference and the specific conditions of your hunting environment. In the post-rut phase, a subtler sound is often more effective, so consider tools that allow for more nuanced control over the volume and intensity of the rattling.

How to Successfully Hunt an Unexpected Buck: Mastering the Element of Surprise

Introduction

Have you ever been in the woods, heart racing, as you spot a majestic buck unexpectedly? It’s a thrilling moment for any hunter, but are you truly prepared to make the most of this surprise opportunity? Today, let’s dive into the art of successfully hunting an unexpected buck, where preparation meets opportunity, and mastery of the element of surprise is key.


Understanding the Behavior of Bucks

The Unpredictable Nature of Bucks

Bucks, particularly during the rutting season, can be quite unpredictable. Their patterns can change overnight, making it essential for hunters to understand their behavior.

Key Points to Consider:

  • Rutting Season Dynamics: How does the behavior of bucks change during the rut?
  • Territorial Tendencies: Understanding the areas bucks favor and why.
  • Feeding Habits: What are bucks eating and when?

Adapting to Their Patterns

To hunt a buck successfully, especially an unexpected one, you need to adapt quickly to their patterns. This means being versatile in your approach and ready to change tactics.

Adaptation Strategies:

  • Trail Camera Insights: Utilize technology to track movement patterns.
  • Observation Skills: How to read signs like rubs and scrapes.

Preparing for the Hunt

Essential Gear and Tools

The right gear can make or break your hunting experience. Let’s break down what you need for a successful hunt.

Must-Have Items:

  • Camouflage and Scent Blockers: Blending in and masking your scent.
  • Reliable Weaponry: Choosing the right rifle or bow for the situation.
  • Navigation Tools: GPS and maps for uncharted territories.

Mental and Physical Preparation

Hunting is not just about the gear; it’s also about being mentally and physically ready.

Preparation Tips:

  • Physical Fitness: The importance of being in good shape for the hunt.
  • Mental Sharpness: Keeping calm and focused under pressure.

Techniques for Successful Hunting

Stealth and Patience

The key to surprising a buck is not being surprised yourself. Stealth and patience are your greatest allies.

Mastering Stealth:

  • Movement Techniques: How to move silently through different terrains.
  • Patience Practice: The art of waiting for the perfect shot.

Advanced Hunting Strategies

Sometimes, traditional methods need an upgrade. Let’s explore some advanced tactics.

Innovative Approaches:

  • Decoy and Calling Techniques: Tricks to lure in a wary buck.
  • Spot and Stalk Method: A step-by-step guide.

Ethical Considerations

Respect for Wildlife

Responsible hunting means respecting the animal and the environment.

Ethical Hunting Practices:

  • Fair Chase Principles: What constitutes ethical hunting?
  • Impact on the Ecosystem: Understanding the hunter’s role in conservation.

Safety First

Your safety and the safety of others are paramount.

Safety Measures:

  • Weapon Handling: Best practices for firearm and bow safety.
  • First Aid Preparedness: Essential skills and kit for emergencies.

Conclusion

Reflecting on the Hunt

After the hunt, it’s important to reflect on the experience, learn from it, and plan for the next adventure.

Takeaways:

  • Successes and Challenges: Analyzing what went right and what could be improved.
  • Continual Learning: Staying updated with new techniques and gear.

Join the Community

Connect with other hunters, share stories, and continue learning.

Community Engagement:

  • Forums and Groups: Where to find like-minded hunters.
  • Workshops and Events: Opportunities for hands-on learning and networking.

Hunting an unexpected buck requires a blend of preparation, adaptability, and respect for nature. By understanding buck behavior, equipping yourself properly, and employing advanced hunting techniques, you can master the element of surprise and enjoy a successful hunting experience. Remember, every hunt is a learning opportunity, so embrace it with enthusiasm and ethical responsibility.

The Pennsylvania Deer Controversy: Understanding the Debate

Introduction

When it comes to wildlife management, few topics stir as much debate as the management of deer populations in Pennsylvania. Known for its rich hunting culture and diverse wildlife, Pennsylvania has been at the center of a controversial debate revolving around deer population control, habitat management, and the impact on local ecosystems. In this article, we’ll delve deep into the Pennsylvania Deer Controversy, exploring its various facets, and understanding the perspectives of different stakeholders.

What’s Stirring the Debate?

The controversy primarily hinges on the management strategies adopted by the Pennsylvania Game Commission (PGC) and their effects on the deer population, local ecology, and hunting community. Critics argue that these strategies have led to a significant decline in deer numbers, adversely affecting hunting activities. Conversely, environmentalists and some ecologists support these measures, citing the need for controlling overpopulation and protecting forest ecosystems.

Understanding the Core Issues

To grasp the essence of this debate, it’s essential to explore the key issues at its heart.

Issue 1: Deer Population Control

The PGC’s Stance

The PGC has implemented stringent hunting regulations and other measures aimed at reducing deer overpopulation. These include extended hunting seasons and increased bag limits in certain areas. The rationale behind this is to prevent habitat degradation and maintain a healthy deer population.

The Hunters’ Perspective

Many hunters feel that these measures are too aggressive, leading to a noticeable decline in deer sightings and successful hunts. They argue that the PGC’s management strategies are diminishing the quality of hunting experiences in Pennsylvania.

Issue 2: Impact on Ecosystem

Ecological Concerns

Overpopulation of deer can lead to significant ecological problems, including overgrazing and the destruction of understory vegetation in forests. This not only affects plant diversity but also has a ripple effect on other wildlife species.

Balancing Act

The challenge lies in balancing the health of the ecosystem with the interests of the hunting community. Finding a middle ground is crucial for sustainable wildlife management.

Analyzing the Economic Impact

The deer controversy isn’t just about wildlife management; it’s also tied to the state’s economy.

Hunting Economy

Hunting is a significant economic activity in Pennsylvania, contributing millions of dollars annually through hunting licenses, equipment sales, and related tourism. A decline in deer populations could negatively impact this economic sector.

Ecotourism and Conservation

Conversely, a healthy and balanced ecosystem can boost ecotourism and conservation efforts, offering long-term economic benefits.

Perspectives from Different Stakeholders

Understanding the views of various stakeholders is key to appreciating the complexity of the issue.

The Hunting Community

Many hunters feel that their cultural heritage and recreational activities are being threatened by the current deer management policies.

Conservationists and Ecologists

This group generally supports the PGC’s efforts, emphasizing the importance of biodiversity and forest health.

Local Residents and Farmers

The impact of deer on agriculture and private properties is another angle to consider, with differing opinions on whether deer populations need to be controlled or encouraged.

Possible Solutions and the Way Forward

Navigating the Pennsylvania Deer Controversy requires a multifaceted approach.

Collaborative Management

Involving all stakeholders in the decision-making process can lead to more balanced and effective management strategies.

Scientific Research and Monitoring

Continued research and monitoring of deer populations and forest health are crucial for making informed decisions.

Public Education and Awareness

Educating the public about the importance of sustainable wildlife management can help in garnering support for necessary measures.

Adaptive Management Strategies

Flexibility in management strategies, allowing for adjustments based on ongoing research and feedback, could be key to resolving the controversy.

Conclusion

The Pennsylvania Deer Controversy is a complex issue that balances ecological needs with cultural and economic factors. It’s a prime example of the challenges faced in wildlife management and the importance of adopting a comprehensive, stakeholder-inclusive approach. As we move forward, it’s essential to continue the dialogue, research, and adaptive management to ensure the health of Pennsylvania’s ecosystems and the satisfaction of its people.

Frequently Asked Questions

1. Why is Deer Population Control a Controversial Issue in Pennsylvania?

Answer: Deer population control in Pennsylvania is controversial due to differing views on the impact of deer on local ecosystems and the economy. While some argue that reducing the deer population is necessary to protect forest health and biodiversity, hunters and local communities express concerns about declining deer numbers and the effect on hunting traditions and the economy.

2. What Strategies Has the Pennsylvania Game Commission Implemented for Deer Management?

Answer: The Pennsylvania Game Commission (PGC) has implemented various strategies, including extended hunting seasons, increased bag limits in certain areas, and habitat management programs. These measures aim to manage deer overpopulation and prevent habitat degradation.

3. How Does Deer Overpopulation Affect the Ecosystem?

Answer: Deer overpopulation can lead to overgrazing and destruction of understory vegetation. This affects plant diversity and can disrupt the balance of local ecosystems, impacting other wildlife species and leading to long-term ecological issues.

4. What is the Economic Impact of Deer Hunting in Pennsylvania?

Answer: Deer hunting is a significant contributor to Pennsylvania’s economy, generating revenue through hunting licenses, equipment sales, and related tourism. Changes in deer populations can have substantial economic impacts on communities that rely on hunting-related activities.

5. Are There Any Proposed Solutions to Resolve the Controversy?

Answer: Proposed solutions include collaborative management involving all stakeholders, continuous scientific research and monitoring of deer populations, public education on sustainable wildlife management, and adaptive management strategies that can be adjusted based on ongoing research and community feedback.

Matrix Arms MX19: The Game-Changing Firearm for Enthusiasts and Professionals

Introduction

Are you an avid firearm enthusiast or a professional in the field, looking for the next big thing in firearms? The Matrix Arms MX19 might just be what you’re looking for. In this comprehensive guide, we’ll delve into every aspect of the Matrix Arms MX19, exploring its features, performance, and why it stands out in the crowded firearms market.


Understanding the Matrix Arms MX19: An Overview

Before we dive deep into the specifics, let’s get a brief overview of what the Matrix Arms MX19 brings to the table.

What Sets the MX19 Apart?

Matrix Arms has always been known for their innovative approach to firearm design, and the MX19 is no exception. It’s a blend of cutting-edge technology and classic design principles, resulting in a firearm that’s both reliable and revolutionary.


Features and Specifications

Let’s break down the MX19’s features and specifications to understand what makes it a standout choice.

Design and Build Quality

  • Materials Used: The MX19 uses top-grade materials, ensuring durability and longevity.
  • Ergonomic Design: The design of the MX19 is focused on user comfort and ease of handling.

Performance and Reliability

  • Accuracy: Matrix Arms has fine-tuned the MX19 for exceptional accuracy.
  • Reliability in Different Conditions: Tested in various conditions, the MX19 shows consistent performance.

Comparative Analysis: MX19 vs. Competitors

When choosing a firearm, it’s crucial to understand how it stacks up against its competitors.

What Makes MX19 a Better Choice?

  • Unique Features: We’ll look at the unique features of the MX19 that give it an edge over others.
  • Price to Performance Ratio: How does the MX19 fare in terms of value for money?

User Experience: Real Feedback and Reviews

Nothing speaks louder than the experience of actual users. We’ll explore what users have to say about the MX19.

Testimonials and Expert Opinions

  • Professional Feedback: Insights from industry experts on the MX19.
  • User Reviews: Real user reviews highlighting the pros and cons.

Maintenance and Care

To ensure your MX19 lasts, proper maintenance is key. We’ll guide you through the best practices.

Routine Maintenance Tips

  • Cleaning and Storage: Best practices for keeping your MX19 in top condition.
  • Troubleshooting Common Issues: How to deal with common problems that might arise.

Accessories and Customization

Customizing your MX19 can enhance its functionality and appearance.

  • Sights, Grips, and More: Top accessories that complement the MX19.
  • Personalizing Your MX19: Tips for making your MX19 uniquely yours.

Conclusion

The Matrix Arms MX19 is more than just a firearm; it’s a testament to the innovation and quality that Matrix Arms stands for. Whether you’re a professional or an enthusiast, the MX19 is designed to meet and exceed your expectations.

Frequently Asked Questions

Q1: Is the Matrix Arms MX19 suitable for beginners? A1: Yes, the MX19 is designed with user-friendliness in mind, making it suitable for beginners. Its ergonomic design and manageable recoil make it an excellent choice for those new to firearms.

Q2: What are the legal considerations for owning a Matrix Arms MX19? A2: The legal considerations for owning an MX19 vary by region. It’s essential to check local laws regarding firearm ownership, registration, and use. Always ensure compliance with all legal requirements.

Q3: Can the MX19 be used for competitive shooting? A3: Absolutely! The MX19’s precision and reliability make it a strong contender for competitive shooting. Its accuracy and adaptability to various accessories are highly beneficial for competitive scenarios.

Q4: How does the MX19 perform in terms of accuracy compared to other firearms in its class? A4: The MX19 stands out in its class for accuracy. Thanks to its precision engineering and quality construction, it provides exceptional accuracy, making it a top choice for both enthusiasts and professionals.

Q5: What maintenance is required to keep the MX19 in optimal condition? A5: Regular cleaning and proper storage are crucial for maintaining the MX19. After use, ensure it is cleaned thoroughly to prevent buildup and potential malfunctions. Regular checks and maintenance will keep it in optimal condition for years.

How To Eliminate String Contact from Your Face When Shooting a Bow


Introduction

Welcome to our in-depth exploration of a common yet solvable issue in archery: string contact with the face. Whether you’re a beginner feeling the sting for the first time or an experienced archer looking to refine your technique, this guide is your go-to resource. We’ll delve into the why and how of string contact, and arm you with strategies to prevent it, enhancing both your comfort and accuracy in archery.


What is String Contact and Why Does it Matter?


Understanding the Issue

  • Defining String Contact: When the bowstring strikes your face during a shot, it’s more than just a nuisance. It’s a sign of a deeper issue in your shooting technique or equipment setup.

The Impact of String Contact

  • Physical Discomfort and Injury: From mild irritation to severe bruising, string contact is not something to ignore.
  • Accuracy Issues: Every archer strives for precision. String contact can throw off your shot, affecting arrow trajectory and your overall performance.

Eliminating String Contact: Strategies and Techniques


1. Perfecting Your Stance

  • The Foundation of Archery: Your stance is the bedrock of your shooting technique. We’ll break down the ideal stance, from foot positioning to body alignment, ensuring a stable and consistent base for every shot.

2. Selecting the Right Equipment

  • Bow and String Considerations: Size matters in archery. We’ll guide you through choosing a bow that complements your body size and strength, along with tips on selecting the right string.

3. Mastering the Draw

  • The Art of the Draw: Learn about anchor points, hand positioning, and drawing techniques that can make all the difference in preventing string contact.

4. Protective Gear: A Smart Choice

  • Safeguarding Yourself: We’ll discuss the best protective gear options, from arm guards to face masks, ensuring your safety while shooting.

Advanced Techniques for Experienced Archers


Analyzing and Refining Your Technique

  • Beyond the Basics: For those who’ve mastered the fundamentals, we delve into advanced strategies to fine-tune your technique, including slow-motion analysis and custom equipment adjustments.

Common Mistakes and How to Avoid Them


Pitfalls in Archery Technique

  • Overdrawing and Neglecting Warm-Up: Common errors can lead to string contact. We’ll teach you how to identify and rectify these issues.

Frequently Asked Questions (FAQs)


Q1: Can string contact cause serious injury?

A1: Absolutely. String contact can lead to bruising, cuts, or even more severe facial injuries. Consistent contact increases these risks, making it crucial to address the issue promptly.

Q2: How important is bow size in preventing string contact?

A2: Extremely important. A bow too long or short for your arm span can make it difficult to maintain proper form, increasing the likelihood of string contact.

Q3: Are there specific exercises to improve my draw and prevent string contact?

A3: Yes, exercises focusing on shoulder strength and stability, as well as practicing drawing techniques, can significantly reduce string contact.

Q4: How does an incorrect stance contribute to string contact?

A4: An improper stance can alter the alignment of your body, arms, and the bow, leading to a flawed draw and increased chances of string contact.

Q5: Is it necessary to use protective gear?

A5: While not mandatory, protective gear like arm guards and face masks can provide a safety net, especially for beginners or those struggling with string contact.


Conclusion


Eliminating string contact is a journey of understanding your equipment, refining your technique, and practicing consistently. By following the strategies and tips provided in this guide, you’re well on your way to a safer, more enjoyable, and successful archery experience.


Visit Us: For more expert advice and articles, head to ShootingGears.com.

How to Pattern Your Shotgun for Hunting: A Comprehensive Guide

Understanding Shotgun Patterning

What is Shotgun Patterning?

Shotgun patterning is the process of testing how your shotgun’s pellets spread at various distances. It’s essential to determine the effective range and the best choke and ammunition combination for your specific hunting needs.

Why is Patterning Important?

  • Accuracy and Efficiency: Knowing your shotgun’s pattern ensures that your shots are accurate and effective.
  • Ethical Hunting: Proper patterning minimizes wounding and ensures a quick, humane harvest.
  • Personalization: Every shotgun patterns differently. Patterning allows you to understand your specific firearm’s characteristics.

Equipment You’ll Need

  • Shotgun and Ammunition: Use the shotgun and the specific type of ammunition you plan to hunt with.
  • Targets: Large paper targets or patterning boards.
  • Measuring Tape: For measuring distance and pattern size.
  • Marker or Tape: To mark shots on the target.
  • Safety Gear: Eye and ear protection.

Step-by-Step Patterning Process

Step 1: Set Up Your Target

  • Distance: Start at 25 yards, a common starting point for patterning.
  • Target Placement: Ensure the target is securely mounted and at eye level.

Step 2: Take Your Shots

  • Shooting Position: Shoot from a stable, consistent position.
  • Aiming: Aim at the center of the target.
  • Number of Shots: Fire at least three shots for accuracy.

Step 3: Analyze the Pattern

  • Count the Pellets: Note the number of pellets within a 30-inch circle.
  • Pattern Evenness: Look for any gaps or dense clusters.
  • Adjustments: Based on the pattern, adjust your choke or try different ammunition.

Choosing the Right Choke and Ammunition

Understanding Chokes

  • Choke Types: Full, modified, and improved cylinder are common types.
  • Choke Selection: Choose based on the distance and type of game.

Selecting Ammunition

  • Shot Size: Varies with the game. Smaller birds require smaller shot.
  • Load: Heavier loads can offer more power but may affect pattern.

Common Patterning Mistakes to Avoid

  • Inconsistent Shooting Stance: Consistency is key in accurate patterning.
  • Ignoring Environmental Factors: Wind and light can affect your pattern.
  • Not Trying Different Ammunition: Different brands and loads can pattern differently.

FAQs: Patterning Your Shotgun for Hunting

Q: How often should I pattern my shotgun? A: Ideally, before each hunting season or when changing ammunition or chokes.

Q: Can weather affect shotgun patterning? A: Yes, factors like wind and temperature can impact the pattern.

Q: Is a tighter pattern always better? A: Not necessarily. The ideal pattern depends on the game and hunting conditions.

Conclusion

Patterning your shotgun is a vital step in preparing for a hunting trip. It ensures your shots are accurate, ethical, and effective. By understanding the patterning process, choosing the right equipment, and avoiding common mistakes, you can significantly enhance your hunting experience.

Remember, the key to successful hunting is not just your equipment but also your understanding and respect for the game and the environment.

Happy Hunting!

Enhanced Guide to Hunting the Rut: Strategies and Insights

Embarking on a hunting journey during the rut, the deer mating season, presents hunters with a unique blend of challenges and opportunities. This period is characterized by heightened deer activity, particularly among bucks, who are on the quest for mates. This comprehensive guide delves deeper into effective strategies, offering detailed insights for a successful rut hunting experience.

In-Depth Understanding of the Rut

What Exactly is the Rut?

The rut is the period in the deer’s life cycle, typically occurring in the fall, when mating is at its peak. During this time, bucks display a significant change in behavior – they become less cautious, more visible, and actively search for does in estrus. This behavioral shift opens up new avenues for hunters.

Detailed Phases of the Rut

  • Pre-Rut: Characterized by bucks marking their territories and showing preliminary signs of increased movement.
  • Peak Rut: This is the high point of deer activity. Bucks are intensely active in pursuing does, often leading to dramatic chases.
  • Post-Rut: Activity levels decline, but residual hunting opportunities exist as bucks recuperate.

Recognizing Rut Signs

  • Scrapes and Rubs: These are physical marks left by bucks to assert dominance and attract does.
  • Daylight Deer Activity: A noticeable increase in deer movement during daylight hours.
  • Vocalizations: Increased calling between bucks and does.

Advanced Preparation for Rut Hunting

Essential and Specialized Gear

  • Optimized Camouflage: Camo gear suited for the specific terrain and foliage.
  • Innovative Scent Control: Advanced odor-masking products.
  • High-Definition Optics: Superior quality binoculars or scopes.

Cutting-Edge Tools

  • Intelligent Trail Cameras: These can be used for detailed monitoring of deer patterns.
  • Sound Simulation Devices: Devices like rattling antlers or grunt calls mimic deer sounds, effectively attracting bucks.

Strategic Scouting and Location Planning

  • Precision Scouting: Pinpoint active deer trails, bedding areas, and key feeding spots.
  • Optimal Stand Placement: Identify and utilize strategic locations such as active trails and natural funnels.

Advanced Hunting Techniques and Strategies

Timing Insights for Maximum Effectiveness

  • Prime Hunting Windows: Focus on early mornings and late afternoons, aligning with deer’s natural activity patterns.
  • Weather Influence: Understand how shifts in weather can dramatically alter deer behavior.

Mastering Deer Attraction

  • Sophisticated Calls and Scents: Employ a range of scents and calls to effectively mimic and lure bucks.
  • Realistic Decoys: Utilize lifelike decoys to pique the curiosity or territorial instincts of bucks.

Mastering Stealth and Endurance

  • Minimal Movement: Cultivate the art of stillness.
  • Extended Patience: Embrace long, vigilant waiting periods for the ideal opportunity.

Enhanced Safety and Ethical Hunting Practices

Prioritizing Safety

  • Visibility Gear: Use high-visibility clothing like blaze orange for safety.
  • Advanced Tree Stand Safety: Employ state-of-the-art safety harnesses and equipment.

Ethical Hunting Commitment

  • Responsible Wildlife Engagement: Ensure humane, ethical shots.
  • Legal Compliance: Strict adherence to all hunting regulations and season guidelines.

Conclusion

With advanced preparation, a deep understanding of deer behavior during the rut, and a commitment to ethical hunting practices, hunters can significantly enhance their chances of a successful and rewarding experience. Remember, safety and respect for wildlife should always be at the forefront of any hunting endeavor.


Frequently Asked Questions

Q1: What’s the best time of day to hunt during the rut?

A1: The most opportune times are early morning and late afternoon, aligning with the natural activity patterns of deer.

Q2: How does weather affect deer activity during the rut?

A2: Weather changes can significantly influence deer movement. For instance, a sudden drop in temperature often increases deer activity.

Q3: What are the most effective ways to attract a buck during the rut?

A3: Utilizing a combination of calls, scents, and decoys is highly effective. Each of these methods imitates aspects of deer behavior and communication, attracting bucks.

Q4: Is it better to hunt before, during, or after the peak of the rut?

A4: While each phase has its advantages, hunting during the peak rut often provides the most activity and visibility of bucks.

Q5: How important is scent control while hunting the rut?

A5: Scent control is crucial. Bucks are highly sensitive to smells, and masking human odor can greatly increase your chances of a successful hunt.

Exit mobile version