Rifle Scope Mounting Mistakes Beginners Make

Most rifle scope mounting mistakes come from treating the job like simple screw tightening instead of precision setup. The common problems are wrong ring height, poor eye relief, a canted reticle, uneven ring pressure, incorrect torque, loose bases, skipped bore-sighting, and no follow-up check after the first range session. Any one of those can create shifting zero, uncomfortable shooting, damaged optics, or frustrating misses. This guide explains the mistakes beginners make and how to avoid them without guessing.

Table of contents

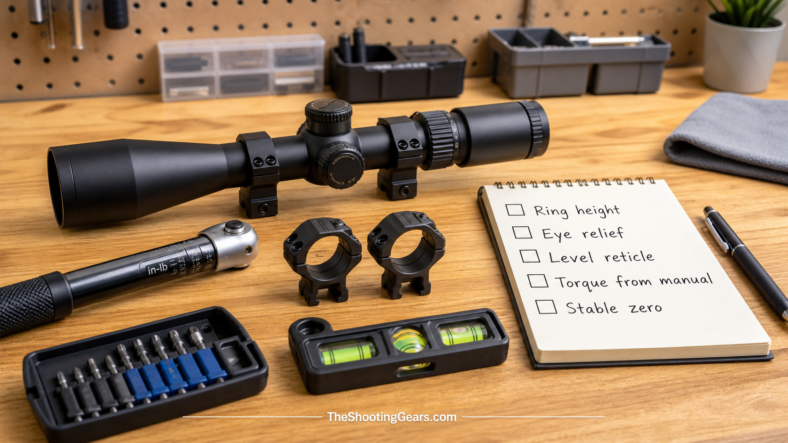
Quick Mounting Checklist

  • Confirm the base fits your rifle and the rings fit your scope tube.
  • Choose ring height that clears the barrel and bolt while keeping a natural cheek weld.
  • Set eye relief from your normal shooting position before tightening the rings.
  • Level the rifle and reticle with proper tools, not just your eye.
  • Use a torque driver and follow the scope, ring, and base maker’s instructions.
  • Tighten ring screws gradually and evenly.
  • Bore-sight before live fire, then confirm zero safely at the range.
  • Recheck screws and zero after the first session.

Always start with safe firearm handling. Keep the rifle unloaded during setup, point it in a safe direction, and follow the NSSF firearm safety rules any time a firearm is handled.

Choosing the Wrong Rings or Base

The first mistake happens before the scope is even on the rifle. Rings must match the scope tube diameter, and the base must match the rifle’s mounting system. A mismatch can stress the tube, place the optic too high, or prevent the scope from holding zero.

Ring height matters too. Very high rings may clear everything, but they can force your head off the stock and make a consistent cheek weld difficult. The goal is enough clearance for the objective bell, barrel, and bolt handle while keeping your eye naturally aligned behind the optic.

Setting Eye Relief Incorrectly

Eye relief is the distance between your eye and the eyepiece where you see a full, clear image. If the scope sits too far forward or too far back, you may crawl the stock, strain your neck, lose field of view, or risk scope bite on a harder-recoiling rifle.

Set eye relief from your real shooting position, not from a bench-only posture. Shoulder the rifle naturally, settle your cheek weld, and move the scope until the image is clear without stretching your neck. Our guide to eye relief and optics comfort explains the concept in more detail.

Failing to Level the Reticle

A canted reticle can cause misses, especially as distance increases. If the vertical crosshair is not truly vertical, dialing elevation may also add unwanted windage. The problem is easy to miss because the scope may look straight when the rifle is held at a slight angle.

Use leveling tools and take your time. Level the rifle first, then level the reticle, and check your natural hold before final torque. A telescopic sight is an optical instrument, so small alignment errors can show up later as real point-of-impact problems.

Over-Tightening or Under-Tightening Screws

Many beginners think tighter is safer. It is not. Over-tightening ring screws can dent or stress the scope tube, while under-tightening can let the optic shift under recoil. Both can produce accuracy problems that look like ammunition or rifle trouble.

Use an inch-pound torque driver and follow the instructions from the scope, ring, and base manufacturers. Do not guess, and do not use a large general-purpose wrench where a small torque driver is needed.

Uneven Ring Pressure

Another common mistake is tightening one screw all the way before touching the others. That can pull the cap unevenly, rotate the scope, or place uneven pressure on the tube. Tighten screws gradually in a crisscross pattern and keep the ring gaps even where the ring design allows it.

If the scope rotates while tightening, pause and correct it before final torque. It is much easier to fix alignment during setup than to chase a crooked reticle at the range.

Skipping Bore-Sighting and First-Shot Checks

Bore-sighting does not replace live-fire zeroing, but it can save time and ammunition. It helps get the first shots on paper so you can make controlled adjustments instead of guessing where the rifle is hitting.

Once you reach the range, use a safe backstop, follow all range rules, and make careful adjustments. If you need a full zeroing process, use our step-by-step rifle scope sight-in guide.

If the rifle is zeroed but your point of impact still shifts with head position, review our guide to adjusting scope parallax before blaming the mount.

Not Rechecking After the First Range Trip

The job is not finished the moment the rifle is zeroed. Recoil, transport, and settling parts can reveal a loose base screw, uneven ring pressure, or a scope that was not fully secure. After the first range session, inspect the setup again and confirm zero before relying on it for hunting or serious practice.

Keep notes on torque values, ammunition, zero distance, and any changes you make. Those notes help you diagnose future problems instead of starting over every time.

Frequently Asked Questions

Can I mount a rifle scope myself?

Yes, if you have the correct parts, safe handling habits, and the right tools. If you are unsure about ring fit, torque, alignment, or safety, use a qualified gunsmith or experienced instructor.

What is the biggest beginner scope-mounting mistake?

The biggest mistake is guessing instead of measuring: guessing ring height, guessing eye relief, guessing level, and guessing torque. A scope mount should be set up deliberately with the correct tools.

Can over-tightening damage a scope?

Yes. Excessive torque can dent or stress the tube and may affect internal movement. Always follow the manufacturer torque instructions for the rings and scope.

Do I need to bore-sight before zeroing?

It is strongly recommended. Bore-sighting helps get initial shots on paper, but you still need live-fire zeroing at the range before relying on the rifle.

Final Takeaway

Good scope mounting is about alignment, fit, and repeatability. Choose the right base and rings, set eye relief from a natural shooting position, level the reticle, use proper torque, tighten screws evenly, bore-sight before live fire, and recheck the setup after the first range trip. If any part of the process feels uncertain, getting help from a qualified gunsmith is cheaper than damaging an optic or chasing a shifting zero.

Why Use a Prism Scope on an AR-Style Rifle: Benefits and Limits


A prism scope is a compact optic that uses a glass prism instead of a series of lenses to focus the image, and it suits an AR-style build when you want a fixed low magnification, an etched reticle that stays visible even with battery failure, and an image that many shooters with astigmatism find cleaner than a red dot. It is a practical choice for range practice and close to mid range hunting where you do not need variable magnification. This guide explains where a prism scope helps, where it does not, and how to decide if one fits your rifle.

Table of contents

What Is a Prism Scope

A prism scope is a sealed optic that focuses light through a single prism rather than the longer lens stack found in a traditional rifle scope. That design lets the optic stay short and light while still offering true optical magnification, usually in a fixed power such as 1x, 3x, or 5x. Most prism scopes use a glass-etched reticle, which means the aiming mark is physically engraved on the glass and stays usable even when the illumination is off or the battery dies.

Because the reticle is etched, a prism scope can offer a more detailed aiming pattern than a simple dot. Many models include holdover marks, ranging brackets, or a center chevron. For general firearm safety and handling context before you mount any optic, the National Shooting Sports Foundation firearm safety rules are a useful reference.

Prism Scope vs Red Dot vs LPVO

A prism scope sits between a red dot and a low power variable optic in capability. A red dot has no magnification and a very wide field of view, which makes it fast at close range, but it relies entirely on a projected dot that some eyes do not see cleanly. A low power variable optic, often called an LPVO, gives you a magnification range such as 1x to 6x but is longer, heavier, and usually more expensive. A prism scope offers a single fixed magnification with an etched reticle, splitting the difference for a shooter who wants a little magnification and a crisp aiming point in a compact package.

When each makes sense

  • Red dot: fastest target acquisition at close range, lightest, simplest, but no magnification and dot quality depends on your eyes.
  • Prism scope: fixed magnification, etched reticle visible without power, compact, good for a shooter who wants a defined aiming point at known distances.
  • LPVO: most flexible across distance, but heavier, longer, and a larger investment.

Why Shooters With Astigmatism Often Prefer a Prism Scope

Shooters with astigmatism often see a red dot as a smear, starburst, or comet tail rather than a clean round dot, because the projected dot relies on the eye’s own focusing. A prism scope places the reticle on a fixed glass surface that the eye focuses on like any printed image, so the aiming mark stays sharp regardless of astigmatism. Many shooters who struggle with red dots find this the single most useful reason to choose a prism optic.

If you are unsure whether astigmatism is affecting how you see a dot, an eye care professional can confirm it. Adjusting the optic’s diopter or reticle illumination brightness can also help, but the etched reticle remains the core advantage for this group.

Fixed Magnification and the Etched Reticle

A prism scope’s fixed magnification is both a strength and a constraint. The strength is simplicity: there is no zoom ring to manage, the optic is shorter, and the reticle is calibrated for that single magnification, so holdover marks read consistently. The constraint is that you cannot dial down to a true 1x for very fast close work or zoom up for longer shots. You pick the magnification that matches your most common distance and accept the tradeoff.

Choosing a magnification

  • 1x prism: behaves much like a red dot but with an etched reticle, best for close range and fast shooting.
  • 3x prism: a common all-around choice for range work and close to mid range field use.
  • 5x prism: more reach for known mid range targets, but a narrower field of view and slower up close.

Eye Relief and Mounting on an AR-Style Build

Prism scopes generally have shorter and less forgiving eye relief than a full size variable scope, meaning your eye needs to sit within a fairly specific distance and position behind the optic to see a full, clear image. On an AR-style platform the flat-top rail makes mounting straightforward, but you should confirm the optic’s eye relief works with your cheek weld and stock length before you settle on a position. For more on this measurement, see our explanation of what eye relief is.

Mount the optic so your head sits naturally on the stock and the full sight picture appears without straining forward or back. Follow the optic and mount manufacturer’s torque guidance, and confirm the rifle is unloaded before any mounting or sighting work. Use the optic maker for model-specific mounting height and eye relief figures, then confirm fit at the range before hunting with it.

Where a Prism Scope Falls Short

A prism scope is not the right pick for every shooter. The fixed magnification limits flexibility, the field of view is narrower than a red dot, and the eye relief is less forgiving, which can slow you down at close range. Prism optics also tend to be a little heavier than a compact red dot of the same footprint. If your main need is the widest possible field of view, the fastest close range speed, or a single optic that covers everything from point blank to long range, a red dot or an LPVO may serve you better.

Who a Prism Scope Suits

A prism scope suits a civilian shooter who wants a compact optic with a sharp etched reticle for range practice or close to mid range hunting, and it is especially worth considering for anyone whose eyes do not resolve a red dot cleanly. It is a sensible choice when you mostly shoot at a consistent distance and value a durable, simple optic over zoom flexibility. If you need long range reach or maximum close range speed, look at a variable scope or a red dot instead.

Frequently Asked Questions

Is a prism scope good for astigmatism?

Yes, many shooters with astigmatism prefer a prism scope. Its reticle is etched on the glass, so the eye focuses on it like any printed image instead of relying on a projected dot that astigmatism can blur. An eye care professional can confirm whether astigmatism is affecting your sight picture.

Does a prism scope work without a battery?

Yes. Because the reticle is physically etched on the glass, you can still aim with a prism scope when the illumination is off or the battery is dead. The illumination only makes the reticle brighter in low light or against dark targets.

What magnification should I choose for a prism scope?

Match the magnification to your most common distance. A 1x behaves like a red dot for close range, a 3x is a flexible all-around choice, and a 5x gives more reach for known mid range targets at the cost of field of view and close range speed.

Can I use a prism scope for hunting?

A prism scope can work for close to mid range hunting where its fixed magnification covers your expected distances. Confirm legal optic and equipment rules with your state wildlife agency before any hunt, since requirements vary by location and season.

Final Takeaway

A prism scope earns its place on an AR-style build when you want a compact optic with a fixed magnification and a crisp etched reticle, and it is one of the best options for shooters whose eyes do not see a red dot cleanly. Weigh the narrower field of view and tighter eye relief against the clarity and simplicity it offers, match the magnification to how you actually shoot, and confirm any hunting equipment rules with your state wildlife agency before heading afield.

How to Mount a Scope: Safe Rifle Scope Installation

To mount a rifle scope correctly, start with an unloaded firearm, confirm the base and rings fit the rifle and scope tube, set the scope for natural eye relief, level the reticle, tighten screws evenly with the manufacturer-recommended torque, then bore-sight and confirm zero at the range. The job is not just putting a scope in rings. Small setup mistakes can create a shifting zero, poor cheek weld, scope bite, or damaged optics.

Table of contents

Before You Start

Safety comes first. Confirm the rifle is unloaded, remove ammunition from the workspace, keep the muzzle pointed in a safe direction, and follow the NSSF firearm safety rules throughout the process. Scope mounting is workshop work, not a rushed range-table job.

Also read the instructions for the rifle, base, rings, and scope. Torque values, screw sizes, ring-cap design, and thread-locker guidance can vary. If the instructions conflict with general advice, follow the manufacturer instructions or ask a qualified gunsmith.

Tools and Parts to Gather

  • Correct scope base or rail for the rifle
  • Correct rings for the scope tube diameter
  • Inch-pound torque driver
  • Correct bits for the screws
  • Bubble levels or a scope leveling kit
  • Degreasing cloth or clean rag
  • Blue thread locker only if the manufacturer recommends it
  • Bore-sighting tool or a safe bore-sighting method

Do not substitute a large general-purpose wrench for a torque driver. Scope tubes and small screws can be damaged by guessing.

Match the Base and Rings

Confirm that the base fits the rifle and that the rings match the scope tube diameter. Ring height should clear the objective bell and bolt while keeping the scope low enough for a stable cheek weld. Rings that are too high often make the rifle feel awkward and reduce consistency.

If you are still choosing an optic or mounting system, compare the setup needs in our guide on how to choose a rifle scope. The best scope on paper will still perform poorly if the mounting system does not fit the rifle and shooter.

Set Eye Relief

Place the scope loosely in the rings, shoulder the rifle in your natural position, and slide the scope forward or back until you see a full, clear image without stretching your neck. Eye relief matters for comfort, field of view, and safety, especially on rifles with more recoil.

Do this from the shooting position you actually use, not from an awkward bench-only posture. Our guide to what eye relief means explains why this step is so important.

Level the Reticle

Level the rifle first, then rotate the scope until the reticle is level. Do not rely only on what looks straight in your shoulder. A canted reticle can cause confusing windage and elevation errors as distance increases.

A telescopic sight is an optical instrument. Small alignment errors may not look serious at home, but they can become obvious when you dial elevation or shoot beyond close range.

Tighten With Proper Torque

Tighten base and ring screws gradually and evenly. For ring caps, alternate screws in small increments so the scope stays centered and the gaps remain even where the ring design allows it. Stop at the torque value specified by the ring or scope maker.

Too much torque can crush or stress the scope tube. Too little torque can allow the scope to shift under recoil. Both problems can look like bad accuracy, so treat torque as part of the accuracy system, not a minor detail.

After tightening, shoulder the rifle one more time before leaving the bench. Confirm the reticle did not rotate, eye relief still feels natural, and the magnification ring, bolt handle, and safety controls all have room to work.

Bore-Sight and Zero

Bore-sighting helps get the first shots on paper, but it does not replace live-fire zeroing. After mounting, bore-sight safely, then go to the range and confirm zero with a stable rest, safe backstop, and careful adjustments.

If you need the full range process, follow our step-by-step rifle scope sight-in guide. If shots shift when your head position changes, check our scope parallax adjustment guide before assuming the mount is the only problem.

Common Mistakes to Avoid

  • Mounting the scope too high and losing cheek weld
  • Setting eye relief from an unnatural position
  • Leveling the reticle by eye only
  • Over-tightening ring screws
  • Leaving base screws loose
  • Using the wrong rings for the scope tube
  • Skipping bore-sighting and wasting ammunition
  • Failing to recheck screws after the first range session

For a deeper troubleshooting list, see our related article on rifle scope mounting mistakes.

Frequently Asked Questions

Can I mount a rifle scope without a gunsmith?

Yes, if you have the correct parts, a torque driver, leveling tools, and safe handling habits. If you are unsure about fit, torque, alignment, or firearm safety, use a qualified gunsmith.

Do I need a torque wrench for scope rings?

Yes. A small inch-pound torque driver helps prevent both over-tightening and under-tightening. Guessing by hand is one of the most common causes of mounting problems.

How high should a scope be mounted?

As low as practical while still clearing the objective bell, barrel, and bolt. The correct height should let you keep a natural cheek weld and see a full image through the scope.

Does bore-sighting mean the rifle is zeroed?

No. Bore-sighting only gets you close. You still need to confirm and adjust zero with live fire at the range before relying on the rifle.

Final Takeaway

Mounting a scope properly is about fit, alignment, and repeatability. Use the correct base and rings, set eye relief from your real shooting position, level the reticle, tighten with the right torque, bore-sight before live fire, and confirm zero at the range. If the setup feels uncertain, a qualified gunsmith is a better choice than risking a damaged optic or a rifle that will not hold zero.

Exit mobile version