Advantages of Using a Bipod for Shooting Accuracy

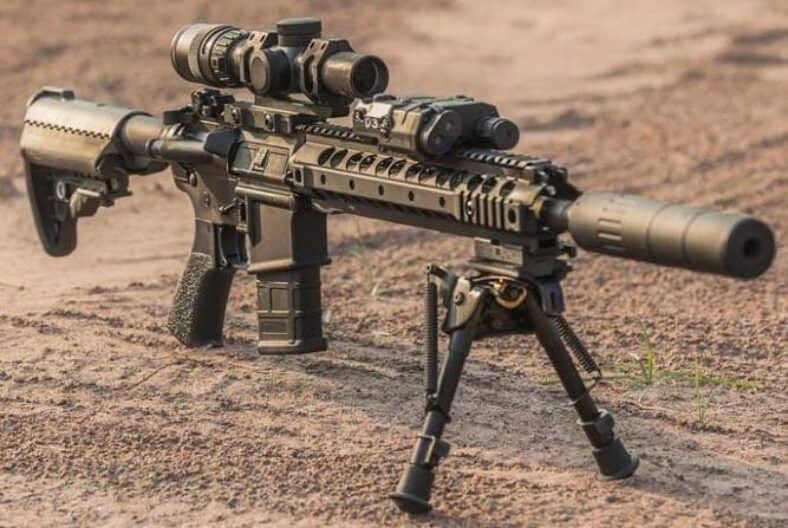
A bipod can improve shooting accuracy by giving the rifle a steadier front support, but it does not replace safe handling, good position, trigger control, or verified zero. The main advantages are stability, repeatable rifle height, reduced fatigue, and better control from prone or supported positions.

This guide explains when a bipod helps, when it can hurt, and how to use one safely. Always follow range rules, your firearm manual, and the NSSF firearm safety rules before any live-fire practice.

Table of Contents
  1. Quick Bipod Checklist
  2. Better Stability
  3. Repeatable Shooting Position
  4. Recoil Management
  5. Field Use
  6. When a Bipod Can Hurt Accuracy
  7. Common Mistakes
  8. Related Guides
  9. FAQ
  10. Final Recommendation

Quick Bipod Checklist

CheckWhat to confirmWhy it matters
AttachmentBipod fits the rifle’s sling stud, rail, or mount correctlyA loose bipod can shift point of impact.
HeightLeg height matches your prone, bench, or field positionWrong height creates strain and poor alignment.
SurfaceFeet grip the ground or bench consistentlySliding or bouncing hurts repeatability.
LoadUse consistent forward pressure when appropriateInconsistent pressure changes recoil behavior.
Rear supportUse a stable rear bag or hand positionA bipod supports the front, not the whole rifle.
Zero checkConfirm zero from the position you will useBench zero and bipod/prone zero may not feel identical.
SafetyKeep muzzle direction and backstop clearStability does not replace safe shooting decisions.

Better Stability

The biggest advantage of a bipod is front-end stability. It reduces wobble compared with unsupported shooting and gives the rifle a consistent point of contact with the ground, bench, or shooting mat. That can make it easier to see the target, hold the reticle steady, and call shots.

A bipod helps most when the shooter also has a stable rear support. A rear bag, consistent shoulder pressure, and relaxed body position all matter. If the rear of the rifle is floating or the shooter is muscling the stock, the bipod alone will not fix accuracy.

Repeatable Shooting Position

A bipod can make position setup more repeatable. The rifle sits at a predictable height, the support point is consistent, and the shooter can build a natural point of aim more easily. This is useful for zeroing, group testing, prone practice, and some hunting setups.

For formal marksmanship development and competitive shooting pathways, USA Shooting is a useful authority source. Practical accuracy still comes from verified practice, not from the accessory alone.

Recoil Management

A good bipod setup can help the rifle track more predictably under recoil. Many shooters apply gentle forward pressure into the bipod so the rifle loads consistently before the shot. The key word is consistently. Changing pressure from shot to shot can change how the rifle moves.

Ammunition and firearm standards are separate from bipod technique, but SAAMI is a useful reference for ammunition terminology and standards. At the range, your own group data is what proves whether a bipod setup is helping.

Field Use

In hunting or field shooting, a bipod can help when the ground allows a stable prone or seated position. It may be less useful in tall grass, steep terrain, brush, or situations where quick movement is needed. Adjustable legs, swivel/cant features, and durable feet can matter more in the field than on a flat bench.

Do not let a bipod tempt you into shots you cannot identify, backstop, or hold ethically. A steadier rifle is still only one part of a safe shot.

When a Bipod Can Hurt Accuracy

A bipod can hurt accuracy if it is loose, mounted poorly, too tall, too short, or used with inconsistent pressure. Hard benches can cause some bipods to hop. Soft ground can make legs sink. Uneven terrain can cant the rifle unless the bipod or shooter position compensates.

Test the rifle from the positions you actually use. If groups open up with the bipod, compare setup, rear support, pressure, and surface before blaming the rifle or ammunition.

Common Bipod Mistakes

  • Using a bipod without stable rear support.
  • Mounting the bipod loosely or on the wrong adapter.
  • Changing forward pressure from shot to shot.
  • Using the wrong leg height for the position.
  • Forgetting to confirm zero from the bipod position.

FAQ

Does a bipod make a rifle more accurate?

A bipod can make the shooter and rifle system steadier, which may improve practical accuracy. It does not change the rifle’s mechanical accuracy by itself.

Should I zero a rifle from a bipod?

If you plan to shoot from a bipod, confirm zero from that position. Changes in support and recoil behavior can affect how the setup feels and groups.

What bipod height is best?

The best height depends on position and terrain. Low bipods can work well for prone shooting on flat ground, while taller legs may help in grass, uneven ground, or seated positions.

Do I still need a rear bag with a bipod?

For precision work, rear support is very helpful. A bipod stabilizes the front of the rifle, but the rear of the stock still needs consistent support.

Final Recommendation

A bipod is useful when it supports a stable, repeatable, safe shooting position. Choose the right height, mount it securely, use consistent pressure, confirm zero from that position, and remember that the bipod supports fundamentals rather than replacing them.

Essential Shooting Gear Checklist for Safe Range Trips

Essential shooting gear starts with safety gear, not accessories. For most range trips, the core kit is eye protection, ear protection, correct ammunition, safe firearm transport, approved targets, a basic tool/cleaning kit, and a simple plan for what you want to practice.

This guide is a practical checklist for responsible range users and new shooters. Always follow your firearm manual, local law, and range rules. The NSSF firearm safety rules should come before any gear recommendation.

Table of Contents
  1. Quick Essential Gear Checklist
  2. Eye and Ear Protection
  3. Safe Transport Gear
  4. Ammunition and Targets
  5. Range Bag Organization
  6. Maintenance and Tools
  7. What Beginners Can Skip
  8. Related Guides
  9. FAQ
  10. Final Recommendation

Quick Essential Gear Checklist

GearWhat to look forWhy it matters
Eye protectionImpact-rated wraparound shooting glassesProtects against debris, brass, target fragments, and weather.
Ear protectionFoam plugs, earmuffs, or doubled-up protection when neededGunfire can damage hearing quickly.
Range bagSeparate pockets for safety gear, ammo, tools, and paperworkOrganization reduces mistakes and wasted time.
Correct ammunitionExact caliber/gauge confirmed against the firearmWrong ammunition is a serious safety risk.
Targets and toolsApproved targets, tape/stapler, marker, and pastersMissing small items can end practice early.
Cleaning/maintenance kitBasic bore care, lubricant, cloth, and small toolsKeeps equipment functional and catches issues.
First-aid basicsSmall kit plus any personal medicationsRange days should be planned like outdoor activities.
Notebook or appRecord firearm, ammo, distance, zero, and resultsNotes make practice measurable.

Eye and Ear Protection Come First

Eye protection should fit securely and provide side coverage. Clear lenses are useful indoors or in low light, while tinted lenses can help outdoors. The best pair is the one you will actually wear for the full session.

Ear protection is equally important. Many shooters use earmuffs, foam plugs, or both together, especially indoors or around rifles and muzzle brakes. The CDC/NIOSH noise resource is a helpful authority reference for understanding why loud sound exposure matters.

Safe Transport Gear

A case, lock, chamber flag, and clear storage plan help keep the trip organized and safe. Transport rules vary by location, so check your local requirements. As a baseline habit, firearms should be unloaded before transport and handled only in safe, approved areas.

Secure storage matters before and after the range day. Project ChildSafe is a useful resource for responsible firearm storage and safety education.

Ammunition and Targets

Bring only ammunition that matches the firearm exactly. Similar-looking cartridges can still be unsafe or wrong. Keep ammunition in labeled boxes or containers and avoid mixing calibers in loose bags.

Targets should match range rules. Some ranges allow only paper; others allow steel at specific distances. Bring target stands, staplers, tape, markers, and pasters only if they are permitted by the facility.

Range Bag Organization

A good range bag does not need to be expensive, but it should separate safety gear, ammunition, tools, documents, and small accessories. Keep eye and ear protection in an easy-to-reach pocket so they go on before the session starts.

Useful extras include a marker, small flashlight, multitool, cleaning cloth, batteries for optics or electronic earmuffs, a small towel, water, and weather-appropriate clothing. Avoid turning the bag into a heavy junk drawer; pack for the actual session.

Maintenance and Tools

Bring basic tools only if you know how to use them safely. A small screwdriver set, optic battery, lubricant, bore snake or cleaning rod, and cloth can solve minor issues. Do not perform unfamiliar repairs at the firing line.

After the trip, inspect the firearm, optics, magazines, and range gear. Record any failures, zero changes, ammunition notes, or gear problems before you forget them.

What Beginners Can Skip

New shooters do not need every accessory at once. Skip complicated timers, specialty rests, advanced holsters, and extra optics until the safety fundamentals, basic marksmanship, and range habits are solid. Spend first on protection, training, correct ammunition, and reliable storage.

When in doubt, ask the range before buying gear. Range rules can make some accessories unnecessary or unusable. A simple, compliant kit is better than a crowded bag full of items you cannot use.

FAQ

What shooting gear should beginners buy first?

Beginners should start with eye protection, ear protection, correct ammunition, safe transport/storage gear, approved targets, and basic cleaning supplies. Training and safe habits matter more than extra accessories.

Do I need both earplugs and earmuffs?

Many shooters double up indoors, around rifles, or near muzzle brakes. The right choice depends on the environment, firearm, and comfort, but hearing protection should always be used around gunfire.

What should stay in a range bag?

Keep eye and ear protection, target tools, a marker, small maintenance items, optic batteries, a first-aid kit, and range documents in the bag. Store ammunition and firearms according to law and range rules.

Is expensive shooting gear necessary?

No. Reliable safety gear and correct ammunition matter more than expensive accessories. Upgrade only when you know what problem the new gear solves.

Final Recommendation

Build your shooting gear kit around safety, organization, and the actual purpose of the range trip. Eye protection, ear protection, correct ammunition, safe transport, and a simple practice plan will do more for most shooters than a bag full of unnecessary accessories.

Shooting Range Trip Checklist: Safe Preparation Guide

A good shooting trip starts before you leave home. Whether you are going to a public range, a private range, or a supervised field session, the safest plan is to confirm rules, pack verified gear, transport firearms and ammunition correctly, and know what you will practice before the first shot.

This guide is a practical pre-trip checklist for responsible shooters. Always follow local laws, range rules, firearm manuals, and the basic safety rules. The NSSF firearm safety rules are the baseline for every range day or shooting activity.

Table of Contents
  1. Quick Pre-Trip Checklist
  2. Confirm Rules and Purpose
  3. Pack Safety Gear
  4. Transport Firearms and Ammunition
  5. Plan Your Practice
  6. Range Etiquette
  7. After-Trip Checks
  8. Related Guides
  9. FAQ
  10. Final Recommendation

Quick Pre-Trip Checklist

CategoryWhat to confirmWhy it matters
RulesRange hours, allowed firearms, allowed ammunition, target rules, and required safety gearEvery range has its own operating rules.
Firearm statusFirearms are unloaded, cased, functional, and legal to transportSafe transport starts before the vehicle moves.
AmmunitionCorrect caliber/gauge, safe condition, and enough for the practice planWrong ammunition is a serious safety risk.
Eye and ear protectionEveryone has suitable protection before shooting startsHearing and eye protection are non-negotiable.
Targets and toolsApproved targets, stapler/tape, marker, spotting aid, and basic maintenance itemsSmall missing items waste range time.
Practice planZeroing, grouping, position work, safety drills, or gear checkA plan makes practice more useful and safer.
Storage after tripFirearms and ammunition return to secure storageThe trip is not over until everything is secured.

Confirm Rules and Purpose Before You Go

Before packing gear, decide what the trip is for. Are you sighting in a rifle, testing a new optic, practicing trigger control, checking hunting gear, or introducing a beginner to safe range habits? A clear purpose keeps the session focused and prevents random gear piles.

Next, check the rules for the location. Public ranges may limit ammunition types, target materials, rapid fire, drawing from a holster, steel target distance, or shotguns. Private land also needs a safe backstop, permission, and compliance with local law.

Pack Safety Gear First

Eye and ear protection should be packed before optional accessories. Bring protection for every person attending, not only the shooter. Electronic earmuffs, foam plugs, wraparound eye protection, a brimmed hat, and a small first-aid kit are basic range-day items.

For secure storage and responsible firearm ownership reminders, Project ChildSafe is a useful resource. Good preparation includes how firearms are stored before and after the trip, not just what happens at the firing line.

Transport Firearms and Ammunition Carefully

Transport rules vary by location, so check your state and local requirements. As a general safety habit, firearms should be unloaded, actions checked, and gear organized so there is no confusion at the range. Keep ammunition in the correct packaging or clearly labeled containers.

Before leaving, confirm that the ammunition matches the firearm. Do not rely on memory or similar-looking cartridges. A quick caliber/gauge check is one of the simplest ways to prevent a serious mistake.

Plan Your Practice Session

A good practice plan is short and specific. Examples include confirming zero, shooting three careful groups, practicing safe loading and unloading, checking optic settings, or working on one accuracy fundamental. Trying to practice everything in one session usually makes progress harder to measure.

Write down firearm, ammunition, distance, weather, optic setting, group size, and any issues. Those notes help you spot patterns later. For organized marksmanship and competition pathways, USA Shooting is a good authority source to keep in your learning path.

Range Etiquette and Communication

Listen to the range officer, follow cease-fire commands immediately, and communicate clearly with the people around you. Do not handle firearms while people are downrange. Keep gear organized so benches, walkways, and firing points stay clear.

If you bring a new shooter, explain the safety rules before arriving and keep the first session simple. A calm, predictable session builds better habits than overwhelming someone with too many firearms, targets, or drills.

After-Trip Checks

When the session is over, confirm firearms are unloaded before casing them, collect targets and trash, and account for ammunition and accessories. At home, clean or inspect firearms as needed, record notes, and return firearms and ammunition to secure storage.

Post-trip notes are especially useful after sight-in work or gear testing. If a scope shifted, ammunition grouped poorly, or a piece of gear failed, write it down before the details fade.

FAQ

What should I bring to a shooting range?

Bring the firearm, correct ammunition, eye protection, ear protection, approved targets, target tools, a range bag, identification or membership card if required, and any manuals or tools needed for the session.

Should I plan drills before going to the range?

Yes. A simple plan helps you use ammunition and time wisely. Focus on one or two goals, such as zero confirmation, group size, trigger control, or safe handling.

How should firearms be transported to the range?

Follow local law and range rules. As a safety habit, firearms should be unloaded, cased, and separated from confusion with loose gear. Ammunition should be clearly identified and matched to the firearm.

What is the most common range-day mistake?

One common mistake is packing gear without a purpose. Another is forgetting small essentials such as eye protection, ear protection, targets, a stapler, or the correct ammunition.

Final Recommendation

A safe shooting trip is built around preparation: rules, safety gear, correct ammunition, organized transport, a clear practice plan, and secure storage afterward. Keep the plan simple, respect the range, and use every trip to build safer habits.

Exit mobile version