How to Sight In a Rifle Scope Safely

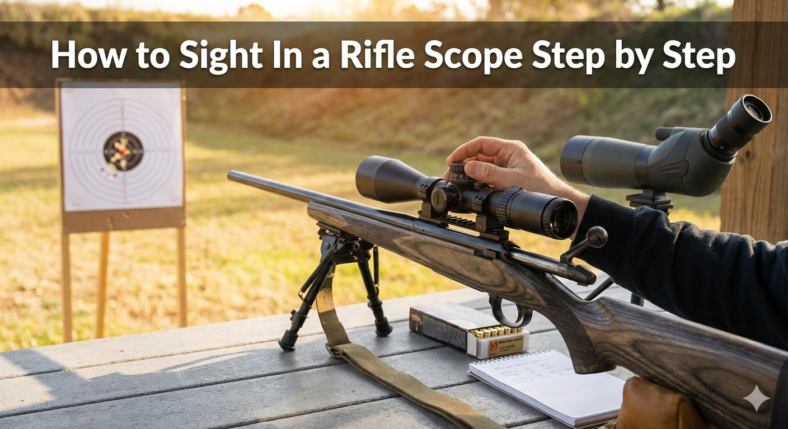
Sighting in a rifle scope means confirming that your point of aim and point of impact match at a chosen distance. The safe way to do it starts with range rules, firearm safety, a stable rest, proper mounting, and careful confirmation. This guide is a practical overview, not a substitute for your rifle manual, scope manual, ammunition data, or qualified instruction.

If you are new to rifles or unsure about any step, work with a certified instructor, range officer, gunsmith, or experienced mentor. Do not troubleshoot a loaded firearm, force scope adjustments, or shoot at a distance where you cannot maintain a safe backstop and clear target identification.

Table of Contents

Quick Answer

To sight in a rifle scope safely, confirm the firearm is in good condition, follow range rules, use a stable rest, start at a close target to get on paper, make small scope adjustments according to the scope manual, then confirm the final zero at your intended distance. Record the rifle, ammunition, distance, conditions, and scope settings.

A safe sight-in session starts with range rules, a clear firearm, a stable rest, short-distance confirmation, final confirmation, and written settings.

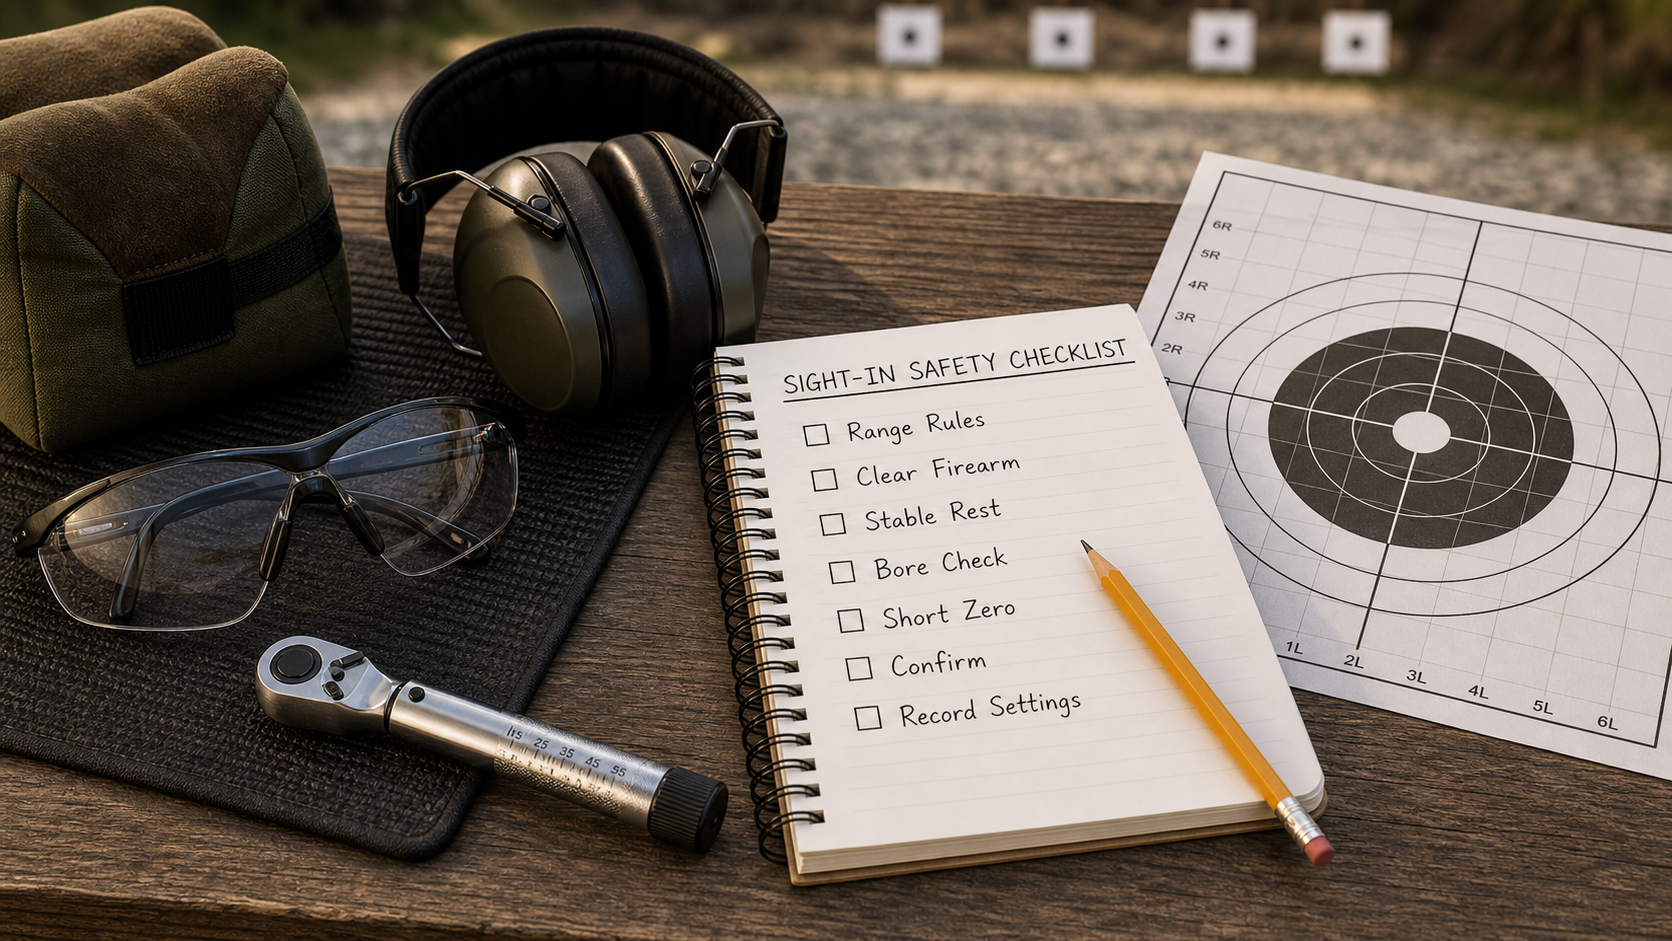
Sight-In Safety Checklist

Run this checklist before live fire. It keeps the session focused and reduces avoidable mistakes.

  • Range rules: Follow all commands, target rules, and cease-fire procedures.
  • Firearm condition: Confirm the rifle is mechanically sound and properly assembled.
  • Scope mounting: Confirm mounts and rings are installed according to manufacturer guidance.
  • Safe backstop: Shoot only at a range or location with a safe backstop and legal permission.
  • Stable rest: Use a bench, bags, or rest that supports repeatable shooting.
  • Known ammunition: Use the exact ammunition you intend to zero with.
  • Record keeping: Write down distance, ammo, settings, and conditions.

Before You Go to the Range

Most sight-in frustration comes from preparation problems: loose mounts, wrong tools, mixed ammunition, unclear target distance, or a scope mounted with poor eye relief. Before live fire, read the rifle and scope manuals, gather the correct tools, confirm the reticle is level, and make sure the scope is not contacting the barrel or action incorrectly.

Review the NSSF firearm safety rules before any range session. Safe muzzle direction, trigger discipline, target identification, and backstop awareness matter more than any optic setting.

Boresighting Is Only a Starting Point

Boresighting can help get the rifle on paper, but it is not a final zero. Treat it as a rough alignment step. The final confirmation must happen with live fire at a safe range and with the ammunition you plan to use.

Build a Stable Setup

A stable shooting position makes scope adjustment easier to read. Use a solid bench, front and rear bags, or another stable rest that supports the rifle without forcing it. Keep your shoulder pressure, cheek weld, and trigger press as consistent as possible. If the rifle moves differently each shot, the group may reflect technique more than the scope.

Let the Barrel and Shooter Settle

Heat, rushing, and fatigue can open groups. Take your time, follow range commands, and avoid chasing every single shot. A small group tells you more than one rushed impact.

Start Close, Then Confirm Farther

Many shooters start close so the first rounds land on paper. Once the rifle is centered enough to adjust confidently, move to the intended zero distance and confirm again. The exact distance depends on your rifle, cartridge, optic, target use, and local range rules.

Do not assume another shooter’s zero distance is right for you. A hunting rifle, target rifle, rimfire, slug gun, and air rifle can all have different practical zero choices. For broader optics background, this telescopic sight reference explains how scopes are used as aiming devices.

Understand Scope Adjustments

Scopes adjust in clicks, but click value and direction should be confirmed from your scope manual. Do not force turrets or guess if the adjustment does not behave as expected. Move the group gradually, confirm with another group, and keep notes.

Do Not Chase Single Shots

One shot can be affected by trigger press, wind, rest movement, heat, or shooter error. Use groups to make decisions. If impacts move unpredictably, stop and check mounts, ammunition consistency, rest stability, and technique before continuing.

Confirm and Record Your Zero

After the rifle is zeroed, confirm it with the exact ammunition and conditions you care about. Let the rifle cool if needed, check that mounts remain secure, and record the final distance, ammunition, group, date, and any turret or reticle notes.

A simple zero card can save confusion later. Keep the rifle model, scope model, ammunition, sight-in distance, weather notes, and final adjustment notes together in your range notebook or phone. If the rifle is later cleaned, bumped, remounted, or switched to different ammunition, treat the old note as a reference point and confirm again at the range before relying on it.

For hunters, zero confirmation is part of responsible preparation. Hunter education resources such as Hunter Ed can help reinforce safe handling, field judgment, and knowing your equipment before hunting.

Common Mistakes

Common mistakes include loose rings, poor eye relief, skipping the manual, changing ammunition mid-session, shooting from an unstable rest, adjusting after every shot, ignoring wind, and failing to record the final zero. Another mistake is confirming from a bench but never practicing from realistic field positions.

If the rifle will be used for hunting, confirm it again after travel, hard knocks, major weather changes, scope removal, or ammunition changes. A zero is not a permanent promise; it is a confirmed condition.

FAQ

What distance should I sight in a rifle scope?

It depends on the rifle, cartridge, optic, target use, and range rules. Start close to get on paper, then confirm at the distance that matches your real use.

Is boresighting enough?

No. Boresighting is only rough alignment. You still need live-fire confirmation at a safe range.

Why is my zero moving?

Possible causes include loose mounts, inconsistent ammunition, unstable rest, shooter technique, heat, wind, or scope issues. Stop and diagnose instead of burning ammunition.

Should I clean the rifle before sighting in?

Follow your rifle manufacturer’s guidance. If the barrel condition changes significantly after cleaning, confirm zero again before relying on it.

Final Takeaway

A safe sight-in session is controlled, documented, and patient. Follow range rules, use a stable setup, start close, confirm at the intended distance, and record your final settings. If anything seems unsafe or unclear, stop and get qualified help.

How To Use a Rifle Scope for Accuracy and Precision

Using a rifle scope well means more than seeing the target clearly. The shooter still has to mount the scope correctly, set eye relief, understand the reticle, confirm zero, manage parallax, and verify every adjustment at the range before trusting the setup in the field.

This guide focuses on safe, practical scope use for accuracy. Always follow firearm safety rules, your optic manual, your firearm manual, and local range rules. The NSSF firearm safety rules are the starting point before any live-fire scope work.

Table of Contents
  1. Quick Scope Accuracy Checklist
  2. Start With Safe Setup
  3. Set Eye Relief and Focus
  4. Understand Reticle and Turrets
  5. Zero and Confirm
  6. Manage Parallax
  7. Field Use Habits
  8. Related Guides
  9. FAQ
  10. Final Recommendation

Quick Scope Accuracy Checklist

CheckWhat to confirmWhy it matters
Safe firearmUnload and clear before setup; follow range commands during live fireOptic work never comes before safety.
Mount fitBase, rings, tube diameter, ring height, and torque are correctA loose or stressed scope will not hold zero.
Eye reliefFull sight picture from your real shooting positionReduces scope bite risk and improves consistency.
Diopter/focusReticle appears sharp to your eyeA fuzzy reticle makes precise aiming harder.
ZeroConfirmed with the exact ammunition you will useDifferent loads can shift point of impact.
ParallaxAdjusted for distance when the scope has parallax controlHelps reduce aiming error at longer distances.
DataRecord distance, ammo, group size, and adjustmentsGood notes prevent repeat mistakes.

Start With Safe Setup

Before using a rifle scope, confirm the scope is mounted correctly. The rings should match the tube diameter, the base should match the rifle, and screws should be tightened to the manufacturer’s inch-pound specs. If the scope shifts under recoil, every other accuracy step becomes unreliable.

Use a stable bench or rest when setting up and zeroing. Keep the muzzle pointed in a safe direction and follow every range command. Scope work often involves repeated adjustments, so slow handling is better than rushing between shots.

Set Eye Relief and Focus

Eye relief is the distance from your eye to the scope where the full image appears. Set it from a real shooting position, not just from a bench posture that you will never use again. A consistent cheek weld and relaxed head position make scope use much more repeatable.

Next, adjust the diopter so the reticle looks sharp. Do this by looking briefly through the scope at a plain background, then adjusting until the reticle is crisp. Avoid staring through the scope while adjusting because your eye may compensate and hide a poor setting.

Understand the Reticle and Turrets

Know whether your scope uses MOA, MIL, BDC marks, or a simpler duplex reticle. Also know how much each turret click moves point of impact at 100 yards or meters. Guessing at clicks wastes ammunition and can make zeroing confusing.

Reticle and turret systems should match your shooting needs. A simple hunting scope may be faster for close field shots, while a more detailed reticle can help with distance work if you practice enough to understand it.

Zero and Confirm With Your Ammunition

Boresighting can help get shots on paper, but it is not a finished zero. Fire careful groups, adjust based on group center, and confirm again. Use the same ammunition you plan to hunt or practice with because different bullet weights and loads can change point of impact.

For ammunition standards and technical terminology, SAAMI is a useful industry authority. For your own setup, the most important data still comes from live-fire confirmation with your rifle, scope, and ammunition.

Manage Parallax

Parallax error happens when the reticle appears to shift on the target as your eye moves behind the scope. Many hunting scopes are factory-set for a common distance, while some scopes have adjustable objective or side-focus controls. If your scope has parallax adjustment, set it for the target distance and verify that the reticle stays stable as your eye position changes slightly.

Parallax matters more as distance increases or targets get smaller. It does not replace a consistent cheek weld, but it helps reduce one more source of aiming error.

Field Use Habits

In the field, keep the scope on a sensible magnification for the terrain. Too much magnification can make close targets harder to find. Too little can make precision harder at distance. Practice changing magnification, checking reticle visibility, and mounting the rifle safely before relying on the optic under pressure.

For formal marksmanship pathways and competition learning, USA Shooting is a useful authority source. For hunting, pair scope skills with local regulations, ethical shot limits, and a clear backstop.

FAQ

What is the first thing to adjust on a rifle scope?

Start with safe mounting, eye relief, and reticle focus before live-fire zeroing. A scope that is uncomfortable or unfocused will be harder to use consistently.

Is boresighting enough to use a rifle scope?

No. Boresighting is only a starting point. You still need to confirm zero with live fire and the ammunition you plan to use.

Why does my scope lose zero?

Common causes include loose mounts, incorrect torque, damaged rings, inconsistent ammunition, scope damage, or shooter technique. Start by checking the mount and confirming groups from a stable position.

Do I need parallax adjustment?

It depends on distance and target size. Many basic hunting scopes work fine within normal ranges, but adjustable parallax can help with longer-distance precision or smaller targets.

Final Recommendation

A rifle scope improves accuracy only when the whole system is verified: safe firearm handling, correct mounting, clear focus, confirmed zero, understood adjustments, and repeatable shooting fundamentals. Take notes, confirm changes at the range, and do not trust an unverified setting in the field.

How To Adjust Scope Parallax for Better Accuracy

Scope parallax adjustment helps reduce aiming error when your eye is not perfectly centered behind the scope. If your scope has a side-focus or adjustable-objective control, the practical goal is to make the reticle stay still on the target when your eye moves slightly behind the eyepiece.

This guide explains parallax in practical shooter language. It is not a replacement for your optic manual, safe firearm handling, or live-fire confirmation. Start with the NSSF firearm safety rules before any scope setup or range work.

Table of Contents
  1. Quick Parallax Adjustment Checklist
  2. What Scope Parallax Is
  3. When Parallax Matters
  4. How To Adjust Parallax
  5. Common Mistakes
  6. Parallax and Zero
  7. Field Use
  8. Related Guides
  9. FAQ
  10. Final Recommendation

Quick Parallax Adjustment Checklist

StepWhat to doWhy it matters
Confirm safetyUnload during setup and follow range commands during live fireOptic adjustment never comes before firearm safety.
Set reticle focusAdjust the diopter so the reticle looks sharpA blurry reticle makes parallax harder to judge.
Set magnificationUse the magnification you plan to shoot or testParallax sensitivity can feel different at higher power.
Aim at targetUse a stable rest and a clear target at known distanceA stable rifle makes reticle movement easier to see.
Move eye slightlyShift your eye behind the scope without moving the rifleReticle movement on target shows parallax error.
Adjust side focus/AOTurn until the reticle appears stable on the targetThis reduces aiming error from imperfect eye position.
Confirm with shotsVerify groups at the rangeAdjustment is only useful if real shots confirm it.

What Scope Parallax Is

Parallax happens when the target image and reticle do not appear on the same optical plane. When that happens, the reticle can seem to shift on the target as your eye moves behind the scope, even if the rifle itself has not moved.

Parallax is not the same as focus, but the controls can feel related. Reticle focus is usually adjusted with the diopter near the eyepiece. Parallax or side-focus adjustment is usually on the side turret or objective bell when the scope includes that feature.

When Parallax Matters

Parallax matters more at longer distances, higher magnification, and smaller targets. It is less noticeable at short distances or low magnification, but it can still affect precision. Many hunting scopes are factory-set for a common distance and may not have a parallax control.

If your scope does not have a parallax adjustment, focus on consistent cheek weld, proper eye relief, and confirmed zero. Those fundamentals still matter even with an adjustable scope.

How To Adjust Scope Parallax

Set up on a stable rest with the firearm pointed safely at the target. Make sure the reticle is sharp first. Then aim at a clear target at the distance you plan to shoot. Without touching the rifle, move your eye slightly up, down, left, and right behind the scope.

If the reticle appears to move across the target, adjust the side-focus or adjustable objective control. The distance numbers on the knob are a starting point, not a guarantee. The practical test is whether the reticle stays still on the target as your eye moves slightly.

Common Parallax Mistakes

  • Using the side-focus knob only to make the target look sharp.
  • Skipping reticle focus before checking parallax.
  • Trusting the knob’s yardage number without verifying on target.
  • Trying to diagnose parallax while the rifle is wobbling.
  • Ignoring cheek weld and eye position.

Parallax and Zero

Parallax adjustment does not replace zeroing. You still need to confirm point of impact with live fire at the range. For ammunition terminology and standards, SAAMI is a useful authority reference, but your actual zero comes from your rifle, scope, ammunition, and shooting position.

When testing zero, use careful groups instead of single shots. If groups shift when your eye position changes, parallax or inconsistent cheek weld may be part of the issue.

Field Use

In the field, you may not have time for perfect adjustment. Set the scope for a practical distance range, keep magnification reasonable, and build a repeatable cheek weld. For formal marksmanship pathways and training culture, USA Shooting is a useful resource.

For hunting, the ethical choice is always to pass on shots where distance, target ID, backstop, or stability are uncertain. Parallax adjustment helps precision, but it cannot fix unsafe conditions.

FAQ

What does scope parallax look like?

It looks like the reticle moving across the target when your eye shifts behind the scope, even though the rifle is still.

Is parallax the same as focus?

No. Focus makes the reticle or target look sharp. Parallax adjustment helps align the reticle and target image so the reticle does not appear to shift with eye movement.

Do all rifle scopes have parallax adjustment?

No. Many hunting scopes are factory-set and do not include a side-focus or adjustable objective control. In that case, consistent eye position is especially important.

Can parallax cause missed shots?

Yes, especially at longer distances, high magnification, or on small targets. It is one possible source of error along with wind, zero, ammunition, trigger control, and shooting position.

Final Recommendation

Adjust parallax by watching reticle movement, not just by reading the yardage number on the knob. Set reticle focus first, use a stable position, verify with live-fire groups, and keep your safety and shot conditions ahead of any optic setting.

Exit mobile version