Step-by-Step Guide: How to Change the Stock on a Rifle

Introduction

Changing the stock on a rifle can enhance its functionality, comfort, and overall aesthetics. Whether upgrading to a stock that better fits your body or opting for a material that improves durability and performance, this guide will walk you through the steps to safely and effectively replace the stock on your rifle.


1. Safety First

1.1 Ensure the Rifle is Unloaded

  • Check Chamber and Magazine: Always ensure that the rifle is completely unloaded before beginning any work. Check the chamber and magazine to confirm that no ammunition is present.

1.2 Engage Safety Mechanisms

  • Safety On: If your rifle has a safety, engage it. Remove the battery or any power source if it’s a modern tactical rifle with electronic systems.

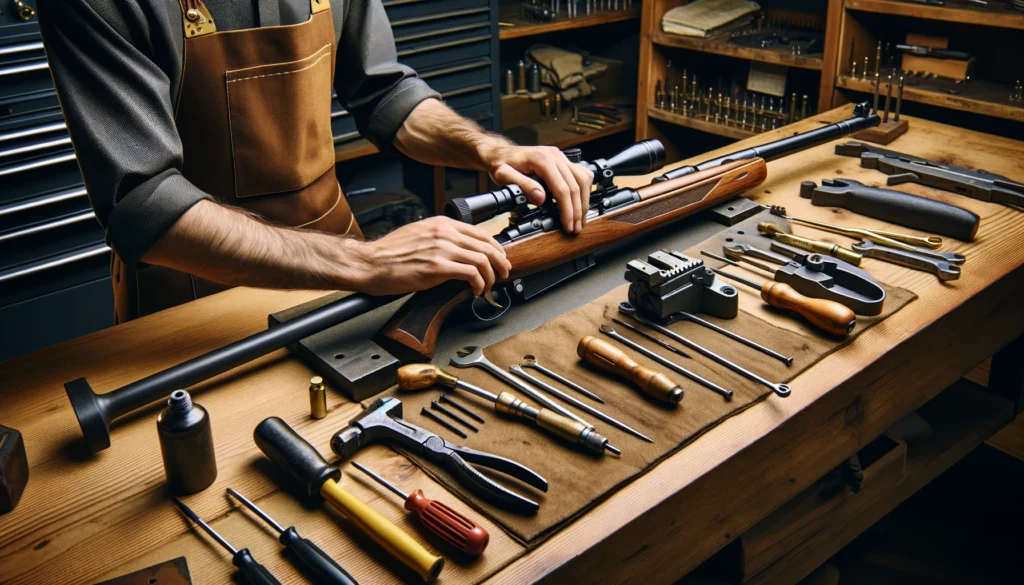
2. Gather Necessary Tools

2.1 Basic Gunsmithing Tools

  • Screwdrivers and Wrenches: You’ll need various screwdrivers and possibly wrenches that fit the specific fasteners on your rifle’s stock. A gunsmithing screwdriver set is recommended to avoid damaging screws.

2.2 Workbench and Vise

  • Stable Platform: Use a padded vise or gun mat on a sturdy workbench to hold your rifle securely during the stock replacement.

3. Removing the Old Stock

3.1 Access the Stock Fasteners

  • Locate Screws or Bolts: Identify all screws, bolts, or other fasteners that attach the stock to the rifle’s action and barrel. These are often found on the underside of the stock.

3.2 Detach the Stock

  • Careful Removal: Slowly and carefully unscrew the fasteners, keeping track of each component. Gently pull the stock away from the barrel and action. Be mindful of any cables or wiring in models with integrated systems.

4. Fitting the New Stock

4.1 Test Fit

  • Dry Fit: Before attaching the new stock, align it with the rifle’s action and barrel to ensure a proper fit. Check for any areas that may need adjustment or additional padding.

4.2 Secure the New Stock

  • Attach and Fasten: Once confirmed that the fit is correct, begin securing the new stock using the original or provided fasteners. Do not overtighten, as this can damage the stock or the rifle.

5. Final Adjustments and Checks

5.1 Check Alignment

  • Ensure Accuracy: Make sure that the stock is aligned correctly with the barrel to ensure the accuracy of the rifle is not compromised.

5.2 Function Testing

  • Operational Check: Safely perform a function test to ensure that all parts are working correctly. Check the trigger, safety, and any other mechanical parts for proper operation.

6. Maintenance and Care

6.1 Regular Inspection

  • Post-Installation Checks: Regularly check the stock for any loosening of fasteners or signs of wear after your first few uses and periodically thereafter.

6.2 Cleaning

  • Keep it Clean: Maintain the new stock by keeping it clean and dry. Use appropriate cleaning products that won’t damage the stock material.

7. Customization Options

7.1 Choosing Features

  • Adjustable Components: Consider stocks with adjustable cheek rests, butt pads, or length of pull to enhance shooting comfort and accuracy, tailored to your specific needs.

7.2 Aesthetic Modifications

  • Personalization: Stocks are available in various colors and finishes, allowing you to personalize the appearance of your rifle. Some stocks also offer the capability to attach additional accessories such as bipods, slings, and scopes.

8. Understanding Legal Considerations

8.1 Compliance with Laws

8.2 Documentation and Registration

  • Keeping Records: If the modification affects the registration details of the firearm, ensure you update any necessary documentation to stay compliant with firearm registration laws.

9. Ergonomic Considerations

9.1 Evaluating Ergonomics

  • Comfort and Usability: When selecting a new stock, consider how the design impacts your natural shooting posture. An ergonomically designed stock can reduce fatigue and improve control during extended use.

9.2 Impact on Recoil Management

  • Recoil Absorption: Different materials and designs can affect the recoil feel of the rifle. Stocks with better recoil absorption can improve shooting accuracy and comfort, especially during prolonged sessions or with higher-caliber rifles.

10. Long-Term Care and Maintenance

10.1 Routine Maintenance Schedule

  • Consistent Care: Set a routine schedule to inspect, clean, and maintain not just the stock but the entire rifle to ensure optimal performance. Include checks for cracks, wear, and any loosening of fittings.

10.2 Handling and Storage

  • Proper Storage: Store your rifle in a cool, dry place to prevent damage to both the stock and mechanical components. Use a gun safe or lockable cabinet that provides adequate protection from environmental elements and unauthorized access.

Conclusion

Replacing the stock on a rifle can significantly enhance your shooting experience. By following these detailed steps, you can ensure that the process is done safely and effectively, leading to better performance and comfort. Always prioritize safety and double-check your work to enjoy the benefits of your newly fitted rifle stock.


Frequently Asked Questions (FAQs)

What materials are best for rifle stocks?

  • Stocks come in various materials including wood, laminates, synthetic polymers, and composites. Each has its benefits depending on your needs, such as durability, weight, and environmental resistance.

How do I know if a new stock will fit my rifle?

  • Check the manufacturer’s specifications and compatibility. Many stocks are designed for specific rifle models. If unsure, consult with a professional gunsmith.

Can changing the stock affect the rifle’s performance?

  • Yes, the stock can affect the rifle’s balance, weight distribution, and overall ergonomics, which can influence shooting performance and comfort. Make sure the new stock complements your shooting style and physical requirements.

Can I revert to the original stock if needed?

  • Yes, as long as you retain the original stock and no permanent modifications were made to the rifle during the stock change, you can revert to the original configuration.

Are there environmental considerations with different stock materials?

  • Yes, different materials react differently to environmental factors such as humidity, temperature, and exposure to elements. For instance, synthetic stocks generally offer better resistance to moisture and temperature variations compared to wood.

What are the typical costs involved in changing a rifle stock?

  • Costs can vary widely based on the type of stock, material, and any additional features like adjustability or integrated components. It’s important to consider both the initial cost and any potential long-term maintenance expenses when selecting a new stock.

Guidelines on How Not to Introduce Your Kids to Guns

Introduction

Introducing children to firearms carries a significant responsibility. It’s crucial to approach this topic with care to ensure safety and instill a proper understanding of gun use and safety. This guide focuses on common mistakes to avoid when introducing your kids to guns, providing a safer and more responsible way to educate them about firearms.


1. Avoiding Premature Introductions

1.1 Assessing Maturity

  • Emotional Readiness: Children must be mature enough to understand the serious nature of handling firearms. Introducing guns too early can be risky if the child does not grasp the permanence of actions taken with a gun.

1.2 Developmental Considerations

  • Understanding Consequences: Ensure the child can comprehend and respect the safety protocols and the potential consequences of improper gun use.

2. Not Overlooking Educational Foundations

2.1 Importance of Education Before Exposure

  • Basic Safety Education: Before handling any firearm, children should be thoroughly educated on gun safety rules such as “Never point a gun at something you do not intend to shoot” and “Always treat guns as if they are loaded.”

2.2 Use of Simulations and Models

  • Learning Tools: Utilize toy models and controlled environments to explain how guns work and to practice safety procedures without using real firearms.

3. Ensuring Proper Supervision

3.1 Constant Adult Supervision

  • No Unsupervised Handling: Never allow a child to handle a firearm without strict adult supervision. Even with toy guns or during educational sessions, adult oversight is crucial.

3.2 Role of Professional Instructors

  • Guidance from Experts: Consider involving certified firearms instructors who specialize in teaching children. Their expertise ensures that correct and safe handling practices are taught.

4. Avoiding Casual Attitudes Toward Firearms

4.1 Seriousness of Gun Use

  • Not a Toy: Do not treat firearms as toys or trivialize their potential danger. Maintain a serious demeanor when discussing or handling guns to model appropriate respect and caution.

4.2 Media Influence

  • Clarifying Realities: Address how firearms are portrayed in media and entertainment. Ensure children understand the difference between fictional representations of guns and real-life firearm safety and responsibility.

5. Not Skipping Practical Safety Measures

5.1 Safe Storage

  • Access Control: Firearms should always be stored in a secure manner, inaccessible to children. Use gun safes, locks, and other security measures to prevent unauthorized access.

5.2 Regular Safety Drills

  • Practice Makes Perfect: Conduct regular safety drills and quizzes to reinforce safety knowledge and ensure that children understand how to act responsibly around firearms.

6. Failing to Set a Good Example

6.1 Modeling Responsible Behavior

  • Lead by Example: Demonstrate responsible gun ownership and handling at all times. Children often emulate adult behaviors, and showing consistent diligence and respect for gun safety can profoundly influence their attitudes.

6.2 Discussing the Ethical Use of Guns

  • Ethical Considerations: Discuss scenarios where firearm use is legally and morally justified. Emphasize the importance of ethical decision-making regarding gun use.

7. Neglecting Legal and Ethical Education

7.1 Understanding Local Laws

  • Compliance with Regulations: Educate both yourself and your child about local and national firearms laws, including ownership, transportation, and usage. It’s vital for children to understand the legal context surrounding gun use.

7.2 Discussing Moral Implications

  • Responsible Gun Use: Engage in discussions about the ethical use of firearms, emphasizing situations where they should and should not be used. Teach children the importance of using guns solely as a means of protection or for legal sporting activities.

8. Skipping Regular Reviews and Updates

8.1 Keeping Information Current

  • Ongoing Education: As children grow and laws change, it’s important to regularly review and update the information you’ve taught about firearms. This includes revisiting safety protocols and legal requirements.

8.2 Adaptive Learning Strategies

  • Evolving Lessons: Adjust lessons on gun safety and handling as children mature, ensuring the information is age-appropriate and relevant to their understanding and experience level.

9. Overlooking Psychological Impact

9.1 Assessing Impact

  • Emotional Readiness: Continually assess the emotional impact that learning about and handling guns may have on a child. Some children may become fearful or anxious, while others may become overly fascinated. Tailor your approach to fit their emotional responses and readiness.

9.2 Providing Support

  • Emotional Guidance: Be prepared to offer emotional support and discuss feelings about guns openly. Address any fears, misconceptions, or unhealthy attitudes that may arise during their learning process.

10. Ignoring the Importance of Non-Firearm Defense Skills

10.1 Broader Self-Defense

  • Alternative Methods: Teach children about non-firearm methods of self-defense. Understanding a range of defensive strategies can provide them with options that don’t involve lethal force.

10.2 Promoting Overall Safety Awareness

  • Situational Awareness: Encourage a broader awareness of personal safety and surroundings, which can help prevent situations where a firearm might be thought necessary.

Conclusion

Introducing your kids to guns is a serious decision that should be approached with utmost caution and responsibility. By avoiding these common mistakes, you can ensure that your child’s introduction to firearms is safe, educational, and respectful of the power and responsibility that come with gun ownership.


Frequently Asked Questions (FAQs)

At what age is it appropriate to introduce children to firearms?

  • There is no one-size-fits-all answer, as maturity and readiness can vary greatly among children. Generally, it is advisable to wait until a child can fully understand and respect the serious nature of handling firearms, typically not before the age of 12.

How can I reinforce gun safety at home?

  • Reinforce gun safety by regularly discussing safety rules, using gun safes and locks, and demonstrating responsible gun handling. Make gun safety a regular topic of conversation and practice, not just a one-time lesson.

What if my child is not interested in learning about guns?

  • Respect their feelings and do not force the education. It’s important for children to feel comfortable and willing to learn about firearms. You can revisit the conversation when they are older or if their interest changes.

How can I make learning about gun safety more engaging for kids?

  • Incorporate interactive elements such as quizzes, practical demonstrations, and even virtual simulations where appropriate. Make learning about firearm safety educational but also engaging and interactive to help maintain their interest and focus.

Is it safe to take children to a shooting range?

  • Yes, with proper precautions. Ensure the range is family-friendly and accustomed to handling young shooters. Begin with theoretical education and closely supervised practical training, ensuring all safety measures are strictly adhered to.

Knot Mastery: 20 Essential Outdoor Knots and Hitches

Introduction

Knowing how to tie various knots is a critical skill for anyone who enjoys outdoor activities. Whether you’re camping, hiking, climbing, or boating, the right knot can ensure safety, convenience, and effectiveness in a wide range of situations. This guide will introduce you to 20 essential knots and hitches, each with specific uses that can enhance your outdoor experiences.


1. Basic Knots

1.1 Square Knot (Reef Knot)

  • Uses: Tying two ropes of similar thickness together. Ideal for securing non-critical items.
  • Tying Method: Right over left, then left over right.

1.2 Bowline

  • Uses: Creating a fixed loop at the end of a rope. Great for rescue scenarios.
  • Tying Method: Form a small loop, pass the end through, around the standing part, and back down through the loop.

1.3 Clove Hitch

  • Uses: Attaching a rope to a post, tree, or another rope.
  • Tying Method: Make two successive loops around an object and slip the second under the first before tightening.

2. Bends

2.1 Sheet Bend

  • Uses: Joining two ropes of different diameters.
  • Tying Method: Make a loop with the thicker rope. Pass the thinner rope through the loop, behind the tail and main part of the thicker rope, then back under itself.

2.2 Double Fisherman’s Knot (Grapevine Knot)

  • Uses: Creating a very strong and secure join between two ropes.
  • Tying Method: Each end of the rope is tied around the other with two overhand knots.

3. Loops

3.1 Figure-Eight Loop

  • Uses: A strong loop for climbing and rescue applications.
  • Tying Method: Make a loop, twist it again, and pass the end through the double loop.

3.2 Alpine Butterfly Knot

  • Uses: Making a strong, secure loop in the middle of a rope.
  • Tying Method: Twist the rope to form a loop, fold the loop down, and pull a section of the loop through itself.

4. Hitches

4.1 Timber Hitch

  • Uses: Tying logs or other large items.
  • Tying Method: Wrap the end of the rope around the object, pull it back under itself five or more turns, then tighten.

4.2 Prusik Knot

  • Uses: Attaching a loop of cord around a rope in a way that it can be moved but holds firmly under load.
  • Tying Method: Wrap a loop of cord around a rope several times and pass the end through the loop.

5. Specialty Knots

5.1 Constrictor Knot

  • Uses: Binding material tightly together; almost impossible to untie.
  • Tying Method: Like a clove hitch but with an extra twist under the last loop.

5.2 Trucker’s Hitch

  • Uses: Securing loads on a vehicle.
  • Tying Method: Create a loop in the middle of the rope, pass the free end around the load and through the loop, then back to itself with a slippery half hitch.

6. Stoppers

6.1 Figure-Eight Knot

  • Uses: Preventing the rope from slipping out of retaining devices.
  • Tying Method: Make a loop, pass the end over and under the standing part, then back through the loop.

6.2 Overhand Knot

  • Uses: Basic stopper knot or component in more complex knots.
  • Tying Method: Pass the end of the rope over itself and through the loop.

7. Securing Gear

7.1 Rolling Hitch

  • Uses: Attaching a rope to a rod, pole, or another rope, particularly when load is applied along the line of the object.
  • Tying Method: Wrap the rope around the object, cross over the standing part and wrap again, then pull the working end through the last wrap under tension.

7.2 Taut-Line Hitch

  • Uses: Tying down tents or adjusting the tension on lines without retying the knot.
  • Tying Method: Wrap the working end around a post or stake, then wrap inside the loop twice, outside once, and tuck under the last wrap.

8. Joining Ropes of Unequal Size

8.1 Zeppelin Bend

  • Uses: Joining two ropes of different diameters or rigidity securely and reliably.
  • Tying Method: Make a bight with each rope, overlay them in opposite directions, and thread each working end through the loop formed by the other bight.

8.2 Becket Hitch (Sheet Bend’s Brother)

  • Uses: Joining a small diameter rope to a larger loop or eye.
  • Tying Method: Pass the smaller rope through the loop and wrap around the entire loop, finishing by tucking the end under its own standing part.

9. Quick Release Knots

9.1 Highwayman’s Hitch

  • Uses: Quick release is needed, such as when tying a boat temporarily.
  • Tying Method: Loop the rope around the post, create a bight in the standing part, pass it through the first loop, then create another bight from the working end, passing it through the second loop.

9.2 Slip Knot

  • Uses: Temporary stops or when a quick release is beneficial.
  • Tying Method: Make a loop, then pull another loop (bight) through it. The knot will hold under tension but can be quickly released by pulling the tail.

10. Decorative Knots

10.1 Monkey’s Fist

  • Uses: Originally used as a heaving line knot on ships, it can serve as a decorative keychain or zipper pull.
  • Tying Method: Wrap the rope around your fingers several times, then wrap perpendicular around those wraps, and finally tuck the end through the middle.

10.2 Diamond Knot

  • Uses: Decorative knot often used at the end of lanyards.
  • Tying Method: Form a loop with two rope ends, weave each end through the opposite loop, and tighten.

11. Rope Care and Maintenance

11.1 Regular Inspection

  • Essential Checks: Regularly inspect the entire length of your ropes for frays, abrasions, or weak spots. These can compromise the strength and safety of the rope.

11.2 Cleaning Your Ropes

  • Proper Washing: Dirt can accelerate wear in ropes. Wash ropes with mild soap and water, rinse thoroughly, and air dry away from direct sunlight.

Conclusion

Mastering these knots and hitches can significantly enhance your safety and efficiency during outdoor adventures. Practice these knots regularly to build familiarity and confidence. Remember, the best knot is the one you can tie correctly and rely on when you need it most.


Frequently Asked Questions (FAQs)

What is the strongest knot for general use?

  • The bowline is renowned for its strength and ease of untying, making it one of the strongest and most versatile knots for general use.

How do I care for ropes to ensure their longevity?

  • Keep ropes clean, dry them away from direct sunlight, and store them loosely coiled in a cool, dry place. Regularly inspect for wear and abrasion to ensure safety.

Can these knots be used for all types of ropes?

  • While most knots work well with many types of ropes, differences in rope material and diameter can affect a knot’s performance. Always test knots with your specific rope to ensure security.

How do I prevent knots from jamming?

  • Properly sizing the rope to the load and avoiding excessive tension can help prevent knots from jamming. Also, learning how to tie and untie knots correctly will minimize this risk.

Are there any apps or tools to help learn knot tying?

  • Yes, there are several apps available that provide step-by-step tutorials and animations for knot tying, which can be very helpful for visual learners.

What is the best way to practice these knots?

  • Regular practice on different types and sizes of ropes and in various practical situations is the best way to become proficient. Incorporating knot tying into your daily activities can also provide ongoing practice and reinforce muscle memory.

Mastering the Edge: How to Sharpen a Knife with a Stone

Introduction

A sharp knife is a safe knife. Sharpening your knife regularly not only makes cutting easier but also reduces the risk of the knife slipping and causing injury. Using a sharpening stone, often referred to as a whetstone, is one of the most effective methods to restore and maintain a sharp edge on your knife. This guide will walk you through the steps to properly sharpen a knife using a stone.


1. Choosing the Right Sharpening Stone

1.1 Types of Stones

  • Grit Levels: Sharpening stones come in various grits, which are classified by the size of the abrasive particles they contain. Coarse stones (200-600 grit) are best for repairing damaged edges, medium stones (700-1200 grit) are ideal for general sharpening, and fine stones (2000-3000 grit) are used for honing and polishing the edge.

1.2 Material Types

  • Water Stones vs. Oil Stones: Water stones (usually softer) require water to lubricate the surface, which helps keep the stone clean of metal filings. Oil stones are harder and slower-wearing, requiring oil for lubrication. Decide based on the type of maintenance you’re willing to perform and the edge quality you desire.

2. Preparing the Stone

2.1 Soaking or Lubricating

  • Water Stones: Soak water stones in water for about 5-10 minutes until no air bubbles emerge from the stone.
  • Oil Stones: Apply a light coating of honing oil or mineral oil to the surface of the stone to ensure smooth movement of the knife blade across the stone.

3. Setting Up Your Sharpening Station

3.1 Stability

  • Secure Placement: Place your stone on a non-slip base or mat to ensure it does not move while sharpening. Stability is key to maintaining control over the sharpening process.

4. Sharpening Technique

4.1 Finding the Angle

  • Knife Angle: The angle between the knife blade and the stone is crucial for effective sharpening. Most kitchen knives work best at a 15-20 degree angle. To find this, visualize the angle in halves: if 90 degrees is perpendicular to the stone, half to 45 degrees, and half again to about 22.5 degrees, then slightly less.

4.2 The Sharpening Process

  • Method: Hold the knife by the handle and place the edge against the stone at the determined angle. Push the blade away from you as if you were trying to slice a thin layer off the top of the stone. Use gentle pressure, and glide the blade from the tip to the heel in a smooth motion.

4.3 Consistent Strokes

  • Repetition and Counting: Ensure you perform an equal number of strokes on each side to maintain balance in the blade’s edge. This consistency is critical for achieving a sharp and symmetrical edge.

5. Checking and Testing Sharpness

5.1 Visual Inspection

  • Look for a Burr: A burr is a slight fold of metal on the opposite side of the edge you’ve been sharpening. Feeling a slight burr along the edge indicates that the knife has been sharpened sufficiently on that side.

5.2 Performance Test

  • Cutting Test: Test the sharpness by carefully cutting into a piece of paper or a ripe tomato. A sharp knife should cut smoothly with minimal pressure.

6. Finishing Touches

6.1 Honing

  • Final Honing: After sharpening, use a honing rod to straighten the edge, removing any remaining burr and aligning the edge for optimal performance.

6.2 Cleaning and Storing

  • Care After Sharpening: Clean the knife and stone with warm water, wipe them dry, and store safely. Proper maintenance extends the life of both your tools and ensures they are ready for next use.

7. Advanced Sharpening Tips

7.1 Multiple Stone Progression

  • Refining the Edge: For an exceptionally sharp edge, progress through multiple stones from coarse to fine grit. Start with a coarse stone to shape the edge, then move to a medium grit stone for sharpening, and finish with a fine grit stone for honing and polishing. This gradual progression ensures a razor-sharp finish.

7.2 Maintaining Consistent Angles

  • Angle Guides: Consider using angle guides, which are tools that help maintain a consistent angle during sharpening. This is particularly useful for beginners or those who struggle to hold a steady angle by hand.

8. Troubleshooting Common Sharpening Issues

8.1 Uneven Edges

  • Solution: If the knife edge becomes uneven, it might be due to applying inconsistent pressure or angle during the sharpening process. Practice maintaining even pressure and angle, and check your progress frequently.

8.2 Over-Sharpening

  • Solution: Avoid over-sharpening as it can thin out the blade excessively, making it fragile. Learn to recognize when the knife is sufficiently sharp and stop at that point.

9. Incorporating Micro-Bevels

9.1 Added Durability

  • Creating a Micro-Bevel: After sharpening the main edge, you can add a slightly steeper angle micro-bevel at the very edge. This small adjustment can enhance the durability of the edge, making it less prone to chipping or rolling.

9.2 How to Add a Micro-Bevel

  • Simple Technique: After completing your normal sharpening, increase the angle slightly (by about 2-3 degrees) and perform a few light strokes on each side of the blade. This will form a robust micro-bevel.

10. Caring for Your Sharpening Stones

10.1 Regular Cleaning

  • Maintenance: Keep your sharpening stones clean to prevent buildup of metal filings and debris, which can reduce their effectiveness. Use a stone cleaner or a mild detergent and a soft brush to clean the surface.

10.2 Flattening the Stones

  • Keeping Stones Flat: Over time, sharpening stones can wear unevenly, leading to a dished or uneven surface. Use a flattening stone or sandpaper on a flat surface to level out your stones periodically.

11. Ethical and Sustainable Practices

11.1 Responsible Sharpening

  • Environmentally Friendly Choices: Consider the environmental impact of your sharpening practices. Opt for natural sharpening stones and biodegradable oils, and properly dispose of any waste materials.

11.2 Supporting Quality Craftsmanship

  • Choosing High-Quality Tools: Invest in high-quality, durable knives and sharpening equipment. Higher quality tools often last longer, reducing waste and the need for frequent replacements.

Conclusion

Sharpening a knife with a stone can be a meditative and rewarding process. With practice, you’ll refine your technique and gain the satisfaction of maintaining your knives in top condition. Remember, a well-sharpened knife is a joy to use and is an essential tool in any kitchen or workshop.


Frequently Asked Questions (FAQs)

How often should I sharpen my knives?

  • The frequency depends on use but generally, sharpening every few months or when you notice a decrease in cutting performance is recommended.

Can I sharpen serrated knives on a stone?

  • Serrated knives require a different approach and often a specialized tool like a serrated knife sharpener. It is possible to sharpen them on a stone, but care must be taken to only sharpen the serrated edges without damaging the grooves.

How do I know if I need to replace my sharpening stone?

  • Look for signs like excessive wear, deep grooves, or an inability to produce a sharp edge. If flattening and cleaning do not restore its performance, it may be time to consider a replacement.

Can all types of knives be sharpened on a stone?

  • Most knives can be sharpened on a stone, but some, like those with coated blades or extremely hard specialty steels, may require specific techniques or tools. Always check the manufacturer’s recommendations for blade care.

The Art of Knife Throwing: A Beginner’s Guide

Introduction

Knife throwing is a skill that combines precision, control, and a bit of flair. Often seen in circuses and action movies, it’s also a popular hobby for those interested in traditional weaponry and target sports. This guide will introduce the basics of knife throwing, helping beginners understand the fundamentals and safety precautions needed to start practicing this unique art form.


1. Choosing the Right Knife

1.1 Types of Throwing Knives

  • Weight and Balance: A good throwing knife should be heavy enough to ensure a stable flight and balanced for consistent performance. Avoid knives with sharp handles; they should be dull to prevent injury when gripped.

1.2 Length and Material

  • Optimal Size: Throwing knives typically range from 8 to 14 inches. A longer knife rotates more slowly, making it easier to control. Stainless steel is a common choice for its durability and weight.

2. Basic Grips

2.1 Hammer Grip

  • Simple and Stable: Hold the knife’s handle as you would a hammer, with your thumb along the top of the handle and fingers wrapped around it. This grip is straightforward and suitable for beginners.

2.2 Pinch Grip

  • For More Control: Pinch the top of the blade or handle between your thumb and forefinger. This grip allows for more precise throws and is often used with lighter knives.

3. Throwing Techniques

3.1 The Basic Stance

  • Foot Position: Stand with your non-dominant foot forward, about shoulder-width apart. The dominant foot should be back, providing stability and balance as you throw.

3.2 The Throw

  • Motion and Release: Start with the knife at your side or raised above your shoulder, depending on your comfort. Bring the knife forward in a smooth motion. Release the knife when your hand is pointing directly at the target. The key is to release the knife without any wrist flick to maintain the knife’s trajectory and rotation.

3.3 Managing the Rotation

  • Distance and Spin: The distance from the target will dictate how much the knife rotates before hitting. Generally, one full rotation happens for every 12 to 16 feet from the target. Beginners should start close (about 5-6 feet) to practice half or no-spin techniques before moving to longer distances that require full rotation.

4. Setting Up Your Practice Area

4.1 Choosing a Target

  • Safe and Durable: Use a soft wood target such as pine or cork, which helps the knife to stick upon impact and minimizes bounce-back. Avoid hard surfaces that can damage your knives.

4.2 Safety Measures

  • Clear and Secure Area: Ensure that your throwing area is clear of other people and pets. Have a solid backdrop like a wooden fence or a specially designed knife throwing board that will stop missed throws.

5. Training and Consistency

5.1 Regular Practice

  • Develop Skill Over Time: Like any skill, knife throwing requires regular practice. Dedicate time each week to practice your grip, stance, and throw to improve accuracy and precision.

5.2 Learn from Each Throw

  • Analyze and Adjust: Pay attention to how each knife lands. If it sticks handle-first, adjust your distance or throwing force. If it hits tip-first but doesn’t stick, it may be rotating too much or too little.

6. Advanced Techniques

6.1 Multiple Knife Throws

  • Increased Difficulty: As you become more comfortable with basic throws, you can start practicing with multiple knives, learning to handle and throw several knives in quick succession.

6.2 No-Spin Throwing

  • Precision Technique: No-spin techniques, where the knife flies straight without rotating, require precise control and are considered an advanced skill. Mastery of this technique can significantly improve accuracy at various distances.

7. Joining a Community

7.1 Clubs and Competitions

  • Connect with Others: Consider joining a knife throwing club or participating in competitions. This can provide valuable feedback from experienced throwers and help you refine your technique in a supportive environment.

7.2 Online Resources

8. Psychological Aspects of Knife Throwing

8.1 Mental Focus and Concentration

  • Building Concentration: Successful knife throwing requires a high level of mental focus. Practicing mindfulness and concentration exercises can enhance your ability to stay calm and focused during throwing sessions, leading to more accurate throws.

8.2 Handling Pressure

  • Competitive Scenarios: Whether you’re throwing in a competition or as a form of entertainment for others, learning to manage pressure is crucial. Techniques such as visualization, breathing exercises, and routine establishment can help maintain performance under stress.

9. Physical Conditioning for Knife Throwers

9.1 Strengthening Exercises

  • Core and Arm Strength: Develop core and upper body strength through exercises like planks, push-ups, and dumbbell rows. Stronger muscles contribute to more powerful and stable throws.

9.2 Flexibility and Mobility

  • Enhancing Range of Motion: Flexibility in the shoulders, arms, and wrists is vital for knife throwers. Incorporate stretching into your routine to improve your range of motion and prevent injuries related to repetitive motion.

10. Equipment Maintenance and Upgrades

10.1 Regular Knife Maintenance

  • Keeping Knives in Top Condition: Regularly check your knives for signs of wear such as chips or bends. Keep them clean and sharp, as a well-maintained knife performs more reliably.

10.2 Upgrading Equipment

  • When to Upgrade: As you develop your skills, consider upgrading your equipment. Higher quality knives and more sophisticated target setups can provide better feedback and improve practice sessions.

11. Building a Practice Routine

11.1 Structured Practice Sessions

  • Routine Development: Create a structured practice routine that includes a warm-up, focused practice on specific skills, and cool-down. A consistent routine helps develop muscle memory and improve throwing accuracy.

11.2 Tracking Progress

  • Maintaining a Log: Keep a detailed log of your practice sessions, including what you practiced, the outcomes, and any adjustments you made. This log will help you track your progress over time and identify areas that need improvement.

12. Expanding Your Skills

12.1 Exploring Related Disciplines

  • Cross-Training: Engage in related disciplines like archery or axe throwing to enhance your understanding of projectile sports. Cross-training can introduce new techniques and improve your overall throwing skills.

12.2 Creative Throwing Challenges

  • Innovative Practice: Set up creative challenges that push your skills to new levels. This could include throwing at moving targets, participating in outdoor throwing events, or even setting up thematic targets that require precise hitting.

Conclusion

Knife throwing is a rewarding skill that offers both a physical and mental challenge. By understanding the basics of knife selection, grip, stance, and throw, you can begin practicing this impressive art safely and effectively. Remember to practice regularly, stay patient with your progress, and always prioritize safety in your throwing activities.


Frequently Asked Questions (FAQs)

Is knife throwing dangerous?

  • Yes, like any sport involving weapons, knife throwing can be dangerous if not practiced with care and proper precautions. Always ensure safety for yourself and others around your practice area.

Can knife throwing be self-taught?

  • Many throwers learn on their own through trial and error, supplemented by instructional books, videos, and community advice. However, if possible, learning from an experienced thrower can dramatically improve your technique and safety practices.

How do I find a knife throwing coach?

  • Look for local sports clubs or check online for knife throwing communities that offer coaching. Many experienced throwers are also active on social media platforms where they share tips and may offer personalized coaching.

What are some common beginner mistakes in knife throwing?

  • Beginners often make the mistake of throwing too hard, which can disrupt the knife’s balance and rotation. Focus on technique rather than force, and be patient with your learning curve.

How can I make knife throwing a regular part of my routine?

  • Schedule regular practice times, set achievable goals, and make your practice sessions enjoyable by varying routines and challenges. Staying consistent and keeping the practice fun are key to making knife throwing a lasting hobby.

Effective Blister Management: How to Treat Blisters for Outdoor Enthusiasts

Introduction

Blisters are a common nuisance for hikers, runners, and anyone who is frequently on their feet. They are typically caused by friction and can become painful obstacles if not managed properly. Knowing how to treat and prevent blisters is essential for maintaining foot health and comfort during any outdoor activity. This guide provides step-by-step instructions on how to effectively manage blisters.


1. Identifying Blisters

1.1 Recognize Early Signs

  • Appearance and Sensation: Blisters are small pockets of fluid that form under the skin, often clear in appearance. They can feel like a painful swelling or bubble on the skin.

2. Initial Treatment

2.1 Clean and Assess

  • Sanitation: Wash your hands and the blistered area with soap and water or an antiseptic wipe. This prevents infection and prepares the area for further treatment.

2.2 Protect the Blister

  • Avoid Popping: Whenever possible, keep the blister intact to naturally protect against bacteria and aid healing. Cover it with a sterile blister bandage or gauze pad.

3. Advanced Care for Painful or Burst Blisters

3.1 Draining a Large or Painful Blister

  • Sterile Procedure: If a blister is too painful to leave intact or has burst, it may be necessary to drain it. Sterilize a needle with rubbing alcohol, gently pierce the edge of the blister, and press the fluid out. Do not remove the overlying skin, as it protects the raw skin underneath.

3.2 Apply Antibiotic Ointment

  • Infection Prevention: After draining, apply a small amount of antibiotic ointment to reduce the risk of infection. This step is crucial for keeping the area clean.

4. Bandaging Techniques

4.1 Use the Right Dressing

  • Specialized Products: Use a hydrocolloid dressing specifically designed for blisters. These dressings provide a moist environment that promotes healing and protects from friction.

4.2 Secure the Bandage

  • Firm Placement: Ensure the bandage fully covers the blister and extends beyond its edges. Secure it in place with medical tape if necessary.

5. Footwear and Activity Adjustments

5.1 Assess and Adjust Footwear

  • Proper Fit: Ill-fitting shoes often cause blisters. Make sure your footwear is not too tight or too loose. Consider using specialized insoles or adjustments to reduce friction.

5.2 Modify Activities

  • Rest and Recovery: If a blister is particularly bothersome, consider adjusting your activities to give it time to heal. Avoid excessive walking or running on a severe blister.

6. Monitoring and Follow-Up

6.1 Watch for Signs of Infection

  • Alert to Changes: Monitor the blister for signs of infection, which include increased pain, redness, swelling, or pus. If you notice these signs, consult a healthcare professional.

6.2 Change Bandages Regularly

  • Maintain Cleanliness: Change the dressing daily or anytime it becomes wet or dirty. This maintains cleanliness and promotes healing.

7. Reducing Friction

7.1 Use Anti-Friction Products

  • Skin Protection: Products such as anti-friction sticks, creams, or powders can be applied to high-risk areas to reduce rubbing. These are particularly useful for long-distance runners or hikers.

7.2 Wearing the Right Socks

  • Moisture-Wicking and Fit: Choose socks that are well-fitted and made from moisture-wicking materials to keep feet dry and reduce the risk of blister formation. Avoid cotton, which retains moisture and increases friction.

8. Strengthening Skin

8.1 Gradual Conditioning

  • Toughening the Skin: Gradually increase activity levels to help toughen the skin on your feet. This natural process can make the skin less susceptible to blisters over time.

8.2 Hydration and Nutrition

  • Skin Elasticity: Maintain good hydration and a balanced diet rich in vitamins and minerals that promote skin health. Healthy, elastic skin is less prone to blistering.

9. Specialty Footwear Adjustments

9.1 Custom Orthotics

  • Individualized Support: For those with specific foot shape issues that predispose them to blisters, custom orthotics prescribed by a podiatrist can provide better support and reduce pressure points.

9.2 Lace Techniques

  • Optimized Fit: Experiment with different lacing techniques to better secure your footwear and eliminate points of excessive pressure or slippage, which can lead to blisters.

10. Recognizing When to Seek Professional Help

10.1 Persistent or Recurring Blisters

  • Medical Attention: If blisters repeatedly occur in the same spots, or if they don’t heal with standard home care, it may be time to consult with a healthcare provider to explore underlying causes.

10.2 Signs of Complications

  • Seeking Treatment: If you experience signs of infection or if a blister becomes extremely painful and limits your mobility, professional medical treatment is necessary to prevent further complications.

11. Practical Exercises for Foot Health

11.1 Stretching and Strengthening

  • Foot Exercises: Regular foot exercises can improve overall foot health, making your feet less prone to injuries and blisters. Toe curls, stretches, and towel grabs are simple but effective.

11.2 Balanced Foot Movements

  • Varied Terrain Walking: Regularly walking on varied terrains can naturally strengthen the feet and ankles, providing more resilience against blisters and other foot-related issues.

Conclusion

Managing blisters effectively is key to maintaining foot health and comfort during outdoor activities. By understanding how to properly treat and protect blisters, you can prevent complications and continue enjoying your adventures with minimal discomfort. Remember, proactive foot care and appropriate footwear are your best defenses against blisters.


Frequently Asked Questions (FAQs)

Can I use home remedies to treat blisters?

  • Home remedies like aloe vera or tea tree oil can soothe blistered skin, but they should not replace proper cleaning and bandaging techniques. Always prioritize keeping the blister clean and protected.

How long do blisters take to heal?

  • Most blisters heal within one to two weeks if they are managed well and kept from infection. Larger or deeper blisters may take longer and should be monitored carefully.

Should I keep a blister uncovered to let it ‘breathe’?

  • While it might seem beneficial to let a blister air out, keeping it covered with a sterile dressing is generally the best practice. This protects against infection and helps maintain an optimal healing environment.

Is it better to wear thick or thin socks for blister prevention?

  • The choice between thick and thin socks should be based on the fit of your shoes and your personal comfort preferences. Thicker socks can offer more cushioning and protection, while thinner socks may provide a closer fit and better heat management. Always ensure your socks and footwear work well together to prevent unnecessary friction.

Can walking barefoot help prevent blisters?

  • Walking barefoot can help strengthen the skin and muscles of the feet, potentially reducing the risk of blisters when you do wear shoes. However, this should be done gradually and in safe environments to avoid injuries.

You can also visit : Survival Gears for Serious Hunting Endeavors

Ascending Safely: How to Prevent Altitude Sickness

Introduction

Altitude sickness, also known as acute mountain sickness (AMS), can affect anyone ascending to high elevations too quickly. It’s a result of the body struggling to adjust to lower oxygen levels at higher altitudes. Understanding how to prevent and manage altitude sickness is crucial for anyone planning to hike, climb, or travel to elevated destinations. Here’s how you can prepare for and prevent altitude sickness during your high-altitude adventures.


1. Understand the Symptoms

1.1 Recognize Early Signs

  • Common Symptoms: Headache, nausea, dizziness, fatigue, and difficulty sleeping are early indicators of AMS. Recognizing these symptoms early can help you take immediate action to prevent worsening conditions.

2. Gradual Acclimatization

2.1 Ascend Slowly

  • Rate of Ascent: Your body needs time to adjust to the decreased oxygen levels at higher altitudes. Ascend slowly, allowing several days for acclimatization, especially above 8,000 feet (about 2,400 meters).

2.2 “Climb High, Sleep Low”

  • Daily Routine: Spend your days reaching higher altitudes but return to lower elevations to sleep. This practice helps your body adapt more effectively.

3. Stay Hydrated

3.1 Increase Fluid Intake

  • Hydration is Key: Dehydration can exacerbate symptoms of AMS. Drink plenty of water before and during your ascent. Monitor your urine color as a gauge for hydration – aim for a light straw color.

4. Monitor Your Health

4.1 Pay Attention to Your Body

  • Self-Monitoring: Listen to your body’s signals. If symptoms of altitude sickness appear, do not ascend further until they have subsided. Ignoring symptoms can lead to more severe forms of altitude sickness.

5. Medications and Supplements

5.1 Consult with a Healthcare Provider

  • Preventative Medications: Medications like Acetazolamide (Diamox) can help prevent AMS when taken before and during your ascent. Consult with a healthcare provider to discuss whether this is a suitable option for you.

5.2 Consider Supplements

  • Ginkgo Biloba: Some studies suggest that Ginkgo Biloba can help prevent altitude sickness, although evidence is mixed. Always consult with a healthcare provider before taking any supplements.

6. Nutritional Considerations

6.1 Carbohydrate-Rich Diet

  • Energy Sources: Consuming a diet high in carbohydrates can provide energy and help reduce symptoms of altitude sickness. Carbohydrates are easier for the body to metabolize at high altitudes.

7. Physical Preparation

7.1 Pre-Ascent Fitness

  • Conditioning: Being in good physical condition can help your body cope with the stresses of high altitudes. Focus on cardiovascular fitness before your trip.

8. Oxygen Supplementation

8.1 Supplemental Oxygen

  • In Severe Cases: For extreme altitudes, carrying supplemental oxygen can be life-saving. This is more common in high-altitude mountaineering.

9. Know When to Descend

9.1 Safety First

  • Immediate Action: If symptoms of altitude sickness persist or worsen, the best and most effective treatment is to descend to a lower altitude as soon as possible. Delaying descent can lead to serious health risks.

10. Avoid Alcohol and Smoking

10.1 Impact on Altitude Sickness

  • Reducing Risk Factors: Alcohol and tobacco can impair your body’s ability to acclimatize. Alcohol dehydrates the body and can worsen the symptoms of altitude sickness. Smoking affects oxygenation, making acclimatization more challenging. Avoid or limit these substances before and during your ascent to high altitudes.

11. Educate Yourself on High Altitude Pulmonary Edema (HAPE) and High Altitude Cerebral Edema (HACE)

11.1 Recognizing Severe Conditions

  • Knowledge is Power: HAPE and HACE are severe forms of altitude sickness that can be life-threatening. Educate yourself on the symptoms, which include severe shortness of breath, confusion, and inability to walk straight, among others. Recognizing these conditions early can be crucial for survival.

11.2 Immediate Descent

  • Critical Response: If HAPE or HACE symptoms are suspected, immediate descent to a lower altitude is necessary. Delaying descent can have fatal consequences. Seek medical attention as soon as possible.

12. Use of Trekking Poles

12.1 Benefits During Ascent

  • Stability and Support: Trekking poles can provide stability and support during your ascent, which can be particularly beneficial in rough terrain. They help distribute the effort more evenly, reducing fatigue and potentially aiding in your acclimatization process.

13. Sleeping at High Altitudes

13.1 Managing Sleep Disturbances

  • Improving Rest: Sleeping at high altitudes can be difficult due to the decreased oxygen levels. Practice good sleep hygiene by establishing a routine, staying warm, and perhaps using breathing exercises to improve oxygenation and sleep quality.

14. Stay Informed on Weather Conditions

14.1 Weather at High Altitudes

  • Preparation and Adaptation: The weather at high altitudes can change rapidly, presenting additional challenges. Stay informed on the weather forecast for your destination and be prepared to adapt your plans. Severe weather can increase the risk of altitude sickness by forcing rapid ascents or descents.

15. Join a Guided Expedition

15.1 Benefits of Experienced Guides

  • Expertise and Safety: Especially for those new to high-altitude adventures, joining a guided expedition can offer the benefit of experienced guides who are familiar with the terrain, weather, and symptoms of altitude sickness. They can provide invaluable advice on acclimatization strategies and safety precautions.

Conclusion

Preventing altitude sickness is about planning, gradual acclimatization, and listening to your body. By taking the right precautions and preparing adequately, you can enjoy the beauty and challenge of high-altitude environments safely. Remember, the mountain will always be there another day; prioritize your health and safety above summit goals.


Frequently Asked Questions (FAQs)

Can I fly into a high-altitude city and avoid altitude sickness?

  • Flying directly into high-altitude areas can increase the risk of AMS since you have less time to acclimatize. If possible, spend a few days at a moderately high elevation before proceeding higher.

Does fitness level affect susceptibility to altitude sickness?

  • Fitness level does not necessarily correlate with susceptibility to AMS. Even highly fit individuals can experience altitude sickness if they ascend too quickly or fail to acclimatize properly.

How quickly can altitude sickness develop?

  • Symptoms of AMS can develop within 6 to 24 hours of reaching a higher altitude, which is why it’s crucial to ascend slowly and allow time for acclimatization.

Can children be more susceptible to altitude sickness?

  • Children can be just as susceptible to altitude sickness as adults, and they may not always communicate their symptoms effectively. Watch for signs of altitude sickness in young ones and ascend at a pace comfortable for them, ensuring they stay well-hydrated and rested.

Is it possible to acclimatize at home before traveling to high altitudes?

  • While pre-acclimatization options are limited, some individuals use altitude training masks or spend time in simulated altitude environments (altitude training facilities) to prepare their bodies. However, the best acclimatization occurs naturally and gradually at the actual altitude.

Surviving a Bear Attack: Essential Strategies and Precautions

Introduction

Encountering a bear in the wild can be a harrowing experience. While bear attacks are rare, understanding how to react can significantly increase your chances of survival and minimize injury. This guide outlines crucial strategies for surviving a bear encounter, whether you’re hiking, camping, or simply find yourself in bear territory.


1. Prevention and Preparedness

1.1 Awareness of Bear Behavior

  • Study Bear Habits: Knowing the types of bears in the area (grizzly, black, or polar) and understanding their behavior can inform your response in an encounter.

1.2 Make Noise While Hiking

  • Avoid Surprise Encounters: Bears generally avoid humans, so making noise—talking, clapping, or wearing bear bells—can prevent startling a bear.

1.3 Store Food Properly

  • Secure Campsite Practices: Use bear-proof containers and hang food away from your campsite to avoid attracting bears with food odors.

2. Identifying Bear Behavior

2.1 Defensive Behavior

  • Bear Feels Threatened: A defensive bear might make bluff charges, clack its teeth, huff, or lay its ears back. It’s reacting to what it perceives as a threat to itself, its cubs, or its food.

2.2 Predatory Behavior

  • Stalking or Focused Attention: This behavior is less common but more dangerous. The bear sees you as prey and may approach silently and intently.

3. If You Encounter a Bear

3.1 Stay Calm and Assess the Situation

  • Do Not Run: Running can trigger a bear’s chase instinct. Speak calmly and firmly, wave your arms slowly to appear larger, and back away slowly, keeping your eye on the bear without making direct eye contact.

3.2 Defensive Strategies

  • Play Dead: If a grizzly bear attacks and you have no bear spray or means of escape, lie flat on your stomach with your hands clasped behind your neck, spread your legs to make it harder for the bear to turn you over. Remain still until the bear leaves the area.

3.3 Fighting Back

  • Predatory Attack or Black Bear Encounter: If a bear continues to stalk you or attacks and you’re sure it’s predatory or it’s a black bear, fight back vigorously. Aim for the bear’s face and muzzle with anything you have.

4. Using Bear Spray

4.1 Effective Deterrent

  • Carry and Know How to Use: Bear spray has proven to be an effective deterrent in bear encounters. Ensure it’s easily accessible and practice drawing and aiming it.

4.2 Deployment Distance

  • Follow Instructions: Bear spray is most effective when used at the recommended distance (usually 20-30 feet). Spray in a brief burst when the bear is within range.

5. After an Encounter

5.1 Report the Encounter

  • Inform Authorities: Notify park rangers or local wildlife authorities about the encounter, especially if the bear displayed aggressive or predatory behavior.

5.2 Seek Medical Attention

  • Even Minor Injuries: If you’re injured, seek medical attention as soon as possible. Bear saliva can introduce harmful bacteria into wounds.

6. Camping in Bear Country

6.1 Choosing a Safe Campsite

  • Distance from Trails and Water: Set up camp at least 200 yards (183 meters) away from trails and water sources to reduce the likelihood of a bear wandering into your camp.

6.2 Cooking and Eating Practices

  • Separate Areas: Cook and eat in an area downwind and away from your sleeping area. This helps keep food odors away from where you’ll be spending the night.

6.3 Handling Toiletries and Other Scented Items

  • Similar to Food: Store toiletries, lotions, and any other scented items as you would food, using bear-proof containers or hanging them away from your camp.

7. When Bears Enter Camp

7.1 Making Yourself Known

  • Calm Presence: If a bear enters your camp, try to make your presence known by talking in a calm, firm tone. Avoid surprising the bear or making sudden movements.

7.2 Securing Safety

  • Find a Safe Position: If the bear continues to approach, find a safer position, such as getting inside a vehicle if available. Do not corner yourself or the bear.

8. Understanding Bear Enclosures

8.1 Bear Lockers and Canisters

  • Mandatory in Some Areas: In certain parks and wilderness areas, the use of bear lockers or bear-resistant food canisters is mandatory to prevent bears from accessing human food.

8.2 Proper Use and Storage

  • Follow Guidelines: Always use bear lockers and canisters according to the guidelines provided by park authorities or manufacturers. This usually involves sealing food and scented items inside and placing the container a safe distance from your tent.

9. Educating Yourself and Others

9.1 Learning from Experts

  • Wildlife Education: Take advantage of educational programs offered by parks and wildlife organizations to learn more about bears and how to coexist safely with them in the wilderness.

9.2 Sharing Knowledge

  • Community Safety: Share your knowledge about bear safety and behavior with fellow hikers, campers, and anyone planning to spend time in bear country. Community awareness can significantly reduce the number of dangerous encounters.

10. Respecting Wildlife

10.1 Ethical Wildlife Viewing

  • Safe Distances: Always observe bears from a safe distance using binoculars or a zoom lens. Getting too close can stress the animals and lead to aggressive behavior.

10.2 Preserving Natural Behaviors

  • Minimal Impact: Do your best to have as little impact on bears’ natural behaviors as possible. Feeding bears or enticing them with food for photos or viewing is dangerous and unethical.

Conclusion

While the prospect of a bear encounter can be daunting, preparedness and knowledge can significantly improve your safety and outcomes. Remember, every bear encounter is unique; assess the situation carefully and use the appropriate strategy to protect yourself. Prioritizing prevention, understanding bear behaviors, and knowing how to respond are your best tools for surviving a bear encounter.


Frequently Asked Questions (FAQs) About Surviving a Bear Attack

Can I use bear spray against all types of bears?

  • Yes, bear spray is effective on all bear species and is recommended as a non-lethal deterrent to protect both humans and bears.

What should I do if I see a bear from a distance?

  • If you see a bear and it hasn’t noticed you, quietly and slowly back away without drawing attention to yourself. If the bear has seen you, make yourself known and slowly back away as described, avoiding sudden movements.

How can I avoid bear encounters while hiking?

  • Aside from making noise, stay vigilant, hike in groups, and avoid dawn, dusk, or nighttime hikes when bears are more active. Always be aware of your surroundings and watch for signs of bear activity such as tracks, scat, or digging.

Is it safe to sleep in a tent in bear country?

  • Yes, it can be safe if you follow proper camping practices, such as storing food and scented items securely, choosing campsites wisely, and maintaining a clean camp. Using a tent can help mask your scent and reduce curiosity from wildlife.

What’s the most important thing to remember if I encounter a bear?

  • Stay calm and assess the situation. Determine the bear’s behavior (defensive or predatory) and respond accordingly—back away slowly if it’s defensive and prepare to fight back if it’s a predatory encounter. Always carry bear spray and know how to use it.

Igniting Flames: How to Start a Fire Without a Lighter

Introduction

Mastering the skill of starting a fire without a lighter is invaluable for outdoor enthusiasts, survivalists, and anyone keen on traditional methods. Whether you find yourself without modern tools or simply wish to connect with ancient techniques, understanding these methods can enhance your outdoor experience and survival skills. This guide explores various ways to create fire using natural and improvised materials.

1. The Friction Method

1.1 Hand Drill

  • Basics: Utilize a dry, straight stick (spindle) and a flat wooden board (fireboard). Carve a small depression in the fireboard, place the spindle in it, and roll it between your hands, moving them quickly up and down the spindle to generate heat through friction.
  • Tip: Use lightweight, dry wood like cedar or willow for both the spindle and fireboard for optimal results.

1.2 Bow Drill

  • Enhancement: A bow drill adds mechanical advantage to the hand drill technique. A curved stick (bow), with a string attached to both ends, wraps around the spindle. Moving the bow back and forth spins the spindle, reducing manual effort and increasing the heat generated.
  • Material Choice: Flexible wood for the bow and strong, non-elastic material for the string enhance efficiency.

2. Solar Power

2.1 Using a Magnifying Glass

  • Concentration of Sunlight: Direct sunlight through a magnifying glass onto tinder. The focused rays will heat the tinder until it ignites.
  • Alternative Tools: Eyeglasses, binocular lenses, or any transparent material that can focus sunlight work as substitutes.

2.2 Reflective Materials

  • Utilizing Reflective Surfaces: Concave mirrors, the bottom of a soda can polished to a shine, or any reflective surface can concentrate sunlight onto tinder in a similar manner to a magnifying glass.

3. Chemical Reactions

3.1 Potassium Permanganate and Glycerin

  • Reaction: Mixing potassium permanganate with glycerin initiates an exothermic chemical reaction, producing heat and igniting the mixture. A small quantity of each substance is sufficient.
  • Safety Note: Handle with care, as this reaction can be vigorous.

3.2 Battery and Steel Wool

  • Conduction: Touching the terminals of a battery to fine steel wool creates a short circuit, heating the steel wool to ignition. Spread the wool out for better oxygen flow to facilitate burning.
  • Battery Type: Almost any battery works, but 9V batteries are particularly effective due to their terminal configuration.

4. Flint and Steel

4.1 Traditional Flint Striking

  • Sparks from Stones: Striking a piece of flint with steel generates sparks. Direct these sparks onto a pile of tinder.
  • Choosing Materials: True flint works best, but quartz or chert are effective alternatives. The steel can be a knife back, a striker, or any hard steel object.

5. Preparation and Safety

5.1 Tinder, Kindling, and Fuel Wood

  • Layering: Prepare a good base of tinder (easily ignitable materials like dry grass, leaves, or cotton), followed by kindling (small twigs and sticks), and fuel wood (larger pieces of wood) to build your fire progressively.
  • Dry Materials: Ensure all materials are dry to facilitate ignition and sustain the fire.

5.2 Fire Safety

  • Responsible Practices: Always clear the area around your fire site to prevent unintended spread. Keep water or soil nearby to extinguish the fire if necessary. Never leave a fire unattended.

6. Adapting Techniques to Environmental Conditions

6.1 Wet Conditions

  • Finding Dry Materials: Look for dry tinder and kindling inside hollow trees, under dense foliage, or within fallen logs. Carrying waterproof tinder, like waxed jute twine or commercial fire starters, can also ensure ignition in damp environments.
  • Creating a Platform: Build a platform or base from larger branches to elevate your fire from wet ground, enhancing airflow and preventing moisture from extinguishing your flames.

6.2 Windy Conditions

  • Windbreaks: Use natural landscape features, like rocks or logs, to shield your fire area from the wind. Alternatively, dig a small pit to both protect the initial flame and concentrate heat.

7. Maximizing Efficiency with Improvised Tools

7.1 Improvising a Bellows

  • Oxygen Boost: A makeshift bellows, crafted from a hollowed-out branch or an accordion-folded piece of sturdy material, can help introduce more oxygen to your fire, vital for fuel combustion and increasing flame size.

7.2 Reflectors

  • Concentrating Heat: Positioning a flat, reflective surface behind your fire can reflect heat back towards the fire, increasing temperature and aiding in the ignition and sustainability of your flames.

8. Learning from Traditional Practices

8.1 Studying Indigenous Techniques

  • Cultural Wisdom: Indigenous and traditional communities have honed fire-starting methods over millennia, often tailored to specific environments. Researching and respecting these techniques can offer valuable insights and alternative methods for fire ignition.

8.2 Natural Materials as Fire Accelerants

  • Resourceful Selection: Many cultures utilize natural resins, fats, or certain fungi as accelerants to quickly ignite or sustain fires. Identifying and ethically harvesting these materials can enhance your backcountry fire-starting toolkit.

9. Practicing Ethical Fire Management

9.1 Minimizing Impact

  • Leave No Trace: Whenever possible, use existing fire rings or pits to minimize environmental impact. If you must create a new fire site, restore the area to its natural state as much as possible afterward.

9.2 Fire Extinguishing Practices

  • Ensuring Complete Extinguishment: Always thoroughly extinguish your fire by dousing it with water, stirring the ashes, and applying more water. The site should be cool to the touch before leaving.

Conclusion

Starting a fire without a lighter is both a practical skill and a satisfying achievement. It connects us to our ancestors and teaches resourcefulness and patience. Whether using friction, the power of the sun, chemical reactions, or flint and steel, mastering these methods can enhance your self-reliance and enrich your outdoor adventures. Always prioritize safety and practice Leave No Trace principles to protect our natural environments.

Frequently Asked Questions (FAQs)

Which method is the easiest for beginners?

  • The flint and steel method is generally the most accessible and easiest to learn for beginners. It requires less physical effort than friction methods and is more reliable than solar or chemical methods, depending on environmental conditions.

How can I improve my success with these fire-starting methods?

  • Practice is key. Each method has its nuances and requires a feel for the materials and technique. Start practicing in controlled conditions before relying on these methods in survival situations.

Can these methods be used in any weather?

  • Weather conditions significantly impact the feasibility of each method. Wet conditions make fire starting challenging, while the solar method requires direct sunlight. Adapt your method to the current weather and always prepare by carrying appropriate backup fire-starting tools.

How do I store my fire-starting materials while hiking?

  • Keep your materials dry and easily accessible. Waterproof bags or containers are ideal for storing tinder, kindling, and any other fire-starting aids. Label them clearly and pack them near the top of your bag for quick access.

Can I practice these fire-starting methods in my backyard?

  • Yes, practicing in a controlled environment like your backyard is an excellent way to refine your skills. Ensure you follow local regulations regarding open fires, use a fire pit if available, and have extinguishing resources close at hand.

What’s the most environmentally friendly way to start a fire?

  • Using fallen wood and natural materials as tinder and kindling is the most sustainable approach. Avoid breaking branches from living trees and gather wood from the ground. Opt for fire-starting methods that don’t leave behind waste or chemicals, ensuring your outdoor ethics align with conservation principles.

Backcountry Gear Selection: Essential Packing List for Your Wilderness Adventure

Introduction

Venturing into the backcountry requires careful planning and preparation, especially when it comes to selecting the right gear. The wilderness demands respect, and having the appropriate equipment can mean the difference between a successful expedition and a potentially dangerous situation. This guide outlines essential gear for any backcountry adventure, ensuring you’re well-prepared for the challenges and joys of the wilderness.


1. Navigation Tools

1.1 Map and Compass

  • Essential Navigation: Even in the age of GPS, the reliability of a good old-fashioned map and compass cannot be overstated. They don’t require batteries and are crucial for navigating in remote areas.

1.2 GPS Device

  • Advanced Navigation: A GPS device can provide precise location data, routes, and waypoints. Opt for models designed for outdoor use, with long battery life and weather resistance.

2. Shelter and Comfort

2.1 Tent or Hammock

  • Protection from the Elements: Choose a lightweight, durable tent or hammock with a rain fly. Consider the season and the typical weather conditions of your destination.

2.2 Sleeping Bag and Pad

  • Warmth and Comfort: Select a sleeping bag suitable for the lowest temperatures you anticipate, and pair it with an insulated sleeping pad to protect against ground chill.

3. Food and Water

3.1 Portable Stove and Fuel

  • Cooking in the Wilderness: A compact, lightweight stove is essential for preparing hot meals. Remember to pack enough fuel for your trip, considering altitude and temperature which can affect stove efficiency.

3.2 Water Filtration System

  • Safe Drinking Water: Always have a means to purify water, whether it’s a pump filter, UV light purifier, or chemical tablets. Multiple methods are advised for redundancy.

4. Clothing and Personal Items

4.1 Layered Clothing

  • Adaptable Outfits: Pack clothing that can be layered to adjust for changing temperatures. Include moisture-wicking base layers, insulating mid-layers, and a waterproof outer layer.

4.2 Sun Protection

  • Essential Defense: Sunglasses, sunscreen, and a brimmed hat are vital for protecting against sun exposure, even in cold environments where the sun’s reflection off snow can be intense.

5. Emergency and First Aid

5.1 First Aid Kit

  • Medical Preparedness: Customize your first aid kit based on the group size, trip duration, and personal medical needs. Include items for wound care, blister prevention, and any prescribed medications.

5.2 Emergency Tools

  • Survival Essentials: Pack a multi-tool, a whistle, a waterproof fire-starting kit, and an emergency blanket. These items can be lifesavers in unexpected situations.

6. Miscellaneous Essentials

6.1 Headlamp and Batteries

  • Lighting: A reliable headlamp is indispensable for nighttime navigation and camp tasks. Carry extra batteries or a solar charger.

6.2 Trash Bags

  • Leave No Trace: Pack out what you pack in. Durable trash bags are essential for carrying out waste, including food scraps and used toilet paper.

7. Communication Devices

7.1 Satellite Phone

  • Remote Connectivity: For areas well beyond cell service, a satellite phone can be a critical link to the outside world, providing a means to call for help in emergencies.

7.2 Personal Locator Beacon (PLB)

  • Emergency Alert: A PLB can be a lifesaver, sending an SOS with your location to rescue services at the push of a button. It’s compact and requires no subscription.

8. Repair Kits and Tools

8.1 Multi-Tool

  • Versatility in Your Pocket: A good multi-tool can address a multitude of needs, from repairs to first aid. Ensure it includes knives, pliers, screwdrivers, and scissors.

8.2 Duct Tape

  • Quick Fixes: Never underestimate the utility of duct tape. It can temporarily repair gear, seal leaks, and even support sprains in a pinch.

9. Trail Nutrition

9.1 High-Energy Snacks

  • Fuel on the Go: Pack calorie-dense foods like nuts, dried fruits, energy bars, and jerky. These provide quick energy and are easy to eat while on the move.

9.2 Cook-Free Options

  • Simplicity and Efficiency: For shorter trips or as a backup, consider meals that don’t require cooking. Pre-packaged, ready-to-eat foods can save time and fuel.

10. Pack Organization

10.1 Compartmentalization

  • Ease of Access: Use packing cubes, compression sacks, or zip-lock bags to organize items within your backpack. This helps keep gear accessible and dry.

10.2 Weight Distribution

  • Balanced Carrying: Place heavier items close to your back and centered in the pack. Distribute weight evenly to maintain balance and reduce strain.

11. Environmental Considerations

11.1 Wildlife Protection

  • Safe Food Storage: In bear country, use bear canisters or bags to store food and scented items safely away from your campsite to protect both you and the wildlife.

11.2 Minimal Impact Camping

  • Eco-friendly Practices: Choose established campsites, use biodegradable soap, and avoid introducing non-native species. Respect wildlife and keep a safe distance.

Conclusion

Careful selection of backcountry gear is essential for a safe and enjoyable wilderness experience. While this list covers the basics, the specifics of what to pack can vary based on the length of your trip, the terrain, the weather, and personal preferences. Always prepare for the unexpected and practice Leave No Trace principles to preserve the natural beauty of the backcountry for future adventurers.


Frequently Asked Questions (FAQs)

How much should my pack weigh?

  • A general guideline is that your loaded backpack should not exceed 20% of your body weight. However, this can vary based on your strength, endurance, and the specifics of your trip.

Can I bring electronic devices into the backcountry?

  • Yes, but prepare for limited access to charging facilities. Solar chargers or power banks can keep devices charged, and waterproof cases will protect them from the elements.

What’s the best way to reduce pack weight?

  • Focus on multi-use items and opt for lightweight, compact gear. Carefully consider each item’s necessity and look for areas where you can trim excess without compromising safety or comfort.

How do I choose a backpack for backcountry trips?

  • Look for a backpack with an internal frame, adjustable straps, and sufficient capacity for your trip length. Comfort, fit, and durability are key considerations.

Is it worth investing in ultralight gear?

  • Ultralight gear can significantly reduce pack weight, making your trip more comfortable. However, assess each item’s durability and functionality. In some cases, slightly heavier gear might offer better performance or reliability.

Can I use regular clothes for backcountry trips?

  • While regular clothes can be used, performance fabrics designed for outdoor activities offer benefits like moisture-wicking, quick-drying, and thermal insulation. Proper outdoor apparel can greatly enhance comfort and safety.
Exit mobile version