Primitive Survival Shelters That Could Save Your Life

Introduction

In a survival situation, finding or creating shelter is one of your top priorities, right after securing water and before food. A shelter can protect you from the elements, help maintain body heat, and provide security from wild animals. Knowing how to construct a few types of primitive shelters using natural materials can be a life-saving skill. Here’s a guide to some fundamental shelters that you can build with minimal tools and materials.


1. Lean-To Shelter

1.1 Construction

  • Materials Needed: Long branches or fallen trees for the frame, smaller branches for the sides, leaves, and moss for insulation and waterproofing.
  • Steps to Build:
    1. Find two trees close together or a large branch that you can lean against a tree.
    2. Lean larger branches at an angle against the tree trunk or horizontal branch to create a spine.
    3. Cover the angled branches with smaller branches, and then pile on leaves, moss, or grass to provide wind and water resistance.

1.2 Best Use

  • Advantages: Quick and easy to build, suitable for wind and light rain protection.
  • Disadvantages: Not fully enclosed, limited insulation.
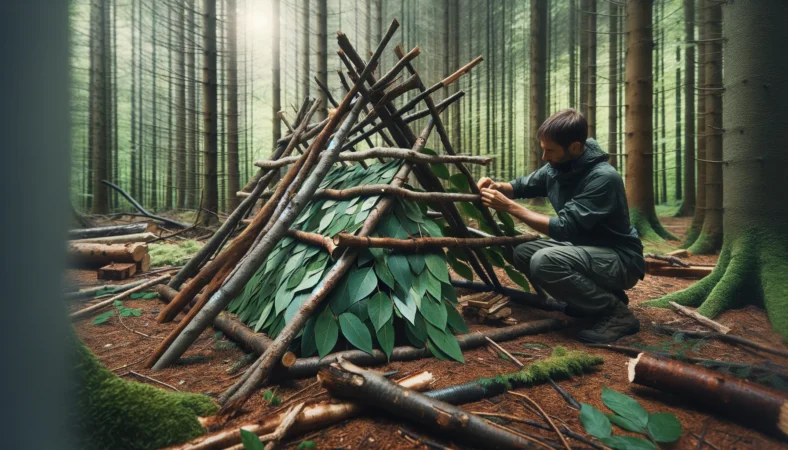
2. A-Frame Shelter

2.1 Construction

  • Materials Needed: Several long branches, lots of smaller branches, leaves, moss, and other insulating materials.
  • Steps to Build:
    1. Create a frame by forming an ‘A’ shape with two large branches and a crosspiece at the top.
    2. Lean smaller branches along both sides of the A-frame.
    3. Cover thoroughly with vegetation and insulating materials to shield against elements.

2.2 Best Use

  • Advantages: More enclosed than a lean-to, offers better protection from wind and rain.
  • Disadvantages: Requires more time and materials to build.

3. Debris Hut

3.1 Construction

  • Materials Needed: A long, sturdy branch for the spine, lots of dry leaves, debris, and smaller branches.
  • Steps to Build:
    1. Secure one end of the spine branch high on a tree or rock and let the other end rest on the ground.
    2. Cover the spine with rib branches placed at an angle, then pile leaves and forest debris over the structure until it’s well insulated.

3.2 Best Use

  • Advantages: Excellent insulation, good for cold weather.
  • Disadvantages: Time-consuming to gather sufficient debris for effective insulation.

4. Snow Cave

4.1 Construction

  • Materials Needed: Compact snow, a digging tool.
  • Steps to Build:
    1. Find a drift of compact snow.
    2. Dig into the side of the drift to create a small dome-shaped cave.
    3. Smooth the inside walls and ceiling to ensure compactness and to prevent dripping.

4.2 Best Use

  • Advantages: Good insulation from cold, uses readily available material in snowy conditions.
  • Disadvantages: Requires specific snow conditions, risk of collapse if not built properly.

5. Wickiup Shelter

5.1 Construction

  • Materials Needed: Upright poles, vines or rope for binding, leaves, branches, and other debris for covering.
  • Steps to Build:
    1. Arrange several long poles in a conical shape, using a tree or a tripod formation as the base.
    2. Secure the poles at the top with vines, rope, or even strips of bark.
    3. Layer the frame densely with branches, leaves, and debris, ensuring thorough coverage for insulation and rain protection.

5.2 Best Use

  • Advantages: Sturdy and relatively spacious, can accommodate a small fire inside for warmth.
  • Disadvantages: Requires more materials and time to build than some simpler shelters.

6. Tarp Shelter

6.1 Construction (assuming you have a tarp)

  • Materials Needed: A tarp, rope or paracord, and nearby trees or poles.
  • Steps to Build:
    1. Secure the tarp between two trees using rope or paracord. If trees aren’t available, poles stuck firmly into the ground can work.
    2. Stretch the tarp tight and anchor each corner with rocks, logs, or stakes.
    3. Adjust the height and angle based on the wind direction and precipitation to provide the best protection from the elements.

6.2 Best Use

  • Advantages: Quick to set up, versatile, and effective in various weather conditions.
  • Disadvantages: Relies on having a man-made material (tarp) and may not be as insulated as natural debris shelters.

7. Subterranean Survival Shelter (Dugout)

7.1 Construction

  • Materials Needed: A shovel (or improvised digging tool), surrounding natural materials for camouflage.
  • Steps to Build:
    1. Dig a pit in the ground deep enough to sit or lie down in, depending on your needs and time available.
    2. Cover the opening with branches, leaves, and any other available materials.
    3. Ensure the roof is sturdy enough to support the debris without collapsing.

7.2 Best Use

  • Advantages: Offers excellent insulation and protection from the elements, particularly in extreme heat or cold.
  • Disadvantages: Labor-intensive to construct and can be hazardous if not properly ventilated or if built in unstable soil.

8. Improvising with Available Materials

8.1 Using Natural Formations

  • Rocks and Caves: Utilize natural rock formations or caves as shelter foundations, reinforcing with additional debris as needed.

8.2 Adapting to the Environment

  • Utilize Surroundings: Adapt the type of shelter construction based on the materials that are most abundant in your current environment.

Conclusion

Survival shelters can significantly increase your chances of enduring adverse conditions in the wilderness. Each type of shelter has its specific advantages depending on the environment and available resources. Practice building different types of shelters before you actually need them, as this will boost your confidence and proficiency under real survival circumstances.


Frequently Asked Questions (FAQs) About Primitive Survival Shelters

How long does it take to build a survival shelter?

  • The time can vary widely based on the type of shelter, your skill level, the materials on hand, and environmental conditions. A basic lean-to could take an hour, while a debris hut might take several hours.

What are the key factors to consider when choosing a shelter location?

  • Look for a location that is dry, level, and protected from the wind. Avoid low spots that could collect water, and stay clear of hazardous areas like dead trees or unstable boulders.

Can these shelters be made without any tools?

  • Yes, all these shelters can be constructed with materials found in nature. However, having a knife or a multi-tool can make the process easier and the shelter more effective.

What are the most common mistakes to avoid when building a survival shelter?

  • Poor Location Choice: Building in areas prone to flooding, landslides, or heavy wind. Always assess the environment carefully.
  • Insufficient Insulation: Failing to use enough insulation materials can lead to significant heat loss.
  • Overexertion: Don’t expend more energy building the shelter than you can afford to lose, especially if food and water are scarce.

How can I improve the water resistance of my shelter?

  • Layering Techniques: Use overlapping layers of branches, leaves, and other debris to create a shingle effect that repels water more effectively.

How to Use Bear Spray: A Guide for Safe Wilderness Adventures

Introduction

Bear spray is a vital tool for safety in bear country. It is an effective non-lethal deterrent that can protect you in the event of a bear encounter. Knowing how to properly use bear spray can make a significant difference in outdoor safety. This guide provides essential tips on how to use bear spray effectively and responsibly.


1. Understanding Bear Spray

1.1 Composition and Function

  • Active Ingredient: Bear spray contains capsaicinoids, derived from peppers, which irritate the eyes and respiratory system of a bear, causing temporary incapacitation.
  • Purpose: It is designed to create a barrier between you and an aggressive bear, giving you time to safely leave the area.

1.2 Range and Spray Duration

  • Effective Range: Most bear sprays are effective up to 30 feet. Always check the specifications on your canister.
  • Spray Duration: Typical spray duration ranges from 4 to 9 seconds, depending on the brand.

2. Choosing the Right Bear Spray

2.1 EPA Approval

  • Regulatory Standards: Ensure the bear spray is EPA-approved. This guarantees that the product meets safety and effectiveness standards.

2.2 Spray Pattern

  • Cloud vs. Stream: Some sprays release a cloud, while others emit a more direct stream. A cloud pattern can be more effective in windy conditions.

3. How to Carry Bear Spray

3.1 Accessibility

  • Holster Use: Carry bear spray in a holster attached to your belt or the outside of your backpack. It must be immediately accessible, not buried in your pack.

3.2 Avoid Extreme Temperatures

  • Storage Tips: Do not leave bear spray in direct sunlight or in a closed vehicle, as extreme temperatures can affect the pressure and efficacy of the spray.

4. How to Use Bear Spray

4.1 Practice

  • Familiarity: Practice with an inert can of bear spray to get used to the weight, range, and operation without the risk of discharging the actual product.

4.2 Deployment Technique

  • Alert and Ready: If you encounter a bear, speak in a calm, firm voice to identify yourself as human and not prey. If the bear approaches, remove the safety clip, aim slightly downward, and be ready to spray.

5. During a Bear Encounter

5.1 Timing and Distance

  • When to Spray: Only use bear spray if the bear is actively approaching you in a threatening manner. Do not spray prematurely; the bear should be within your effective spray range.

5.2 Spraying Technique

  • Bursts: Deploy short, controlled bursts aimed at the bear’s face, adjusting for any wind direction to maximize effectiveness.

6. After Using Bear Spray

6.1 Leave the Area

  • Immediate Withdrawal: After spraying, leave the area calmly but quickly. Do not run; keep your eyes on the bear and move away slowly.

6.2 Report the Encounter

  • Notify Authorities: Inform park rangers or local wildlife officials about the encounter and your use of bear spray, providing details for future safety measures and monitoring.

7. Safety Precautions When Handling Bear Spray

7.1 Handling Care

  • Safety Mechanisms: Always be aware of the safety mechanism on your bear spray canister. Ensure the safety is securely in place when not in use to prevent accidental discharge.

7.2 Educating Companions

  • Group Awareness: If you are traveling in a group, make sure everyone knows where the bear spray is kept and how to use it. This ensures that anyone in the group can react effectively in an emergency.

8. Legal and Regulatory Considerations

8.1 Legal Restrictions

  • Permitted Areas: Bear spray is legal in many wilderness areas, but it’s crucial to check the regulations of your specific destination. Some national parks or areas may have specific rules about carrying and using bear spray.

8.2 Transporting Bear Spray

  • Travel Regulations: Be aware of transportation regulations, especially when flying. Bear spray cannot be taken aboard commercial aircraft in carry-on or checked baggage. Purchase or rent bear spray at your destination if traveling by air.

9. Expiry and Disposal

9.1 Check Expiry Dates

  • Regular Checks: Bear spray has an expiration date, typically around 2 to 4 years from the date of manufacture. Regularly check your canister’s expiry date and replace it as necessary.

9.2 Proper Disposal

  • Disposal Methods: Dispose of expired or used bear spray canisters according to local regulations. Some areas offer recycling or hazardous waste disposal services specifically designed for bear spray.

10. Alternative Safety Measures

10.1 Avoiding Encounters

  • Preventive Practices: Besides carrying bear spray, engage in practices that reduce the likelihood of bear encounters. Store food and garbage properly, make noise while hiking to avoid surprise encounters, and travel in groups.

10.2 Additional Deterrents

  • Other Tools: Consider carrying additional deterrents such as air horns or bear bangers, which can also help scare off a bear before it gets too close.

Conclusion

Carrying and knowing how to use bear spray is crucial for safety when exploring areas where bears are active. By preparing in advance and understanding the correct usage techniques, you can confidently enjoy your wilderness adventures knowing you are prepared to handle a bear encounter safely.


Frequently Asked Questions (FAQs)

How long does bear spray last once sprayed?

  • Bear spray effectiveness in the air lasts only a few minutes. The residue may irritate a bear’s senses for longer, but environmental conditions like wind can diminish its effects quickly.

Is bear spray harmful to the environment?

  • Bear spray is designed to be a non-lethal, minimal-impact deterrent. It does not have long-lasting environmental effects, making it a safe choice for wildlife and habitat conservation.

How effective is bear spray in windy conditions?

  • Wind Considerations: Wind can affect the direction and reach of bear spray. Always note the wind direction before using spray to avoid self-contamination. If possible, position yourself upwind of the bear to maximize effectiveness.

Should children carry bear spray?

  • Guidance for Minors: It is generally advised that children do not carry bear spray. Adults should carry the spray and be prepared to deploy it if necessary. However, educating children on bear safety and the proper use of bear spray is crucial so they understand what to do if they encounter a bear.

Mastering the Basics: How to Read a Compass

Introduction

Understanding how to read a compass is a fundamental skill for navigation, particularly when hiking or engaging in outdoor activities where GPS may not be available. A compass points you toward magnetic north and helps you determine your direction relative to the Earth’s magnetic poles. This guide will walk you through the basic steps of reading a compass effectively.

1. Understanding Compass Components

1.1 Magnetic Needle

  • Color-Coded: Typically, the compass needle is color-coded, with the red end pointing towards magnetic north. Remember, the needle points to magnetic north, not true north (geographic north).

1.2 Baseplate

  • Clear Base: The baseplate is usually transparent and contains a ruler for map measurements. It should be held level to accurately read the compass.

1.3 Rotating Bezel (Azimuth Ring)

  • Degrees: The bezel rotates and is marked with degrees from 0 to 360. This is used to set and read your bearing.

1.4 Orienting Arrow and Lines

  • Alignment Features: Inside the compass housing, you’ll find the orienting arrow and orienting lines, which are used to help align the compass correctly with a map.

2. Setting a Bearing

2.1 Align the Bezel

  • Setting Course: To set a bearing, turn the bezel so the desired degree on the bezel lines up with the direction of travel arrow on the baseplate.

2.2 Read the Bearing

  • Determine Direction: Holding the compass flat, turn your body until the red end of the magnetic needle lines up with the orienting arrow of the compass housing. The number on the bezel that aligns with the direction of travel arrow now indicates your bearing.

3. Taking a Bearing from a Map

3.1 Place the Compass on the Map

  • Align with Map Lines: Place your compass on the map so the edge of the baseplate connects your current location with your desired destination.

3.2 Rotate the Bezel

  • Align North: Rotate the bezel until the orienting lines and the orienting arrow line up with the map’s north-south grid lines. Make sure the compass’s direction of travel arrow points towards your destination.

3.3 Translate to the Ground

  • Transfer Bearing: Pick up the compass and turn your body until the red end of the magnetic needle aligns with the orienting arrow. The direction of travel arrow now points to your destination in the real world.

4. Correcting for Magnetic Declination

4.1 Understand Declination

  • Adjust for Variation: Magnetic declination is the angle between magnetic north and true north. It varies depending on where you are on Earth. Most maps provide information on local declination.

4.2 Adjust the Compass

  • Apply Declination: If your compass has a declination scale, use it to adjust the bezel accordingly. If not, you’ll need to mentally adjust the bearing you follow by the declination amount.

5. Tips for Accurate Compass Use

5.1 Keep Away from Metal and Electronics

  • Avoid Interference: Metal objects and electronic devices can interfere with the compass needle. Ensure there are no potential sources of interference near your compass when taking bearings.

5.2 Regularly Practice

  • Skill Maintenance: Regular practice with your compass will help you gain confidence and speed in navigation, making it a reliable tool for any adventure.

6. Navigating Without a Map

6.1 Using Landmarks

  • Landmark Navigation: When you don’t have a map, use your compass in conjunction with natural landmarks or features. Determine the bearing to a noticeable landmark and navigate towards it, resetting your bearing as you reach each landmark.

6.2 Path Correction

  • Stay on Track: Regularly check your compass to ensure you’re staying on the intended bearing. This is especially important in dense forests or foggy conditions where visible landmarks might be obscured.

7. Advanced Techniques

7.1 Triangulation

  • Location Pinpointing: If you’re unsure of your location, use the triangulation method. Take bearings from your position to three known locations visible on your map and on the landscape. Draw lines along these bearings from the known locations on your map; the point where they intersect is your location.

7.2 Back Bearings

  • Reverse Navigation: To return to your starting point or ensure you can find your way back, take a back bearing. This is the opposite direction of your original bearing and can be calculated by adding or subtracting 180 degrees from your original bearing.

8. Compass Care and Maintenance

8.1 Routine Checks

  • Compass Health: Regularly inspect your compass for damage, such as a cracked housing or air bubbles in the liquid-filled chamber, which can affect accuracy.

8.2 Cleaning and Storage

  • Proper Handling: Clean your compass with a soft cloth and store it in a dry, cool place away from direct sunlight and strong magnetic fields to maintain its accuracy and prolong its lifespan.

9. Choosing the Right Compass

9.1 Types of Compasses

  • Selecting Based on Use: Consider the specific needs of your outdoor activities when choosing a compass. For hiking, a baseplate compass is generally sufficient, while more technical pursuits like orienteering or marine navigation might require a precision or a prismatic compass.

9.2 Features to Consider

  • Compass Features: Look for features like a global needle, which is effective across both hemispheres, luminous markings for low-light conditions, and built-in declination adjustment for convenience.

10. Teaching Others Compass Skills

10.1 Educational Workshops

  • Community Learning: Organize or participate in workshops to teach others how to use a compass. Sharing your knowledge can help prepare more people for safe outdoor adventures.

10.2 Creating Guides and Resources

  • Resource Development: Develop online resources, guides, or video tutorials that can help others learn about compass use. This can be particularly useful for educators, guides, and outdoor enthusiasts.

Conclusion

A compass is a vital tool for navigation that doesn’t rely on batteries or satellite signals, making it exceptionally reliable when you’re off the beaten path. By learning how to read and use a compass properly, you enhance your outdoor skills and prepare yourself for safe exploration in any environment.

Frequently Asked Questions (FAQs)

How often should I replace my compass?

  • Compass Lifespan: A good quality compass can last many years if properly cared for. Regular checks for air bubbles in the liquid housing and demagnetization of the needle are essential.

Can I use any compass for all types of navigation?

  • Compass Types: While basic compass skills are transferable, different types of compasses may be better suited for specific activities. For example, a mirror sighting compass is often used for precise directional readings in wilderness navigation.

What should I do if my compass seems to be giving incorrect readings?

  • Troubleshooting: First, ensure you’re not near any magnetic sources that could interfere with the needle. If the problem persists, consider having your compass professionally calibrated or replaced if it’s old or damaged.

Is it necessary to know how to use a compass in the age of GPS technology?

  • Skill Relevance: Yes, compass skills remain relevant. Electronics can fail due to battery depletion, damage, or signal loss, especially in remote areas. A compass is a reliable, fail-safe navigation tool that works independently of electronic signals.

How to Sharpen an Axe: A Step-by-Step Guide

Keeping your axe sharp is not just about making chopping wood easier—it’s about safety, efficiency, and preserving the tool’s lifespan. A dull axe requires more force, tires you out faster, and is more likely to slip off the wood, leading to potential accidents. On the other hand, a sharp axe slices cleanly, reduces strain, and ensures smoother, more controlled cuts.

In this comprehensive guide, you’ll learn how to sharpen an axe at home, what tools to use, common mistakes to avoid, and advanced techniques to take your edge to the next level.

Why Sharpening an Axe Matters

  • Efficiency: A sharp axe bites into the wood with less effort.
  • Safety: Dull blades glance off logs and increase the risk of injury.
  • Durability: Regular sharpening preserves the axe head and prevents excessive wear.
  • Versatility: A well-sharpened axe can handle tasks ranging from splitting firewood to felling trees with ease.

1. Gather Your Tools and Safety Gear

Before you start sharpening, it’s important to have the right tools and protective equipment on hand.

1.1 Essential Sharpening Tools

  • Coarse File: Removes chips and reshapes the edge.
  • Sharpening Stone (Dual Grit): A coarse side for shaping and a fine side for honing.
  • Honing Oil or Water: Lubricates the stone, reduces heat, and carries away metal filings.
  • Strop or Leather Strap: Polishes the edge and removes tiny burrs.

1.2 Safety Gear

  • Gloves: Protect your hands from accidental cuts and metal filings.
  • Eye Protection: Shields your eyes from sparks, chips, and debris.
  • Stable Vice or Clamp: Keeps the axe steady while you work.

2. Preparing the Axe for Sharpening

2.1 Clean the Axe Head

Use steel wool, sandpaper, or a wire brush to remove rust, pitch, and debris. A clean surface ensures your file and stone can make even contact with the blade.

2.2 Secure the Axe

Clamp the axe head in a sturdy vice with the cutting edge facing upward. Stabilizing the axe is critical to maintaining consistent sharpening angles.

3. Filing the Edge

3.1 Choosing the Right File

Select a bastard file (coarse) designed for metalwork. Check that it’s clean, sharp, and free from rust.

3.2 Filing Technique

  • Push the file away from you in long, smooth strokes.
  • Always maintain the axe’s original bevel angle (typically 25–30°).
  • File evenly along the entire edge.
  • Work both sides alternately to keep the edge symmetrical.

Pro Tip: Use a marker to color the edge. Filing will remove the ink, showing you where the metal is being ground down.

4. Sharpening with a Stone

4.1 Preparing the Stone

Apply honing oil (for oil stones) or water (for water stones) to reduce friction and prevent clogging.

4.2 Sharpening Process

  • Start with the coarse grit.
  • Move the stone in small circular or sweeping motions, following the bevel angle.
  • Apply light, even pressure.
  • Flip the axe and repeat on the other side.
  • Continue until the edge feels uniformly sharp.

5. Honing the Edge

5.1 Fine Grit Sharpening

Switch to the fine grit side of the stone. This step smooths out roughness left by the coarse grit and refines the cutting edge.

5.2 Checking for Sharpness

  • Visual Check: Hold the blade under a light. A properly sharpened edge will not reflect light.
  • Tactile Check: Gently run your thumb perpendicular to the edge (never along it). You should feel a clean, even burr.

6. Stropping the Edge

6.1 Using a Strop

Drag the edge lightly across a leather strop or strap away from the cutting edge. Stropping polishes the blade and removes microscopic burrs.

6.2 Testing Sharpness

Test your axe on a piece of softwood. A sharp axe will bite cleanly into the grain without slipping or bouncing.

7. Maintaining Your Axe After Sharpening

7.1 Regular Maintenance

  • Wipe the blade after use.
  • Apply a thin coat of oil to prevent rust.
  • Store in a dry place, ideally with a protective sheath.

7.2 Safe Handling

Never leave your axe exposed. Use blade covers to prevent accidental cuts and damage.

8. Common Sharpening Mistakes to Avoid

  • Over-Sharpening: Removing too much metal weakens the axe head.
  • Inconsistent Angles: Leads to uneven cutting and edge failure.
  • Skipping Grits: Jumping from coarse directly to fine grit leaves the edge unfinished.

9. Advanced Sharpening Techniques

9.1 Leather Honing Wheel

Mounted on a bench grinder, this can polish your axe to a mirror-like finish for precision work.

9.2 Micro-Beveling

Adding a slight secondary bevel strengthens the edge, making it more durable for splitting and heavy use.

10. Sharing Axe Care Knowledge

  • Workshops & Demonstrations: Teach others proper axe sharpening techniques.
  • Online Tutorials: Share your skills with a global audience via YouTube or blogs.

Conclusion

Sharpening an axe is a valuable skill that ensures safety, efficiency, and tool longevity. By following the step-by-step process—filing, sharpening with a stone, honing, and stropping—you’ll keep your axe in top condition for any task, whether it’s splitting firewood at camp or felling trees at home.

Frequently Asked Questions (FAQs)

How often should I sharpen my axe?

  • Frequency of Sharpening: This depends on usage. Regular users should inspect and sharpen their axes whenever they notice a decrease in cutting efficiency. Typically, sharpening once or twice a season is sufficient for casual users.

Can I use a power grinder to sharpen my axe?

  • Caution with Power Tools: While a grinder can speed up the process, it’s easy to remove too much material and overheat the metal, potentially weakening the axe. Manual sharpening is recommended for greater control.

What is the best angle to sharpen an axe?

  • Sharpening Angle: Most axes work well with an edge angle of 30 to 40 degrees. However, the ideal angle can vary based on the axe’s use (splitting versus chopping) and the wood type commonly handled.

What type of oil should I use on my axe?

  • Choosing the Right Oil: Use natural oils like linseed or mineral oil on the blade. These oils provide protection against rust without harming the metal or the environment.

How can I repair a nicked or damaged axe edge?

  • Repair Techniques: Start with a coarse file to work out nicks or significant dullness. Be patient and file evenly along the edge, maintaining the original angle. Finish with finer tools like sharpening stones and strops to restore a sharp edge.

Can sharpening affect the balance of my axe?

  • Balance Considerations: Proper sharpening should not affect the balance of your axe significantly. However, removing excessive material from one side more than the other can lead to imbalance. Always strive to remove metal evenly and check the balance periodically if doing extensive sharpening.

Ways to Signal for Help in the Wilderness: Essential Survival Techniques

Introduction

When exploring the great outdoors, it’s crucial to be prepared for unexpected situations where you might need to signal for help. Whether due to injury, getting lost, or other emergencies, knowing how to effectively signal for assistance can be life-saving. This guide outlines several methods to signal for help if you find yourself in distress while in the wilderness.


1. Visual Signals

1.1 Using a Mirror or Reflective Object

  • Method: Use a mirror or any reflective surface to reflect sunlight. Aim the reflection towards a perceived rescuer or over a wide area to attract attention. This can be seen from great distances under the right conditions.

1.2 Creating Smoke Signals

  • Method: Build a fire using green branches and leaves after lighting a fire with dry materials. The greenery produces thick smoke, which is visible over long distances. Three puffs of smoke in a row are universally recognized as a distress signal.

1.3 Brightly Colored Fabrics

  • Method: Use brightly colored clothing or any fabric. Lay them out in a clear area or tie them to a high point where they are visible from the air or ground.

2. Audible Signals

2.1 Whistle Blowing

  • Method: Carry a whistle and use three sharp blasts to signal for help. This sequence can be repeated every few minutes. Whistles can carry further than the human voice, especially in dense forests.

2.2 Bang Rocks or Wood Together

  • Method: Use available objects such as rocks or large pieces of wood to create loud noises by banging them together. Repetitive loud noises can alert rescuers nearby.

3. Electronic Signals

3.1 Using a Personal Locator Beacon (PLB)

  • Method: Activate a PLB if you have one. These devices send a distress signal with your location to emergency services via satellite.

3.2 Cell Phone

  • Method: If you have cell service, attempt to call emergency services. Even without cell service, try texting 911 or using emergency SOS features that might connect through any available network.

4. Signal Fires

4.1 Building a Signal Fire

  • Location: Choose a prominent location such as a clearing or a hilltop where smoke and light are visible from a distance.
  • Structure: Build three fires in a triangle (the international distress signal) or in a straight line to maximize visibility.

5. Using Natural Features

5.1 Symbols in the Sand or Snow

  • Method: Use a stick to draw large SOS symbols or arrows in the sand, dirt, or snow. These can be seen from the air or by ground search parties.

6. Improvising with Technology

6.1 Reflective Surfaces

  • Method: Use the reflective surface of your phone, a CD, or any metallic object to catch the sun’s rays and create a signal light.

6.2 Flashlight or Strobe Light

  • Method: Use a flashlight or any strobe light function on your electronic devices during the night to create a visible signal in the dark.

7. Coordination with Search Teams

7.1 Stay Informed

  • Stay Put: Once you’ve signaled for help and know that a search team is on the way, it’s crucial to stay in one place if safe to do so. Moving around can make it harder for rescuers to locate you.

7.2 Use of Markers

  • Method: If you must move (for safety or to reach a better signaling location), use natural materials or any items you have to mark your path. This can help rescuers track your movements.

8. Pre-Trip Planning

8.1 Inform Others of Your Plans

  • Safety Protocol: Always let someone know your planned route and expected return time before heading into the wilderness. This information is crucial for initiating a timely and accurate search if you do not return as scheduled.

8.2 Carry Emergency Contact Information

  • Method: Have information on hand about who to contact in case of emergency, including local ranger stations, park management, and emergency services. This can expedite the rescue process.

9. Training and Preparedness

9.1 Survival Skills Training

  • Recommended Courses: Consider taking a course in wilderness survival skills. These courses often include practical instructions on how to effectively signal for help, among other survival techniques.

9.2 Regular Practice

  • Skill Maintenance: Regularly practice using your signaling devices and emergency protocols. Familiarity with these tools under non-stressful conditions can make a significant difference in an actual emergency.

10. Mental Resilience and Psychological Preparation

10.1 Stay Calm

  • Mindset Management: In a survival situation, maintaining your calm can significantly impact your ability to make rational decisions and effectively signal for help. Practice stress management techniques like deep breathing to help keep your cool.

10.2 Visualize Success

  • Positive Thinking: Use visualization techniques to focus on positive outcomes. Imagine being rescued and the steps you will take to make that happen. This can boost your morale and encourage you to remain proactive in your survival efforts.

Conclusion

When venturing into the wilderness, always prepare for the unexpected by carrying essential signaling devices and knowing how to use your surroundings to signal for help. Familiarize yourself with these techniques before your trip and ensure that you are equipped to use them if necessary.


Frequently Asked Questions (FAQs)

What is the most effective way to signal for help if lost?

  • The most effective way can depend on your resources and environment. Visual signals like mirrors during the day and fires or lights at night are universally recognized. Always have a whistle and a mirror as part of your survival kit.

How often should I signal for help?

  • Continue signaling regularly until help arrives. Use intervals of three (three whistle blows, three fires, etc.), as this is an internationally recognized distress signal pattern.

What should I include in a basic signal kit for hiking?

  • A basic signal kit should include a whistle, a waterproof and windproof lighter or matches for starting a signal fire, a mirror for signaling during daylight, and a compact LED flashlight or headlamp with a strobe feature for night signaling.

How can I increase the chances of my signals being seen or heard?

  • Choose open areas away from dense foliage for visual signals like mirrors or fires. For audible signals, find a rhythm or pattern that stands out from natural background noises. Using the universal distress signal of three repeats (three blasts, three flashes, three fires) helps distinguish your signals from random sounds or sights.

Can technology like GPS devices or smartphones replace traditional signaling methods?

  • While technology can enhance your ability to communicate distress, it’s essential to also carry and know how to use traditional signaling methods. Technology can fail, run out of battery, or lack coverage in remote areas, so having backup methods is crucial for ensuring your safety.

How to Survive an Alligator Attack: Essential Safety Tips

Introduction

Alligator encounters, while rare, can be dangerous if not handled properly. Whether you’re living in or visiting areas where alligators are native, understanding how to minimize risks and react during an encounter can be life-saving. Here’s a comprehensive guide on how to survive an alligator attack.


1. Avoiding Alligator Encounters

1.1 Be Aware of Your Environment

  • Know Their Habitat: Alligators can be found in freshwater environments like ponds, marshes, and rivers. Always be vigilant when you are near these areas.

1.2 Avoid Water Edges

  • Stay Clear of Water: Alligators are ambush predators that can attack near the water’s edge. Avoid lingering at the shores of bodies of water and do not swim outside of designated swimming areas.

2. Prevention is Key

2.1 Do Not Feed Alligators

  • Avoid Attracting Attention: Feeding alligators can cause them to associate humans with food, increasing the danger of future encounters. It’s illegal in many places because it is so hazardous.

2.2 Keep Pets and Children Away

  • Extra Precaution: Keep pets on leashes and away from the water’s edge, and watch children closely when they are near water.

3. Recognizing Warning Signs

3.1 Alligator Behavior

  • Warning Signs: An alligator may hiss or open its mouth as a warning if you are too close. Recognizing these signs can give you time to back away safely.

4. If You Encounter an Alligator

4.1 Do Not Run Away

  • Walk Backwards Slowly: If you spot an alligator, do not turn your back or run. Alligators can run very fast over short distances. Instead, slowly back away until you are a safe distance from the alligator.

4.2 If Attacked, Fight Back

  • Target Sensitive Areas: If an alligator makes contact, fight back by hitting or poking it in the eyes or snout. These are sensitive areas, and your resistance might make the alligator release you and retreat.

5. After an Encounter

5.1 Seek Immediate Medical Attention

  • Treat Injuries: Alligator bites can cause serious injuries and infections. Even minor injuries should be treated by a healthcare professional as soon as possible.

5.2 Report the Encounter

  • Inform Authorities: Always report any aggressive alligator encounters to wildlife officials. This helps manage potentially dangerous animals and prevent future incidents.

6. Educating Yourself and Others

6.1 Learning About Alligator Biology and Behavior

  • Understanding Alligators: Educate yourself about alligator biology, behavior, and ecology. Knowing how these animals behave and react in their natural habitat can help you make informed decisions when you’re in or near their environments.

6.2 Community Education

  • Spreading Knowledge: Share knowledge about alligator safety with family, friends, and community members, especially those new to areas where alligators are common. Community education can dramatically reduce the likelihood of dangerous encounters.

7. Safe Fishing Practices

7.1 Be Cautious When Fishing

  • Avoid Attracting Alligators: Be mindful when cleaning fish or disposing of fish remains. Alligators are attracted to easy food sources. Dispose of fish scraps in designated disposal sites, not in the water.

7.2 Use Elevated Platforms

  • Elevated Fishing Locations: When possible, fish from piers or other elevated structures. These locations can reduce the risk of encountering alligators while fishing near their habitats.

8. Camping Near Alligator Habitats

8.1 Campsite Selection

  • Choose Safe Locations: When camping near bodies of water known to host alligators, select campsites at a safe distance from the water’s edge. Avoid areas with signs of alligator activity such as slides or tracks.

8.2 Secure Food and Garbage

  • Avoid Attracting Wildlife: Secure food and garbage at night or when not attended. Unsecured food can attract alligators and other wildlife to your campsite.

9. Handling an Injured Alligator

9.1 Do Not Approach

  • Safety First: Never attempt to approach or handle an injured alligator. An injured animal can be unpredictable and more dangerous.

9.2 Contact Wildlife Authorities

  • Professional Assistance: If you encounter an injured alligator, contact local wildlife authorities. Trained professionals can handle the situation more safely and appropriately.

10. Advocating for Alligator Conservation

10.1 Support Conservation Efforts

  • Promoting Healthy Populations: Support local and national conservation efforts that aim to preserve alligator habitats and maintain healthy alligator populations. Healthy ecosystems contribute to natural alligator behavior, reducing negative interactions with humans.

10.2 Participate in Conservation Programs

  • Active Involvement: Participate in programs that protect alligator habitats or promote human-wildlife coexistence. Your involvement can make a significant difference in the management and conservation of these powerful creatures.

Conclusion

Understanding how to avoid and react to alligator encounters is crucial for anyone living in or visiting their habitats. By taking preventive measures and knowing how to react during an encounter, you can greatly increase your chances of safely coexisting with these ancient reptiles.


Frequently Asked Questions (FAQs)

What time of day are alligators most active?

  • Alligators are typically most active between dusk and dawn, so it is best to avoid being near water during these times.

Can alligators climb fences or walls?

  • Alligators are poor climbers, but they can reach up if the barrier is too low. Ensure that fences around bodies of water are at least 4-5 feet high with no substantial gaps at the bottom.

Is it safe to swim in waters where alligators live?

  • Swimming in designated swimming areas during daylight hours is generally safe. Always adhere to local wildlife advisories and avoid swimming in areas known to have large alligator populations.

How do I teach children about alligator safety?

  • Educate children about the importance of keeping a distance from all water bodies in alligator territories, never feeding wildlife, and always having an adult present. Interactive educational tools, such as books and videos, can also help make the learning process engaging and effective.

What should I do if an alligator approaches my boat?

  • Remain calm, keep your limbs inside the boat, and slowly move away from the alligator if possible. Do not attempt to touch or feed the alligator, as this can provoke aggressive behavior.

Can alligators recognize human behavior?

  • Alligators may become accustomed to human presence, especially if they are regularly fed by people. This can lead them to associate humans with food, potentially leading to more aggressive behavior. Always maintain a safe and respectful distance to discourage this association.

How to Survive a Mountain Lion Attack: Essential Safety Tips

Introduction

Encountering a mountain lion in the wild is a rare but potentially dangerous situation. These powerful predators, also known as cougars or pumas, are generally elusive, but if you spend time in their habitats, knowing how to respond during an encounter is crucial. This guide provides essential tips to increase your chances of safely handling a mountain lion encounter.


1. Prevention and Awareness

1.1 Understanding Mountain Lion Behavior

  • Territorial Nature: Mountain lions are territorial animals. Understanding their behavior can help you avoid inadvertently threatening them.

1.2 Hiking in Groups

  • Safety in Numbers: Always hike in groups when you are in mountain lion territory. Mountain lions are less likely to approach groups.

2. Making Yourself Less Appealing

2.1 Do Not Run

  • Triggering Chase: Running may trigger a mountain lion’s instinct to chase. Instead, stand tall and maintain eye contact.

2.2 Make Yourself Big

  • Intimidation Tactics: Raise your arms or open your jacket wide to appear larger. The goal is to make yourself seem like a less appealing target.

3. Defensive Actions

3.1 Maintain Eye Contact

  • Assert Dominance: Do not turn your back or look away from the mountain lion. Maintaining eye contact shows dominance.

3.2 Speak Loudly and Firmly

  • Use Your Voice: Speak in a loud, firm voice to further assert your presence and dominance. Avoid high-pitched sounds or screaming, which could trigger predatory instincts.

4. If the Encounter Escalates

4.1 Use Rocks or Sticks

  • Improvise Weapons: If available, throw rocks, branches, or whatever you can find without crouching down or turning away from the mountain lion.

4.2 Fight Back If Attacked

  • Last Resort: In the unlikely event of an attack, fight back. Use whatever objects are at hand and aim for the mountain lion’s face and eyes.

5. After an Encounter

5.1 Report the Encounter

  • Inform Authorities: Always report any encounters with mountain lions to local wildlife authorities. Reporting can help manage potentially dangerous wildlife behavior and aid in public safety measures.

5.2 Review and Reflect

  • Learn from the Experience: Review what happened during the encounter to understand how you might improve your response in future situations.

6. Choosing Safe Campsites

6.1 Selecting a Location

  • Avoid Dense Cover: Choose campsites away from thick brush or dense cover, which are preferred hiding spots for mountain lions. Open areas with good visibility can reduce the chances of a surprise encounter.

6.2 Keeping a Clean Camp

  • Reduce Attractants: Ensure that all food items, toiletries, and garbage are stored in bear-proof containers or hung between trees at a height. The scent of these items can attract mountain lions indirectly by attracting smaller wildlife, which are prey for these predators.

7. Traveling with Children and Pets

7.1 Extra Precautions

  • Keep Close: Always keep children within sight and close by. Do not let them wander off or play in mountain lion territory without supervision. Teach them what to do if they ever see a mountain lion.

7.2 Pet Safety

  • On Leash: Keep pets on a leash. Roaming pets can attract mountain lions and may lead them back to you.

8. Understanding Mountain Lion Tracks and Signs

8.1 Identifying Signs

  • Learn to Recognize Tracks: Mountain lion tracks are generally round with no claw marks, as their claws are retractable. Learning to recognize these tracks and signs of scat or scratch marks on trees can alert you to mountain lion activity in the area.

8.2 Monitoring Wildlife Activity

  • Using Trail Cameras: In areas frequently used for hiking or camping, consider setting up trail cameras to monitor wildlife activity, including mountain lion movements. This can provide valuable information for avoiding encounters.

9. Legal Considerations and Wildlife Protection

9.1 Understanding Hunting Laws

  • Legal Restrictions: In many places, mountain lions are protected under local, state, or federal laws. Be aware of and respect all wildlife laws, which are designed to balance predator management and ecosystem health.

9.2 Promoting Conservation

  • Support Conservation Efforts: Engage in or support conservation programs that aim to protect mountain lion habitats and promote a healthy balance between human activities and wildlife.

10. Emergency Preparedness

10.1 First Aid Training

  • Be Prepared for Injuries: Basic first aid knowledge and a well-equipped first aid kit can be vital in the event of an attack or any injury in the wilderness. Consider taking a wilderness first aid course.

10.2 Emergency Communication

  • Plan for No Cell Service: In many remote areas, cell service may be unreliable. Carry a satellite phone, GPS beacon, or similar device to ensure you can call for help in an emergency.

Conclusion

While a mountain lion attack is unlikely, being prepared can significantly improve your safety and reaction in the event of an encounter. Remember, the key to dealing with wildlife encounters is to stay calm, make yourself appear less vulnerable, and take proactive measures to protect yourself and others.


Frequently Asked Questions (FAQs)

What should I do if I see a mountain lion from a distance?

  • Keep your distance and do not approach the animal. Try to back away slowly and safely, making sure the mountain lion has a clear escape route.

Can I hike safely in mountain lion territory?

  • Yes, hiking in mountain lion territory can be safe if you take precautions, stay alert, and follow the guidelines outlined above to avoid and handle encounters.

How can I avoid accidentally attracting mountain lions?

  • Keep food and garbage securely stored, especially at night. Avoid hiking or jogging at dawn, dusk, or night when mountain lions are most active.

How effective are pepper sprays in deterring mountain lion attacks?

  • Pepper spray, specifically designed for bears, can be effective against mountain lions at close range. Ensure it is easily accessible and you know how to use it under pressure.

What are the best practices for group hiking in mountain lion areas?

  • Stay together as a group, making noise as you move through trails to reduce the chances of surprising a mountain lion. Large groups are less likely to be attacked.

Why Earth Day Should Matter to Hunters: Conservation and Stewardship

Introduction

Earth Day serves as a global reminder of our collective responsibility to preserve and enhance the natural environment. For hunters, this day holds particular significance. Hunting is intimately connected to the health of ecosystems and wildlife populations, making Earth Day an opportunity to reflect on conservation practices and the role hunters play in environmental stewardship.


1. The Role of Hunters in Conservation

1.1 Funding Conservation Efforts

  • License Fees and Excise Taxes: Hunters contribute financially to conservation through hunting licenses, permits, and excise taxes on hunting gear. These funds are crucial for wildlife management and habitat conservation programs.

1.2 Habitat Restoration

  • Active Participation: Many hunters participate in habitat restoration projects, such as planting native vegetation, creating water sources, and controlling invasive species, which help sustain biodiversity.

2. Sustainable Hunting Practices

2.1 Population Control

  • Maintaining Balance: By adhering to regulated hunting seasons and bag limits, hunters help maintain healthy wildlife populations, preventing overpopulation and its negative impacts on habitats.

2.2 Ethical Hunting

  • Promoting Ethical Practices: Ethical hunting involves taking only what you need, ensuring a quick and humane kill, and using as much of the animal as possible. These practices minimize waste and respect the natural resources.

3. Education and Advocacy

3.1 Raising Awareness

  • Educational Outreach: Hunters often serve as educators and advocates for conservation, sharing knowledge about wildlife management and the importance of protecting natural habitats with the broader community.

3.2 Supporting Conservation Organizations

  • Engagement and Support: Many hunters support or are actively involved in wildlife conservation organizations, which play a critical role in protecting ecosystems and educating the public about the importance of conservation.

4. Hunters as Environmental Monitors

4.1 Observing Changes

  • Citizen Science: Hunters are often among the first to notice changes in wildlife populations and habitat conditions. They can provide valuable data to wildlife biologists and conservationists, aiding in early detection of environmental issues.

4.2 Advocating for Sustainable Practices

  • Policy Influence: Hunters can use their firsthand knowledge of environmental changes to advocate for sustainable land and wildlife management policies that benefit both the environment and the sport.

5. The Impact of Climate Change

5.1 Addressing the Effects

  • Adaptive Strategies: Hunters must adapt to changes brought by climate change, such as shifts in wildlife migration patterns and altered habitats, by supporting adaptive wildlife management strategies that ensure the sustainability of hunting practices.

5.2 Reducing Carbon Footprint

  • Environmental Responsibility: Hunters can lead by example by adopting practices that reduce their carbon footprint, such as using more fuel-efficient vehicles for hunting trips or investing in renewable energy sources.

6. Promoting Wildlife Conservation Initiatives

6.1 Support for Protected Areas

  • Advocacy for Expansion: Hunters can advocate for the establishment and expansion of protected areas that safeguard critical habitats and wildlife corridors, ensuring the survival of game and non-game species alike.

6.2 Participating in Wildlife Censuses

  • Data Collection: Participating in wildlife censuses and other scientific surveys can help manage animal populations more effectively, providing crucial data that informs sustainable hunting and conservation policies.

7. Cultivating a Culture of Respect

7.1 Respecting Wildlife and Nature

  • Cultural Shift: Promote a culture that respects wildlife and natural resources among hunters and the broader community. This respect fosters a deeper appreciation for the environment and motivates more people to engage in conservation efforts.

7.2 Role Modeling

  • Leading by Example: Hunters can lead by example by demonstrating responsible behaviors and practices that prioritize ecosystem health and animal welfare. This leadership can inspire new generations of hunters and conservationists.

8. Enhancing Local Economies

8.1 Economic Benefits of Conservation

  • Boosting Local Economies: By supporting habitats that attract diverse species, conservation efforts can boost local economies through eco-tourism and hunting tourism, providing financial incentives to preserve and expand natural areas.

8.2 Investment in Research and Development

  • Funding Conservation Research: Hunters can contribute to or fund research that develops new methods or technologies for sustainable hunting and wildlife management, helping to advance conservation science.

9. Fostering Collaborative Efforts

9.1 Partnerships with Conservation Groups

  • Building Alliances: By forming partnerships with conservation groups, government agencies, and other stakeholders, hunters can help create more effective and comprehensive conservation strategies.

9.2 Community-Based Conservation

  • Engagement in Local Initiatives: Hunters can play a significant role in community-based conservation initiatives, which often require the buy-in and participation of local populations to succeed.

10. Commitment to Continuous Education

10.1 Lifelong Learning

  • Ongoing Education: Commit to continuous education on the latest wildlife management and conservation practices. Staying informed helps hunters adapt to evolving challenges and enhance their conservation efforts.

10.2 Public Education Campaigns

  • Spreading Knowledge: Engage in or support public education campaigns that raise awareness about the importance of biodiversity, the ecological benefits of well-managed hunter populations, and the critical role hunters play in conservation.

Conclusion

Earth Day underscores the vital connection between hunters and conservation. By embracing their role as stewards of the earth, hunters not only ensure the continuation of their sport but also contribute to the broader goal of environmental preservation. This day serves as a reminder of the importance of sustainable practices and the impact individuals can have on global conservation efforts.


Frequently Asked Questions (FAQs)

Why is biodiversity important to hunters?

  • Biodiversity ensures the health and stability of ecosystems, which support robust wildlife populations necessary for hunting. Diverse habitats support a variety of game species, enhancing hunting opportunities and experiences.

How can hunters participate in Earth Day?

  • Hunters can engage in local cleanup events, habitat restoration projects, or educational programs to teach others about the role of ethical hunting in conservation. Participation in Earth Day activities reinforces the commitment to sustainability and conservation.

What are the long-term benefits of conservation-minded hunting?

  • Long-term benefits include sustained wildlife populations, healthier ecosystems, and secured hunting opportunities for future generations. Conservation-minded practices ensure that natural resources are managed responsibly and remain abundant.

Can hunters really make a difference in conservation?

  • Absolutely. Hunters are often on the front lines of conservation, significantly impacting wildlife management and habitat preservation through their actions and financial contributions.

What can young hunters learn from Earth Day?

  • Young hunters can learn the importance of environmental stewardship and the ethical responsibilities that come with hunting. Earth Day provides a platform to educate them on sustainable practices and the role of hunters in maintaining ecological balance.

How can non-hunters support conservation efforts on Earth Day?

  • Non-hunters can support conservation efforts by participating in local clean-ups, learning about and advocating for wildlife conservation, and supporting policies that protect natural habitats and biodiversity.

Hunting in the Fog: Strategies for Success and Safety

Introduction

Hunting in foggy conditions presents unique challenges and opportunities for hunters. The reduced visibility can complicate navigation and targeting, but it can also provide cover, making it easier to approach game undetected. This guide will explore essential strategies for hunting effectively and safely in the fog.


1. Preparation and Planning

1.1 Check Weather Conditions

  • Understanding the Forecast: Before heading out, check the weather forecast to ensure you’re prepared for the expected conditions. Fog can change rapidly, so it’s important to stay informed.

1.2 Appropriate Gear

  • Visibility Aids: Use fog-rated scopes or red-dot sights that can help improve target acquisition in limited visibility. Also, carry a reliable GPS device and a compass to aid navigation when landmarks are obscured.

2. Safety Precautions

2.1 Stay Visible

  • Wear Reflective Clothing: To prevent accidents, especially if hunting in a group, wear high-visibility or reflective clothing that stands out against the fog.

2.2 Communicate Regularly

  • Check-ins: If hunting with others, maintain regular communication to keep track of each other’s locations and status. Use radios or smartphones to stay in contact.

3. Adjusting Hunting Techniques

3.1 Slower Movement

  • Stealth Approach: Move slowly and carefully. Fog can muffle sound, allowing you to approach game more closely than usual, but sudden movements can still startle wildlife.

3.2 Close-Range Hunting

  • Limit Shots to Visible Range: Only take shots at distances where you can clearly see and identify your target. This reduces the risk of mistaken targets and ensures a humane kill.

4. Navigation Skills

4.1 Use of Landmarks

  • Orienting Strategies: Familiarize yourself with the hunting area’s landmarks before the fog sets in. Use these fixed points to navigate and orient yourself when visibility decreases.

4.2 Advanced Navigation Tools

  • GPS and Mapping Apps: Utilize GPS devices and mapping apps that can help you track your position and plot safe routes in low visibility.

5. Enhancing Sensory Awareness

5.1 Listening Skills

  • Heightened Hearing: Pay close attention to sounds. In foggy conditions, sounds can help you locate game or navigate when visibility is poor.

5.2 Minimize Noise

  • Quiet Gear: Ensure your gear is quiet, securing anything that might clink or rustle, which could alert game to your presence.

6. Ethical Considerations

6.1 Responsible Hunting

  • Ethical Practices: Be extra cautious about target identification and backstop awareness. Fog can distort perception, making it crucial to be certain of your target and what’s beyond it.

6.2 Impact on Wildlife

  • Disturbance Minimization: Understand how your presence affects wildlife, especially under unusual conditions like fog. Minimize stress and disturbance to animals.

7. Legal and Regulatory Compliance

7.1 Adhering to Hunting Laws

  • Legal Requirements: Always ensure that your hunting methods and the tools you use comply with local hunting laws, which may have specific regulations about hunting in reduced visibility conditions like fog.

7.2 Area-Specific Regulations

  • Understanding Restrictions: Some areas might have specific restrictions or guidelines for hunting in fog, particularly concerning the use of firearms and the type of game allowed. Always check these details before planning your hunt.

8. Post-Hunt Practices

8.1 Effective Game Recovery

  • Tracking Techniques: In foggy conditions, tracking wounded game can be particularly challenging. It’s essential to mark the location and follow any signs meticulously. Using brightly colored marking tape can help in retracing steps and ensuring no game is lost.

8.2 Handling and Processing Game

  • Care and Hygiene: Process any harvested game as soon as possible to prevent spoilage, which can be accelerated by damp, foggy conditions. Ensure you’re carrying the necessary tools to do so efficiently and hygienically.

9. Personal Health and Comfort

9.1 Protecting Yourself from the Elements

  • Appropriate Clothing: Wear layers that can protect you from moisture while maintaining body warmth. Fog can be cold and damp, so water-resistant outer layers are advisable.

9.2 Managing Fatigue and Visibility

  • Rest and Eye Care: Hunting in fog can strain the eyes and increase fatigue due to heightened concentration. Take regular breaks, and if necessary, use eye drops to keep your vision clear and prevent discomfort.

10. Advanced Planning and Simulation

10.1 Scenario Planning

  • Anticipate Challenges: Consider all possible scenarios that could arise while hunting in fog, from losing your way to encountering other hunters. Plan your responses to these situations in advance.

10.2 Training and Simulations

  • Practice Runs: If possible, visit the hunting area prior to your actual hunt on a foggy day for a dry run. Practice navigating and locating landmarks to build confidence and familiarity with the environment.

Conclusion

Hunting in the fog requires careful preparation, acute awareness, and adaptation to the environment. By employing the strategies outlined above, hunters can enjoy successful outings that are both fruitful and safe. Remember, the key to fog hunting is patience, precision, and preparedness.


Frequently Asked Questions (FAQs)

How does fog affect the behavior of animals?

  • Animals may become more active during lighter fog conditions as it provides them with cover from predators, including humans.

What are the best types of firearms and ammunition for foggy conditions?

  • Opt for firearms with shorter range and higher precision. Use ammunition that performs well at shorter distances to ensure effective shots.

Can hunting dogs be helpful in fog?

  • Yes, well-trained hunting dogs can be invaluable in fog, using their keen sense of smell to track game when visual contact is limited.

Is it better to hunt alone or with a partner in fog?

  • Hunting with a partner is advisable in foggy conditions for safety reasons. Communication devices can help maintain contact if visibility becomes too restricted.

How can I improve my visibility without compromising stealth?

  • Using low-light optics like thermal or infrared scopes can improve visibility while maintaining stealth. However, ensure these are legal in your hunting area before use.

What first aid considerations should I take into account when hunting in fog?

  • Carry a well-equipped first aid kit tailored for both minor injuries and major emergencies. Given the reduced visibility, prepare for possible navigational mishaps or falls, which are more common in such conditions.

Optimal Shot Placement for Feral Hogs: A Hunter’s Guide

Introduction

Hunting feral hogs requires not only skill and patience but also a deep understanding of the animal’s anatomy to ensure ethical and effective shot placement. Feral hogs are resilient creatures with a tough hide and a strong skeletal structure, which can make them challenging targets. This guide provides insights into the most humane and efficient ways to target feral hogs to ensure a quick and ethical harvest.


1. Understanding Hog Anatomy

1.1 Vital Areas

  • Heart and Lungs: Located just behind the front leg and slightly lower in the chest, this area offers the most reliable shot for a quick and humane kill. Aiming here disrupts major blood vessels and both lungs, leading to a rapid decrease in oxygen and blood pressure.

1.2 Less Effective Targets

  • Head Shots: While lethal, headshots can be risky due to the hog’s small and mobile target area. Misses can result in non-lethal wounds, which are inhumane and can lead to prolonged suffering.

2. Preferred Firearms and Ammunition

2.1 Rifle Choices

  • High Caliber Rifles: For hogs, .270, .308, and .30-06 calibers are effective, providing enough power to penetrate the tough hide and reach vital organs.

2.2 Ammunition Types

  • Expanding Bullets: Soft-point or hollow-point bullets are recommended as they expand upon impact, maximizing internal damage while minimizing the risk of over-penetration.

3. Shot Placement Techniques

3.1 Broadside Shot

  • Optimal Angle: This is the most favorable shooting position, where the hog’s side is fully exposed to you. Aim for the heart-lung area just behind and above the front leg.

3.2 Quartering Away Shot

  • Angle Consideration: When the hog is facing away from you at an angle, aim for the heart-lung area from the side or slightly behind. This shot can allow the bullet to enter a larger area of vital organs.

4. Factors Affecting Shot Effectiveness

4.1 Distance and Accuracy

  • Manageable Ranges: The effectiveness of a shot diminishes with distance. It’s important to shoot within a range where you can maintain accuracy to hit the vital zones.

4.2 Animal Movement

  • Timing and Patience: Wait for the moment when the hog is calm and ideally positioned to increase the likelihood of a successful and ethical shot.

5. Ethical Considerations

5.1 Minimizing Suffering

  • Responsibility of the Hunter: Every hunter has a responsibility to ensure that their actions cause the least amount of suffering to the animal. This involves precise shot placement and being prepared to follow up with additional shots if necessary.

5.2 Respect for Wildlife

  • Conservation Awareness: Understanding the role of feral hogs in the ecosystem and their impact can help foster a respectful approach to hunting these animals.

6. Tracking and Recovery

6.1 Importance of Following Up

  • Ethical Duty: After taking a shot, it’s crucial to track the hog to ensure it is quickly recovered. Even well-placed shots can sometimes require tracking to find the animal.

6.2 Tracking Tips

  • Blood Trails: Learn to recognize and follow blood trails. Blood color and pattern can indicate the nature of the wound, helping you understand how far the animal might have traveled and how urgently you need to follow up.

7. Handling After the Kill

7.1 Field Dressing

  • Immediate Action: Begin field dressing as soon as possible to preserve the meat quality and prevent spoilage. Removing internal organs and cooling the body quickly is crucial, especially in warm climates.

7.2 Safe Handling

  • Hygiene and Safety: Use gloves while handling the carcass and ensure your tools are sanitized to prevent contamination. Be aware of zoonotic diseases that can be transmitted from feral hogs to humans.

8. Legal and Regulatory Compliance

8.1 Understanding Local Laws

  • Hunting Regulations: Make sure you are familiar with local hunting laws, including seasons, licensing requirements, and bag limits. This information is crucial to ensure that your hunting activities are legal and regulated.

8.2 Reporting Harvests

  • Contribution to Conservation: Some regions require hunters to report their harvests, which helps wildlife officials manage populations and study wildlife health. Participating in these efforts supports sustainable hunting practices.

9. Enhancing Skills with Advanced Techniques

9.1 Long-Range Shooting

  • Skill Development: For hunters interested in long-range shooting, investing time in learning about ballistics, wind reading, and advanced optics can enhance accuracy over greater distances.

9.2 Using Technology

  • Modern Aids: Consider using technological aids like ballistic calculators, thermal imaging scopes, and GPS devices to enhance your hunting efficiency and effectiveness.

10. Community Engagement and Education

10.1 Joining Hunting Groups

  • Shared Knowledge: Participate in local or online hunting communities to exchange knowledge, learn from experienced hunters, and stay updated on the latest hunting strategies and conservation news.

10.2 Educating Others

  • Promoting Responsible Hunting: Share your knowledge and experiences with new hunters or the general public to promote ethical hunting practices and a positive understanding of the role of hunting in conservation.

Conclusion

Successful feral hog hunting relies on precise shot placement, appropriate equipment, and an ethical approach to wildlife. By focusing on the vital areas and using the right firearms and ammunition, hunters can achieve quick, humane kills, minimizing the suffering of the animal and ensuring respect for the natural world.


Frequently Asked Questions (FAQs)

What should I do if I’m unsure about a shot?

  • If you’re unsure about making a clean shot, it’s better to wait for a better opportunity than to risk wounding the animal.

How can I practice for better accuracy?

  • Regular target practice under various conditions can improve your shooting skills. Additionally, using a shooting simulator or engaging in field shooting exercises can help simulate hunting scenarios.

How do I deal with variable wind conditions when shooting?

  • Practice shooting in various wind conditions to understand how it affects bullet trajectory. Learning to read wind speed and direction can significantly improve your accuracy in the field.

What are the best practices for disposing of unused parts of the hog carcass?

  • Follow local guidelines for disposing of animal remains. This often involves burying inedible parts at a sufficient depth to prevent attracting predators or scavengers, or taking them to designated disposal facilities.
Exit mobile version