How to Purify Water Outdoors: Safe Drinking Water Methods

Safe drinking water in the outdoors starts with choosing the cleanest source you can, removing sediment, and using a treatment method that matches the risk. Boiling, filtering, chemical disinfecting, and UV treatment can all help, but no single method is perfect for every contaminant. For camping, hunting, and emergency use, the safest plan is to carry enough water when possible, bring a backup treatment method, and follow current official guidance when water may be contaminated by sewage, flooding, chemicals, or heavy runoff.

Table of contents

Quick Answer

For most outdoor situations, start with the clearest moving water available, remove sediment, then treat it with boiling, a quality filter or purifier, chemical disinfectant, or UV device according to the product directions. Boiling is one of the most reliable emergency methods for pathogens when fuel is available, while filters are convenient for field use. Chemical and UV methods require careful contact time, clear water, and correct use.

Water safety is context-dependent. If water may be affected by flooding, chemical spills, mining runoff, pesticides, saltwater, fuel, or sewage, ordinary backpacking treatment may not make it safe. In those situations, use carried water or follow official emergency water guidance such as the EPA emergency disinfection guidance.

Choose the Safest Source First

Treatment works better when you start with better water. Clear flowing water from a spring or stream is usually a better starting point than stagnant water, muddy puddles, water near heavy livestock use, or water downstream from camps, roads, industrial areas, or dead animals. You still need to treat it, but source choice reduces the burden on your gear.

Avoid obvious contamination

Do not assume a scenic water source is safe. Avoid water with fuel smell, chemical odor, unusual color, oily sheen, algae bloom, sewage exposure, or strong runoff after storms. If the source looks or smells wrong, the best treatment is often choosing a different source.

Carry water when risk is high

On short hunts, day hikes, and range trips, carrying enough water is simpler and safer than relying on unknown sources. Ready.gov recommends storing emergency water as part of household preparedness, and the same mindset applies to vehicle kits and base camps. See Ready.gov water preparedness guidance for general planning context.

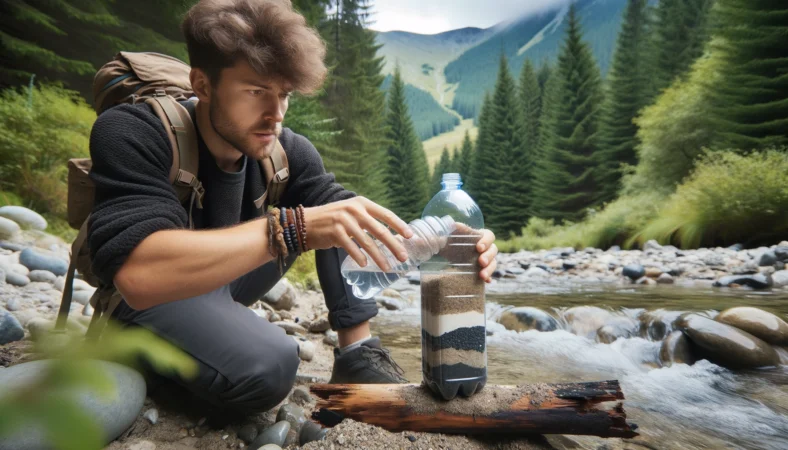
Pre-Filter Cloudy Water

Cloudy water can make treatment less effective and can clog filters quickly. Let sediment settle, then pour the clearer water through a clean cloth, coffee filter, bandana, or dedicated pre-filter before disinfecting or filtering. Pre-filtering does not make water safe by itself; it simply improves the next treatment step.
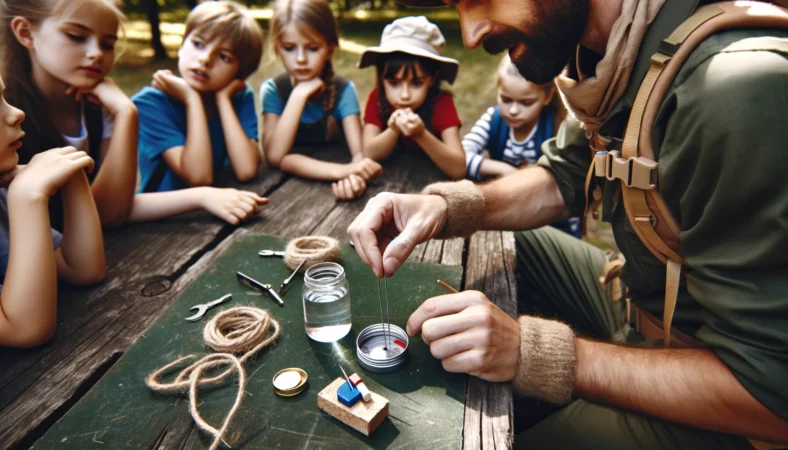
Boiling Water

Boiling is a strong emergency method for treating biological hazards when you have fuel, a safe container, and time. Bring water to a rolling boil and follow current official guidance for duration, especially at elevation or during emergency advisories. Boiling does not remove chemical contamination, fuel, salt, heavy metals, or sediment. If those are concerns, use another water source.

Best use

Boiling is useful at camp, in a cabin, after an emergency notice, or when a field filter breaks. It is less convenient when you are moving quickly or conserving fuel in cold weather.

Water Filters and Purifiers

Outdoor water filters physically remove particles and many microorganisms according to their design. Some are pump filters, some are squeeze filters, some are gravity systems, and some are built into bottles. Read the product label carefully because not every filter handles the same hazards. A filter that removes bacteria and protozoa may not remove viruses unless it is rated as a purifier or paired with another treatment.

Protect the clean side

Keep dirty water and clean water separate. Do not let untreated water drip onto the clean bottle opening, hose, or filter outlet. Mark dirty bags and clean bottles clearly. Cross-contamination is one of the easiest ways to defeat a good filter.

Watch freezing conditions

Some hollow-fiber filters can be damaged if they freeze after getting wet. In cold weather, keep the filter close to your body or inside a sleeping bag overnight if the maker recommends it. A frozen damaged filter may look normal but fail internally.

Chemical Disinfection

Chemical disinfectants such as chlorine dioxide or iodine products can be useful backups because they are lightweight and compact. They require the correct dose, enough contact time, and reasonably clear water. Cold water and cloudy water can require more time. Always follow the specific product directions and health warnings.

Chemical treatment is not ideal for everyone. Some products are not recommended for certain people or long-term use, and taste can be an issue. If you have medical concerns, pregnancy, thyroid issues, allergies, or medication questions, ask a qualified professional and follow the product label.

UV Treatment

UV treatment devices use ultraviolet light to inactivate microorganisms when used correctly. They are fast and convenient for clear water, but they depend on batteries, electronics, proper stirring or exposure, and clear water that allows light to reach the organisms. Sediment and cloudy water can reduce effectiveness, so pre-filtering matters.

What Not to Trust by Itself

  • Clear appearance alone. Clear water can still contain microorganisms.
  • Cold mountain water alone. Cold does not guarantee safe water.
  • Running water alone. Flowing water can still be contaminated upstream.
  • Charcoal sticks or improvised filters alone. They may improve taste or sediment but should not be treated as full disinfection.
  • Solar warmth alone. Sun exposure without a verified method is not a dependable field plan.
  • Old chemicals or expired tablets. Treatment products can lose reliability over time.

Build a Practical Field Plan

A good outdoor water plan uses layers. Carry water for the known part of the trip, identify backup sources on the map, bring a primary treatment method, and carry a small backup such as chlorine dioxide tablets or a second filter. For hunting and backcountry trips, water planning belongs with route planning, shelter, weather, and emergency signaling. Our wilderness signaling guide covers another part of that safety system.

Also think about storage. Use clean bottles or bladders, avoid dipping clean containers directly into untreated sources, and keep camp hygiene separate from drinking water. If you are assembling gear for a trip, pair water treatment with the planning steps in our hunting trip kit guide.

Frequently Asked Questions

Is boiling better than filtering water?

Boiling is strong for biological hazards when done correctly, but it requires fuel and time and does not remove chemical contamination. Filters are convenient in the field, but their protection depends on what they are rated to remove. Many outdoor plans use both a filter and a backup method.

Can a water filter remove viruses?

Some purifiers are designed for viruses, but many common backpacking filters focus on bacteria and protozoa. Read the product label carefully and do not assume every filter covers every hazard.

Does clear stream water need treatment?

Yes. Clear water can still contain microorganisms or upstream contamination. Clear water is a better starting point than muddy water, but it still needs appropriate treatment before drinking.

What should I do if water may be chemically contaminated?

Do not rely on ordinary boiling, basic filters, or simple disinfectants for chemical contamination. Choose another source, use carried water, or follow official emergency guidance for the situation.

Final Takeaway

Safe outdoor drinking water is about source choice, sediment control, correct treatment, and backup planning. Boiling, filters, chemical disinfectants, and UV devices each have strengths and limits. Start with the cleanest source you can, treat it according to the risk, protect clean containers from cross-contamination, and do not treat unknown chemical or flood contamination like ordinary backcountry water. A little planning before the trip is far better than guessing when you are already thirsty.

How to Make a Compass: Improvised Methods and Limits


You can make a simple improvised compass by magnetizing a small steel needle, then floating it on a leaf or a piece of cork in still water so it can pivot freely and align roughly with Earth’s magnetic field. This is a useful skill to understand and a fair emergency backup, but it is only a backup. An improvised compass gives a rough sense of direction at best and offers no guaranteed accuracy. A real compass, a paper map, and a GPS device remain the tools you should actually rely on and carry on every trip.

Table of contents

Why an Improvised Compass Is a Backup Only

An improvised compass is a learning exercise and a last-resort tool, not a navigation system. A floating magnetized needle can swing toward magnetic north under good conditions, but it is sensitive to the slightest air movement, water ripple, or nearby metal, and it gives you a line, not a bearing you can trust over distance. Small errors in direction grow into large errors in position the further you travel, so an improvised compass should never be the reason you head into unfamiliar country.

Plan your navigation before you leave. The National Park Service includes navigation tools in its Ten Essentials, and a map and compass sit at the top of that list for a reason. Tell someone your route and expected return time, so that even a navigation mistake does not turn into a search that starts too late. Treat everything below as knowledge for an emergency, not a substitute for proper gear.

The Magnetized Needle and Water Method

The most common improvised compass uses a small steel needle, something to magnetize it, and a still container of water. The needle becomes a weak magnet that can pivot to align with Earth’s magnetic field.

Step 1: Magnetize the Needle

Stroke the needle repeatedly in one direction with a magnet if you have one, lifting it away and starting from the same end each time, perhaps twenty to thirty strokes. If you have no magnet, you can build a faint charge by stroking the needle many times in one direction against silk, wool, or even your hair, though this produces a much weaker and less reliable result. Always stroke in a single direction, never back and forth.

Step 2: Float the Needle

Rest the needle on something that floats, such as a small leaf, a piece of cork, a bit of foam, or a flat scrap of paper, then set it gently on the surface of water in a non-metal container. Surface tension holds the needle up. Use still water and keep the container away from wind, vehicles, electronics, knives, belt buckles, and any other metal that can pull the needle off true.

Step 3: Let It Settle

Allow the needle to rotate and come to rest on its own. It should settle along a roughly north-south line. Nudge it gently and watch it return to the same orientation to confirm it is responding to the magnetic field rather than to a current in the water. Remember that this tells you an axis, not which end is north until you check against the sun or terrain.

Other Improvised Methods

The needle and water method is the most dependable improvised approach, but a couple of others can help in a pinch.

Suspended Magnetized Needle

If you have no water, you can hang a magnetized needle from a thread tied at its balance point. Let it dangle freely away from wind and metal and it will slowly rotate toward a north-south line. This works but is very sensitive to air movement, so it is harder to use outdoors than the floating method.

The Sun and a Shadow Stick

You do not need a magnet to find rough direction. Push a straight stick upright into level ground, mark the tip of its shadow, wait fifteen to twenty minutes, and mark the new shadow tip. The line between the two marks runs roughly east to west, which lets you face north. This method needs sun and gives only a general orientation, but it requires no materials beyond a stick.

Which End Points North?

A floating needle aligns along a north-south axis, but on its own it cannot tell you which end is north. Cross-check it against another clue. In the Northern Hemisphere the sun is roughly south in the middle of the day, and the shadow-stick method above gives you east and west. Once you know one direction with confidence, you can label the needle’s ends. Never assume an improvised compass is pointing the way you hope; verify against the sun, terrain, or known landmarks before you act on it.

The Tools You Should Actually Carry

An improvised compass is what you build when your real gear is lost or broken. To avoid ever depending on one, carry and know how to use the proper tools.

  • A baseplate or lensatic compass. Inexpensive, reliable, needs no battery, and lets you take and follow real bearings.
  • A current topographic map. A compass is far more useful paired with a map of your area.
  • A GPS device or GPS app, with backup power. Accurate location, but batteries die and screens break, so it never fully replaces map and compass.
  • Knowledge of how to use them together. Practice taking a bearing, orienting a map, and following a route before your trip, not during an emergency.

Carrying redundant navigation tools and knowing the basics of land navigation is what keeps a wrong turn from becoming a survival situation. The improvised compass is the safety net beneath that, not the plan itself.

Frequently Asked Questions

How accurate is a homemade compass?

An improvised compass gives only a rough north-south line, and its accuracy varies with how well you magnetized the needle and how still your setup is. It can confirm a general direction in an emergency, but it offers no guaranteed precision and small errors grow over distance. Use a real compass for anything you must rely on.

What can I use to magnetize a needle without a magnet?

You can build a weak charge by stroking the needle many times in one direction against silk, wool, or hair. This is far weaker and less reliable than using an actual magnet, and the resulting needle may not hold its charge long. A magnet, even a small one from a piece of gear, gives a much better result.

Can I find direction without any compass at all?

Yes, roughly. The shadow-stick method uses the sun to give you an east-west line and works without any magnet or water. Knowing the sun is generally south at midday in the Northern Hemisphere also helps you orient. These give general direction, not precise bearings.

Why does my floating needle keep spinning or pointing the wrong way?

Usually the cause is nearby metal, moving air, ripples in the water, or a weakly magnetized needle. Move away from knives, buckles, electronics, and vehicles, shelter the container from wind, use still water, and remagnetize the needle if needed. Always cross-check the result against the sun or known landmarks.

Final Takeaway

Knowing how to make a compass from a magnetized needle and water is a worthwhile skill for an emergency, and the shadow-stick trick adds a no-materials backup. But an improvised compass only points along a rough line and carries no guaranteed accuracy, so it belongs at the bottom of your navigation toolkit. Carry a real compass, a current map, and a GPS, learn to use them together, and tell someone your route before you go. That preparation, not a floating needle, is what keeps you found.

Ultimate Guide to the Best Muck Boots for Hunting

When you’re out hunting, the last thing you want to worry about is your feet. That’s where muck boots come in. Ideal for navigating wet, muddy terrains, muck boots provide the comfort and protection essential for a successful hunt.

In this guide, we will explore various options, key features, and tips for selecting the best muck boots tailored to your hunting needs.

What Are Muck Boots?

Muck boots are a type of waterproof boot designed specifically for rough, wet conditions. Unlike standard boots, they are made from a combination of rubber, neoprene, and other materials that provide exceptional water resistance and insulation.

Originally developed for agricultural use, muck boots have gained popularity among hunters for their durability and comfort in harsh environments.

Why Use Muck Boots for Hunting?

Protection and Comfort: Muck boots are essential for keeping your feet dry and comfortable throughout the day. Their unique design protects against water, mud, and even snow, making them ideal for use in diverse hunting environments.

Versatility: Whether you’re in a marshy swamp or a dense forest, muck boots offer the traction and stability needed to move confidently across different terrains.

Key Features to Consider When Choosing Muck Boots

Waterproofing

The primary reason to choose muck boots is their waterproof capabilities. Look for boots that feature a seamless design and are made from high-grade rubber to ensure maximum protection against water.

Insulation

Depending on when and where you hunt, the insulation level of your boots can be critical. Boots with neoprene layers can provide warmth in cold conditions without adding excessive weight.

Comfort and Fit

An often overlooked aspect of choosing hunting boots is the fit. Muck boots that fit well will not only be more comfortable but will also prevent blisters and foot fatigue during long hunts.

Durability and Material

High-quality muck boots are made from durable materials that can withstand punctures and tears. Investing in a robust pair means they will serve you well for many hunting seasons.

Traction and Stability

The outsole of muck boots should have deep treads for stability on slippery surfaces. This is crucial for maintaining balance and safety while navigating challenging terrains.

Top 5 Best Muck Boots for Hunting in 2024

1.Muck Wetland Rubber Premium Men’s Field Boots

The Muck Wetland Rubber Premium Men’s Field Boots are designed for the ultimate outdoor enthusiast. Crafted from durable rubber and meticulously designed to offer unbeatable waterproof protection, these knee-high boots are perfect for navigating through wet, windy, and muddy conditions.

With all seams cemented, stitched, and sealed with rubber tape, these boots ensure your feet stay dry no matter the weather. The robust rubber cupsole offers exceptional durability and traction, making these boots a reliable choice for any outdoor adventure.

Pros

  • Superior Waterproofing
  • Excellent Traction

Cons

  • Boots might feel heavy

These boots are an excellent choice for those who need reliable, heavy-duty footwear for challenging outdoor conditions. They combine practical features with high-grade materials to keep you protected and comfortable in the great outdoors.

2.Muck Boot Men’s Fieldblazer Classic Industrial Boot

The Muck Boot Men’s Fieldblazer Classic Industrial Boot is crafted for the modern outdoorsman who values performance and durability. Combining a mid-calf design with a man-made sole and versatile outer materials, these boots are designed with functionality and user comfort in mind.

They are tested to perform excellently in real-world environments, ensuring they meet the demands of various outdoor activities. The user-friendly style and design make them a practical choice for those who need reliable footwear in industrial or rugged settings.

Pros

  • Optimized for Performance
  • Quality Assurance
  • Lightweight

Cons

  • Limited Insulation

Ideal for those who require dependable boots that offer protection and performance in industrial settings or rugged landscapes, the Muck Boot Men’s Fieldblazer Classic Industrial Boot blends innovation with practical design to suit a variety of outdoor needs.

3.Muck Boot Woody Max Rubber Insulated Men’s Hunting Boot

The Muck Boot Woody Max Rubber Insulated Men’s Hunting Boot is engineered to provide top-notch performance in harsh outdoor conditions.

Made in the USA or imported, these boots feature a 5mm CR Flex-Foam neoprene liner that ensures 100% waterproof protection while offering superior comfort, flexibility, and heat retention.

The boots are designed to adapt to the contours of your foot, preventing blisters and chafing. Additionally, a stretch-fit comfort topline binding helps seal in warmth and keeps out cold and debris, and a 2mm thermal foam under the footbed adds extra insulation for colder environments.

Pros

  • Excellent Insulation
  • Superior Waterproof and Warmth

Cons

  • Heavier than standard hunting boots

These boots are well-suited for hunters who face cold, wet conditions and need reliable, insulated footwear that offers both protection and comfort in the outdoors.

4.Muck Boot Men’s Excursion Pro Mid Snow Boot

The Muck Boot Men’s Excursion Pro Mid Snow Boot combines durability and comfort for versatile use in various climates. Made in the USA or imported, this boot is crafted entirely from rubber, providing excellent waterproofing and heat retention properties.

The 4 mm CR Flex-Foam adjusts to the shape of your foot, minimizing blisters and chafing. It features an XpressCool lining that wicks moisture away, keeping your feet cool and dry in warmer weather.

The boots are comfort rated from 40 °F to 95 °F (4 °C to 35 °C) and include an EVA midsole for lightweight support and cushioning, complemented by an etc® Sockliner that reduces friction and heat build-up.

Pros

  • Optimal Comfort and Flexibility
  • Effective Moisture Management

Cons

  • Durability Concerns

These boots are ideal for individuals who need reliable, moisture-wicking footwear capable of handling diverse weather conditions, particularly in transitional seasons or milder winter climates.

5.Muck Boot Men’s Arctic Pro Snow Boot

The Muck Boot Men’s Arctic Pro Snow Boot is engineered to tackle the most extreme winter conditions. Made in the USA or imported, these boots boast a robust design featuring a thick 8 mm neoprene fabric that contours to your foot for excellent heat retention and comfort.

They are equipped with 2 mm of thermal foam under the footbed for superior warmth, making them the warmest boots in the Muck lineup, with a comfort range of -60 °F/-50 °C to 30 °F/-1 °C. Fleece linings add extra insulation while the stretch-fit Comfort Topline keeps the cold out and the heat in.

The boots also feature lightweight EVA insoles for cushioning and Bob-Tracker outsoles for durable performance in icy conditions.

Pros

  • Exceptional Warmth
  • Enhanced Support and Comfort

Cons

  • Robust construction can feel bulky

The Muck Boot Men’s Arctic Pro Snow Boot is ideal for hunters, ice fishermen, and outdoor enthusiasts who require the utmost in warmth and protection during the coldest winter months.

How to Care for Your Muck Boots

To ensure your muck boots last many hunting seasons, follow these care tips:

  • Cleaning: Rinse boots with water after each use to remove dirt and debris.
  • Storage: Store in a cool, dry place away from direct sunlight.
  • Conditioning: Occasionally apply a rubber conditioner to maintain flexibility and prevent cracking.

Conclusion

Choosing the right pair of muck boots can significantly enhance your hunting experience. By considering the factors outlined above, you can select boots that offer the best combination of protection, comfort, and durability.

Primitive Survival Shelters That Could Save Your Life

Introduction

In a survival situation, finding or creating shelter is one of your top priorities, right after securing water and before food. A shelter can protect you from the elements, help maintain body heat, and provide security from wild animals. Knowing how to construct a few types of primitive shelters using natural materials can be a life-saving skill. Here’s a guide to some fundamental shelters that you can build with minimal tools and materials.


1. Lean-To Shelter

1.1 Construction

  • Materials Needed: Long branches or fallen trees for the frame, smaller branches for the sides, leaves, and moss for insulation and waterproofing.
  • Steps to Build:
    1. Find two trees close together or a large branch that you can lean against a tree.
    2. Lean larger branches at an angle against the tree trunk or horizontal branch to create a spine.
    3. Cover the angled branches with smaller branches, and then pile on leaves, moss, or grass to provide wind and water resistance.

1.2 Best Use

  • Advantages: Quick and easy to build, suitable for wind and light rain protection.
  • Disadvantages: Not fully enclosed, limited insulation.

2. A-Frame Shelter

2.1 Construction

  • Materials Needed: Several long branches, lots of smaller branches, leaves, moss, and other insulating materials.
  • Steps to Build:
    1. Create a frame by forming an ‘A’ shape with two large branches and a crosspiece at the top.
    2. Lean smaller branches along both sides of the A-frame.
    3. Cover thoroughly with vegetation and insulating materials to shield against elements.

2.2 Best Use

  • Advantages: More enclosed than a lean-to, offers better protection from wind and rain.
  • Disadvantages: Requires more time and materials to build.

3. Debris Hut

3.1 Construction

  • Materials Needed: A long, sturdy branch for the spine, lots of dry leaves, debris, and smaller branches.
  • Steps to Build:
    1. Secure one end of the spine branch high on a tree or rock and let the other end rest on the ground.
    2. Cover the spine with rib branches placed at an angle, then pile leaves and forest debris over the structure until it’s well insulated.

3.2 Best Use

  • Advantages: Excellent insulation, good for cold weather.
  • Disadvantages: Time-consuming to gather sufficient debris for effective insulation.

4. Snow Cave

4.1 Construction

  • Materials Needed: Compact snow, a digging tool.
  • Steps to Build:
    1. Find a drift of compact snow.
    2. Dig into the side of the drift to create a small dome-shaped cave.
    3. Smooth the inside walls and ceiling to ensure compactness and to prevent dripping.

4.2 Best Use

  • Advantages: Good insulation from cold, uses readily available material in snowy conditions.
  • Disadvantages: Requires specific snow conditions, risk of collapse if not built properly.

5. Wickiup Shelter

5.1 Construction

  • Materials Needed: Upright poles, vines or rope for binding, leaves, branches, and other debris for covering.
  • Steps to Build:
    1. Arrange several long poles in a conical shape, using a tree or a tripod formation as the base.
    2. Secure the poles at the top with vines, rope, or even strips of bark.
    3. Layer the frame densely with branches, leaves, and debris, ensuring thorough coverage for insulation and rain protection.

5.2 Best Use

  • Advantages: Sturdy and relatively spacious, can accommodate a small fire inside for warmth.
  • Disadvantages: Requires more materials and time to build than some simpler shelters.

6. Tarp Shelter

6.1 Construction (assuming you have a tarp)

  • Materials Needed: A tarp, rope or paracord, and nearby trees or poles.
  • Steps to Build:
    1. Secure the tarp between two trees using rope or paracord. If trees aren’t available, poles stuck firmly into the ground can work.
    2. Stretch the tarp tight and anchor each corner with rocks, logs, or stakes.
    3. Adjust the height and angle based on the wind direction and precipitation to provide the best protection from the elements.

6.2 Best Use

  • Advantages: Quick to set up, versatile, and effective in various weather conditions.
  • Disadvantages: Relies on having a man-made material (tarp) and may not be as insulated as natural debris shelters.

7. Subterranean Survival Shelter (Dugout)

7.1 Construction

  • Materials Needed: A shovel (or improvised digging tool), surrounding natural materials for camouflage.
  • Steps to Build:
    1. Dig a pit in the ground deep enough to sit or lie down in, depending on your needs and time available.
    2. Cover the opening with branches, leaves, and any other available materials.
    3. Ensure the roof is sturdy enough to support the debris without collapsing.

7.2 Best Use

  • Advantages: Offers excellent insulation and protection from the elements, particularly in extreme heat or cold.
  • Disadvantages: Labor-intensive to construct and can be hazardous if not properly ventilated or if built in unstable soil.

8. Improvising with Available Materials

8.1 Using Natural Formations

  • Rocks and Caves: Utilize natural rock formations or caves as shelter foundations, reinforcing with additional debris as needed.

8.2 Adapting to the Environment

  • Utilize Surroundings: Adapt the type of shelter construction based on the materials that are most abundant in your current environment.

Conclusion

Survival shelters can significantly increase your chances of enduring adverse conditions in the wilderness. Each type of shelter has its specific advantages depending on the environment and available resources. Practice building different types of shelters before you actually need them, as this will boost your confidence and proficiency under real survival circumstances.


Frequently Asked Questions (FAQs) About Primitive Survival Shelters

How long does it take to build a survival shelter?

  • The time can vary widely based on the type of shelter, your skill level, the materials on hand, and environmental conditions. A basic lean-to could take an hour, while a debris hut might take several hours.

What are the key factors to consider when choosing a shelter location?

  • Look for a location that is dry, level, and protected from the wind. Avoid low spots that could collect water, and stay clear of hazardous areas like dead trees or unstable boulders.

Can these shelters be made without any tools?

  • Yes, all these shelters can be constructed with materials found in nature. However, having a knife or a multi-tool can make the process easier and the shelter more effective.

What are the most common mistakes to avoid when building a survival shelter?

  • Poor Location Choice: Building in areas prone to flooding, landslides, or heavy wind. Always assess the environment carefully.
  • Insufficient Insulation: Failing to use enough insulation materials can lead to significant heat loss.
  • Overexertion: Don’t expend more energy building the shelter than you can afford to lose, especially if food and water are scarce.

How can I improve the water resistance of my shelter?

  • Layering Techniques: Use overlapping layers of branches, leaves, and other debris to create a shingle effect that repels water more effectively.

How to Use Bear Spray: A Guide for Safe Wilderness Adventures

Introduction

Bear spray is a vital tool for safety in bear country. It is an effective non-lethal deterrent that can protect you in the event of a bear encounter. Knowing how to properly use bear spray can make a significant difference in outdoor safety. This guide provides essential tips on how to use bear spray effectively and responsibly.


1. Understanding Bear Spray

1.1 Composition and Function

  • Active Ingredient: Bear spray contains capsaicinoids, derived from peppers, which irritate the eyes and respiratory system of a bear, causing temporary incapacitation.
  • Purpose: It is designed to create a barrier between you and an aggressive bear, giving you time to safely leave the area.

1.2 Range and Spray Duration

  • Effective Range: Most bear sprays are effective up to 30 feet. Always check the specifications on your canister.
  • Spray Duration: Typical spray duration ranges from 4 to 9 seconds, depending on the brand.

2. Choosing the Right Bear Spray

2.1 EPA Approval

  • Regulatory Standards: Ensure the bear spray is EPA-approved. This guarantees that the product meets safety and effectiveness standards.

2.2 Spray Pattern

  • Cloud vs. Stream: Some sprays release a cloud, while others emit a more direct stream. A cloud pattern can be more effective in windy conditions.

3. How to Carry Bear Spray

3.1 Accessibility

  • Holster Use: Carry bear spray in a holster attached to your belt or the outside of your backpack. It must be immediately accessible, not buried in your pack.

3.2 Avoid Extreme Temperatures

  • Storage Tips: Do not leave bear spray in direct sunlight or in a closed vehicle, as extreme temperatures can affect the pressure and efficacy of the spray.

4. How to Use Bear Spray

4.1 Practice

  • Familiarity: Practice with an inert can of bear spray to get used to the weight, range, and operation without the risk of discharging the actual product.

4.2 Deployment Technique

  • Alert and Ready: If you encounter a bear, speak in a calm, firm voice to identify yourself as human and not prey. If the bear approaches, remove the safety clip, aim slightly downward, and be ready to spray.

5. During a Bear Encounter

5.1 Timing and Distance

  • When to Spray: Only use bear spray if the bear is actively approaching you in a threatening manner. Do not spray prematurely; the bear should be within your effective spray range.

5.2 Spraying Technique

  • Bursts: Deploy short, controlled bursts aimed at the bear’s face, adjusting for any wind direction to maximize effectiveness.

6. After Using Bear Spray

6.1 Leave the Area

  • Immediate Withdrawal: After spraying, leave the area calmly but quickly. Do not run; keep your eyes on the bear and move away slowly.

6.2 Report the Encounter

  • Notify Authorities: Inform park rangers or local wildlife officials about the encounter and your use of bear spray, providing details for future safety measures and monitoring.

7. Safety Precautions When Handling Bear Spray

7.1 Handling Care

  • Safety Mechanisms: Always be aware of the safety mechanism on your bear spray canister. Ensure the safety is securely in place when not in use to prevent accidental discharge.

7.2 Educating Companions

  • Group Awareness: If you are traveling in a group, make sure everyone knows where the bear spray is kept and how to use it. This ensures that anyone in the group can react effectively in an emergency.

8. Legal and Regulatory Considerations

8.1 Legal Restrictions

  • Permitted Areas: Bear spray is legal in many wilderness areas, but it’s crucial to check the regulations of your specific destination. Some national parks or areas may have specific rules about carrying and using bear spray.

8.2 Transporting Bear Spray

  • Travel Regulations: Be aware of transportation regulations, especially when flying. Bear spray cannot be taken aboard commercial aircraft in carry-on or checked baggage. Purchase or rent bear spray at your destination if traveling by air.

9. Expiry and Disposal

9.1 Check Expiry Dates

  • Regular Checks: Bear spray has an expiration date, typically around 2 to 4 years from the date of manufacture. Regularly check your canister’s expiry date and replace it as necessary.

9.2 Proper Disposal

  • Disposal Methods: Dispose of expired or used bear spray canisters according to local regulations. Some areas offer recycling or hazardous waste disposal services specifically designed for bear spray.

10. Alternative Safety Measures

10.1 Avoiding Encounters

  • Preventive Practices: Besides carrying bear spray, engage in practices that reduce the likelihood of bear encounters. Store food and garbage properly, make noise while hiking to avoid surprise encounters, and travel in groups.

10.2 Additional Deterrents

  • Other Tools: Consider carrying additional deterrents such as air horns or bear bangers, which can also help scare off a bear before it gets too close.

Conclusion

Carrying and knowing how to use bear spray is crucial for safety when exploring areas where bears are active. By preparing in advance and understanding the correct usage techniques, you can confidently enjoy your wilderness adventures knowing you are prepared to handle a bear encounter safely.


Frequently Asked Questions (FAQs)

How long does bear spray last once sprayed?

  • Bear spray effectiveness in the air lasts only a few minutes. The residue may irritate a bear’s senses for longer, but environmental conditions like wind can diminish its effects quickly.

Is bear spray harmful to the environment?

  • Bear spray is designed to be a non-lethal, minimal-impact deterrent. It does not have long-lasting environmental effects, making it a safe choice for wildlife and habitat conservation.

How effective is bear spray in windy conditions?

  • Wind Considerations: Wind can affect the direction and reach of bear spray. Always note the wind direction before using spray to avoid self-contamination. If possible, position yourself upwind of the bear to maximize effectiveness.

Should children carry bear spray?

  • Guidance for Minors: It is generally advised that children do not carry bear spray. Adults should carry the spray and be prepared to deploy it if necessary. However, educating children on bear safety and the proper use of bear spray is crucial so they understand what to do if they encounter a bear.

The Best Headlamps for Hunting of 2025

Welcome to your definitive guide on choosing the best headlamps for hunting. Whether you’re a seasoned hunter who treks through the woods at dawn or someone who enjoys the occasional night-time hunt, having the right headlamp can make a significant difference.

In this guide, we’ll explore the essential features of hunting headlamps, review some of the top products on the market, and provide practical tips to enhance your night-time hunting experience.

Why Use a Headlamp for Hunting?

Advantages Over Traditional Flashlights

Using a headlamp offers several advantages over a traditional flashlight. The most notable is the ability to use both hands freely without compromising your visibility.

This is crucial when you need precision and stability like when navigating rough terrains or aiming your weapon.

Additionally, headlamps typically provide a broader and more consistent field of light, which is essential for spotting wildlife and navigating the wilderness safely.

Situational Benefits for Hunters

Headlamps shine in scenarios where lighting conditions are less than ideal. They allow hunters to track animals during the twilight hours, set up camp in the dark, or handle equipment without additional light sources.

More importantly, a reliable headlamp contributes to safety by illuminating potential hazards and helping hunters stay aware of their surroundings.

Key Features to Consider When Choosing a Hunting Headlamp

Brightness and Light Modes

Brightness, measured in lumens, is critical. For hunting, a headlamp with adjustable brightness settings is ideal.

The ability to switch between high, low, strobe, and red light is advantageous for various hunting needs red light modes are particularly beneficial for preserving night vision and staying discreet.

Battery Life and Power Options

Consider the battery type and life expectancy of the headlamp. Rechargeable batteries can be economical and convenient, while disposable ones are great for longer trips where charging might not be possible.

It’s also important to choose a headlamp that offers long battery life, especially in its lowest settings, to avoid being left in the dark at critical moments.

Comfort and Adjustability

A good hunting headlamp should be comfortable and adjustable. Look for options with elastic, sweat-resistant bands, and those that offer a balanced weight distribution to avoid neck strain during prolonged use.

Durability and Weather Resistance

Durability is crucial for any hunting gear. A headlamp with a high waterproof rating and robust construction can withstand harsh weather conditions and accidental drops, making it a reliable choice for any hunting expedition.

Additional Features

Consider headlamps that offer extra features like adjustable beam distance, peripheral lighting, and emergency modes such as SOS signaling. These features can enhance practicality and safety in the field.

Top 5 Best Headlamps for Hunting in 2024

Our selection is based on thorough testing and feedback from seasoned hunters. Each headlamp has been evaluated for brightness, battery life, comfort, durability, and additional features relevant to hunting.

1. DanForce Camouflaged Headlamp

The DanForce Camouflaged Headlamp Ultra Bright USB Rechargeable LED Headlamp is crafted for tactical use, especially suited for outdoor activities like hunting and fishing.

It features a robust design with an aluminum body and IPX45 rating, ensuring it stands up to water, dust, and damage.

Offering 1080 lumens across four lighting modes (high, medium, low, and strobe), and a secondary red light for night vision preservation, this headlamp combines functionality with high performance.

Its adjustable 90-degree tilt and focus capability make it perfect for any situation that requires precise, directed lighting. Additionally, the headlamp comes with a 5000 mAh rechargeable battery, ensuring long-lasting use on a single charge.

Pros

  • Durability and Resistance
  • Custom Comfort
  • Rechargeable Battery

Cons

  • Heavy for users
  • Limited Water Resistance

Overall, the DanForce Camouflaged Headlamp is a high-quality, versatile option for anyone needing a reliable light source while engaging in outdoor activities, tactical tasks, or any situation requiring a durable, powerful headlamp.

2. LHKNL Headlamp Flashlight

The LHKNL Headlamp Flashlight is an ultra-light, bright LED rechargeable headlight designed to enhance your outdoor experiences.

Weighing just 1.87 ounces, this headlamp features a 1200 lumen output and offers white and red lighting options to suit various conditions.

It boasts eight different lighting modes, including a motion sensor mode that allows for hands-free operation by simply waving your hand. The headlamp is pivotable up to 60 degrees, providing targeted illumination where it’s needed.

Designed to be both waterproof and versatile, it’s suitable for a wide range of outdoor activities, from running and hiking to camping and fishing. Each package includes two headlamps, making it a perfect gift for adventure enthusiasts.

Pros

  • High Brightness and Multi-Mode Functionality
  • Motion Sensor Control

Cons

  • Complexity in Controls

The LHKNL Headlamp Flashlight is a highly functional, user-friendly option for those who need reliable, adjustable lighting in a compact, lightweight design. It’s especially suitable for

3. Zoomable, Super Bright & Comfortable Outdoor Head Lamp

The Headlamp Flashlight is designed to light up the darkest nights with its powerful 9500 Lux LED and a custom round lens that magnifies and directs light efficiently.

Engineered in Germany, this headlamp offers zoomable features, allowing users to illuminate wide areas or focus on distant targets. Its design includes a convex lens that can be tilted to aim the light precisely where needed.

The headlamp is mounted on three soft, adjustable straps that ensure a comfortable, slip-free fit, making it ideal for outdoor enthusiasts engaged in hiking, fishing, hunting, or camping.

Unlike rechargeable models, this headlamp is powered by 3 AA batteries (included), providing reliable and long-lasting illumination.

Its robust construction uses aero aluminum alloy and ABS, and it boasts an IP44 waterproof rating, ensuring durability in various weather conditions.

Pros

  • Super Bright Illumination
  • Comfortable and Secure Fit:

Cons

  • Weight and Bulk

This Headlamp Flashlight is a practical choice for anyone needing robust, reliable lighting in outdoor settings. Its powerful beam, adjustable focus, and comfortable fit make it a valuable tool for a wide range of outdoor activities.

4. AMAKER LED Rechargeable Headlamp

The AMAKER LED Rechargeable Headlamp stands out with its incredible 900,000 lumens of brightness and a beam reach of up to 3280 feet (1000 meters), making it one of the most powerful headlamps available for outdoor enthusiasts.

It features a robust design with an adjustable 90° tilt and six versatile lighting modes, including high, low, strobe, enlarge, zoom, and a red backlight.

This headlamp is equipped with a large 7500mAh rechargeable battery, ensuring extended use up to 10 hours on high and 45 hours on low.

Additionally, it includes USB charging and power output capabilities, allowing you to charge your devices on the go.

Built to endure tough environments, it boasts an IPX6 waterproof rating, making it suitable for all weather conditions, from heavy rain to extreme temperatures.

Pros

  • Exceptional Brightness
  • Long Battery Life and Rechargeable
  • Versatile Lighting Modes

Cons

  • Overpowering for Basic Needs

The AMAKER LED Rechargeable Headlamp is an excellent choice for those who require a high-performance, versatile lighting solution for outdoor adventures, especially in challenging conditions.

Its advanced features and powerful illumination make it a top contender in the high-end headlamp market.

5. Victoper Rechargeable Headlamp

The Victoper Rechargeable Headlamp is a high-performance, versatile outdoor lighting tool designed for a wide range of activities, from cave exploring to night running and camping.

It features eight powerful LED lights that emit up to 18,000 lumens, providing brilliant illumination to ensure clear visibility in the darkest environments.

This lightweight headlamp is comfortable for prolonged use, weighing just 5.3 ounces, and offers eight different lighting modes to suit any situation, including strong and warm beams, red light for night vision, and various SOS strobe settings.

It’s equipped with two rechargeable batteries and supports USB charging, offering 3-6 hours of runtime depending on the mode used.

With an IPX5 waterproof rating, the headlamp is ready for all weather conditions, making it a reliable companion for any adventure.

Pros

  • Superior Brightness
  • Multiple Lighting Modes

Cons

  • Limited Battery Life on High Mode

Overall, the Victoper Rechargeable Headlamp is a robust, feature-rich headlamp designed for anyone who needs reliable, bright, and adaptable lighting for their outdoor adventures.

Whether used for hiking, camping, or emergency situations, it promises to be an essential gear item for both casual outdoor enthusiasts and serious adventurers.

How to Maximize Your Headlamp’s Performance

Maintenance Tips

To ensure your headlamp remains in top condition, regularly clean the lens and body after use. Store it in a cool, dry place and always remove the batteries if it will not be used for an extended period.

For rechargeable models, maintain the battery by following the manufacturer’s guidelines.

Usage Tips

Adjust the settings to suit your environment lower settings for close-up tasks and higher settings for long-distance visibility. Always test your headlamp before heading out, and carry spare batteries or a backup light source if possible.

Conclusion

Choosing the right headlamp can elevate your hunting experience by providing safety, convenience, and efficiency. By considering the features discussed and reviewing some of the best models on the market, you’re well on your way to finding the perfect.

Mastering the Basics: How to Read a Compass

Introduction

Understanding how to read a compass is a fundamental skill for navigation, particularly when hiking or engaging in outdoor activities where GPS may not be available. A compass points you toward magnetic north and helps you determine your direction relative to the Earth’s magnetic poles. This guide will walk you through the basic steps of reading a compass effectively.

1. Understanding Compass Components

1.1 Magnetic Needle

  • Color-Coded: Typically, the compass needle is color-coded, with the red end pointing towards magnetic north. Remember, the needle points to magnetic north, not true north (geographic north).

1.2 Baseplate

  • Clear Base: The baseplate is usually transparent and contains a ruler for map measurements. It should be held level to accurately read the compass.

1.3 Rotating Bezel (Azimuth Ring)

  • Degrees: The bezel rotates and is marked with degrees from 0 to 360. This is used to set and read your bearing.

1.4 Orienting Arrow and Lines

  • Alignment Features: Inside the compass housing, you’ll find the orienting arrow and orienting lines, which are used to help align the compass correctly with a map.

2. Setting a Bearing

2.1 Align the Bezel

  • Setting Course: To set a bearing, turn the bezel so the desired degree on the bezel lines up with the direction of travel arrow on the baseplate.

2.2 Read the Bearing

  • Determine Direction: Holding the compass flat, turn your body until the red end of the magnetic needle lines up with the orienting arrow of the compass housing. The number on the bezel that aligns with the direction of travel arrow now indicates your bearing.

3. Taking a Bearing from a Map

3.1 Place the Compass on the Map

  • Align with Map Lines: Place your compass on the map so the edge of the baseplate connects your current location with your desired destination.

3.2 Rotate the Bezel

  • Align North: Rotate the bezel until the orienting lines and the orienting arrow line up with the map’s north-south grid lines. Make sure the compass’s direction of travel arrow points towards your destination.

3.3 Translate to the Ground

  • Transfer Bearing: Pick up the compass and turn your body until the red end of the magnetic needle aligns with the orienting arrow. The direction of travel arrow now points to your destination in the real world.

4. Correcting for Magnetic Declination

4.1 Understand Declination

  • Adjust for Variation: Magnetic declination is the angle between magnetic north and true north. It varies depending on where you are on Earth. Most maps provide information on local declination.

4.2 Adjust the Compass

  • Apply Declination: If your compass has a declination scale, use it to adjust the bezel accordingly. If not, you’ll need to mentally adjust the bearing you follow by the declination amount.

5. Tips for Accurate Compass Use

5.1 Keep Away from Metal and Electronics

  • Avoid Interference: Metal objects and electronic devices can interfere with the compass needle. Ensure there are no potential sources of interference near your compass when taking bearings.

5.2 Regularly Practice

  • Skill Maintenance: Regular practice with your compass will help you gain confidence and speed in navigation, making it a reliable tool for any adventure.

6. Navigating Without a Map

6.1 Using Landmarks

  • Landmark Navigation: When you don’t have a map, use your compass in conjunction with natural landmarks or features. Determine the bearing to a noticeable landmark and navigate towards it, resetting your bearing as you reach each landmark.

6.2 Path Correction

  • Stay on Track: Regularly check your compass to ensure you’re staying on the intended bearing. This is especially important in dense forests or foggy conditions where visible landmarks might be obscured.

7. Advanced Techniques

7.1 Triangulation

  • Location Pinpointing: If you’re unsure of your location, use the triangulation method. Take bearings from your position to three known locations visible on your map and on the landscape. Draw lines along these bearings from the known locations on your map; the point where they intersect is your location.

7.2 Back Bearings

  • Reverse Navigation: To return to your starting point or ensure you can find your way back, take a back bearing. This is the opposite direction of your original bearing and can be calculated by adding or subtracting 180 degrees from your original bearing.

8. Compass Care and Maintenance

8.1 Routine Checks

  • Compass Health: Regularly inspect your compass for damage, such as a cracked housing or air bubbles in the liquid-filled chamber, which can affect accuracy.

8.2 Cleaning and Storage

  • Proper Handling: Clean your compass with a soft cloth and store it in a dry, cool place away from direct sunlight and strong magnetic fields to maintain its accuracy and prolong its lifespan.

9. Choosing the Right Compass

9.1 Types of Compasses

  • Selecting Based on Use: Consider the specific needs of your outdoor activities when choosing a compass. For hiking, a baseplate compass is generally sufficient, while more technical pursuits like orienteering or marine navigation might require a precision or a prismatic compass.

9.2 Features to Consider

  • Compass Features: Look for features like a global needle, which is effective across both hemispheres, luminous markings for low-light conditions, and built-in declination adjustment for convenience.

10. Teaching Others Compass Skills

10.1 Educational Workshops

  • Community Learning: Organize or participate in workshops to teach others how to use a compass. Sharing your knowledge can help prepare more people for safe outdoor adventures.

10.2 Creating Guides and Resources

  • Resource Development: Develop online resources, guides, or video tutorials that can help others learn about compass use. This can be particularly useful for educators, guides, and outdoor enthusiasts.

Conclusion

A compass is a vital tool for navigation that doesn’t rely on batteries or satellite signals, making it exceptionally reliable when you’re off the beaten path. By learning how to read and use a compass properly, you enhance your outdoor skills and prepare yourself for safe exploration in any environment.

Frequently Asked Questions (FAQs)

How often should I replace my compass?

  • Compass Lifespan: A good quality compass can last many years if properly cared for. Regular checks for air bubbles in the liquid housing and demagnetization of the needle are essential.

Can I use any compass for all types of navigation?

  • Compass Types: While basic compass skills are transferable, different types of compasses may be better suited for specific activities. For example, a mirror sighting compass is often used for precise directional readings in wilderness navigation.

What should I do if my compass seems to be giving incorrect readings?

  • Troubleshooting: First, ensure you’re not near any magnetic sources that could interfere with the needle. If the problem persists, consider having your compass professionally calibrated or replaced if it’s old or damaged.

Is it necessary to know how to use a compass in the age of GPS technology?

  • Skill Relevance: Yes, compass skills remain relevant. Electronics can fail due to battery depletion, damage, or signal loss, especially in remote areas. A compass is a reliable, fail-safe navigation tool that works independently of electronic signals.

How to Sharpen an Axe: A Step-by-Step Guide

Keeping your axe sharp is not just about making chopping wood easier—it’s about safety, efficiency, and preserving the tool’s lifespan. A dull axe requires more force, tires you out faster, and is more likely to slip off the wood, leading to potential accidents. On the other hand, a sharp axe slices cleanly, reduces strain, and ensures smoother, more controlled cuts.

In this comprehensive guide, you’ll learn how to sharpen an axe at home, what tools to use, common mistakes to avoid, and advanced techniques to take your edge to the next level.

Why Sharpening an Axe Matters

  • Efficiency: A sharp axe bites into the wood with less effort.
  • Safety: Dull blades glance off logs and increase the risk of injury.
  • Durability: Regular sharpening preserves the axe head and prevents excessive wear.
  • Versatility: A well-sharpened axe can handle tasks ranging from splitting firewood to felling trees with ease.

1. Gather Your Tools and Safety Gear

Before you start sharpening, it’s important to have the right tools and protective equipment on hand.

1.1 Essential Sharpening Tools

  • Coarse File: Removes chips and reshapes the edge.
  • Sharpening Stone (Dual Grit): A coarse side for shaping and a fine side for honing.
  • Honing Oil or Water: Lubricates the stone, reduces heat, and carries away metal filings.
  • Strop or Leather Strap: Polishes the edge and removes tiny burrs.

1.2 Safety Gear

  • Gloves: Protect your hands from accidental cuts and metal filings.
  • Eye Protection: Shields your eyes from sparks, chips, and debris.
  • Stable Vice or Clamp: Keeps the axe steady while you work.

2. Preparing the Axe for Sharpening

2.1 Clean the Axe Head

Use steel wool, sandpaper, or a wire brush to remove rust, pitch, and debris. A clean surface ensures your file and stone can make even contact with the blade.

2.2 Secure the Axe

Clamp the axe head in a sturdy vice with the cutting edge facing upward. Stabilizing the axe is critical to maintaining consistent sharpening angles.

3. Filing the Edge

3.1 Choosing the Right File

Select a bastard file (coarse) designed for metalwork. Check that it’s clean, sharp, and free from rust.

3.2 Filing Technique

  • Push the file away from you in long, smooth strokes.
  • Always maintain the axe’s original bevel angle (typically 25–30°).
  • File evenly along the entire edge.
  • Work both sides alternately to keep the edge symmetrical.

Pro Tip: Use a marker to color the edge. Filing will remove the ink, showing you where the metal is being ground down.

4. Sharpening with a Stone

4.1 Preparing the Stone

Apply honing oil (for oil stones) or water (for water stones) to reduce friction and prevent clogging.

4.2 Sharpening Process

  • Start with the coarse grit.
  • Move the stone in small circular or sweeping motions, following the bevel angle.
  • Apply light, even pressure.
  • Flip the axe and repeat on the other side.
  • Continue until the edge feels uniformly sharp.

5. Honing the Edge

5.1 Fine Grit Sharpening

Switch to the fine grit side of the stone. This step smooths out roughness left by the coarse grit and refines the cutting edge.

5.2 Checking for Sharpness

  • Visual Check: Hold the blade under a light. A properly sharpened edge will not reflect light.
  • Tactile Check: Gently run your thumb perpendicular to the edge (never along it). You should feel a clean, even burr.

6. Stropping the Edge

6.1 Using a Strop

Drag the edge lightly across a leather strop or strap away from the cutting edge. Stropping polishes the blade and removes microscopic burrs.

6.2 Testing Sharpness

Test your axe on a piece of softwood. A sharp axe will bite cleanly into the grain without slipping or bouncing.

7. Maintaining Your Axe After Sharpening

7.1 Regular Maintenance

  • Wipe the blade after use.
  • Apply a thin coat of oil to prevent rust.
  • Store in a dry place, ideally with a protective sheath.

7.2 Safe Handling

Never leave your axe exposed. Use blade covers to prevent accidental cuts and damage.

8. Common Sharpening Mistakes to Avoid

  • Over-Sharpening: Removing too much metal weakens the axe head.
  • Inconsistent Angles: Leads to uneven cutting and edge failure.
  • Skipping Grits: Jumping from coarse directly to fine grit leaves the edge unfinished.

9. Advanced Sharpening Techniques

9.1 Leather Honing Wheel

Mounted on a bench grinder, this can polish your axe to a mirror-like finish for precision work.

9.2 Micro-Beveling

Adding a slight secondary bevel strengthens the edge, making it more durable for splitting and heavy use.

10. Sharing Axe Care Knowledge

  • Workshops & Demonstrations: Teach others proper axe sharpening techniques.
  • Online Tutorials: Share your skills with a global audience via YouTube or blogs.

Conclusion

Sharpening an axe is a valuable skill that ensures safety, efficiency, and tool longevity. By following the step-by-step process—filing, sharpening with a stone, honing, and stropping—you’ll keep your axe in top condition for any task, whether it’s splitting firewood at camp or felling trees at home.

Frequently Asked Questions (FAQs)

How often should I sharpen my axe?

  • Frequency of Sharpening: This depends on usage. Regular users should inspect and sharpen their axes whenever they notice a decrease in cutting efficiency. Typically, sharpening once or twice a season is sufficient for casual users.

Can I use a power grinder to sharpen my axe?

  • Caution with Power Tools: While a grinder can speed up the process, it’s easy to remove too much material and overheat the metal, potentially weakening the axe. Manual sharpening is recommended for greater control.

What is the best angle to sharpen an axe?

  • Sharpening Angle: Most axes work well with an edge angle of 30 to 40 degrees. However, the ideal angle can vary based on the axe’s use (splitting versus chopping) and the wood type commonly handled.

What type of oil should I use on my axe?

  • Choosing the Right Oil: Use natural oils like linseed or mineral oil on the blade. These oils provide protection against rust without harming the metal or the environment.

How can I repair a nicked or damaged axe edge?

  • Repair Techniques: Start with a coarse file to work out nicks or significant dullness. Be patient and file evenly along the edge, maintaining the original angle. Finish with finer tools like sharpening stones and strops to restore a sharp edge.

Can sharpening affect the balance of my axe?

  • Balance Considerations: Proper sharpening should not affect the balance of your axe significantly. However, removing excessive material from one side more than the other can lead to imbalance. Always strive to remove metal evenly and check the balance periodically if doing extensive sharpening.

Ways to Signal for Help in the Wilderness: Methods That Work


The most reliable ways to signal for help in the wilderness are a loud whistle, a signal mirror, fire and smoke, large ground-to-air symbols, and an electronic distress beacon such as a personal locator beacon (PLB) or satellite messenger. Each method works best in different conditions, so the strongest plan is to carry more than one and know how to use each before you head out. None of these replace the most important step, which is telling someone where you are going and when you expect to return, so a search can start early if you do not come back.

Table of contents

Prevention Comes Before Any Signal

A signal only helps after something has already gone wrong. The single best thing you can do is reduce the chance you ever need to use one, and make sure rescuers know to come looking quickly if you do. Before any trip into remote country, leave a written trip plan with a reliable person. It should list where you are going, your route, when you expect to return, what vehicle you are driving, and who to call if you are overdue. Many search efforts start late simply because no one knew the person was missing.

Pack the gear that lets you both survive and signal. The National Park Service publishes a widely used Ten Essentials list that includes navigation tools, a light source, extra food and water, insulation, and a way to start a fire. Build your signaling tools into that kit rather than treating them as an afterthought. Treat every improvised method described below as a backup to a real, dedicated signaling device.

Sound Signals: The Whistle

A whistle is the simplest and most dependable sound signal, and it carries far further than your voice while using far less energy. Shouting tires you quickly and strains your throat, especially if you are cold, injured, or dehydrated. A pealess plastic whistle weighs almost nothing, works when wet, and can be heard well beyond the range of a yell.

A Common Distress Pattern

Three repeated signals is a commonly taught distress pattern in North America. Three sharp whistle blasts, a pause, then three more, tells anyone within hearing range that this is an emergency and not a casual call. Repeat the pattern at intervals and listen between sets for a reply. Keep a whistle on a lanyard or clipped to a pack strap where you can reach it even if you cannot move much.

Visual Signals You Can See for Miles

Visual signals work best in open terrain and clear weather, when a searcher on the ground or in the air can scan a wide area. The two most useful tools are a signal mirror and bright, contrasting material.

Signal Mirror

A signal mirror reflects sunlight in a focused flash that can be visible over long distances on a clear day. Purpose-built signal mirrors have a small sighting hole that helps you aim the flash toward an aircraft, vehicle, or distant person. To aim one, hold it near your eye, find the bright spot of reflected light on a nearby surface such as your other hand, then sweep that spot toward your target. A mirror needs direct sun to work, so it is a fair-weather tool, not an all-conditions one.

Bright Colors and Contrast

Anything brightly colored that contrasts with its surroundings can draw attention. An orange poncho, a space blanket, or gear laid out in an open area stands out against natural greens and browns. Lay items in a clearing, on snow, or on bare ground rather than under tree cover. Movement also catches the eye, so waving a bright item is more noticeable than letting it sit still.

Fire and Smoke Signals

Fire is a strong signal because it works day and night. At night the flames are visible from a distance, and during the day you can add green vegetation or damp material to create thick smoke. Three fires arranged in a triangle or a line is a recognized distress pattern when you have the materials and a safe place to build them.

Fire carries real risk. A signal fire that escapes can become a wildfire that endangers you and others. Build only on bare mineral soil or rock, clear a wide ring of flammable material, keep the fire small and controlled, and never leave it unattended. Follow the Leave No Trace guidance on responsible fire use, including current local fire restrictions, which the Leave No Trace principles address directly. In dry or windy conditions, or where fires are banned, choose a different signal.

Ground-to-Air Symbols

If you cannot move and you expect an aircraft to search the area, large ground symbols can communicate your situation from above. Make them as big as you can, ideally tens of feet across, using logs, rocks, branches, stamped patterns in snow, or contrasting material. Bigger and higher-contrast is better, because a small mark is easy to miss from altitude.

Ground-to-air emergency codes can vary by context, but common survival references use a large V for assistance needed and a large X for medical help. A straight line can indicate the direction you intend to travel. Place symbols in the most open spot available so they are not hidden by trees or terrain. These are general internationally recognized markings; defer to instructions from any rescue authority you are able to reach.

Electronic Beacons and Satellite Messengers

For remote travel beyond cell coverage, a dedicated electronic distress device is the most direct way to summon help. A personal locator beacon (PLB) sends a one-way distress signal with your location to a government search-and-rescue network such as the Cospas-Sarsat system. A satellite messenger uses a commercial satellite service, often allowing two-way text messaging and an SOS function. Both work in places where a phone has no signal, which describes most backcountry hunting and hiking areas.

How to Use One Responsibly

Register your device with the appropriate authority before your trip and keep the registration current, because accurate contact details speed up any response. In the United States, NOAA explains how to register a 406 MHz beacon. Carry it on your body, not buried in a pack, so you can reach it if you are injured or separated from your gear. Learn how to trigger the SOS function at home, not in a crisis. Activate the distress function only for a genuine emergency, since false alerts pull rescuers away from real ones. A device does not replace a trip plan; it works alongside one.

What to Do While You Wait for Help

Once you have sent a signal, your job shifts to staying findable and staying alive. If you have told someone your plan or activated a beacon, staying put usually makes you easier to locate than wandering. Move only if your location is unsafe or if you have a clear, reachable destination.

  • Stay where searchers expect you to be unless the spot is dangerous.
  • Protect yourself from cold, heat, wind, and rain to avoid a second emergency.
  • Keep your signaling tools ready so you can respond the moment a searcher appears.
  • Conserve energy, water, and any device battery.
  • Repeat your signals at intervals rather than constantly, and listen and watch between sets.

For life-threatening situations where you have any communication, contacting 911 or local emergency services connects you with the agencies that coordinate search and rescue. Follow their instructions over any general advice here.

Frequently Asked Questions

What is the universal signal for distress in the wilderness?

Three of anything is the widely recognized distress signal. That means three whistle blasts, three fires, three flashes, or three shouts, repeated at intervals. The pattern of three tells others your call is an emergency rather than ordinary noise.

Is a cell phone enough to signal for help?

A cell phone is useful where there is coverage, but most remote backcountry has no signal. Treat a phone as one tool among several. For travel beyond cell range, a PLB or satellite messenger is far more reliable, and simple tools like a whistle and mirror work without any battery.

Should I stay put or try to walk out?

If you left a trip plan or activated a beacon, staying put usually makes you easier to find. Moving can take you out of the search area and burn energy you may need. Move only if your location is unsafe or you have a clear, reachable goal.

How far can a signal mirror be seen?

A signal mirror flash can be visible over long distances on a clear, sunny day, which is why it is a valued tool. It depends entirely on direct sunlight and a clear line of sight, so it does not work in shade, fog, or at night. Pair it with methods that work in low light.

Final Takeaway

Signaling for help is a layered skill, not a single trick. Carry a whistle, a signal mirror, fire-starting tools, and, for remote trips, a registered PLB or satellite messenger. Learn each one before you need it, and treat improvised methods as backups to dedicated devices. The step that matters most happens before you leave: tell someone where you are going and when you will be back, so help can start looking the moment you are overdue.

Best Hunting Blinds: A Comprehensive Buyer’s Guide

When it comes to hunting, having the right gear is as crucial as possessing sharp instincts and patience. Among the essential pieces of equipment is the hunting blind, a staple for concealment and strategic advantage.

This article dives deep into the world of hunting blinds, exploring different types, essential features, and the top models available on the market today. Whether you’re a novice or an experienced hunter, finding the best hunting blind can significantly enhance your hunting success.

Understanding Hunting Blinds

Definition and Purpose

A hunting blind is a cover device for hunters, designed to reduce the chance of detection by game. It provides concealment by blending into the environment, shielding movement, and minimizing human scent.

Advantages of Using Hunting Blinds

Using a hunting blind offers several benefits:

  • Concealment: Keeps the hunter out of sight, making it easier to observe and target wildlife.
  • Protection: Shields from environmental elements like wind, rain, and snow, improving comfort during long waits.
  • Noise Reduction: Helps dampen sound, allowing hunters to remain undetected as they prepare for the shot.

Types of Hunting Blinds

Ground Blinds

Ground blinds are a popular choice among hunters for their versatility, ease of use, and effective concealment capabilities. These types of blinds are particularly favored by both bow and rifle hunters for their ability to blend seamlessly into a variety of environments from wooded areas to open fields.

Box Blinds

Box blinds, also known as tower or deer stands, are a favored choice among hunters who value comfort, extended field visibility, and durability in their hunting setups. These structures are particularly well-suited for use in open fields, along food plots, or in other expansive terrains where an elevated view provides a strategic advantage.

Portable Blinds

Portable blinds are a popular choice among hunters who need the flexibility to move quickly and adapt to various hunting environments. These blinds are designed for easy transport and rapid deployment, making them ideal for hunters who track game over large areas or those who hunt on public lands where permanent setups are not feasible.

List of list of top 5 Best Hunting Blinds

1.Ameristep Caretaker Blind Overview

Key Features:

  • Durability: Constructed with weather-resistant fabric that stands up well in various environmental conditions.
  • Concealment: Features a Realtree Edge camo pattern that blends seamlessly into most woodland environments.
  • Versatility: Suitable for both bow and firearm hunting.
  • Design: Comes with a hub-style design, which allows for quick and easy setup and takedown.
  • Visibility: Equipped with shoot-through mesh windows and a shadow guard to eliminate shadows and silhouettes.

Pros

  • Easy to Set Up
  • Portability
  • Affordable

Cons

  • Wind Stability
  • Noise

The Ameristep Caretaker Blind is a solid choice for hunters looking for an affordable, easy-to-set-up hunting blind that offers good space and effective concealment in woodland environments.

While it does have some drawbacks, such as noise and issues with high winds, its overall value and performance make it a popular choice among both novice and experienced hunters.

2.RHINO Blinds R75 2 Person Hunting Ground Blind Overview

Key Features:

  • Material Strength: Made from true 150 denier polyester, providing robust fabric strength in both horizontal and vertical weaves.
  • Size and Capacity: Spacious enough to comfortably fit 2 people with a 60″ x 60″ floor space and a 66″ center height.
  • Easy Setup and Takedown: Designed for efficiency, it can be set up quickly, typically in as little as 60 seconds after being removed from the carry bag.
  • Durability Treatments: The blind is UV treated, DWR (durable water repellent) treated, and antimicrobial treated to resist fading, dry rot, mold, and other common issues.
  • Professional Endorsement: Supported by hunting professionals and guides, adding credibility to its quality and effectiveness.

Pros

  • All-Weather Use
  • Rapid Deployment
  • Reliability

Cons

  • Limited visibility

The RHINO Blinds R75 2 Person Hunting Ground Blind is an excellent choice for both novice and experienced hunters who value quick setup, durability, and all-weather reliability.

Its endorsements by professionals and its robust feature set make it a top pick for regular use. While it has some minor drawbacks, such as potential noise during setup, its overall design and functionality make it a formidable tool for successful hunting.

3.Ameristep Throwdown Ground Blind Overview

Key Features:

  • Compact and Portable Design: The blind features a patented hub design with an integrated stake system, making it a single compact unit easy to carry and track.
  • Quick Setup: Ideal for run-and-gun hunting, especially turkey hunting, it sets up quickly, providing immediate concealment.
  • Lightweight Construction: Weighing only 1.8 lbs, it’s designed to be easily transported and stowed in a turkey vest.
  • Effective Concealment: Despite its small size, it features three panels with realistic 3D leafy die-cuts, offering significant concealment for two hunters.
  • Durable Materials: Constructed from high-quality, durable polyester and ZS3 fabric, which minimizes noise and sheen, enhancing stealth.

Pros

  • Ease of Use
  • High Mobility
  • Sturdy in Various Conditions

Cons

  • Limited Space
  • Limited Coverage

The Ameristep Throwdown Ground Blind is tailored for hunters who require a blend of mobility, quick setup, and effective concealment. Its lightweight, compact design makes it an ideal choice for turkey hunting or similar activities where speed and flexibility are paramount.

While it offers excellent portability and ease of use, its smaller size and lower height may be limiting for some hunting situations. However, for those needing a minimalistic, easy-to-deploy hunting blind, it presents a solid option.

4.Barronett Blinds RA200BW Radar Pop Up Portable Blind Overview

Key Features:

  • Material Quality: Constructed from HD 150 denier fabric, ensuring durability and resistance to wear.
  • Design and Color: Features a Bloodtrail Backwoods Camo pattern, designed for optimal concealment in a variety of woodland environments.
  • Size: Spacious interior with dimensions of 67″D x 71″W x 71″H, allowing enough room for multiple hunters and gear.
  • Frame Material: Built with a sturdy iron frame to withstand outdoor conditions.
  • Windows: Equipped with zipperless windows for noise-free adjustment, and shoot-through mesh suitable for broadhead use.
  • Additional Features: Includes a rear peek window for enhanced field view, and is water-resistant with a black interior coating to minimize light and glare inside the blind.

Pros

  • Zipperless window design allows for quiet adjustments
  • Concealment
  • Ease of Transport

Cons

  • Shoot-Through Mesh Limitation

The Barronett Blinds RA200BW Radar Pop Up Portable Blind is well-suited for hunters looking for a reliable, spacious, and easy-to-use option with effective concealment capabilities.

Its robust construction and thoughtful features like noise-free windows and additional viewing options make it a solid choice for serious hunters.

While it’s a bit heavier, its durability and roominess justify the extra weight, making it a great investment for those who prioritize comfort and utility in a hunting blind.

5.HUNTSEN Pop-Up Hunting Blind Overview

Key Features:

  • Visibility and Concealment: Features three full panels of one-way see-through mesh that provides a 270-degree view, allowing for broad visibility while remaining concealed.
  • Design for Stealth: Equipped with silent-sliding windows on each side, enhancing the ability to stay unnoticed by game.
  • Camouflage: The realistic camo pattern and brushed-in loops are designed to blend seamlessly with various natural environments.
  • Size and Comfort: Offers a spacious interior with dimensions of 65″ height, hub to hub 75″ x 75″, and a floor space of 55″ x 55″, comfortably accommodating 2-3 persons.
  • Material and Construction: Made of high-quality polyester fabric, with strong metal hubs, reinforced corners, and durable straps to withstand diverse weather conditions.

Pros

  • Lightweight and Portable
  • Durable

Cons

  • Visibility Limitations
  • Noise Potential

The HUNTSEN Pop-Up Hunting Blind is a versatile choice for hunters seeking ease of use, excellent visibility, and effective camouflage. It’s particularly suited for those who appreciate a quick setup and the ability to move stealthily in the field.

The blind’s construction and features make it a robust option for various hunting excursions, whether targeting deer, turkey, or elk. However, hunters should consider the potential for noise and the limitations of the mesh during colder seasons.

Overall, this blind offers a compelling mix of functionality and convenience for both novice and experienced hunters.

Key Features to Consider When Choosing a Hunting Blind

Material and Durability

Opt for blinds made from durable, weather-resistant materials like polyester or nylon to withstand the elements.

Size and Capacity

Consider the number of people and the equipment you plan to accommodate. Compact blinds are great for solo hunts, while larger options like the Barronett Blinds Big Cat Pop Up Portable offer ample space for groups.

Visibility and Concealment

Look for blinds with camouflage patterns appropriate for your hunting environment. Features like shoot-through mesh windows also enhance concealment while allowing for visibility.

Ease of Setup and Transportation

Ease of setup is critical, especially for mobile hunters. Choose blinds that can be assembled quickly and are light enough to transport easily.

Conclusion

Choosing the right hunting blind is about understanding your needs, the specific game you’re targeting, and the typical environments you hunt in. With the right blind, you can enjoy increased comfort, better concealment, and ultimately, more successful hunts. Remember to maintain your blind well and adapt it as needed to ensure it serves you

Exit mobile version