Keeping Your Sleeping Bag Warm and Dry: Field Tips That Work

Keeping your sleeping bag warm and dry comes down to three habits: protect it from ground moisture, manage condensation before it soaks the insulation, and avoid sleeping in damp clothing. A sleeping bag works by trapping warm air around your body, and that trapped air disappears when insulation is compressed, dirty, or wet. This guide explains the practical steps that help campers, hunters, and backpackers sleep warmer without damaging the bag or carrying unnecessary gear.

Table of contents

Quick Warm-and-Dry Checklist

  • Use a sleeping pad with enough insulation for the temperature.
  • Keep the bag off bare ground, wet tent floors, and snow.
  • Vent the shelter enough to reduce condensation.
  • Change into dry base layers before getting in the bag.
  • Do not breathe into the bag; moisture from breath can dampen insulation.
  • Air the bag when the weather gives you a safe dry window.
  • Store the bag loose at home, not compressed in its stuff sack.

If you remember only one thing, remember this: your sleeping pad and dry clothing matter almost as much as the sleeping bag itself. A good bag on cold wet ground can still feel miserable, while a modest bag on a warm pad with dry layers can perform much better.

Why Sleeping Bags Get Cold or Damp

A sleeping bag does not create heat. Your body creates heat, and the bag slows heat loss by trapping air in lofted insulation. When that loft is compressed under your body, soaked by moisture, or filled with damp air, it insulates less effectively. That is why cold ground, condensation, sweat, rain, snow, and poor storage all make a bag feel colder than its temperature rating suggests.

Temperature ratings are also not personal guarantees. Metabolism, fatigue, food, wind exposure, shelter choice, pad insulation, clothing, and humidity all affect comfort. Treat the rating as a planning tool and build a sleep system that includes the bag, pad, shelter, clothing, and site choice.

Block Ground Moisture and Cold

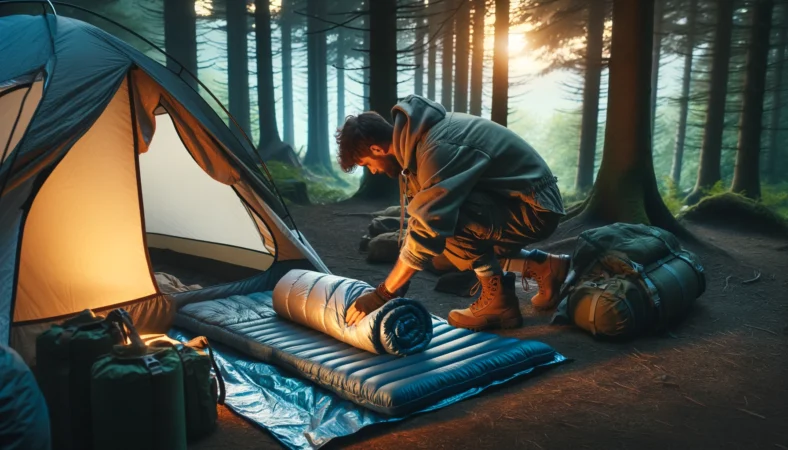
The ground pulls heat away quickly, especially when it is damp, frozen, or covered in snow. Your sleeping bag compresses underneath you, so the insulation below your body does little compared with the pad. That makes a sleeping pad one of the most important parts of staying warm.

Use the right sleeping pad

Choose a pad with enough insulation for the season. Closed-cell foam pads are durable and moisture resistant, while inflatable insulated pads can be warmer and more comfortable. In cold conditions, some campers stack a foam pad under an inflatable pad to add insulation and protect against punctures.

Add a ground barrier when needed

A tent footprint, tarp, bivy groundsheet, or dry natural surface can help keep moisture away from the tent floor and bag. Do not place the sleeping bag directly on wet vegetation or bare ground. If you are hunting from a spike camp, clear sharp sticks and wet debris before laying out the sleep system.

Manage Condensation Inside Shelter

Condensation forms when warm humid air meets colder surfaces. In a tent, tarp, blind, or small shelter, moisture from breathing, damp clothes, and wet ground can collect on walls and drip or brush onto the sleeping bag. This is one reason a bag can feel damp even when it never rained.

Vent before sealing everything tight

It is tempting to close every vent when the night gets cold, but trapping moisture can make the shelter wetter. Use the shelter vents, leave a small opening when conditions allow, and pitch the shelter to encourage airflow while still blocking wind-driven rain or snow.

Keep wet gear away from the bag

Rain jackets, boots, gaiters, and sweaty layers should not touch the sleeping bag if you can avoid it. Put wet gear near the shelter door, inside a separate bag, or under a vestibule where it will not transfer moisture to insulation. For wet-weather clothing planning, see our guide to waterproof hunting clothing.

Sleep in Dry Layers

Dry base layers help your sleeping bag work. If you crawl into the bag wearing damp socks, sweaty thermals, or the same clothes you hiked in, the bag has to absorb that moisture. Change into dedicated sleep socks and a dry base layer when possible. In cold camps, keep those sleep layers in a dry bag during the day.

Do not overdress inside the bag

Warm layers are useful, but bulky layers can compress insulation or cause sweating. If you sweat during the night, that moisture can chill you later. Use breathable dry layers, adjust the zipper for ventilation, and add a hat or hood before piling on heavy clothing.

Protect the footbox

The footbox often touches tent walls or damp gear. Keep spare socks dry, avoid putting wet boots near the bag, and make sure your feet are not pressing the bag against a wet tent wall. A small dry bag with sleep socks can make a big difference on multi-day trips.

Store and Pack the Bag Correctly

Compression is useful for travel but bad for long-term storage. At home, store the sleeping bag loose in a large storage sack or hang it in a dry space. Long-term compression reduces loft, especially in down bags, and less loft means less warmth.

Pack it dry and protect it in your bag

Use a waterproof stuff sack, pack liner, or heavy-duty dry bag when rain, river crossings, snow, or wet brush are realistic. The sleeping bag should be one of the most protected items in your pack. For backcountry planning, pair this with a basic emergency and navigation kit; our wilderness signaling guide covers another part of that safety system.

Dry a Damp Bag in the Field

If the bag picks up moisture, dry it whenever the weather gives you a safe chance. Shake it out, expose it to dry air, and avoid letting direct intense heat damage the shell or insulation. In camp, drape it over a clean line, branch, tent, or pack surface where it will not pick up dirt or sparks.

Never dry a sleeping bag too close to a stove, fire, heater, or lantern. Heat, sparks, and flame can damage fabric and insulation quickly. A slow dry in moving air is safer than trying to force the process next to a heat source.

Cold-Weather Safety Notes

Cold, wet conditions can become serious when fatigue and wind stack up. The National Weather Service cold-safety guidance is a useful reminder that wind chill, wet clothing, and prolonged exposure all increase risk. If you are shivering hard, confused, unusually clumsy, or unable to warm up, treat it as more than a comfort problem and take action.

This article is general outdoor education, not medical advice. For hunting camps, also plan around local weather, route difficulty, daylight, and the distance back to the vehicle or trailhead.

Frequently Asked Questions

Should I wear clothes inside a sleeping bag?

Yes, but they should be dry and breathable. A dry base layer, clean socks, and a warm hat can help. Avoid sleeping in damp hiking or hunting clothes because that moisture can reduce warmth and make the bag clammy.

Why is my sleeping bag wet in the morning?

Common causes include condensation inside the shelter, damp clothing, breath moisture, a wet tent wall touching the bag, ground moisture, or storing the bag in a wet pack. Ventilation and better separation from wet gear usually help.

Can I breathe into my sleeping bag to warm it up?

It is better not to. Your breath adds moisture inside the bag, and that moisture can make insulation less effective over the night. Use the hood, collar, hat, and zipper instead of breathing into the insulation.

How do I keep a down sleeping bag dry?

Use a waterproof stuff sack or pack liner, keep wet clothing away from it, vent your shelter, and dry the bag during safe weather windows. Down is warm for its weight, but it needs careful moisture management.

Final Takeaway

A warm dry sleeping bag starts before bedtime. Pick a protected campsite, use an insulated pad, vent the shelter, change into dry layers, keep wet gear away from the bag, and store the bag loose at home. Those habits protect loft, reduce moisture, and make the bag’s rating more realistic in the field. For hunters and campers, that means better rest and a safer next day outdoors.

How to Purify Water Outdoors: Safe Drinking Water Methods

Safe drinking water in the outdoors starts with choosing the cleanest source you can, removing sediment, and using a treatment method that matches the risk. Boiling, filtering, chemical disinfecting, and UV treatment can all help, but no single method is perfect for every contaminant. For camping, hunting, and emergency use, the safest plan is to carry enough water when possible, bring a backup treatment method, and follow current official guidance when water may be contaminated by sewage, flooding, chemicals, or heavy runoff.

Table of contents

Quick Answer

For most outdoor situations, start with the clearest moving water available, remove sediment, then treat it with boiling, a quality filter or purifier, chemical disinfectant, or UV device according to the product directions. Boiling is one of the most reliable emergency methods for pathogens when fuel is available, while filters are convenient for field use. Chemical and UV methods require careful contact time, clear water, and correct use.

Water safety is context-dependent. If water may be affected by flooding, chemical spills, mining runoff, pesticides, saltwater, fuel, or sewage, ordinary backpacking treatment may not make it safe. In those situations, use carried water or follow official emergency water guidance such as the EPA emergency disinfection guidance.

Choose the Safest Source First

Treatment works better when you start with better water. Clear flowing water from a spring or stream is usually a better starting point than stagnant water, muddy puddles, water near heavy livestock use, or water downstream from camps, roads, industrial areas, or dead animals. You still need to treat it, but source choice reduces the burden on your gear.

Avoid obvious contamination

Do not assume a scenic water source is safe. Avoid water with fuel smell, chemical odor, unusual color, oily sheen, algae bloom, sewage exposure, or strong runoff after storms. If the source looks or smells wrong, the best treatment is often choosing a different source.

Carry water when risk is high

On short hunts, day hikes, and range trips, carrying enough water is simpler and safer than relying on unknown sources. Ready.gov recommends storing emergency water as part of household preparedness, and the same mindset applies to vehicle kits and base camps. See Ready.gov water preparedness guidance for general planning context.

Pre-Filter Cloudy Water

Cloudy water can make treatment less effective and can clog filters quickly. Let sediment settle, then pour the clearer water through a clean cloth, coffee filter, bandana, or dedicated pre-filter before disinfecting or filtering. Pre-filtering does not make water safe by itself; it simply improves the next treatment step.

Boiling Water

Boiling is a strong emergency method for treating biological hazards when you have fuel, a safe container, and time. Bring water to a rolling boil and follow current official guidance for duration, especially at elevation or during emergency advisories. Boiling does not remove chemical contamination, fuel, salt, heavy metals, or sediment. If those are concerns, use another water source.

Best use

Boiling is useful at camp, in a cabin, after an emergency notice, or when a field filter breaks. It is less convenient when you are moving quickly or conserving fuel in cold weather.

Water Filters and Purifiers

Outdoor water filters physically remove particles and many microorganisms according to their design. Some are pump filters, some are squeeze filters, some are gravity systems, and some are built into bottles. Read the product label carefully because not every filter handles the same hazards. A filter that removes bacteria and protozoa may not remove viruses unless it is rated as a purifier or paired with another treatment.

Protect the clean side

Keep dirty water and clean water separate. Do not let untreated water drip onto the clean bottle opening, hose, or filter outlet. Mark dirty bags and clean bottles clearly. Cross-contamination is one of the easiest ways to defeat a good filter.

Watch freezing conditions

Some hollow-fiber filters can be damaged if they freeze after getting wet. In cold weather, keep the filter close to your body or inside a sleeping bag overnight if the maker recommends it. A frozen damaged filter may look normal but fail internally.

Chemical Disinfection

Chemical disinfectants such as chlorine dioxide or iodine products can be useful backups because they are lightweight and compact. They require the correct dose, enough contact time, and reasonably clear water. Cold water and cloudy water can require more time. Always follow the specific product directions and health warnings.

Chemical treatment is not ideal for everyone. Some products are not recommended for certain people or long-term use, and taste can be an issue. If you have medical concerns, pregnancy, thyroid issues, allergies, or medication questions, ask a qualified professional and follow the product label.

UV Treatment

UV treatment devices use ultraviolet light to inactivate microorganisms when used correctly. They are fast and convenient for clear water, but they depend on batteries, electronics, proper stirring or exposure, and clear water that allows light to reach the organisms. Sediment and cloudy water can reduce effectiveness, so pre-filtering matters.

What Not to Trust by Itself

  • Clear appearance alone. Clear water can still contain microorganisms.
  • Cold mountain water alone. Cold does not guarantee safe water.
  • Running water alone. Flowing water can still be contaminated upstream.
  • Charcoal sticks or improvised filters alone. They may improve taste or sediment but should not be treated as full disinfection.
  • Solar warmth alone. Sun exposure without a verified method is not a dependable field plan.
  • Old chemicals or expired tablets. Treatment products can lose reliability over time.

Build a Practical Field Plan

A good outdoor water plan uses layers. Carry water for the known part of the trip, identify backup sources on the map, bring a primary treatment method, and carry a small backup such as chlorine dioxide tablets or a second filter. For hunting and backcountry trips, water planning belongs with route planning, shelter, weather, and emergency signaling. Our wilderness signaling guide covers another part of that safety system.

Also think about storage. Use clean bottles or bladders, avoid dipping clean containers directly into untreated sources, and keep camp hygiene separate from drinking water. If you are assembling gear for a trip, pair water treatment with the planning steps in our hunting trip kit guide.

Frequently Asked Questions

Is boiling better than filtering water?

Boiling is strong for biological hazards when done correctly, but it requires fuel and time and does not remove chemical contamination. Filters are convenient in the field, but their protection depends on what they are rated to remove. Many outdoor plans use both a filter and a backup method.

Can a water filter remove viruses?

Some purifiers are designed for viruses, but many common backpacking filters focus on bacteria and protozoa. Read the product label carefully and do not assume every filter covers every hazard.

Does clear stream water need treatment?

Yes. Clear water can still contain microorganisms or upstream contamination. Clear water is a better starting point than muddy water, but it still needs appropriate treatment before drinking.

What should I do if water may be chemically contaminated?

Do not rely on ordinary boiling, basic filters, or simple disinfectants for chemical contamination. Choose another source, use carried water, or follow official emergency guidance for the situation.

Final Takeaway

Safe outdoor drinking water is about source choice, sediment control, correct treatment, and backup planning. Boiling, filters, chemical disinfectants, and UV devices each have strengths and limits. Start with the cleanest source you can, treat it according to the risk, protect clean containers from cross-contamination, and do not treat unknown chemical or flood contamination like ordinary backcountry water. A little planning before the trip is far better than guessing when you are already thirsty.

Exit mobile version